- Swap
- Swap space
- Swap partition
- Activation by systemd
- Disabling swap
- Swap file
- Swap file creation
- Swap file removal
- Compressed block device in RAM
- Swap encryption
- Performance
- Swappiness
- VFS cache pressure
- Priority
- Striping
- See also
- Управление и мониторинг областью подкачки в Linux
- Какой объем swap space необходим?
- Когда необходима область подкачки?
- Создание файла подкачки.
Swap
This page provides an introduction to swap space and paging on GNU/Linux. It covers creation and activation of swap partitions and swap files.
Linux divides its physical RAM (random access memory) into chunks of memory called pages. Swapping is the process whereby a page of memory is copied to the preconfigured space on the hard disk, called swap space, to free up that page of memory. The combined sizes of the physical memory and the swap space is the amount of virtual memory available.
Support for swap is provided by the Linux kernel and user-space utilities from the util-linux package.
Swap space
Swap space can take the form of a disk partition or a file. Users may create a swap space during installation or at any later time as desired. Swap space can be used for two purposes, to extend the virtual memory beyond the installed physical memory (RAM), and also for suspend-to-disk support.
If it is beneficial to extend the virtual memory with swap depends on the amount of installed physical memory. If the amount of physical memory is less than the amount of memory required to run all the desired programs, then it may be beneficial to enable swap. This avoids out of memory conditions, where the Linux kernel OOM killer mechanism will automatically attempt to free up memory by killing processes. To increase the amount of virtual memory to the required amount, add the necessary difference (or more) as swap space.
The biggest drawback of enabling swap is its lower performance, see section #Performance. Hence, enabling swap is a matter of personal preference: some prefer programs to be killed over enabling swap and others prefer enabling swap and slower system when the physical memory is exhausted.
The factual accuracy of this article or section is disputed.
Reason: Linus Torvalds says that swap partitions are preferable: «all the normal distributions set things up with swap partitions, not files, because honestly, swapfiles tend to be slower and have various other complexity issues.» (Discuss in Talk:Swap)
Or to show physical memory as well as swap usage:
Swap partition
A swap partition can be created with most GNU/Linux partitioning tools. Swap partitions are designated as type 82 on MBR and 0657FD6D-A4AB-43C4-84E5-0933C84B4F4F on GPT.
To set up a partition as Linux swap area, the mkswap(8) command is used. For example:
To enable the device for paging:
To enable this swap partition on boot, add an entry to /etc/fstab :
UUID=device_UUID none swap defaults 0 0
where the device_UUID is the UUID of the swap space.
Note: The fstab-entry is optional if the swap partition is located on a device using GPT. See #Activation by systemd.
Warning: Enabling discard on RAID setups using mdadm will cause system lockup on boot and during runtime, if using swapon.
Activation by systemd
systemd activates swap partitions based on two different mechanisms. Both are executables in /usr/lib/systemd/system-generators . The generators are run on start-up and create native systemd units for mounts. The first, systemd-fstab-generator , reads the fstab to generate units, including a unit for swap. The second, systemd-gpt-auto-generator inspects the root disk to generate units. It operates on GPT disks only, and can identify swap partitions by their type GUID, see systemd#GPT partition automounting for more information.
Disabling swap
To deactivate specific swap space:
Alternatively use the -a switch to deactivate all swap space.
Since swap is managed by systemd, it will be activated again on the next system startup. To disable the automatic activation of detected swap space permanently, run systemctl —type swap to find the responsible .swap unit and mask it.
Swap file
As an alternative to creating an entire partition, a swap file offers the ability to vary its size on-the-fly, and is more easily removed altogether. This may be especially desirable if disk space is at a premium (e.g. a modestly-sized SSD).
Swap file creation
Use dd to create a swap file the size of your choosing. For example, creating an 8 GiB swap file:
# dd if=/dev/zero of=/swapfile bs=1M count=8k status=progress
Note: Using dd to allocate a swap file is the most portable solution, see swapon(8) § Files with holes for details.
Set the right permissions (a world-readable swap file is a huge local vulnerability):
After creating the correctly sized file, format it to swap:
Finally, edit the fstab configuration to add an entry for the swap file:
/swapfile none swap defaults 0 0
For additional information, see fstab#Usage.
Note: The swap file must be specified by its location on the file system, not by its UUID or LABEL.
Swap file removal
To remove a swap file, it must be turned off first and then can be removed:
# swapoff /swapfile # rm -f /swapfile
Finally, remove the relevant entry from /etc/fstab .
Compressed block device in RAM
zswap is available by default if you use a swap file or partition, but you can avoid swap files or partitions altogether by using a compressed block device in RAM, using zram. See Improving performance#zram or zswap for more information on the differences between using zram or zswap.
Swap encryption
Performance
Swap operations are usually significantly slower than directly accessing data in RAM. Disabling swap entirely to improve performance can sometimes lead to a degradation, since it decreases the memory available for virtual file system (VFS) caches, causing more frequent and costly disk usage.
Swap values can be adjusted to help performance:
Swappiness
When memory usage reaches a certain threshold, the kernel starts looking at active memory and seeing what it can free up. File data can be written out to the file system (if changed), unloaded and re-loaded later; other data must be written to swap before it can be unloaded.
Note: There is a common misconception that swappiness affects the memory threshold or prevents using swap space, but it only affects the preference for freeing up file pages over swap. See: this article for a more detailed explanation or the the kernel source code where it is used.
To check the current swappiness value:
Alternatively, the files /sys/fs/cgroup/memory/memory.swappiness (cgroup v1-specific) or /proc/sys/vm/swappiness can be read in order to obtain the raw integer value.
To temporarily set the swappiness value:
To set the swappiness value permanently, create a sysctl.d(5) configuration file. For example:
/etc/sysctl.d/99-swappiness.conf
To have the boot loader set swappiness when loading the kernel, add a kernel parameter, e.g. sysctl.vm.swappiness=10 .
To test and more on why this may work, take a look at this article. For a more recent counter-argument, see this article.
VFS cache pressure
Another sysctl parameter that affects swap performance is vm.vfs_cache_pressure , which controls the tendency of the kernel to reclaim the memory which is used for caching of VFS caches, versus pagecache and swap. Increasing this value increases the rate at which VFS caches are reclaimed[1]. For more information, see the Linux kernel documentation.
Priority
If you have more than one swap file or swap partition you should consider assigning a priority value (0 to 32767) for each swap area. The system will use swap areas of higher priority before using swap areas of lower priority. For example, if you have a faster disk ( /dev/sda ) and a slower disk ( /dev/sdb ), assign a higher priority to the swap area located on the fastest device. Priorities can be assigned in fstab via the pri parameter:
/dev/sda1 none swap defaults,pri=100 0 0 /dev/sdb2 none swap defaults,pri=10 0 0
Or via the —priority parameter of swapon:
# swapon --priority 100 /dev/sda1
If two or more areas have the same priority, and it is the highest priority available, pages are allocated on a round-robin basis between them.
Striping
There is no necessity to use RAID for swap performance reasons. The kernel itself can stripe swapping on several devices, if you just give them the same priority in the /etc/fstab file. Refer to The Software-RAID HOWTO for details.
See also
Управление и мониторинг областью подкачки в Linux
![]()
Область подкачки играет важную роль в производительности системы. Давайте узнаем, как определить размер области подкачки в вашей системе и как она используется.
Большинство из нас не часто задумываемся об области подкачки, если только мы не сталкиваемся с проблемой нехватки памяти в наших системах. Даже в этом случае изучение и оценка области подкачки в системе не является сложным, и знание того, что нормально для вашей системы, может помочь вам определить, когда что-то работает не так. Итак, давайте изучим некоторые команды, которые помогут вам заглянуть в область подкачки. Но сначала давайте рассмотрим некоторые базовые основы.
Что такое область подкачки и как она используется.
Область подкачки (swap space) – это дисковое пространство, которое действует как расширение памяти. Он используется, когда физическая память (ОЗУ) системы заполнена и системе требуется больше ресурсов памяти. Это называется «swap», потому что система перемещает некоторые неактивные страницы в памяти в область подкачки, чтобы можно было разместить больше данных в ОЗУ. Другими словами, это позволяет освободить оперативную память в загруженной системе.
Программы и данные используют оперативную память, потому что это единственный способ их обработки системой. Фактически, когда система загружается, она перемещает такие программы, как ядро и systemd , в оперативную память, чтобы начать работу.
Область подкачки может быть настроена как отдельный раздел диска или как файл. В наши дни большинство установок Linux создают раздел во время установки, и это является опцией. Однако вы можете создать файл подкачки и использовать его для подкачки.
Из-за нехватки области подкачки вы можете столкнуться с проблемой, называемой «перегрузкой», при которой программы и данные перемещаются между ОЗУ и областью подкачки так часто, что система работает очень медленно.
Вместе RAM и swap называются «виртуальной памятью».
Какой объем swap space необходим?
Раньше для области подкачки рекомендовали выбирать объем равный двойному размеру оперативной памяти, но это было в те времена, когда в системах не было столько оперативной памяти, как сегодня. Эти рекомендации для Ubuntu, но вероятно, должны работать и для других дистрибутивов:
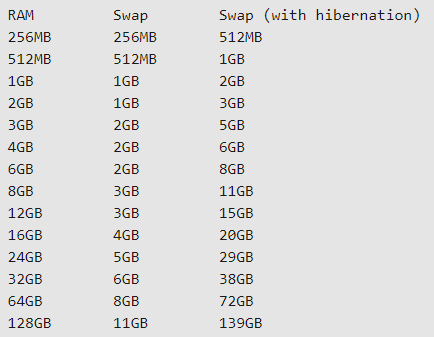
Важно различать подкачку и подкачку с гибернацией. Система, которая переходит в спящий режим, немедленно сохраняет состояние вашей системы на жестком диске и выключается. Когда вы разбудите его (например, подняв «крышку» ноутбука), все запущенные вами программы вернутся в то состояние, в котором они находились, когда система перешла в спящий режим. Поэтому рекомендуется увеличить область подкачки. Но не все системы переходят в спящий режим.
Чтобы узнать, может ли ваша система перейти в спящий режим, выполните команду:
$ which pm-hibernate /usr/sbin/pm-hibernate
Если на экран выведен ответ, показанный выше, значит ваша система готова к переходу в спящий режим. Вы можете проверить это, выполнив эту команду:
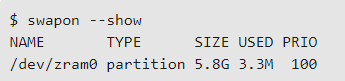
Как можно просмотреть объем области подкачки в вашей системе Linux?
Используйте команду swapon —show , чтобы просмотреть область подкачки в вашей системе.
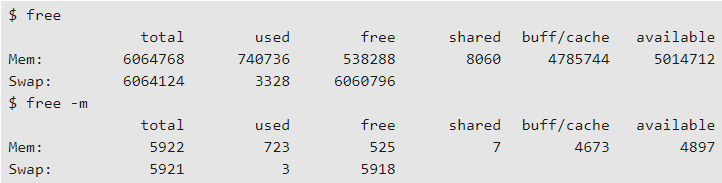
Еще одна полезная команда — это команда free , которая отображает как размер области подкачки, так и использование памяти. При использовании параметра -m результаты отображаются в МБ, а не в КБ.
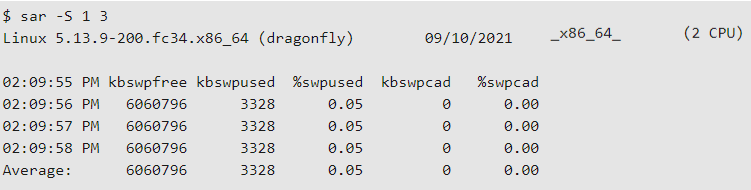
Команда sar сообщает об использовании области подкачки
Обратите внимание, что в приведенных выше выходных данных команды free область подкачки используется скромно, хотя доступно много свободной памяти.
Вы также можете просмотреть раздел подкачки с помощью такой команды:
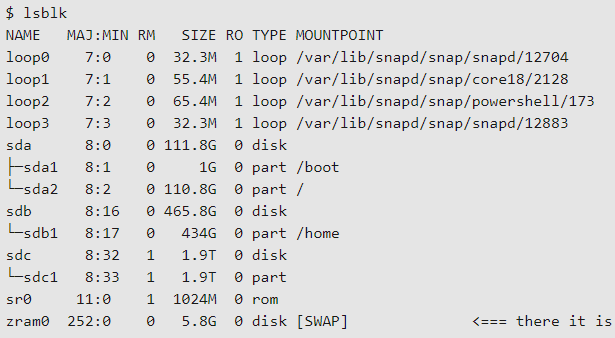
Когда необходима область подкачки?
Если в вашей системе много памяти, возможно, вам никогда не понадобится использовать область подкачки. Но почти всегда полезно иметь ее под рукой. Дисковое пространство относительно дешево по сравнению с памятью, и вы никогда не знаете, когда какой процесс увеличит нагрузку. С другой стороны, если ваша область подкачки интенсивно используется почти все время, вам, возможно, следует подумать о добавлении дополнительной оперативной памяти в систему, поскольку с ее использованием связаны некоторые затраты на производительность.
Создание файла подкачки.
Если вам нужно создать файл подкачки в системе Linux, используйте команду:
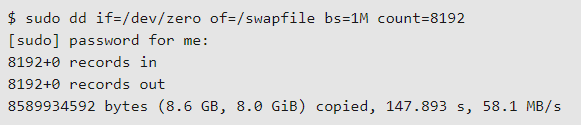
После создания файла измените права доступа к нему, запустите команду mkswap и используйте команду swapon -a , чтобы сделать его доступным, и команду swapon —show , чтобы убедиться, что он запущен.
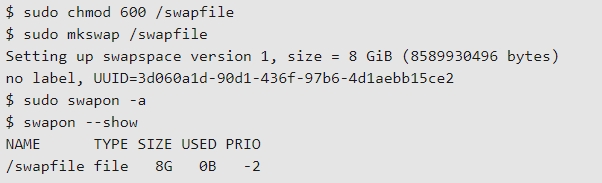
Можно включать и выключать использование файла подкачки с помощью команд swapoff и swapon , хотя вы, возможно, захотите отключить подкачку, только если вы добавили раздел подкачки и хотите использовать его вместо файла подкачки.