- How to access a usb flash drive from the terminal?
- 2. Create a mount point (optional)
- 3. Mount!
- pmount / pumount
- Как в Linux посмотреть подключенные USB устройства
- Просмотр списка имен USB устройств с помощью команды df
- Список имен подключенных USB — устройств с помощью команды lsblk
- Список USB — устройств с помощью команды fdisk
- Список USB контроллеров и устройств, использующих USB устройства
- Заключение
- Зайти на флешку в linux
- 3 ответа 3
How to access a usb flash drive from the terminal?
You’ll need to know what the drive is called to mount it. To do that fire off one of the following (ranked in order of my preference):
lsblk sudo blkid sudo fdisk -l You’re looking for a partition that should look something like: /dev/sdb1 . The more disks you have the higher the letter this is likely to be. Anyway, find it and remember what it’s called.
2. Create a mount point (optional)
This needs to be mounted into the filesystem somewhere. You can usually use /mnt/ if you’re being lazy and nothing else is mounted there but otherwise you’ll want to create a new directory:
3. Mount!
sudo mount /dev/sdb1 /media/usb When you’re done, just fire off:
This answer is almost 6 years old and while the core of it still works, things like fdisk -l aren’t the most user-friendly options. There are also new mechanisms in higher stacks for mounting devices in a sane and standard way which might not always be available.
So I’ve added some polish from the other answers. While you’re reading this footnote and you’re doing this on a desktop system, there definitely are arguments for using udisksctl , per wecac’s answer. This mounts in the same way the desktop does —creating your own /media/$USER/device directory— but I think there are still arguments for a static mountpoint, especially when you don’t want the path to change.
Udisks also relies on D-Bus, so might not be available everywhere.
the main disadvantage of this method is that it mounts the device as root. if the device is FAT formatted then the user won’t be able to write to it. the /media/$USER/device mountpoint will also always be the same
All answers assume that there magically appears a /dev/sdX after putting in the USB stick. What if it doesn’t? I see in the logs that it is detected, but no new /dev. lsusb show all the gory details too. Ie sudo lsusb -vs 15:2 | grep id gives idVendor 0x090c Silicon Motion, Inc. — Taiwan (formerly Feiya Technology Corp.) idProduct 0x1000 Flash Drive
@CarloWood I have faced a similar situation. In some logs, i think dmesg or something, I found that the drive was unable to power itself up. I just ended up using a different port for the drive. As far as i know there is not a way to mount a drive, whose device driver hasnt created a device file in /dev/
pmount / pumount
Install pmount . Mounts disks in /media/
pmount /dev/sdb1 pumount /dev/sdb1 Replace «sdb1» with your specific device path. For more information see the manpage:
pmount ("policy mount") is a wrapper around the standard mount program which permits normal users to mount removable devices without a match- ing /etc/fstab entry. pmount is invoked like this: pmount device [ label ] This will mount device to a directory below /media if policy is met (see below). If label is given, the mount point will be /media/label, otherwise it will be /media/device. Thanks, I knew how to do the accepted answer but was looking for something a bit easier that didn’t leave me having to clear up empty folders myself.
Use udisksctl from package= udisks2 (in both Ubuntu and Debian). Procedure is:
- Find the ID of the block device you want to mount, using lsblk :
user@machine:~$ lsblk NAME MAJ:MIN RM SIZE RO TYPE MOUNTPOINT sda 8:0 0 1.8T 0 disk ├─sda1 8:1 0 19.1M 0 part /boot/efi ├─sda2 8:2 0 1.8T 0 part └─sda3 8:3 0 16G 0 part [SWAP] sdb 8:16 0 931.5G 0 disk ├─sdb1 8:17 0 37M 0 part ├─sdb2 8:18 0 15.9G 0 part [SWAP] └─sdb3 8:19 0 915.7G 0 part / sdc 8:32 1 14.4G 0 disk └─sdc1 8:33 1 14.4G 0 part sdd 8:48 0 1.8T 0 disk └─sdd1 8:49 0 1.8T 0 part user@machine:~$ udisksctl mount --block-device /dev/sdc1 ==== AUTHENTICATING FOR org.freedesktop.udisks2.filesystem-mount === Authentication is required to mount Kingston DT microDuo 3C (/dev/sdc1) Multiple identities can be used for authentication: 1. XXXXX. (user) 2. . (YYYYY) Choose identity to authenticate as (1-2): 1 Password: ==== AUTHENTICATION COMPLETE === Mounted /dev/sdc1 at /media/user/USBDRIVELABEL. Addressing Hans Deragon’s comment below: you can also tell udisksctl to do —no-user-interaction . It does not attempt to authenticate the user, which usually «just works»:
user@machine:~$ udisksctl mount --block-device /dev/sdc1 --no-user-interaction # possibly some complaining here about I/O charset or need to run `fsck` Mounted /dev/sdc1 at /media/user/USBDRIVELABEL. In addition to using the standard mount command (which requires root) you can mount drives using udisks and dbus with your standard user.
To do this it is useful (but not required) to know a few things about the drive first:
Knowing these you can use a simple command to mount a drive from the command line.
gdbus call --system --dest org.freedesktop.UDisks --object-path /org/freedesktop/UDisks/devices/ --method org.freedesktop.UDisks.Device.FilesystemMount "" [] this call should echo the path it is mounted at if the mount succeeds.
To unmount drives mounted in this way you can run:
gdbus call --system --dest org.freedesktop.UDisks --object-path /org/freedesktop/UDisks/devices/ --method org.freedesktop.UDisks.Device.FilesystemUnmount [] N.B. the is simply the end of the path to it. So for example if what you want to mount is at /dev/sdb2 then you would put sdb2 in place of .
If you do not know which device it is or what filesystem it uses do not fear. You can easily print out all that information with this little command:
gdbus introspect --system --dest org.freedesktop.UDisks --object-path /org/freedesktop/UDisks/devices --recurse --only-properties | grep -E "(readonly .+ (IdLabel|IdType|Device(IsMounted|IsDrive|File) ).*|\>|.*\<)" This will print out something like this:
node /org/freedesktop/UDisks/devices < node /org/freedesktop/UDisks/devices/sda < interface org.freedesktop.UDisks.Device < readonly s IdLabel = ''; readonly s IdType = ''; readonly s IdUsage = ''; readonly b DeviceIsMounted = false; readonly s DeviceFile = '/dev/sda'; >; >; node /org/freedesktop/UDisks/devices/sda1 < interface org.freedesktop.UDisks.Device < readonly s IdLabel = 'SYSTEM'; readonly s IdType = 'ntfs'; readonly s IdUsage = 'filesystem'; readonly b DeviceIsMounted = false; readonly s DeviceFile = '/dev/sda1'; >; >; node /org/freedesktop/UDisks/devices/sda2 < interface org.freedesktop.UDisks.Device < readonly s IdLabel = 'Windows7'; readonly s IdType = 'ntfs'; readonly s IdUsage = 'filesystem'; readonly b DeviceIsMounted = true; readonly s DeviceFile = '/dev/sda2'; >; >; node /org/freedesktop/UDisks/devices/sda3 < interface org.freedesktop.UDisks.Device < readonly s IdLabel = 'Recovery'; readonly s IdType = 'ntfs'; readonly s IdUsage = 'filesystem'; readonly b DeviceIsMounted = false; readonly s DeviceFile = '/dev/sda3'; >; >; node /org/freedesktop/UDisks/devices/sda4 < interface org.freedesktop.UDisks.Device < readonly s IdLabel = ''; readonly s IdType = ''; readonly s IdUsage = ''; readonly b DeviceIsMounted = false; readonly s DeviceFile = '/dev/sda4'; >; >; node /org/freedesktop/UDisks/devices/sda5 < interface org.freedesktop.UDisks.Device < readonly s IdLabel = ''; readonly s IdType = 'ext4'; readonly s IdUsage = 'filesystem'; readonly b DeviceIsMounted = true; readonly s DeviceFile = '/dev/sda5'; >; >; node /org/freedesktop/UDisks/devices/sda6 < interface org.freedesktop.UDisks.Device < readonly s IdLabel = ''; readonly s IdType = 'swap'; readonly s IdUsage = 'other'; readonly b DeviceIsMounted = false; readonly s DeviceFile = '/dev/sda6'; >; >; node /org/freedesktop/UDisks/devices/sda7 < interface org.freedesktop.UDisks.Device < readonly s IdLabel = ''; readonly s IdType = 'ext4'; readonly s IdUsage = 'filesystem'; readonly b DeviceIsMounted = true; readonly s DeviceFile = '/dev/sda7'; >; >; node /org/freedesktop/UDisks/devices/sdb < interface org.freedesktop.UDisks.Device < readonly s IdLabel = ''; readonly s IdType = ''; readonly s IdUsage = ''; readonly b DeviceIsMounted = false; readonly s DeviceFile = '/dev/sdb'; >; >; node /org/freedesktop/UDisks/devices/sdb1 < interface org.freedesktop.UDisks.Device < readonly s IdLabel = 'USB DRIVE'; readonly s IdType = 'vfat'; readonly s IdUsage = 'filesystem'; readonly b DeviceIsMounted = false; readonly s DeviceFile = '/dev/sdb1'; >; >; node /org/freedesktop/UDisks/devices/sr0 < interface org.freedesktop.UDisks.Device < readonly s IdLabel = ''; readonly s IdType = ''; readonly s IdUsage = ''; readonly b DeviceIsMounted = false; readonly s DeviceFile = '/dev/sr0'; >; >; >; Those that have IdUsage = 'filesystem' may be mounted using the above command.
This means that, for example, if i wanted to mount the device 'USB DRIVE' i would run the command
gdbus call --system --dest org.freedesktop.UDisks --object-path /org/freedesktop/UDisks/devices/sdb1 --method org.freedesktop.UDisks.Device.FilesystemMount "vfat" [] These commands all work using the dbus messaging system, the same way that Nautilus and other file managers auto-mount things. In these commands we are sending various objects (i.e. /org/freedesktop/. messages asking them to mount and unmount certain devices. They might or might not do this depending on the permissions one has been given in PolicyKit .
Using similar commands one can control almost every aspect of ones experience in Ubuntu and simulate most system programs and functions (i.e. shutdown, volume change, etc.).
Как в Linux посмотреть подключенные USB устройства
В настоящее время многие компьютерные периферийные устройства, такие как веб-камеры, мыши, сканеры, принтеры, жесткие диски, USB (Pendrive) подключаются по USB. После того, как эти устройства подключены к рабочему столу или серверу, важно знать имя устройства или путь к нему. Это помогает идентифицировать USB устройства для таких задач, как форматирование или отключение.
В Linux все файлы устройств хранятся в каталоге /dev и должны быть доступны во время загрузки системы.
В этой статье я покажу вам различные способы как в ubuntu посмотреть usb устройства. Большинство команд, упомянутых здесь, должны работать практически на всех дистрибутивах Linux. Например Ubuntu, Debian, Mint.
Просмотр списка имен USB устройств с помощью команды df
Команда df — это полезная команда, которая может помочь составить список всех подключенных томов, включая USB-накопители.
Как только USB-устройство подключается в систему Linux, это устройство автоматически монтируется в раздел /media и становится готовым к использованию.
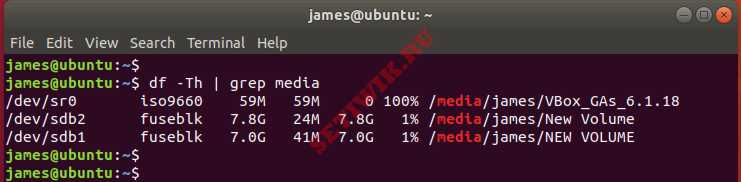
Из приведенного выше вывода следует, что у меня есть 1 USB-накопитель /dev/sdb с 2 разделами /dev/sdb1 и /dev/sdb2
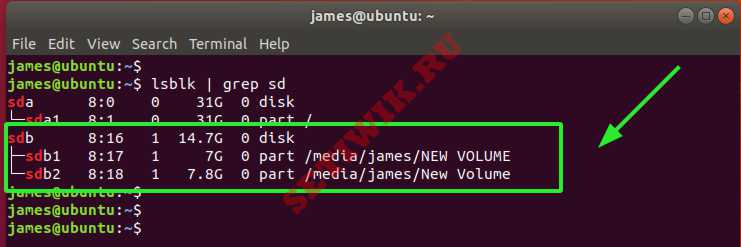
Список имен подключенных USB — устройств с помощью команды lsblk
Команда Lsblk используется для перечисления всех блочных устройств в системе Linux. Из списка можно фильтровать USB-устройства с помощью команды grep.
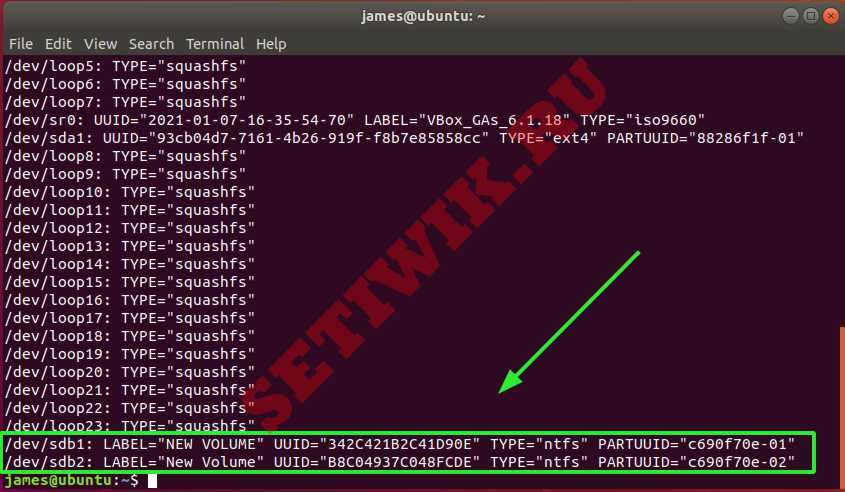
Чтобы получить дополнительную информацию, такую как UUID, производитель и тип файловой системы, используйте команду blkid, как показано на рисунке ниже.
Список USB — устройств с помощью команды fdisk
Вы можете использовать старую добрую команду fdisk, которая используется для разбиения томов на разделы, чтобы перечислить все разделы в системе Linux, включая USB-накопители.
Запятая будет отображать подробную информацию о вашем USB-томе, включая разделы , размер тома, секторы и тип файловой системы.
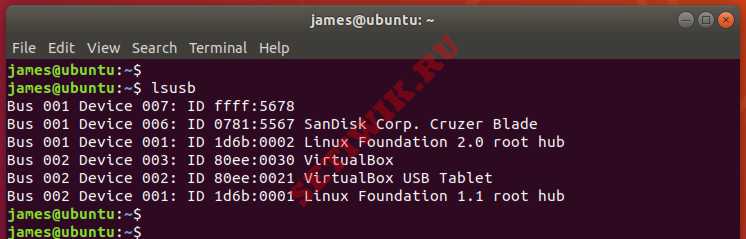
На выводе выше отображается идентификатор шины, идентификатор устройства, идентификатор USB, а также поставщик или производитель USB-устройств
Команда lsusb перечисляет подключенные устройства и не предоставляет дополнительной информации о USB-устройствах.
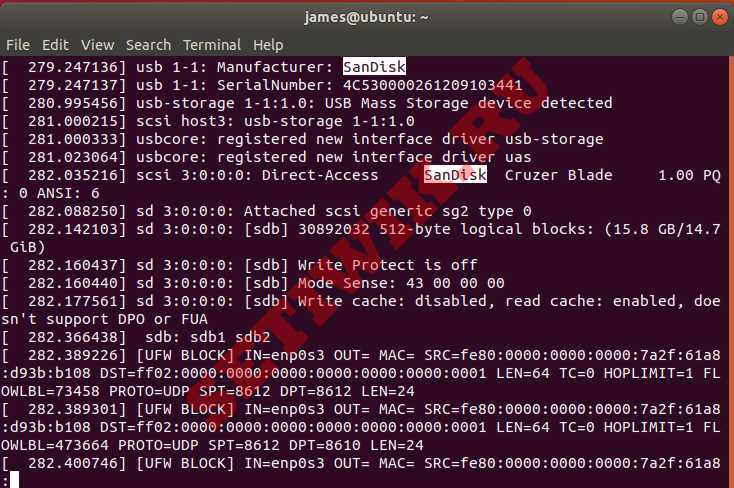
Для получения дополнительной информации о подключенных USB устройствах используйте команду dmesg. Команда dmesg, также известная как “сообщение драйвера” или “показать сообщение”, используется для проверки загрузочных сообщений. Кроме того, эта команда используется для отладки проблем, связанных с оборудованием и печати сообщений, генерируемых драйверами устройств.
Вы можете использовать команду dmesg и grep, чтобы сузиться до USB-устройств.
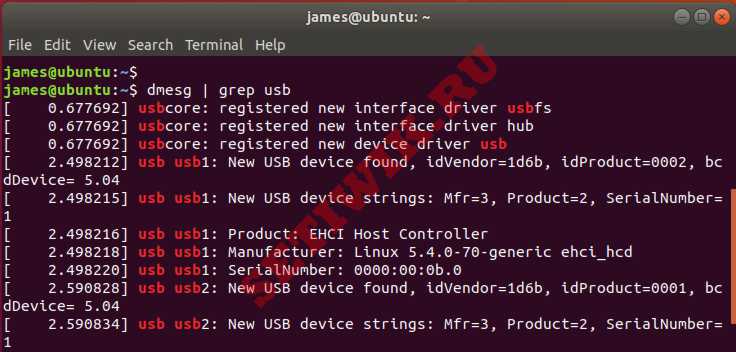
Кроме того, вы можете передать вывод команды dmesg в less для облегчения прокрутки.
На выходе вы можете найти определенную строку, нажав клавишу прямой косой черты ( / ) на клавиатуре, а затем имя или идентификатор устройства USB-устройства.
В моем случае я ищу дополнительную информацию о USB устройстве под названием SanDisk.
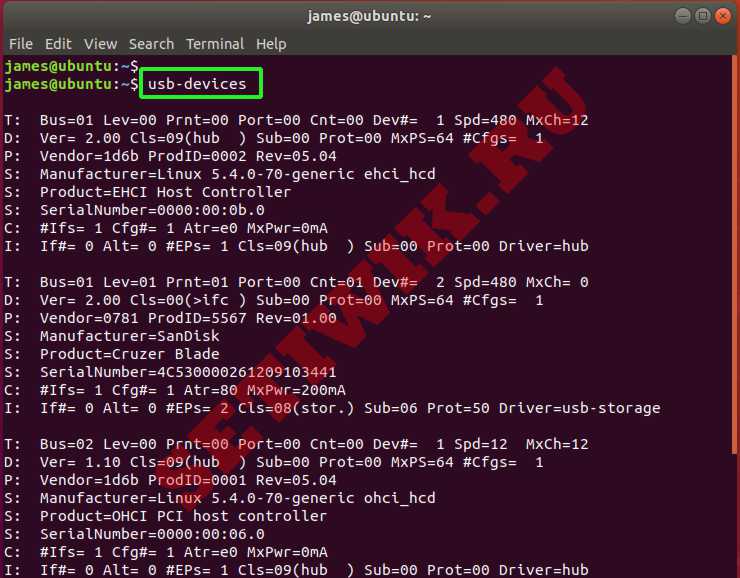
Список USB контроллеров и устройств, использующих USB устройства
Команда usb-devices-это сценарий оболочки, который позволяет вам перечислить все USB-контроллеры и USB-устройства, подключенные к вашему компьютеру. Он печатает детали USB-устройства, такие как производитель, название продукта, серийный номер и многое другое. Вот вывод команды:
Заключение
В этой статье мы продемонстрировали различные способы просмотра USB-устройств, подключенных к системе Linux.
Зайти на флешку в linux
Все привет. Нужно зайти на флешку в терминале путь:/dev/ttyUSB0 Подскажите, пожалуйста, как это можно сделать?
3 ответа 3
/dev/ttyUSB0 - это как бы более низкий уровень доступа к флешке. Устройство для флешки скорее всего будет выглядеть немного по другому. Самый простой способ найти - это вставить флешку и сразу в терминале запустит команду dmesg. Там в конце должно быть что то вида
new high-speed USB device number 7 using xhci_hcd это значит, что как минимум само устройство было распознано на низком уровне.
Чуть ниже будет где то такое
New USB device found, idVendor=1111, idProduct=1234, bcdDevice= 1.00 и смотрим ещё ниже по тексту и там должно быть такое
[sde] 121438208 512-byte logical blocks: (62.2 GB/57.9 GiB) это значит, что флешка (диск) найдены, размер виден и известно имя - sde (у Вас, естественно, может быть другое). Но только sde - это название всей флешки, а конкретный раздел на флешке будет называться sde1 (или другие числа в конце, в зависимости от разбивки диска).
Проверяем наличие (флешка вставлена)
(вместо буквы e Вам нужно будет подставить свою. Если линукс совсем-совсем древний, то там будет /dev/hda* или подобное).
Ок, теперь имя уже известно. Можно пробовать монтировать. Для начала нужно создать для него каталог, можно даже в домашнем каталоге. Пусть это будет /home/Alexandr/usbstick Теперь монтируем
mkdir /home/Alexandr/usbstick sudo mount -t vfat /dev/sde1 /home/Alexandr/usbstick тут есть важный параметр - -t vfat - большинство флешек в fat, но бывают и в ntfs. (тогда нужно -t ntfs-3g )
В целом, очень странно, что флешка не подмонтировалась сама. Скорее всего она либо сломана, либо она на ntfs, а в системе не установлено под нее поддержка. Последние 10-20 строк с dmesg в момент вставки флешки могут прояснить ситуацию.