- Introduction
- Graphical Interface
- From the Command Line (Normal Superuser Mount)
- From the Command Line (As a Regular User)
- Manipulating Other Formats
- See Also
- Монтирование образов дисков
- Подключение стандартного ISO-образа
- Используя графический интерфейс
- Как смонтировать ISO-файл в Linux
- Как смонтировать файлы ISO с помощью командной строки
- Монтирование файлов ISO с помощью Gnome
- Выводы
Introduction
For an introductory explanation of ISO images, instructions for creating and also burning them see IsoImage.
The mounting of images is a very useful operation. It can allow a user to easily access data on an ISO without the need to burn and waste a disc. It also is much faster when dealing with the need to manage many images at once. These operations can be performed from a graphical user interface (GUI) or from a standard Terminal.
Graphical Interface
gISOMount is a graphical utility for mounting and managing ISO images with the added ability to calculate md5sums and read volume information.
To get gISOMount ensure Universe section of the Ubuntu repositories is enabled in your Software Sources. Then to install this software in Ubuntu, install the following package: gisomount.
The program can then be launched from Applications -> System Tools -> gISOMountUsage.
Usage is straightforward, simply browse to an ISO image on your hard drive and then either mount, calculate the md5 for comparison with a reference, or burn it to a disc. Additionally, once an image is select, the program can read off volume information in the pane. A favourites functionality allows commonly used images to be pulled up quickly.
From the Command Line (Normal Superuser Mount)
The default mount point for Ubuntu is under /media. It is recommended a user create subdirectories to this folder for mounting to keep things organized. There is no physical limitation preventing mounting to any other directory on a drive.
To Mount
To mount the image to a directory is a simple two step procedure. Sudo is required because we are working in directories owned by root. First make a directory with a name that identifies the contents of the ISO, usually its name.
Then mount the file with the following command to the newly created directory. In the following example, it is assumed that NameOfISO.iso is in the users working directory, if not replace with the absolute path to the file.
sudo mount -o loop example.iso /media/example
To mount the image so that it can be written to, use the following mount command instead:
sudo mount -o rw,loop example.iso /media/example
To Unmount
Umounting media is simply the reverse. First unmount the image, then remove the directory it was mounted to. Unmounting is universal, it doesn’t matter what image was mounted it can be unmounted this way.
From the Command Line (As a Regular User)
The fuseiso program, along with the FUSE package, allows you to mount an ISO image as a regular user. You still need administrator rights to set it up, but you don’t need to enter your password every time you use it.
First you must install the fuseiso package (install fuseiso now):
sudo apt-get install fuseiso
See FuseIso for a more detailed explanation of fuseiso. This also describes how to configure the permissions on fuseiso. To make the permissions permanent, you must add your userid to the fuse group, and add fuse to the /etc/modules file (both these actions require sudo access, but this is a one-off).
To Mount
When you use FUSE (via fuseiso in this case) to mount a filesystem, the logged in user must have write access to the directory on which the filesystem is to be mounted. For instance, you could create a new, empty directory in your home directory.
cd ~ mkdir example fuseiso example.iso example
Manipulating Other Formats
See Also
- cdemu is a kernel module for mounting Cue/Bin files directly. To install it you would have to setup linux headers, compile the module and modprobe it in. This is out of the scope of this page. There is a script under development in the Ubuntu forums for automating the building of cdemuLocated Here (Use this at your own risk.)
- «Mount and Unmount ISO images without burning them» has a nice step-by-step explanation (with screen shots) showing how to mount and unmount ISO images.
MountIso (последним исправлял пользователь 95 2012-11-12 22:05:40)
The material on this wiki is available under a free license, see Copyright / License for details
You can contribute to this wiki, see Wiki Guide for details
Монтирование образов дисков
ISO -образ — это неформальный термин для обозначения образа диска, содержащего файловую систему стандарта ISO 9660. В более общем смысле, термин относится к образу любого оптического диска. Этот образ представляет собой обыкновенный файл. Его можно использовать (в совокупности со специальными программными средствами) вместо компакт-диска.
Монтирование образов — очень полезная операция. Она позволяет пользователю получить доступ к данным на ISO , не прожигая диск и не портя болванку. Это гораздо быстрее, когда приходится работать сразу с несколькими образами. Эти операции можно провести с использованием графического пользовательского интерфейся ( GUI ) или при помощи Терминала.
Следует иметь в виду, что ISO -образ содержит меньше информации, чем исходный компакт-диск. На компакт-диске содержится служебная информация, которая может, в частности, использоваться для защиты от копирования. Возможностью сохранять подобную информацию обладают некоторые из программ для работы с компакт-дисками.
Подключение стандартного ISO-образа
Используя графический интерфейс
Для монтирования образов дисков в Gnome имеется множество графических утилит:
ISOmorphin — программа написанная на языке Python. Для работы необходимо закачать и распаковать архив в любое удобное место, а затем запустить файл isomorphin.py в папке.

Gmount-iso — Маленькая и довольно удобная программка, позволяющая монтировать ISO образы в произвольную папку, а также отмонтировать уже подключённые образы. Добавлена возможность расчета md5 суммы и объема образа. Интерфейс программы прост до безобразия и в пояснениях не нуждается. Для установки используйте команду:
sudo apt-get install gmountiso
Данная программа будет доступна в меню: Приложения→Системные→gISOMountUsage.
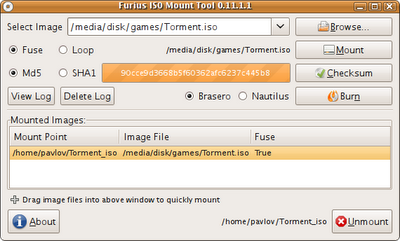
Furius ISO Mount — автоматически создает точку монтирования в домашней папке пользователя и удаляет ее при размонтировании, позволяет записывать образы в форматах ISO и IMG. А так же рассчитывать контрольные суммы Md5 и SHA1.
AcetoneISO — графическое приложение, написанное на Qt, для работы с образами CD/DVD дисков (клон Daemon Tools для Linux с новыми возможностями). На сайте заявлены следующие возможности:
Как смонтировать ISO-файл в Linux
Файл ISO — это архивный файл, который обычно содержит полный образ компакт-диска или DVD. Например, большинство операционных систем, таких как Windows, Linux и macOS, распространяются в виде образов ISO.
Файлы ISO можно извлечь с помощью популярных архивных программ, смонтировать на устройстве с петлей и записать на USB-накопитель или пустой компакт-диск.
В этом руководстве мы объясним, как монтировать файлы ISO в Linux.
Как смонтировать файлы ISO с помощью командной строки
Команда mount позволяет прикреплять (монтировать) файлы ISO в определенной точке монтирования в дереве каталогов.
Инструкции в этом разделе должны работать с любым дистрибутивом Linux, включая Ubuntu, Debian и CentOS.
- Начните с создания точки монтирования, это может быть любое место, которое вы хотите:
sudo mount /path/to/image.iso /media/iso -o loopМонтирование файлов ISO с помощью Gnome
Если вы используете дистрибутив Linux, который использует Gnome в качестве среды рабочего стола, вы можете смонтировать файл ISO с помощью приложения для монтирования образа диска Gnome.
Найдите ISO-файл, который вы хотите смонтировать, и щелкните его правой кнопкой мыши. В контекстном меню выберите «Открыть с помощью Disk Image Mounter».
После подключения образа на рабочем столе должен появиться значок устройства. Дважды щелкните по нему, и откроется файловый менеджер Gnome.
Чтобы отключить файл ISO, щелкните правой кнопкой мыши значок устройства и выберите «Размонтировать».
Выводы
В Linux вы можете монтировать файлы ISO с помощью команды mount . Пользователи настольных компьютеров могут использовать графические инструменты, такие как Gnome Disk Image Mounter.
Если у вас есть какие-либо вопросы или отзывы, не стесняйтесь оставлять комментарии.