- Как смонтировать и размонтировать образ ISO в Linux
- Как смонтировать образ ISO в Linux
- Как размонтировать образ ISO в Linux.
- Заключение.
- Смонтировать файл ISO образа в Linux
- Introduction
- Mounting ISO Files
- Manipulating Other Formats
- CloneCD/IMG Images
- CUE/BIN Images
- MDF Images
- NRG Images
- DMG Images
- Installation
- To Convert to IMG
- To Mount
- Creating the ISO
- Disc Image Integration for Nautilus
- Archive Mounter
- See Also
Как смонтировать и размонтировать образ ISO в Linux
Образ ISO (Международная организация по стандартизации) представляет собой архивный файл, содержащий образ диска, называемый форматом файловой системы ISO 9660. Каждый файл ISO имеет расширение .iso, которое имеет определенный формат, взятый из файловой системы ISO 9660, и специально используется в CD/DVD-ROM. Проще говоря, iso-файл — это образ диска. В этой статье описывается, как смонтировать и размонтировать образ ISO в операционной системе Linux, чтобы получить доступ к содержимому файлов и просмотреть их.
Большинство образов, которые мы загружаем из Интернета, имеют формат ISO. Обычно образ ISO содержит установку программного обеспечения, такого как операционная система, установочные файлы игр или любых других приложений.
Иногда нам нужно получить доступ к файлам и просмотреть содержимое этих образов ISO, но не тратя время и дополнительное место на диске, записывая их на CD/DVD или USB-накопители с помощью дополнительных инструментов. Итак, приступим.
Как смонтировать образ ISO в Linux
Чтобы смонтировать ISO-образ в дистрибутивах Linux на основе RedHat или Debian, вы должны войти в систему как пользователь «root» или переключиться на «sudo» и выполнить следующие команды из терминала, чтобы создать точку монтирования:
После того, как вы создали точку монтирования, используйте команду «mount», чтобы смонтировать ваш iso-файл. В моем случае это образ с дистрибутивом slitaz и именем файла «slitaz-rolling.iso»
user@computer$ mount -t iso9660 -o loop /home/user/slitaz-rolling.iso /mnt/iso
mount: /mnt/iso: WARNING: device write-protected, mounted read-only.
Если все успешно, то на экране вы увидите предупреждающую надпись о том, что смонтированное устройство защищено от записи и доступно только для чтения.
- -t — этот аргумент используется для указания типа монтируемой файловой системы
- ISO 9660 — тип файловой системы, которую мы монтируем.
- -o — параметры монтируемой файловой системы
- loop — loop-устройство — это псевдоустройство, которое часто используется для монтирования ISO-образов CD/DVD и делает эти файлы доступными как блочное устройство.
Вы увидите список файлов ISO-образа, которые мы смонтировали выше. Например, список каталогов образа slitaz-rolling.iso будет выглядеть следующим образом:
total 12
drwxr-xr-x 4 root root 2048 Aug 14 03:54 boot
drwxr-xr-x 3 root root 2048 Aug 14 03:54 EFI
-rw-r—r— 1 root root 4922 Aug 14 03:54 index.html
-rw-r—r— 1 root root 1711 Aug 14 03:54 md5sum
-rw-r—r— 1 root root 811 Aug 14 03:54 README
Как размонтировать образ ISO в Linux.
Просто запустите следующую команду из терминала под учетной записью «root» или с использованием «sudo», чтобы размонтировать смонтированный образ ISO.
Заключение.
Вот и добавилось в копилку навыков еще одно умение. Надеюсь кому-то пригодится. А если вам интересно подписывайтесь на мой канал дзен (кнопка ниже), либо в telegrmm и ВКонтакте . Так же не забудьте про мой сайт RoadIT , в котором я потихоньку собираю материал, знание которого приведет вас в мир IT.
Смонтировать файл ISO образа в Linux

16.03.2023

itpro

Linux, Ubuntu

Комментариев пока нет
ISO это популярный формат файлов для хранения образов оптических дисков с файловой системой ISO 9660. Формат ISO сейчас чаще применяются в качестве основного средства распространения установочных образов программ (у любого системного администратора есть установочные образы Windows, Linux, VMware, других операционных систем и различных программ). В этой статье мы рассмотрим, как смонтировать ISO образ в Linux и получить доступ к файлам на нем.
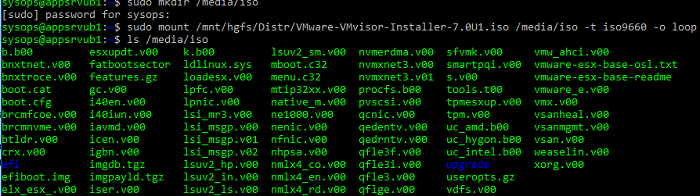
Создайте точку монтирования для вашего ISO образа:
Смонтируйте ISO файл в точку монтирования с помощью команды mount:
$ sudo mount /mnt/hgfs/Distr/VMware-VMvisor-Installer-7.0U1.iso /media/iso -t iso9660 -o loop
- -t – аргумент указывает тип файловой системы (не обязательный параметр);
- ISO 9660 –файловая система CD/DVD дисков;
- -oloop – смонтировать образ как loopback устройство; позволяет работать с файлом образа, как с обычным блочным устройством.
После успешного монтирования ISO образа вы можете получить доступ к файлам на нем. Выведите список файлов в ISO образе:
Можно скопировать файлы с ISO образа на ваш компьютер:
$ sudo cp -r /mnt/iso /home/user/Documents
Чтобы отмонтировать ISO файл, выполните:
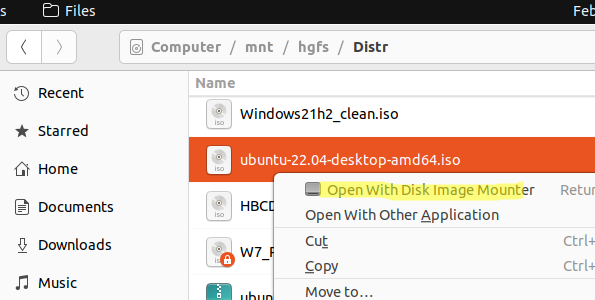
Также вы можете смонтировать ISO файл из графического интерфейса Ubuntu. Например, если у вас используется среда рабочего стола Gnome, просто щелкните правой кнопкой по ISO файлу и выберите Open With Disk Image Mounter.
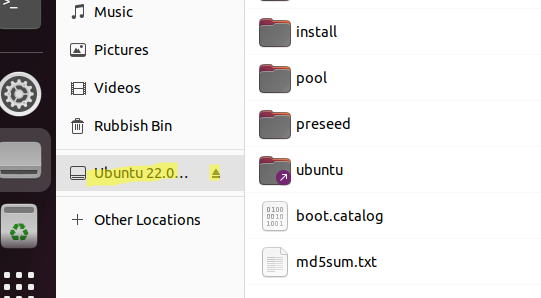
В правой панели появится значок устройства образа, щелкните по нему и увидите список файлов в ISO файле.
Чтобы отключить ISO образ, щелкните по значку устройства и выберите Unmount.
![]() Предыдущая статья Следующая статья
Предыдущая статья Следующая статья ![]()

Установка и настройка прокси сервера Squid в Linux
Мониторинг срока регистрации (освобождения) домена в Zabbix
Настройка Wi-Fi точки доступа на Linux
Управление конфигурацией Windows через Ansible
Introduction
For an introductory explanation of ISO images, instructions for creating and also burning them see IsoImage.
Mounting ISO Files
For instructions on how to mount an ISO, see MountIso.
Manipulating Other Formats
There are many other formats of archives that have been created over the years for numerous reasons. To mount them, it is usually necessary to convert them to ISO and then use your preferred means. Unless otherwise specified, these programs are available in the Universe repository and can be installed by numerous means. For convenience apturl links have been made, click the package names and they will install as long as the protocol is supported. None of these programs are installed by default.
The following exclusively deals with the command line.
CloneCD/IMG Images
ccd2iso /path/to/example.img /path/to/example.iso
sudo mount -o loop /path/to/example.iso /media/example
CUE/BIN Images
bchunk /path/to/example.bin /path/to/example.cue /path/to/example.iso
MDF Images
mdf2iso /path/to/example.mdf /path/to/example.iso
sudo mount -o loop=/dev/loop0 /path/to/example.iso /media/example
NRG Images
nrg2iso /path/to/example.nrg /path/to/example.iso
sudo mount -o loop,offset=307200 /path/to/example.nrg /media/example
DMG Images
DMG (.dmg) images are primarily used by Apple, conversion of these files will allow data to be accessed. It will not allow the running of OSX programs on Linux without considerable effort not outlined in this guide. The following process will first convert to IMG and then to ISO, you may however stop at the first step if you wish and mount or burn.
Installation
For instructions on installation, see DMG2IMG.
To Convert to IMG
The following command will convert the example file from DMG to IMG.
dmg2img /path/to/example.dmg /path/to/example.img
Do NOT follow the instructions for mounting the file at the end of the conversion. It is not advisable to mount to the /mnt directory.
To Mount
As always a directory will be created in /media, the next step will ensure hfsplus support is available, lastly the IMG file mounted to the directory.
sudo mount -t hfsplus -o loop example.img /media/example
At this point, the image is available for browsing under the /media/example directory. These files can now be transferred to hard drive or elsewhere for storage. If you want an ISO file, continue to the next section.
Creating the ISO
The IMG file we now have is still an hfsplus archive, which cannot simply be converted into an ISO. As such, we will have to use an intermediary step to convert the data from its stored format to an ISO. Since we’ve already mounted it to a directory, the easiest way is simply to create a new ISO with any disc authoring program you are familiar with. Brasero, GnomeBaker and K3b are just a few options for this.
Simply open your software of choice and start a new data disc. Then add the files from the mounted archive to this new data disc project. Once satisfied, select Burn and instead of recording a CD or DVD, choose to make an ISO file.
For most users, Brasero will be available, for those inexperienced in it’s use the following is a guide.
If you’re using GNOME then you can run Brasero from Applications -> Sound & Video -> Brasero. Start a new data disc by selecting Data Project from the main Brasero window, or through the menu Project -> New Project. Ensure the side panel is enabled from View -> Enable Side Panel. From the side panel, navigate to the directory where the IMG was mounted, usually the name of the IMG will be listed in the Places pane. In our example, the location in Places would be called example located in the /media/example directory. Simply drag all the files and folders you want to the project.
Once ready, push Burn. and ensure you select to create Image File: at the new window so it creates an ISO. If you wish to change the default name or the location it is created, select Properties. Once satisfied, push Burn and the ISO will be created. Leave Increase compatibility with Windows systems checked unless you know better.
Disc Image Integration for Nautilus
Archive Mounter
By default in GNOME, Nautilus has support for mounting ISOs by simply right clicking on the file and selecting Open with Archive Mounter. This option still appears limited, mainly designed for archives and ISOs. This feature is still under development, thus the following guide will be preserved.
See Also
- AcetoneISO is a feature rich program which let you mount and burn ISO, BIN, NRG, MDF, and IMG files through a graphical user interface. It’s available through Ubuntu’s universe repository.
- Furius Iso Mount, available from the Ubuntu Software Center, enables you to mount ISO, BIN, NRG, MDF, and IMG files through a graphical user interface
- cdemu is a kernel module for mounting Cue/Bin files directly. To install it you would have to setup linux headers, compile the module and modprobe it in. This is out of the scope of this page. There is a script under development in the Ubuntu forums for automating the building of cdemuLocated Here (Use this at your own risk.)
- «Mount and Unmount ISO images without burning them» has a nice step-by-step explanation (with screen shots) showing how to mount and unmount ISO images.
- clonezilla is an open source disk backup & restore distro
ManageDiscImages (последним исправлял пользователь 78 2015-11-30 18:17:47)
The material on this wiki is available under a free license, see Copyright / License for details
You can contribute to this wiki, see Wiki Guide for details