- Использование прокси
- Глобальные настройки
- Firefox
- Chromium-browser
- APT
- Bash
- wget
- apt-add-repository
- How to Configure Proxy Settings on Ubuntu 20.04
- Setting Up Proxy with Ubuntu Desktop GUI
- Setting up Proxy With Ubuntu Desktop Terminal
- Setting Up Temporary Proxy for a Single User
- Setting Up Permanent Proxy for a Single User
- Setting Up Permanent Proxy for All Users
- Setting Up Proxy for APT
Использование прокси
В этой статье содержится описание настроек прокси-соединений для различных программ.
Глобальные настройки
Для того, чтобы настроить прокси в Ubuntu откройте Системные параметры, перейдите в пункт Сеть. Выберите пункт Сетевая прокси-служба. Смените метод на Вручную и введите ваши настройки прокси. Минус такой настройки в том, что в случае, если у Вас прокси с авторизацией по логину и паролю, то указать эти данные невозможно, и прокси не будет работать.
Настроить прокси на системном уровне можно и через конфигурационные файлы (True UNIX-way). Для этого нужно открыть на редактирования с правами root файл /etc/environment (например sudo nano /etc/environment). В конец файла добавим строки:
https_proxy="https://user:pass@proxy:port/" http_proxy="http://user:pass@proxy:port/" ftp_proxy="ftp://user:pass@proxy:port/" socks_proxy="socks://user:pass@proxy:port/"
Если прокси без авторизации, то строки должны быть вида:
Для применения настроек придется пере-загрузиться, изменения в файле /etc/environment вступили в силу при запуске процесса init — родителя всех процессов в системе и именно от него все дочерние процессы унаследуют настройки прокси в переменных окружения.
Как правила глобальной насторойки прокси достаточно для того что бы все остальные приложения работали через прокси без необходимости настраивать прокси внутри приложения. Однако некоторые приложения не умеют работать с глобальными настройками или им нужны особенные настройки.
Firefox
Firefox умеет использовать как глобальные настройки, так и свои собственные. Для того чтобы назначить ему прокси, откройте его окно настроек, перейдите на вкладку Дополнительно, далее на вкладку Сеть и нажмите на кнопку Настроить напротив надписи Настройка параметров соединения Firefox с Интернетом. Важное отличие от других программ — он умеет использовать NTLM аутентификацию (используется на Microsoft Internet Security and Acceleration Server).
Chromium-browser
Также может использовать глобальные настройки и имеет свои. Для того чтобы назначить ему прокси персонально, откройте файл /etc/chromium-browser/default и допишите следующие строки:
CHROMIUM_FLAGS="-proxy-server=адрес:порт"
APT
В новых версиях умеет работать с глобальными настройками, но в более старых мог работать только с персональными настройками. Сообщенные настройки: в файле /etc/apt/apt.conf нужно указать:
Acquire::http::proxy "http://логин:пароль@ip_прокси:порт_прокси/"; Acquire::https::proxy "http://логин:пароль@ip_прокси:порт_прокси/"; Acquire::ftp::proxy "http://логин:пароль@ip_прокси:порт_прокси/"; Acquire::socks::proxy "http://логин:пароль@ip_прокси:порт_прокси/"; Acquire. Proxy "true";
Если сервер без авторизации, то логин:пароль@ нужно убрать.
Bash
Само собой настройка через /etc/environment (описано выше в разделе глобальных настроек) будет работать для всех программ запущенных из терминала. Если вы хотите указать настройки персонально для запускаемой программы, то перед ее запуском нужно выполнить:
export http_proxy='http://логин:пароль@ip_прокси:порт_прокси/' export ftp_proxy='http://логин:пароль@ip_прокси:порт_прокси/'
wget
Дописываем в файл /etc/wgetrc :
proxy-user = username proxy-password = password http_proxy = http://xxx.xxx.xxx.xxx:8080/ ftp_proxy = http://xxx.xxx.xxx.xxx:8080/ use_proxy = on
Если прокси без авторизации, то proxy-user и proxy-password нужно убрать
apt-add-repository
Многие компании и университеты блокируют все неизвестные порты наружу. Обычно блокируется и порт 11371, используемый утилитой apt-add-repository для добавления репозиториев. Есть простое решение, как получать ключи репозиториев через 80-ый порт, который используется для доступа к web-страницам и чаще всего не блокируется.
Редактируем файл /usr/lib/python2.6/dist-packages/softwareproperties/ppa.py (нужны привилегии root, вместо /usr/lib/python2.6 может быть версия 2.7). Ищем фразу keyserver.ubuntu.com , заменяем
В версии 16.04 достаточно иметь настроенной переменную окружения
https_proxy="https://user:pass@proxy:port/"
- Сайт
- Об Ubuntu
- Скачать Ubuntu
- Семейство Ubuntu
- Новости
- Форум
- Помощь
- Правила
- Документация
- Пользовательская документация
- Официальная документация
- Семейство Ubuntu
- Материалы для загрузки
- Совместимость с оборудованием
- RSS лента
- Сообщество
- Наши проекты
- Местные сообщества
- Перевод Ubuntu
- Тестирование
- RSS лента
© 2018 Ubuntu-ru — Русскоязычное сообщество Ubuntu Linux.
© 2012 Canonical Ltd. Ubuntu и Canonical являются зарегистрированными торговыми знаками Canonical Ltd.
How to Configure Proxy Settings on Ubuntu 20.04
Using a proxy server as an internet access intermediary is a common business scenario. However, personal users can also benefit from increased network security, privacy, and speed provided by proxies.
In this tutorial, you will learn how to set up your Ubuntu 20.04 system to work with a proxy server.

- Ubuntu 18.04 or later
- Access to terminal with sudo privileges
- Proxy info (web or IP address, username, and password)
Note: If you wish to set up one of your machines to act as a proxy, refer to How to Set Up & Install Squid Proxy Server on Ubuntu.
Setting Up Proxy with Ubuntu Desktop GUI
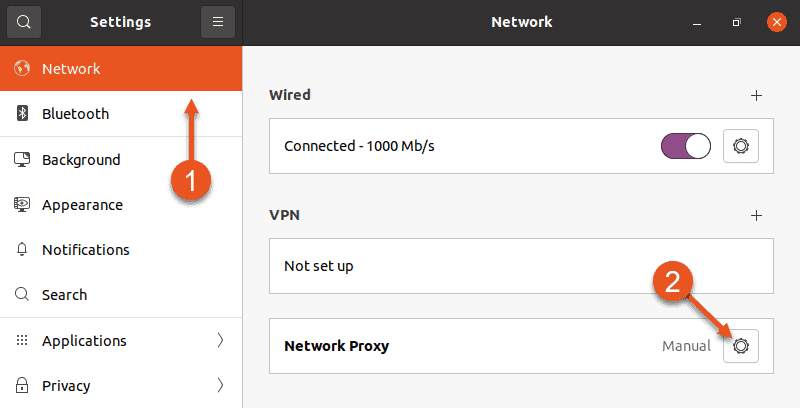
1. To access proxy settings using the Ubuntu GUI, open Ubuntu’s main Settings.
2. Select the Network setting in the menu on the left side of the window.
3. Then, click the cog in the Network Proxy section.
4. A Network Proxy dialogue appears. Choose Manual and enter your proxy info into the fields below.
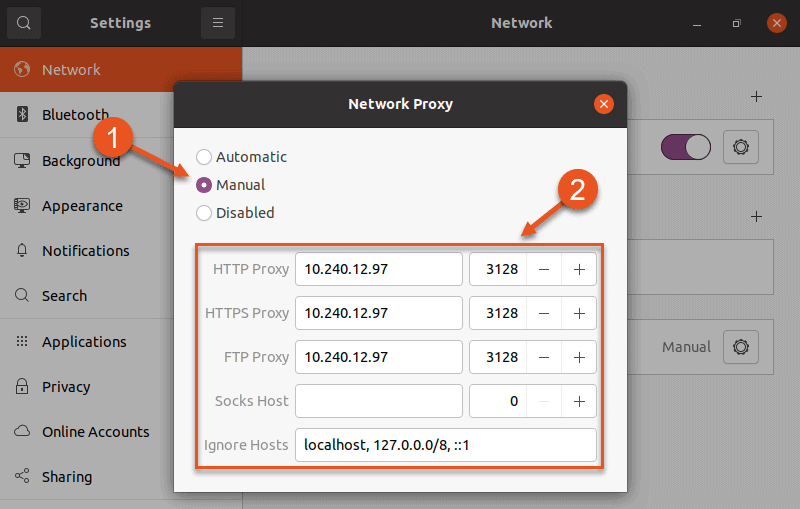
5. Exit the dialogue and Ubuntu will automatically apply the proxy settings.
Setting up Proxy With Ubuntu Desktop Terminal
Use the command line interface for more granular control of proxy settings. This allows you to:
- Make temporary or permanent changes to the configuration.
- Set up proxy for a single user or for all users.
Setting Up Temporary Proxy for a Single User
A temporary proxy connection resets after a system reboot. To establish such a connection for the current user, use the export command.
The syntax for establishing a temporary proxy connection is:
export HTTP_PROXY=[username]:[password]@[proxy-web-or-IP-address]:[port-number] export HTTPS_PROXY=[username]:[password]@[proxy-web-or-IP-address]:[port-number] export FTP_PROXY=[username]:[password]@ [proxy-web-or-IP-address]:[port-number] . export NO_PROXY=localhost,127.0.0.1. 1Provide the proxy address (web or IP), followed by the port number. If the proxy server requires authentication, add your proxy username and password as the initial values.
This is what the set of commands should look like in terminal:

The purpose of the NO_PROXY line is to tell the system that local traffic should ignore the proxy.
Setting Up Permanent Proxy for a Single User
As stated above, proxy settings configured through a terminal window reset after you reboot your system. To make permanent changes for a single user, edit the .bashrc file.
1. Open the file with a text editor of your choice:
2. Now add the following lines at the bottom of the .bashrc file:
export HTTP_PROXY="[username]:[password]@[proxy-web-or-IP-address]:[port-number]" export HTTPS_PROXY="[username]:[password]@[proxy-web-or-IP-address]:[port-number]" export FTP_PROXY="[username]:[password]@ [proxy-web-or-IP-address]:[port-number]" . export NO_PROXY="localhost,127.0.0.1. 1"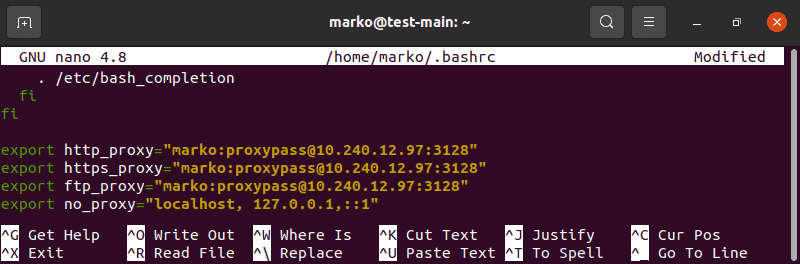
4. Then, run the following command in to apply the new settings to the current session:
Setting Up Permanent Proxy for All Users
To permanently set up proxy access for all users, you have to edit the /etc/environment file.
1. First, open the file in a text editor:
2. Next, update the file with the same information you added to the .bashrc file in the previous scenario:
export HTTP_PROXY="[username]:[password]@[proxy-web-or-IP-address]:[port-number]" export HTTPS_PROXY="[username]:[password]@[proxy-web-or-IP-address]:[port-number]" export FTP_PROXY="[username]:[password]@ [proxy-web-or-IP-address]:[port-number]" . export NO_PROXY="localhost,127.0.0.1. 1"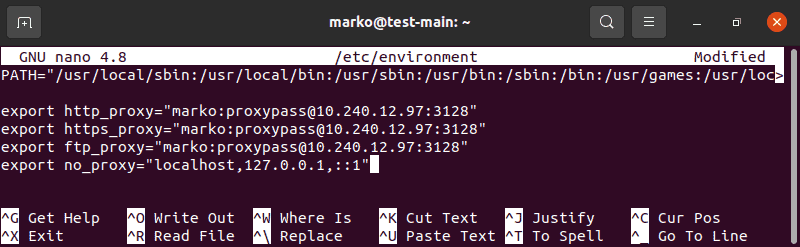
3. Save the file and exit. The changes will be applied the next time you log in.
Setting Up Proxy for APT
On some systems, the apt command-line utility needs a separate proxy configuration, because it does not use system environment variables.
1. To define proxy settings for apt, create or edit (if it already exists) a file named apt.conf in /etc/apt directory:
2. Add the following lines to the file:
Acquire::http::Proxy "http://[username]:[password]@ [proxy-web-or-IP-address]:[port-number]"; Acquire::https::Proxy "http://[username]:[password]@ [proxy-web-or-IP-address]:[port-number]";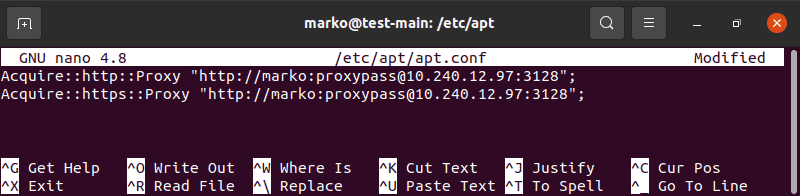
3. Save the file and exit. The configuration will be applied after a reboot.
This tutorial provided instructions on how to set up proxy settings on Ubuntu 20.04. You should now know how to make temporary and permanent changes to your system’s proxy configuration, for a single user or for the entire system.