- Как открывать порты в системе Linux
- Требования
- Проверка открытых портов
- Открытие порта для TCP-соединений
- Ubuntu и системы на базе ufw
- CentOS и системы на базе firewalld
- Для других дистрибутивов Linux
- Тестирование порта
- Сохранение правил брандмауэра
- Для брандмауэра ufw
- Для firewalld
- Для iptables
- Подводим итоги
- How to Open a Port in Linux
- 1. Overview
- 2. What Is a Network Port?
- 3. iptables
- 4. Opening the Network Port
- 5. Conclusion
Как открывать порты в системе Linux
Порт — это конечная точка соединения. В операционной системе порт открывается или закрывается для передачи пакетов данных определенных процессов или сетевых служб.
Обычно порты определяют конкретную присвоенную им сетевую службу. Это можно изменить вручную, настроив службу на использование другого порта, но в целом можно оставить значения по умолчанию.
Первые 1024 порта (номера портов от 0 до 1023) называются общеизвестными или системными и зарезервированы для часто используемых служб. К ним относятся SSH (порт 22), HTTP (порт 80), HTTPS (порт 443) и тому подобное.
Номера портов выше 1024 называются эфемерными портами.
- Порты с номерами от 1024 до 49151 называются зарегистрированными/пользовательскими.
- Номера портов с 49152 по 65535 называются динамическими/частными портами.
В этом мануале мы откроем эфемерный порт в Linux, поскольку общие службы используют известные порты.
Требования
Для выполнения туториала нужно уметь пользоваться терминалом.
Проверка открытых портов
Прежде чем открыть порт в Linux, нужно проверить список всех открытых портов и выбрать эфемерный порт, которого нет в этом списке.
С помощью команды netstat можно получить список всех открытых портов, включая TCP и UDP — это распространенные протоколы для передачи пакетов на сетевом уровне.
Учитывая используемые флаги, команда выводит следующее:
Active Internet connections (only servers)
Proto Recv-Q Send-Q Local Address Foreign Address State tcp 0 0 127.0.0.1:5432 0.0.0.0:* LISTEN tcp 0 0 127.0.0.1:27017 0.0.0.0:* LISTEN tcp 0 0 127.0.0.1:6379 0.0.0.0:* LISTEN tcp 0 0 127.0.0.53:53 0.0.0.0:* LISTEN tcp 0 0 0.0.0.0:22 0.0.0.0:* LISTEN tcp6 0 0 ::1:5432 . * LISTEN tcp6 0 0 ::1:6379 . * LISTEN tcp6 0 0 . 22 . * LISTEN udp 0 0 127.0.0.53:53 0.0.0.0:* LISTEN
Примечание. Если в вашем дистрибутиве нет netstat, то с помощью команды ss можно вывести список открытых портов путем проверки сокетов прослушивания.
Убедитесь, что команда ss выводит согласованные выходные данные:
Netid State Recv-Q Send-Q Local Address:Port Peer Address:Port udp UNCONN 0 0 127.0.0.53%lo:53 0.0.0.0:* tcp LISTEN 0 128 127.0.0.1:5432 0.0.0.0:* tcp LISTEN 0 128 127.0.0.1:27017 0.0.0.0:* tcp LISTEN 0 128 127.0.0.1:6379 0.0.0.0:* tcp LISTEN 0 128 127.0.0.53%lo:53 0.0.0.0:* tcp LISTEN 0 128 0.0.0.0:22 0.0.0.0:* tcp LISTEN 0 128 [::1]:5432 0.0.0.0:* tcp LISTEN 0 128 [::1]:6379 0.0.0.0:* tcp LISTEN 0 128 [::]:22 0.0.0.0:*
Эта команда выводит практически те же открытые порты, что и netstat.
Открытие порта для TCP-соединений
Теперь откроем закрытый порт и настроим его на прослушивание TCP-соединений.
В этом туториале мы откроем порт 4000. Но при желании вы можете выбрать другой закрытый порт. Только убедитесь, что его номер больше 1023.
С помощью команды netstat убедитесь, что порт 4000 не используется:
То же самое можно сделать с помощью команды ss:
Вывод должен быть пустым, таким образом подтверждается, что порт сейчас не используется, чтобы была возможность вручную добавить правила порта в системный брандмауэр iptables.
Ubuntu и системы на базе ufw
ufw — клиент командной строки для брандмауэра UncomplicatedFirewall.
Команда будет выглядеть следующим образом:
CentOS и системы на базе firewalld
firewall-cmd — клиент командной строки для брандмауэра firewalld.
Команды будут выглядеть так:
Для других дистрибутивов Linux
Изменить системные правила фильтрации пакетов IPv4 можно с помощью iptables.
iptables -A INPUT -p tcp —dport 4000 -j ACCEPT
Тестирование порта
После успешного открытия TCP-порта нужно его протестировать.
При отправке вывода ls любому подключенному клиенту, сначала запустите netcat (nc) и прослушивайте (-l) порт (-p) 4000:
Теперь клиент получит вывод ls после того, как он откроет TCP-соединение на порту 4000. Пока оставьте этот сеанс.
Откройте другой терминал на той же машине.
Поскольку мы открыли TCP-порт, мы можем протестировать TCP-подключения с помощью telnet. Если у вас этой команды нет, установите ее с помощью менеджера пакетов.
Введите IP вашего сервера и номер порта (в данном случае 4000) и выполните следующую команду:
Эта команда пытается открыть TCP-соединение на локальном хосте через порт 4000.
Получим следующий вывод, в котором указано, что соединение с программой установлено (nc):
Trying ::1. Trying 127.0.0.1. Connected to localhost. Escape character is '^]'. while.sh
Вывод ls (в данном примере while.sh) отправлен клиенту, что указывает на успешное TCP-соединение.
С помощью nmap проверьте, открыт ли порт (-p):
Эта команда проверит открытый порт:
Starting Nmap 7.60 ( https://nmap.org ) at 2020-01-18 21:51 UTC Nmap scan report for localhost (127.0.0.1) Host is up (0.00010s latency). Other addresses for localhost (not scanned): ::1 PORT STATE SERVICE 4000/tcp open remoteanything Nmap done: 1 IP address (1 host up) scanned in 0.25 seconds
Как видите, вы успешно открыли новый порт в Linux.
Примечание: nmap выводит список только открытых портов, на которых в данный момент есть прослушивающее приложение. Если вы не используете приложение для прослушивания (например netcat), то порт 4000 будет отображаться как закрытый, поскольку в настоящее время на этом порту нет ни одного прослушивающего приложения. Аналогично не будет работать и telnet, поскольку этой команде также нужно прослушивающее приложение. Именно по этой причине nc такой полезный инструмент. Он имитирует такие среды с помощью простой команды.
Но порт открыт временно, так как изменения будут сбрасываться при каждой перезагрузке системы.
Сохранение правил брандмауэра
Способ, который мы рассмотрели в этом мануале только временно обновляет правила брандмауэра, пока система не выключится или не перезагрузится. Поэтому для повторного открытия того же порта после перезагрузки необходимо повторить эти шаги. Однако правила брандмауэра можно сохранить навсегда.
Для брандмауэра ufw
Правила ufw не сбрасываются при перезагрузке. Это происходит потому, что он интегрирован в процесс загрузки, и ядро применяет соответствующие конфигурационные файлы и сохраняет правила брандмауэра ufw.
Для firewalld
Необходимо применить флаг –permanent, чтобы правила были действительны после перезагрузки системы.
Для iptables
Чтобы сохранить правила конфигурации, рекомендуется использовать iptables-persistent.
Подводим итоги
В этом туториале мы разобрали, как открыть новый порт в Linux и настроить его для входящих соединений, а также поработали с netstat, ss, telnet, nc и nmap.
How to Open a Port in Linux
![]()
The Kubernetes ecosystem is huge and quite complex, so it’s easy to forget about costs when trying out all of the exciting tools.
To avoid overspending on your Kubernetes cluster, definitely have a look at the free K8s cost monitoring tool from the automation platform CAST AI. You can view your costs in real time, allocate them, calculate burn rates for projects, spot anomalies or spikes, and get insightful reports you can share with your team.
Connect your cluster and start monitoring your K8s costs right away:
1. Overview
Indeed, every application employs ports to interact with other devices across the network. With TCP and UDP as the two primary transport protocols, we need ports to transmit/receive data over the networks. All operating systems require this logical entity for effective communication. Whenever we start the application services, they automatically get mapped to the available network ports.
However, the ports are closed by default in many operating systems. That’s why we have to open network ports at the base operating system to enable the communication flow from the base to the remote system.
This article explains how to open a network port in Linux.
2. What Is a Network Port?
Fundamentally, every host machine can run several applications within the system. If an application has to communicate with other devices, it uses the network interface with the host-associated IP address. However, if two or more applications running on the same machine, then the associated port helps to distinguish the traffic for that specific application from the network interface. When we say that a port is open or listening, it means that the application or process is ready to accept traffic.
3. iptables
iptables is the default firewall software that Linux systems use to filter network packets. It uses the Netfilter framework to implement the IP packet filter rules that manage the incoming and outgoing packets. Basically, it revolves around the concept of tables and chains.
A chain is a set of rules for processing the packets, and a table is a collection of chains used to perform a specific function. Here, the filter examines the packets against the rules and routes them accordingly. It’s always a good practice to enable packet filters to improve the application and system security.
Next, let’s list the firewall rules using the iptables command:
$ sudo iptables -L Chain INPUT (policy DROP) target prot opt source destination Chain FORWARD (policy ACCEPT) target prot opt source destination Chain OUTPUT (policy ACCEPT) target prot opt source destinationHere, the output shows that by default, all the input traffic gets blocked. As a result, any packet reaching the server from the other devices gets dropped.
In general, the application of rules is temporary and, upon system restart, gets removed. To avoid this occurrence, let’s save the iptables rules using the iptables-save command:
4. Opening the Network Port
For the sake of discussion, let’s take the below example:
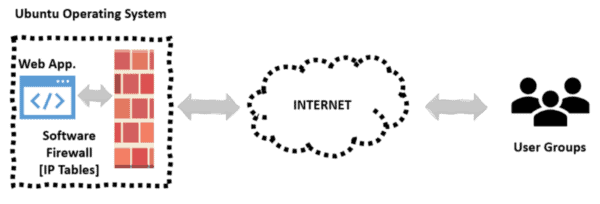
Here, we have a web application hosted on port 8080 in the Linux Machine. The firewall software in the Linux system monitors the incoming and outgoing traffic. However, based on the user-defined firewall rules, it filters the network packets. Even though the web application is running successfully within the system, exposing it to the outside world depends on the firewall rules.
Let’s deploy a simple nodejs application on the server that runs on port 8080:
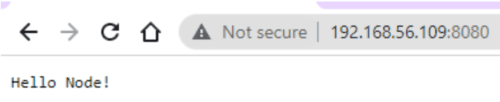
$ npm start > [email protected] start /home/tools/baeldung-iptables/node-hello > node index.js Server running on http://192.168.56.109:8080/ .. ..We deployed the application successfully, and it’s accessible on the machine as we can verify using the curl command:
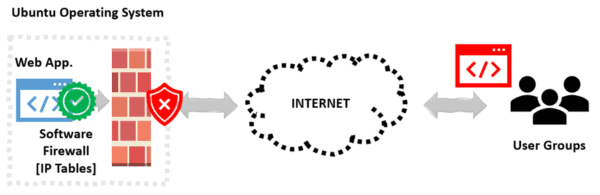
$ curl https://localhost:8080/ Hello Node!Now, let’s open http://192.168.56.109:8080 from the browser. Though the “nodejs” application is running with no exception, the site is not opening from the browser:

Here, the issue arises because of the packet filter deployment in the server. As per the below illustration, the server drops the request at the interface:
To overcome this problem, we have to create a rule in the iptable that allows all the web traffic coming into the server at port 8080:
$ sudo iptables -A INPUT -p tcp --dport 8080 -j ACCEPTIn this case, we are appending a rule into the INPUT chain to ACCEPT any TCP packets with the destination port of 8080:
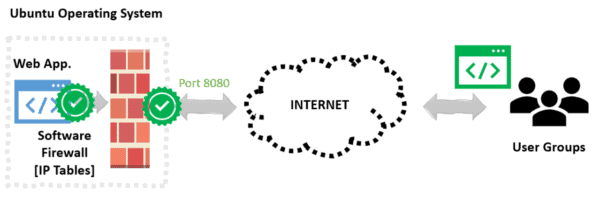
Now, let’s refresh the browser page and check:
Likewise, let’s look at a few more examples of blocking incoming network connections.
To block all incoming TELNET connections to the server, we add the below rule into the INPUT chain:
$ sudo iptables -I INPUT -p tcp --dport 23 -j DROPIf we want to block any incoming web traffic connections to the server from a specific IP address, we can do so by adding a similar rule into the INPUT chain:
$ sudo iptables -I INPUT -p tcp --dport 80 -s 192.168.56.109 -j DROP5. Conclusion
In summary, network ports are essential for applications to interact with other devices. The enablement of iptables in the server is critical in enriching its security constructs as it helps to manage the application traffic over the network. As a best practice, the rules need to be tailored using iptables based on our applications’ needs.