- KVM hypervisor: a beginners’ guide
- What is KVM hypervisor?
- KVM hypervisor benefits
- How to install KVM on Ubuntu 20.04
- Step 1: Install required packages
- Step 2: Check virtualisation capabilities
- Step 3: Launch a VM
- Virtualisation management software
- Virtual Machine Manager
- Multipass
- OpenStack
- Next steps
- Ubuntu cloud
- Общие принципы работы QEMU-KVM
- 2) QEMU
- 3) Protection rings
- 4) QEMU-KVM
KVM hypervisor: a beginners’ guide
KVM (Kernel-based Virtual Machine) is the leading open source virtualisation technology for Linux. It installs natively on all Linux distributions and turns underlying physical servers into hypervisors so that they can host multiple, isolated virtual machines (VMs). KVM comes with no licenses, type-1 hypervisor capabilities and a variety of performance extensions which makes it an ideal candidate for virtualisation and cloud infrastructure implementation. But what are the benefits of KVM hypervisor and how do you get started?
In the following blog, we present the beginner’s guide to KVM on Ubuntu.
What is KVM hypervisor?
KVM hypervisor enables full virtualisation capabilities. It provides each VM with all typical services of the physical system, including virtual BIOS (basic input/output system) and virtual hardware, such as processor, memory, storage, network cards, etc. As a result, every VM completely simulates a physical machine.
KVM is available as a Linux kernel module. It plugs directly into the kernel’s code and allows it to function as a hypervisor. Every VM runs as a separate Linux process under systemd, with dedicated virtual hardware resources attached. KVM can only be used on a processor with hardware virtualisation extensions, such as Intel-VT or AMD-V.
KVM hypervisor benefits
The main benefit of the KVM hypervisor is its native availability on Linux. Since KVM is part of Linux, it installs natively, enabling straightforward user experience and smooth integration. But KVM brings more benefits compared to other virtualisation technologies. Those include:
- Performance – One of the main drawbacks of traditional virtualisation technologies is performance degradation compared to physical machines. Since KVM is the type-1 hypervisor, it outperforms all type-2 hypervisors, ensuring near-metal performance. With KVM hypervisor VMs boot fast and achieve desired performance results.
- Scalability – As a Linux kernel module, the KVM hypervisor automatically scales to respond to heavy loads once the number of VMs increases. The KVM hypervisor also enables clustering for thousands of nodes, laying the foundations for cloud infrastructure implementation.
- Security – Since KVM is part of the Linux kernel source code, it benefits from the world’s biggest open source community collaboration, rigorous development and testing process as well as continuous security patching.
- Maturity – KVM was first created in 2006 and has continued to be actively developed since then. It is a 15-year old project, presenting a high level of maturity. More than 1,000 developers around the world have contributed to KVM code.
- Cost-efficiency – Last but not least, the cost is a driving factor for many organisations. Since KVM is open source and available as a Linux kernel module, it comes at zero cost out of the box. Businesses can optionally subscribe to various commercial programmes, such as UA-I (Ubuntu Advantage for Infrastructure) to receive enterprise support for their KVM-based virtualisation or cloud infrastructure.
How to install KVM on Ubuntu 20.04
In the following section, we present how to install KVM on Ubuntu 20.04 LTS in three simple steps.
Step 1: Install required packages
On your Ubuntu 20.04 execute the following command to install the required packages:
$ sudo apt -y install bridge-utils cpu-checker libvirt-clients libvirt-daemon qemu qemu-kvmStep 2: Check virtualisation capabilities
Execute the following command to make sure your processor supports virtualisation capabilities:
The output of this command is pretty straightforward and clearly indicates whether KVM can be used or not:
INFO: /dev/kvm exists KVM acceleration can be usedStep 3: Launch a VM
In order to launch your first Ubuntu Server 20.04 LTS instance on KVM execute the following command:
$ sudo virt-install --name ubuntu-guest --os-variant ubuntu20.04 --vcpus 2 --ram 2048 --location http://ftp.ubuntu.com/ubuntu/dists/focal/main/installer-amd64/ --network bridge=virbr0,model=virtio --graphics none --extra-args='console=ttyS0,115200n8 serial'This opens an interactive console that you can use to manually install the Ubuntu guest.
Virtualisation management software
In order to facilitate the management of VMs and provide a graphical user interface various types of management software are available for KVM. In the following section, we briefly present the most popular ones.
Virtual Machine Manager
Virtual Machine Manager is a desktop user interface for managing KVM VMs. It presents a summary view of running guest instances, their live performance and resource utilisation statistics. Virtual Machine Manager comes with wizards that enable the creation of new VMs and the configuration of their resource allocation and virtual hardware.
Multipass
Multipass is the recommended method to create Ubuntu VMs on workstations. It is designed for developers who want to quickly set up a fresh Ubuntu environment with just a single command. Multipass installs on Linux, Windows and macOS, and supports leading hypervisors, including KVM.
OpenStack
OpenStack is the most popular open source cloud computing platform that enables the management of distributed compute, network and storage resources in the data centre. It wraps around the KVM hypervisor providing virtualisation capabilities and enables fully automated provisioning of VMs through a self-service portal.
Next steps
Now, once you’ve learned what KVM hypervisor is and how to use it on Ubuntu, you may be wondering what next steps you should take. Here are some useful links that might help you on this journey.
Refer to Ubuntu Server documentation for more advanced scenarios and additional information about the different types of management software.
Learn more about OpenStack – the world’s leading open-source software for virtualisation management and cloud infrastructure implementation.
Ubuntu cloud
Ubuntu offers all the training, software infrastructure, tools, services and support you need for your public and private clouds.
Общие принципы работы QEMU-KVM

KVM (Kernel-based Virtual Machine) – гипервизор (VMM – Virtual Machine Manager), работающий в виде модуля на ОС Linux. Гипервизор нужен для того, чтобы запускать некий софт в несуществующей (виртуальной) среде и при этом, скрывать от этого софта реальное физическое железо, на котором этот софт работает. Гипервизор работает в роли «прокладки» между физическим железом (хостом) и виртуальной ОС (гостем).
Поскольку KVM является стандартным модулем ядра Linux, он получает от ядра все положенные ништяки (работа с памятью, планировщик и пр.). А соответственно, в конечном итоге, все эти преимущества достаются и гостям (т.к. гости работают на гипервизоре, которые работает на/в ядре ОС Linux).
KVM очень быстрый, но его самого по себе недостаточно для запуска виртуальной ОС, т.к. для этого нужна эмуляция I/O. Для I/O (процессор, диски, сеть, видео, PCI, USB, серийные порты и т.д.) KVM использует QEMU.
2) QEMU
QEMU (Quick Emulator) – эмулятор различных устройств, который позволяет запускать операционные системы, предназначенные под одну архитектуру, на другой (например, ARM –> x86). Кроме процессора, QEMU эмулирует различные периферийные устройства: сетевые карты, HDD, видео карты, PCI, USB и пр.
Инструкции/бинарный код (например, ARM) конвертируются в промежуточный платформонезависимый код при помощи конвертера TCG (Tiny Code Generator) и затем этот платформонезависимый бинарный код конвертируется уже в целевые инструкции/код (например, x86).
ARM –> промежуточный_код –> x86
По сути, вы можете запускать виртуальные машины на QEMU на любом хосте, даже со старыми моделями процессоров, не поддерживающими Intel VT-x (Intel Virtualization Technology) / AMD SVM (AMD Secure Virtual Machine). Однако в таком случае, это будет работать весьма медленно, в связи с тем, что исполняемый бинарный код нужно перекомпилировать на лету два раза, при помощи TCG (TCG – это Just-in-Time compiler).
Т.е. сам по себе QEMU мега крутой, но работает очень медленно.
3) Protection rings
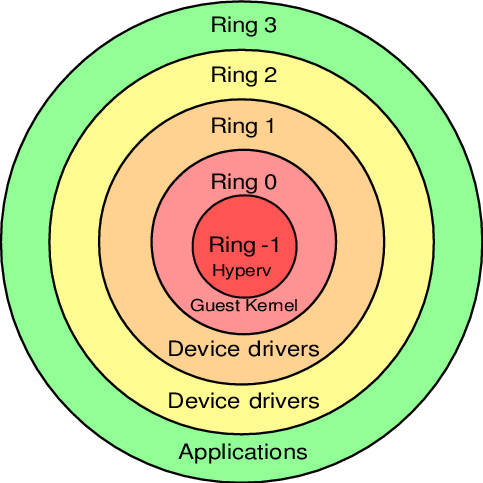
Бинарный программный код на процессорах работает не просто так, а располагается на разных уровнях (кольцах / Protection rings) с разными уровнями доступа к данным, от самого привилегированного (Ring 0), до самого ограниченного, зарегулированного и «с закрученными гайками» (Ring 3).
Операционная система (ядро ОС) работает на Ring 0 (kernel mode) и может делать с любыми данными и устройствами все, что угодно. Пользовательские приложения работают на уровне Ring 3 (user mode) и не в праве делать все, что захотят, а вместо этого каждый раз должны запрашивать доступ на проведение той или иной операции (таким образом, пользовательские приложения имеют доступ только к собственным данным и не могут «влезть» в «чужую песочницу»). Ring 1 и 2 предназначены для использования драйверами.
До изобретения Intel VT-x / AMD SVM, гипервизоры работали на Ring 0, а гости работали на Ring 1. Поскольку у Ring 1 недостаточно прав для нормального функционирования ОС, то при каждом привилегированном вызове от гостевой системы, гипервизору приходилось на лету модифицировать этот вызов и выполнять его на Ring 0 (примерно так, как это делает QEMU). Т.е. гостевой бинарный код НЕ выполнялся напрямую на процессоре, а каждый раз на лету проходил несколько промежуточных модификаций.
Накладные расходы были существенными и это было большой проблемой и тогда производители процессоров, независимо друг от друга, выпустили расширенный набор инструкций (Intel VT-x / AMD SVM), позволяющих выполнять код гостевых ОС НАПРЯМУЮ на процессоре хоста (минуя всякие затратные промежуточные этапы, как это было раньше).
С появлением Intel VT-x / AMD SVM, был создан специальный новый уровень Ring -1 (минус один). И теперь на нем работает гипервизор, а гости работают на Ring 0 и получают привилегированный доступ к CPU.
- хост работает на Ring 0
- гости работают на Ring 0
- гипервизор работает на Ring -1
4) QEMU-KVM
KVM предоставляет доступ гостям к Ring 0 и использует QEMU для эмуляции I/O (процессор, диски, сеть, видео, PCI, USB, серийные порты и т.д., которые «видят» и с которыми работают гости).
Отсюда QEMU-KVM (или KVM-QEMU) 🙂
P.S. Текст этой статьи изначально был опубликован в Telegram канале @RU_Voip в качестве ответа на вопрос одного из участников канала.
Напишите в комментариях, в каких местах я не правильно понимаю тему или если есть, что дополнить.