- Linux kernel release 6.x 
- What is Linux?
- On what hardware does it run?
- Documentation
- Installing the kernel source
- Software requirements
- Build directory for the kernel
- Configuring the kernel
- Compiling the kernel
- If something goes wrong
- How to install full kernel source on Debian or Ubuntu
- Install Full Kernel Source on Debian
- Install Full Kernel Source on Ubuntu
- Support Xmodulo
Linux kernel release 6.x 
These are the release notes for Linux version 6. Read them carefully, as they tell you what this is all about, explain how to install the kernel, and what to do if something goes wrong.
What is Linux?
Linux is a clone of the operating system Unix, written from scratch by Linus Torvalds with assistance from a loosely-knit team of hackers across the Net. It aims towards POSIX and Single UNIX Specification compliance.
It has all the features you would expect in a modern fully-fledged Unix, including true multitasking, virtual memory, shared libraries, demand loading, shared copy-on-write executables, proper memory management, and multistack networking including IPv4 and IPv6.
It is distributed under the GNU General Public License v2 — see the accompanying COPYING file for more details.
On what hardware does it run?
Although originally developed first for 32-bit x86-based PCs (386 or higher), today Linux also runs on (at least) the Compaq Alpha AXP, Sun SPARC and UltraSPARC, Motorola 68000, PowerPC, PowerPC64, ARM, Hitachi SuperH, Cell, IBM S/390, MIPS, HP PA-RISC, Intel IA-64, DEC VAX, AMD x86-64 Xtensa, and ARC architectures.
Linux is easily portable to most general-purpose 32- or 64-bit architectures as long as they have a paged memory management unit (PMMU) and a port of the GNU C compiler (gcc) (part of The GNU Compiler Collection, GCC). Linux has also been ported to a number of architectures without a PMMU, although functionality is then obviously somewhat limited. Linux has also been ported to itself. You can now run the kernel as a userspace application — this is called UserMode Linux (UML).
Documentation
- There is a lot of documentation available both in electronic form on the Internet and in books, both Linux-specific and pertaining to general UNIX questions. I’d recommend looking into the documentation subdirectories on any Linux FTP site for the LDP (Linux Documentation Project) books. This README is not meant to be documentation on the system: there are much better sources available.
- There are various README files in the Documentation/ subdirectory: these typically contain kernel-specific installation notes for some drivers for example. Please read the Documentation/process/changes.rst file, as it contains information about the problems, which may result by upgrading your kernel.
Installing the kernel source
- If you install the full sources, put the kernel tarball in a directory where you have permissions (e.g. your home directory) and unpack it:
xz -cd linux-6.x.tar.xz | tar xvf -
xz -cd ../patch-6.x.xz | patch -p1
Replace «x» for all versions bigger than the version «x» of your current source tree, in_order, and you should be ok. You may want to remove the backup files (some-file-name~ or some-file-name.orig), and make sure that there are no failed patches (some-file-name# or some-file-name.rej). If there are, either you or I have made a mistake. Unlike patches for the 6.x kernels, patches for the 6.x.y kernels (also known as the -stable kernels) are not incremental but instead apply directly to the base 6.x kernel. For example, if your base kernel is 6.0 and you want to apply the 6.0.3 patch, you must not first apply the 6.0.1 and 6.0.2 patches. Similarly, if you are running kernel version 6.0.2 and want to jump to 6.0.3, you must first reverse the 6.0.2 patch (that is, patch -R) before applying the 6.0.3 patch. You can read more on this in Documentation/process/applying-patches.rst . Alternatively, the script patch-kernel can be used to automate this process. It determines the current kernel version and applies any patches found:
linux/scripts/patch-kernel linux
Software requirements
Compiling and running the 6.x kernels requires up-to-date versions of various software packages. Consult Documentation/process/changes.rst for the minimum version numbers required and how to get updates for these packages. Beware that using excessively old versions of these packages can cause indirect errors that are very difficult to track down, so don’t assume that you can just update packages when obvious problems arise during build or operation.
Build directory for the kernel
When compiling the kernel, all output files will per default be stored together with the kernel source code. Using the option make O=output/dir allows you to specify an alternate place for the output files (including .config). Example:
kernel source code: /usr/src/linux-6.x build directory: /home/name/build/kernel
To configure and build the kernel, use:
cd /usr/src/linux-6.x make O=/home/name/build/kernel menuconfig make O=/home/name/build/kernel sudo make O=/home/name/build/kernel modules_install install
Please note: If the O=output/dir option is used, then it must be used for all invocations of make.
Configuring the kernel
Do not skip this step even if you are only upgrading one minor version. New configuration options are added in each release, and odd problems will turn up if the configuration files are not set up as expected. If you want to carry your existing configuration to a new version with minimal work, use make oldconfig , which will only ask you for the answers to new questions.
"make config" Plain text interface. "make menuconfig" Text based color menus, radiolists & dialogs. "make nconfig" Enhanced text based color menus. "make xconfig" Qt based configuration tool. "make gconfig" GTK+ based configuration tool. "make oldconfig" Default all questions based on the contents of your existing ./.config file and asking about new config symbols. "make olddefconfig" Like above, but sets new symbols to their default values without prompting. "make defconfig" Create a ./.config file by using the default symbol values from either arch/$ARCH/defconfig or arch/$ARCH/configs/$_defconfig, depending on the architecture. "make $_defconfig" Create a ./.config file by using the default symbol values from arch/$ARCH/configs/$_defconfig. Use "make help" to get a list of all available platforms of your architecture. "make allyesconfig" Create a ./.config file by setting symbol values to 'y' as much as possible. "make allmodconfig" Create a ./.config file by setting symbol values to 'm' as much as possible. "make allnoconfig" Create a ./.config file by setting symbol values to 'n' as much as possible. "make randconfig" Create a ./.config file by setting symbol values to random values. "make localmodconfig" Create a config based on current config and loaded modules (lsmod). Disables any module option that is not needed for the loaded modules. To create a localmodconfig for another machine, store the lsmod of that machine into a file and pass it in as a LSMOD parameter. Also, you can preserve modules in certain folders or kconfig files by specifying their paths in parameter LMC_KEEP. target$ lsmod > /tmp/mylsmod target$ scp /tmp/mylsmod host:/tmp host$ make LSMOD=/tmp/mylsmod \ LMC_KEEP="drivers/usb:drivers/gpu:fs" \ localmodconfig The above also works when cross compiling. "make localyesconfig" Similar to localmodconfig, except it will convert all module options to built in (=y) options. You can also preserve modules by LMC_KEEP. "make kvm_guest.config" Enable additional options for kvm guest kernel support. "make xen.config" Enable additional options for xen dom0 guest kernel support. "make tinyconfig" Configure the tiniest possible kernel.
- Having unnecessary drivers will make the kernel bigger, and can under some circumstances lead to problems: probing for a nonexistent controller card may confuse your other controllers.
- A kernel with math-emulation compiled in will still use the coprocessor if one is present: the math emulation will just never get used in that case. The kernel will be slightly larger, but will work on different machines regardless of whether they have a math coprocessor or not.
- The «kernel hacking» configuration details usually result in a bigger or slower kernel (or both), and can even make the kernel less stable by configuring some routines to actively try to break bad code to find kernel problems ( kmalloc() ). Thus you should probably answer ‘n’ to the questions for «development», «experimental», or «debugging» features.
Compiling the kernel
- Make sure you have at least gcc 5.1 available. For more information, refer to Documentation/process/changes.rst .
- Do a make to create a compressed kernel image. It is also possible to do make install if you have lilo installed to suit the kernel makefiles, but you may want to check your particular lilo setup first. To do the actual install, you have to be root, but none of the normal build should require that. Don’t take the name of root in vain.
- If you configured any of the parts of the kernel as modules , you will also have to do make modules_install .
- Verbose kernel compile/build output: Normally, the kernel build system runs in a fairly quiet mode (but not totally silent). However, sometimes you or other kernel developers need to see compile, link, or other commands exactly as they are executed. For this, use «verbose» build mode. This is done by passing V=1 to the make command, e.g.:
If something goes wrong
If you have problems that seem to be due to kernel bugs, please follow the instructions at ‘ Reporting issues ‘.
Hints on understanding kernel bug reports are in ‘ Bug hunting ‘. More on debugging the kernel with gdb is in ‘ Debugging kernel and modules via gdb ‘ and ‘ Using kgdb, kdb and the kernel debugger internals ‘.
How to install full kernel source on Debian or Ubuntu
Question: I need to download and install a full kernel source tree to compile a custom kernel for my Debian or Ubuntu system. What is a proper way to download full kernel source on Debian or Ubuntu?
Before installing full kernel source on your Linux system, ask yourself whether you really need the full kernel source. If you are trying to compile a kernel module or a custom driver for your kernel, you do not need the full kernel source. You only need to install matching kernel header files, and that’s it.
You need the full kernel source tree only if you want to build a custom kernel after modifying the kernel code in any way and/or tweaking default kernel options.
Here is how to download and install full kernel source tree from Debian or Ubuntu repositories. While you can download the official kernel source code from https://www.kernel.org/pub/linux/kernel/, using distro’s repositories allows you to download a kernel source with the maintainer’s patches applied to it.
Install Full Kernel Source on Debian
Before downloading kernel source, install dpkg-dev , which contains a suite of development tools needed to build Debian source packages. Among other things, dpkg-dev contains dpgk-source tool which can extract a Debian source package and automatically apply patches.
$ sudo apt-get install dpkg-dev
Next, run the following command to download full kernel source.
$ apt-get source linux-image-$(uname -r)
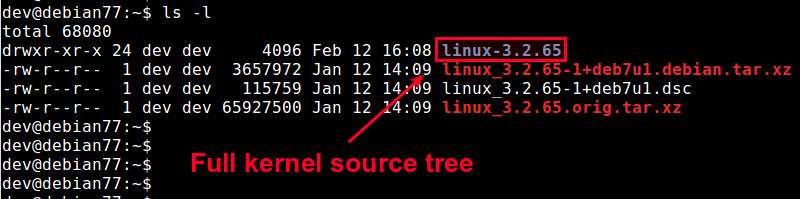
Along with the full kernel source ( linux_X.X.XX.orig.tar.xz ), any available kernel patches ( linux_X.X.X+XXX.debian.tar.xz ) and source control file ( linux_XXXX.dsc ) will also be downloaded and stored in the current directory. The .dsc file instructs how the patches are applied to the kernel sources.
Upon the completion of download, the above command will automatically invoke dpkg-source tool, which will unpack the downloaded kernel source in the current directory, and apply downloaded patches according to .dsc file.
The final full kernel source tree will be available in the current directory as linux-X.X.XX .
Install Full Kernel Source on Ubuntu
If you want to install full kernel source, the Debian way described above should work on Ubuntu as well.
There is another way to download full kernel source on Ubuntu. You can actually check out the kernel source tree maintained by Canonical for different Ubuntu releases.
$ sudo apt-get install git $ git clone git://kernel.ubuntu.com/ubuntu/ubuntu-$(lsb_release --codename | cut -f2).git
For example, if you are using Ubuntu 14.04, the above command will check out code from » ubuntu-trusty » Git repository.

Once you check out the Git repository, use the following command to install necessary development packages to meet the build dependencies for the kernel source tree.
$ sudo apt-get build-dep linux-image-$(uname -r)
Support Xmodulo
This website is made possible by minimal ads and your gracious donation via PayPal or credit card
Please note that this article is published by Xmodulo.com under a Creative Commons Attribution-ShareAlike 3.0 Unported License. If you would like to use the whole or any part of this article, you need to cite this web page at Xmodulo.com as the original source.