- Disable Spectre and Meltdown mitigations
- 3 Answers 3
- Beware: Spectre proof-of-concept exploits can run in browser JavaScript
- 5. Настройка параметров ядра#
- 5.1. Обновление загрузчика и отключение ненужных заплаток#
- 5.1.1. Разъяснения#
- Настройка параметров ядра#
- Обновление загрузчика и отключение ненужных заплаток#
- Разъяснения#
- How to disable mitigations for CPU vulnerabilities
Disable Spectre and Meltdown mitigations
Can I disable Spectre and Meltdown mitigation features in Ubuntu 18.04LTS? I want to test how much more performance I gain when I disable these two features in Linux, and if the performance is big, to make it permanently.
3 Answers 3
A number of kernel boot parameters are available to disable or fine-tune hardware vulnerability mitigations:
- for Spectre v1 and v2: nospectre_v1 (x86, PowerPC), nospectre_v2 (x86, PowerPC, S/390, ARM64), spectre_v2_user=off (x86)
- for SSB: spec_store_bypass_disable=off (x86, PowerPC), ssbd=force-off (ARM64)
- for L1TF: l1tf=off (x86)
- for MDS: mds=off (x86)
- for TAA: tsx_async_abort=off
- for iTLB multihit: kvm.nx_huge_pages=off
- for SRBDS: srbds=off
- for retbleed: retbleed=off
- KPTI can be disabled with nopti (x86, PowerPC) or kpti=0 (ARM64)
A meta-parameter, mitigations , was introduced in 5.2 and back-ported to 5.1.2, 5.0.16, and 4.19.43 (and perhaps others). It can be used to control all mitigations, on all architectures, as follows:
- mitigations=off will disable all optional CPU mitigations;
- mitigations=auto (the default setting) will mitigate all known CPU vulnerabilities, but leave SMT enabled (if it is already);
- mitigations=auto,nosmt will mitigate all known CPU vulnerabilities and disable SMT if appropriate.
Some of these can be toggled at runtime; see the linked documentation for details.
With a kernel 5.1.13 or newer :
On boot parameter you can use
With a kernel older than 5.1.13 :
noibrs noibpb nopti nospectre_v2 nospectre_v1 l1tf=off nospec_store_bypass_disable no_stf_barrier mds=off mitigations=off Add either mitigations=off or that long one-liner to your /etc/sysconfig/grub and re-generate grub’s configuration file with
(your distributions procedure will vary).
Debian/Ubuntu derived distributions:
Edit the file /etc/default/grub then run
I notice you have mitigations=off in that long one-liner. Is that going to do anything on older kernels?
In CentOS 7 and probably all Red Hat distros, you should use sudo grub2-mkconfig -o /boot/grub2/grub.cfg to properly update and apply these grub changes properly.
On Fedora 37, with a sufficiently new kernel, mitigations status can be displayed by printing the content of files under /sys/devices/system/cpu/vulnerabilities/ .
$ grep . /sys/devices/system/cpu/vulnerabilities/* /sys/devices/system/cpu/vulnerabilities/itlb_multihit:KVM: Mitigation: VMX disabled /sys/devices/system/cpu/vulnerabilities/l1tf:Not affected /sys/devices/system/cpu/vulnerabilities/mds:Not affected /sys/devices/system/cpu/vulnerabilities/meltdown:Not affected /sys/devices/system/cpu/vulnerabilities/mmio_stale_data:Mitigation: Clear CPU buffers; SMT vulnerable /sys/devices/system/cpu/vulnerabilities/retbleed:Mitigation: Enhanced IBRS /sys/devices/system/cpu/vulnerabilities/spec_store_bypass:Mitigation: Speculative Store Bypass disabled via prctl /sys/devices/system/cpu/vulnerabilities/spectre_v1:Mitigation: usercopy/swapgs barriers and __user pointer sanitization /sys/devices/system/cpu/vulnerabilities/spectre_v2:Mitigation: Enhanced IBRS, IBPB: conditional, RSB filling, PBRSB-eIBRS: SW sequence /sys/devices/system/cpu/vulnerabilities/srbds:Mitigation: Microcode /sys/devices/system/cpu/vulnerabilities/tsx_async_abort:Not affected To disable the mitigations in one swoop, do
sudo grubby --update-kernel=ALL --args="mitigations=off" and behold how the printout changed after a reboot
$ grep . /sys/devices/system/cpu/vulnerabilities/* /sys/devices/system/cpu/vulnerabilities/itlb_multihit:KVM: Mitigation: VMX disabled /sys/devices/system/cpu/vulnerabilities/l1tf:Not affected /sys/devices/system/cpu/vulnerabilities/mds:Not affected /sys/devices/system/cpu/vulnerabilities/meltdown:Not affected /sys/devices/system/cpu/vulnerabilities/mmio_stale_data:Vulnerable /sys/devices/system/cpu/vulnerabilities/retbleed:Vulnerable /sys/devices/system/cpu/vulnerabilities/spec_store_bypass:Vulnerable /sys/devices/system/cpu/vulnerabilities/spectre_v1:Vulnerable: __user pointer sanitization and usercopy barriers only; no swapgs barriers /sys/devices/system/cpu/vulnerabilities/spectre_v2:Vulnerable, IBPB: disabled, STIBP: disabled, PBRSB-eIBRS: Vulnerable /sys/devices/system/cpu/vulnerabilities/srbds:Vulnerable /sys/devices/system/cpu/vulnerabilities/tsx_async_abort:Not affected Beware: Spectre proof-of-concept exploits can run in browser JavaScript
As the leaky.page proof-of-concept demonstrates, this vulnerability can be exploited from browser JavaScript code. Therefore, as long as you use a web browser, there is value in keeping the mitigations on.
5. Настройка параметров ядра#
5.1. Обновление загрузчика и отключение ненужных заплаток#
По умолчанию в ядре Linux включено довольно много исправлений безопасности, которые однако существенно снижают производительность процессора. Вы можете их отключить через редактирование параметров загрузчика. Рассмотрим на примере GRUB:
sudo nano /etc/default/grub # Редактируем настройки вручную или через grub-customizer как на изображении:
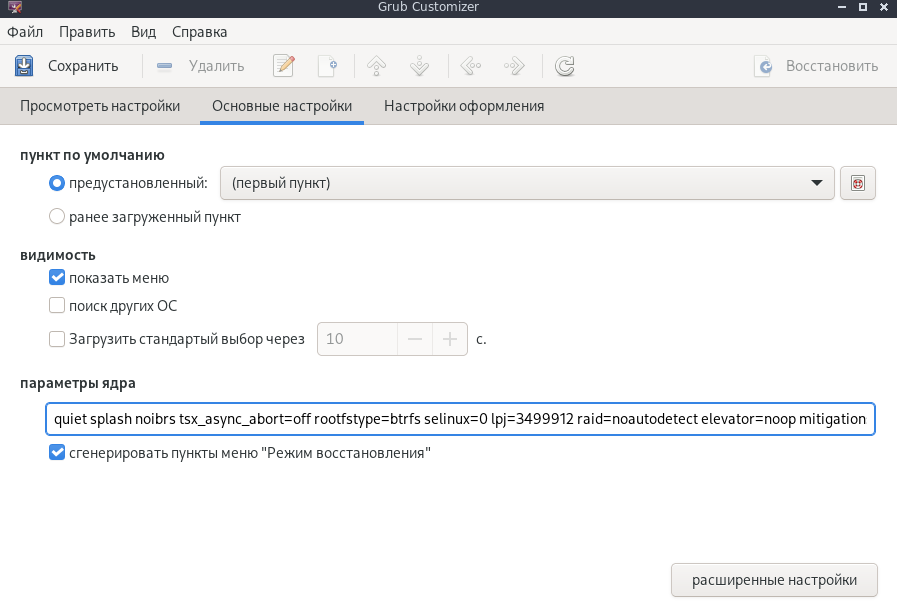
GRUB_CMDLINE_LINUX_DEFAULT="quiet splash rootfstype=btrfs lpj=3499912 raid=noautodetect mitigations=off preempt=none nowatchdog audit=0 page_alloc.shuffle=1 split_lock_detect=off pci=pcie_bus_perf"
sudo grub-mkconfig -o /boot/grub/grub.cfg # Обновляем загрузчик, можно так же сделать через grub-customizer, добавить и прожать, затем сохранить на 2 и 1 вкладке.
5.1.1. Разъяснения#
lpj= — Уникальный параметр для каждой системы. Его значение автоматически определяется во время загрузки, что довольно трудоемко, поэтому лучше задать вручную. Определить ваше значение для lpj можно через следующую команду: sudo dmesg | grep «lpj=»
mitigations=off — Непосредственно отключает все заплатки безопасности ядра (включая Spectre и Meltdown). Подробнее об этом написано здесь.
raid=noautodetect — Отключает проверку на RAID во время загрузки. Если вы его используете — НЕ прописывайте данный параметр.
rootfstype=btrfs — Здесь указываем название файловой системы в которой у вас отформатирован корень.
nowatchdog — Отключает сторожевые таймеры. Позволяет избавиться от заиканий в онлайн играх.
page_alloc.shuffle=1 — Этот параметр рандомизирует свободные списки распределителя страниц. Улучшает производительность при работе с ОЗУ с очень быстрыми накопителями (NVMe, Optane). Подробнее тут.
split_lock_detect=off — Отключаем раздельные блокировки шины памяти. Одна инструкция с раздельной блокировкой может занимать шину памяти в течение примерно 1 000 тактов, что может приводить к кратковременным зависаниям системы.
pci=pcie_bus_perf — Увеличивает значение Max Payload Size (MPS) для родительской шины PCI Express. Это даёт лучшую пропускную способность, т. к. некоторые устройства могут использовать значение MPS/MRRS выше родительской шины. Больше подробностей здесь (англ.):
Настройка параметров ядра#
Обновление загрузчика и отключение ненужных заплаток#
По умолчанию в ядре Linux включено довольно много исправлений безопасности, которые однако существенно снижают производительность процессора. Вы можете их отключить через редактирование параметров загрузчика. Рассмотрим на примере GRUB:
sudo nano /etc/default/grub # Редактируем настройки вручную или через grub-customizer как на изображении:

GRUB_CMDLINE_LINUX_DEFAULT="quiet splash rootfstype=btrfs lpj=3499912 raid=noautodetect elevator=noop mitigations=off preempt=none nowatchdog audit=0"
sudo grub-mkconfig -o /boot/grub/grub.cfg # Обновляем загрузчик, можно так же сделать через grub-customizer, добавить и прожать, затем сохранить на 2 и 1 вкладке.
Разъяснения#
lpj= — Уникальный параметр для каждой системы. Его значение автоматически определяется во время загрузки, что довольно трудоемко, поэтому лучше задать вручную. Определить ваше значение для lpj можно через следующую команду: sudo dmesg | grep «lpj=»
mitigations=off — Непосредственно отключает все заплатки безопасности ядра (включая Spectre и Meltdown). Подробнее об этом написано здесь.
raid=noautodetect — Отключает проверку на RAID во время загрузки. Если вы его используете — НЕ прописывайте данный параметр.
rootfstype=btrfs — Здесь указываем название файловой системы в которой у вас отформатирован корень.
elevator=noop — Указывает для всех дисков планировщик ввода NONE. Не использовать если у вас жесткий диск.
nowatchdog — Отключает сторожевые таймеры. Позволяет избавиться от заиканий в онлайн играх.
How to disable mitigations for CPU vulnerabilities
Inspect kernel parameters for detailed information.
mitigations= [X86,PPC,S390,ARM64] Control optional mitigations for CPU vulnerabilities. This is a set of curated, arch-independent options, each of which is an aggregation of existing arch-specific options. off Disable all optional CPU mitigations. This improves system performance, but it may also expose users to several CPU vulnerabilities. Equivalent to: nopti [X86,PPC] kpti=0 [ARM64] nospectre_v1 [X86,PPC] nobp=0 [S390] nospectre_v2 [X86,PPC,S390,ARM64] spectre_v2_user=off [X86] spec_store_bypass_disable=off [X86,PPC] ssbd=force-off [ARM64] l1tf=off [X86] mds=off [X86] tsx_async_abort=off [X86] kvm.nx_huge_pages=off [X86] Exceptions: This does not have any effect on kvm.nx_huge_pages when kvm.nx_huge_pages=force. auto (default) Mitigate all CPU vulnerabilities, but leave SMT enabled, even if it's vulnerable. This is for users who don't want to be surprised by SMT getting disabled across kernel upgrades, or who have other ways of avoiding SMT-based attacks. Equivalent to: (default behavior) auto,nosmt Mitigate all CPU vulnerabilities, disabling SMT if needed. This is for users who always want to be fully mitigated, even if it means losing SMT. Equivalent to: l1tf=flush,nosmt [X86] mds=full,nosmt [X86] tsx_async_abort=full,nosmt [X86]
Update GRUB configuration.
Sourcing file `/etc/default/grub' Sourcing file `/etc/default/grub.d/init-select.cfg' Generating grub configuration file . Found linux image: /boot/vmlinuz-5.4.0-14-generic Found initrd image: /boot/initrd.img-5.4.0-14-generic Found linux image: /boot/vmlinuz-5.4.0-9-generic Found initrd image: /boot/initrd.img-5.4.0-9-generic Found memtest86+ image: /memtest86+.elf Found memtest86+ image: /memtest86+.bin done
Inspect applied mitigations.
Architecture: x86_64 CPU op-mode(s): 32-bit, 64-bit Byte Order: Little Endian Address sizes: 39 bits physical, 48 bits virtual CPU(s): 4 On-line CPU(s) list: 0-3 Thread(s) per core: 1 Core(s) per socket: 4 Socket(s): 1 NUMA node(s): 1 Vendor ID: GenuineIntel CPU family: 6 Model: 60 Model name: Intel(R) Core(TM) i5-4570S CPU @ 2.90GHz Stepping: 3 CPU MHz: 1200.788 CPU max MHz: 3600.0000 CPU min MHz: 800.0000 BogoMIPS: 5786.81 Virtualization: VT-x L1d cache: 128 KiB L1i cache: 128 KiB L2 cache: 1 MiB L3 cache: 6 MiB NUMA node0 CPU(s): 0-3 Vulnerability Itlb multihit: KVM: Vulnerable Vulnerability L1tf: Mitigation; PTE Inversion; VMX vulnerable, SMT disabled Vulnerability Mds: Vulnerable; SMT disabled Vulnerability Meltdown: Vulnerable Vulnerability Spec store bypass: Vulnerable Vulnerability Spectre v1: Vulnerable: __user pointer sanitization and usercopy barriers only; no swapgs barriers Vulnerability Spectre v2: Vulnerable, IBPB: disabled, STIBP: disabled Vulnerability Tsx async abort: Not affected Flags: fpu vme de pse tsc msr pae mce cx8 apic sep mtrr pge mca cmov pat pse36 clflush dts acpi mmx fxsr sse s se2 ss ht tm pbe syscall nx pdpe1gb rdtscp lm constant_tsc arch_perfmon pebs bts rep_good nopl xtopolog y nonstop_tsc cpuid aperfmperf pni pclmulqdq dtes64 monitor ds_cpl vmx smx est tm2 ssse3 sdbg fma cx16 xtpr pdcm pcid sse4_1 sse4_2 x2apic movbe popcnt tsc_deadline_timer aes xsave avx f16c rdrand lahf_lm a bm cpuid_fault epb invpcid_single ssbd ibrs ibpb stibp tpr_shadow vnmi flexpriority ept vpid ept_ad fsg sbase tsc_adjust bmi1 avx2 smep bmi2 erms invpcid xsaveopt dtherm ida arat pln pts md_clear flush_l1d
Follow me on Mastodon , check out source code ad GitHub