how to install ‘version.h’ in ubuntu ?
Just now , I try to install the Jungo WinDriver in the Ubuntu 13.10 . But I am puzzled by the its manual of how to Install version.h :
Install version.h: The file version.h is created when you first compile the Linux kernel source code. Some distributions provide a compiled kernel without the file version.h. Look under /usr/src/linux/include/linux to see whether you have this file. If you do not, follow these steps: Become super user: $ su Change directory to the Linux source directory: # cd /usr/src/linux Type: # make xconfig Save the configuration by choosing Save and Exit. Type: # make dep Exit super user mode: # exit /usr/src/windriver/redist# ./configure --with-kernel-source=/usr/src/linux-headers-3.11.0.12-generic USE_KBUILD = yes checking for cpu architecture. x86_64 checking for WinDriver root directory. /usr/src/WinDriver checking for linux kernel source. found at /usr/src/linux checking for lib directory. ln -sf $(ROOT_DIR)/lib/$(SHARED_OBJECT)_32.so /usr/lib/$(SHARED_OBJECT).so; ln -s /usr/lib /usr/lib64; ln -sf $(ROOT_DIR)/lib/$(SHARED_OBJECT).so /usr/lib64/$(SHARED_OBJECT).so checking which directories to include. -I/usr/src/linux/include checking linux kernel version. 3.11.10.6 checking for modules installation directory. /lib/modules/3.11.0-12-generic/kernel/drivers/misc checking output directory. LINUX.3.11.0-12-generic.x86_64 checking target. LINUX.3.11.0-12-generic.x86_64/windrvr6_usb.ko checking for regparm kernel option. find: `/usr/src/WinDriver/redist/.tmp_driver/.tmp_versions': No such file or directory 0 checking for modpost location. /usr/src/linux/scripts/mod/modpost configure.usb: creating ./config.status config.status: creating makefile.usb.kbuild checking for cpu architecture. x86_64 checking for WinDriver root directory. /usr/src/WinDriver checking for linux kernel source. found at /usr/src/linux checking for lib directory. ln -sf $(ROOT_DIR)/lib/$(SHARED_OBJECT)_32.so /usr/lib/$(SHARED_OBJECT).so; ln -s /usr/lib /usr/lib64; ln -sf $(ROOT_DIR)/lib/$(SHARED_OBJECT).so /usr/lib64/$(SHARED_OBJECT).so checking which directories to include. -I/usr/src/linux/include checking linux kernel version. 3.11.10.6 checking for modules installation directory. /lib/modules/3.11.0-12-generic/kernel/drivers/misc checking output directory. LINUX.3.11.0-12-generic.x86_64 checking target. LINUX.3.11.0-12-generic.x86_64/windrvr6.ko checking for regparm kernel option. find: `/usr/src/WinDriver/redist/.tmp_driver/.tmp_versions': No such file or directory 0 checking for right linked object. windrvr_gcc_v3.a checking for modpost location. /usr/src/linux/scripts/mod/modpost configure.wd: creating ./config.status config.status: creating makefile.wd.kbuild How to Install Kernel Headers in Ubuntu and Debian
In our last article, we have explained how to install kernel headers in CentOS 7. Kernel Headers contain the C header files for the Linux kernel, which offers the various function and structure definitions required when compiling any code that interfaces with the kernel, such as kernel modules or device drivers and some user programs.
It is very important to note that the kernel headers package you install should match with the currently installed kernel version on your system. If your kernel version ships with the default distribution installation or you have upgraded your Kernel using dpkg or apt package manager from the Ubuntu or Debian base repositories, then you must install matching kernel headers using package manager only. And if you’ve compiled kernel from sources, you must also install kernel headers from sources.
In this article, we will explain how to install Kernel Headers in Ubuntu and Debian Linux distributions using default package manager.
Install Kernel Headers in Ubuntu and Debian
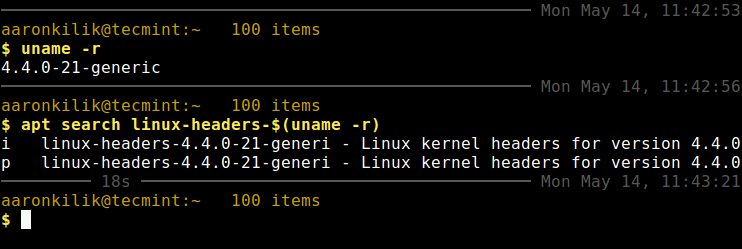
First check your installed kernel version as well as kernel header package that matches your kernel version using following commands.
$ uname -r $ apt search linux-headers-$(uname -r)
On Debian, Ubuntu and their derivatives, all kernel header files can be found under /usr/src directory. You can check if the matching kernel headers for your kernel version are already installed on your system using the following command.
$ ls -l /usr/src/linux-headers-$(uname -r)
From the above output, it’s clear that the matching kernel header directory doesn’t exist, meaning the package is not yet installed.
Before you can install the appropriate kernel headers, update your packages index, in order to grab information about the latest package releases, using the following command.
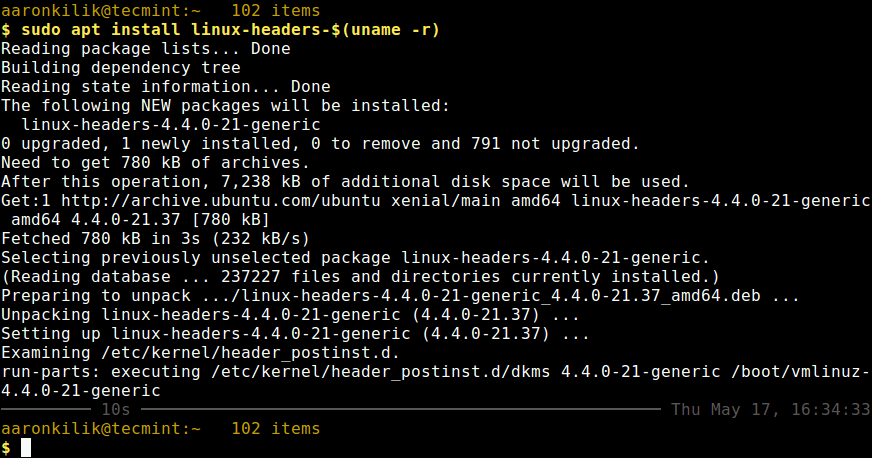
Then run the following command that follows to install the Linux Kernel headers package for your kernel version.
$ sudo apt install linux-headers-$(uname -r)
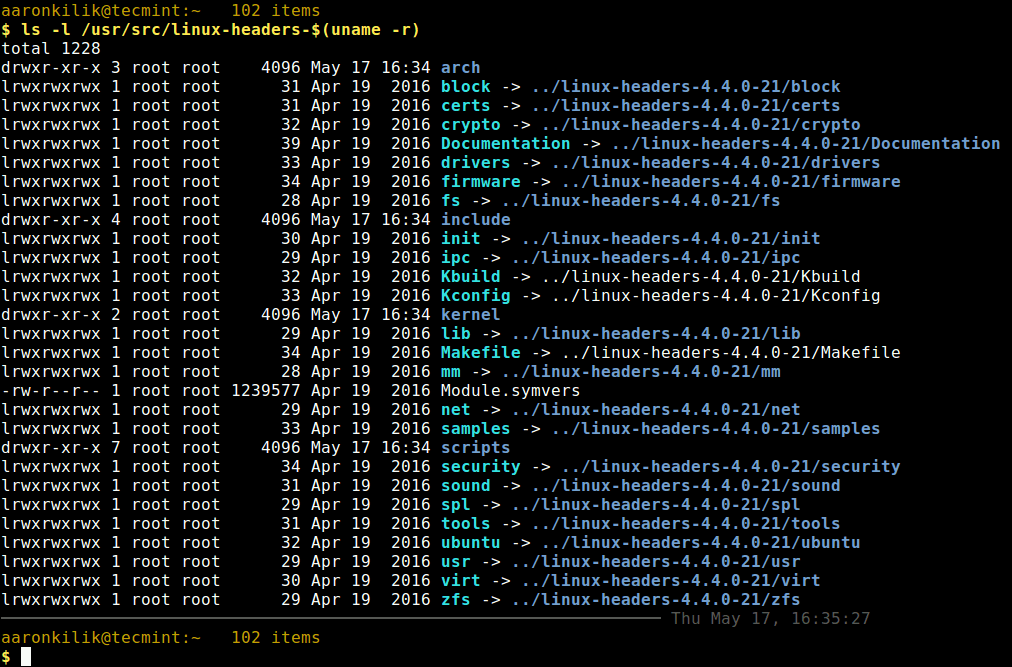
Next, check if the matching kernel headers have been installed on your system using the following command
$ ls -l /usr/src/linux-headers-$(uname -r)
That’s all! In this article, we have explained how to install kernel headers in Ubuntu and Debian Linux and other distributions in the Debian family tree.
Always keep in mind that to compile a kernel module, you will need the Linux kernel headers. If you have any quires, or thoughts to share, use the comment form below to reach us.
Linux kernel header files to match the current kernel
I’ve seen a few questions about linux-headers packages but couldn’t find anything to address my specific issue. I’m on Kubuntu 16.04, and I got the following error (from VirtualBox):
Please install the Linux kernel «header» files matching the current kernel for adding new hardware support to the system. The distribution packages containing the headers are probably: linux-headers-generic linux-headers-4.13.0-43-generic
I was surprised to see that linux-headers-generic was not installed, although I’m not really sure if it’s supposed to be there by default. In any case, while the kernel is 4.13.0-43-generic, the corresponding headers are, indeed, not installed:
$ uname -r 4.13.0-43-generic $ aptitude search linux-headers | grep ^i id linux-headers-4.13.0-32 - Header files related to Linux kernel versi id linux-headers-4.13.0-32-generic - Linux kernel headers for version 4.13.0 on i A linux-headers-4.13.0-37 - Header files related to Linux kernel versi i A linux-headers-4.13.0-37-generic - Linux kernel headers for version 4.13.0 on i A linux-headers-4.13.0-38 - Header files related to Linux kernel versi i A linux-headers-4.13.0-38-generic - Linux kernel headers for version 4.13.0 on i A linux-headers-4.13.0-39 - Header files related to Linux kernel versi i A linux-headers-4.13.0-39-generic - Linux kernel headers for version 4.13.0 on The linux-headers-generic «will always depend on the latest generic kernel headers available», so I thought that installing it would install the latest packages (in this case, linux-headers-4.13.0-43-generic as required by VirtualBox) and keep them up to date. However, if I try that, I’m asked to install what appear to be really old packages:
$ sudo aptitude install linux-headers-generic The following NEW packages will be installed: linux-headers-4.4.0-127 linux-headers-4.4.0-127-generic linux-headers-generic 0 packages upgraded, 3 newly installed, 0 to remove and 0 not upgraded. Need to get 10.8 MB of archives. After unpacking 78.4 MB will be used. - Should either of the linux-headers-generic packages have been there by default? Which one?
- Do I need to install either of them in my case?
- If I install the necessary linux-headers-4.13.0-43-generic package directly, what happens when the kernel is upgraded?
How to create /usr/src/linux-headers- files
I am trying to compile a custom kernel for Nvidia’s Jetson TK1 board, and it seems that as well as the kernel itself (zImage) I will need /usr/src/linux-headers-
Not at my computer until tomorrow, but the output is basically completely different. No commonality whatsoever as far as I could see.
How do I install kernel header files?
You should be able to install the kernel header files for the currently running kernel by running the following in a terminal:
sudo apt-get install linux-headers-$(uname -r) In general, the kernel header packages are named linux-header-* where «*» indicates the version & variant (generic, server, etc.).
hey thanks but could you tell me what does generic, server, etc means i want to write (kernel driver)
This won’t install the headers for future updates automatically and you’ll have to re-run this command every time. Therefore, it’s recommended to install the metapackage instead, as described in another answer.
sudo apt-get install linux-headers-generic if you are on a Desktop installation. The apt-get will solve the dependencies and install the correct version of kernel headers.
In Debian Wheezy I get the error message «Package linux-headers-generic is not available, but is referred to by another package. [. ] E: Package ‘linux-headers-generic’ has no installation candidate»
@IQAndreas the linux-headers-generic package is ubuntu specific. On Debian you should use sudo apt-get install linux-headers-$(uname -r)
I have linux-headers-generic installed on 18.04 but still don’t have the headers for the newest and current kernel version. Maybe it’s just a bug with this version, I’ve compiled kernel modules in earlier versions so I must’ve had the correct headers back then.
Case of Obsolete kernel package
This should cover another problem when: the currently running kernel is obsolete, meaning it’s not in the repository anymore neither its headers. So the best thing to do is to update the kernel to last version in the repository.
linux-generic is a meta package to keep current version of the kernel & its headers:
sudo apt-get update sudo apt-get install linux-generic Note: Depending on your Ubuntu edition, See if you need linux-lowlatency (Ubuntu Studio), linux-signed-generic or linux-virtual .


