- Linux kernel virtual machines
- Checking support for KVM
- Hardware support
- Kernel support
- Para-virtualization with Virtio
- Kernel support
- List of para-virtualized devices
- How to use KVM
- Tips and tricks
- Nested virtualization
- Enabling huge pages
- Secure Boot
- See also
- Общие принципы работы QEMU-KVM
- 2) QEMU
- 3) Protection rings
- 4) QEMU-KVM
Linux kernel virtual machines
KVM, Kernel-based Virtual Machine, is a hypervisor built into the Linux kernel. It is similar to Xen in purpose but much simpler to get running. Unlike native QEMU, which uses emulation, KVM is a special operating mode of QEMU that uses CPU extensions (HVM) for virtualization via a kernel module.
Using KVM, one can run multiple virtual machines running unmodified GNU/Linux, Windows, or any other operating system. (See Guest Support Status [dead link 2023-06-17 ⓘ] for more information.) Each virtual machine has private virtualized hardware: a network card, disk, graphics card, etc.
Differences between KVM and Xen, VMware, or QEMU can be found at the KVM FAQ [dead link 2023-06-17 ⓘ] .
This article does not cover features common to multiple emulators using KVM as a backend. You should see related articles for such information.
Checking support for KVM
Hardware support
KVM requires that the virtual machine host’s processor has virtualization support (named VT-x for Intel processors and AMD-V for AMD processors). You can check whether your processor supports hardware virtualization with the following command:
$ LC_ALL=C lscpu | grep Virtualization
$ grep -E --color=auto 'vmx|svm|0xc0f' /proc/cpuinfo
If nothing is displayed after running either command, then your processor does not support hardware virtualization, and you will not be able to use KVM.
Note: You may need to enable virtualization support in your BIOS. All x86_64 processors manufactured by AMD and Intel in the last 10 years support virtualization. If it looks like your processor does not support virtualization, it is almost certainly turned off in the BIOS.
Kernel support
Arch Linux kernels provide the required kernel modules to support KVM.
- One can check if the necessary modules, kvm and either kvm_amd or kvm_intel , are available in the kernel with the following command:
$ zgrep CONFIG_KVM /proc/config.gz
The module is available only if it is set to either y or m .
kvm_intel 245760 0 kvmgt 28672 0 mdev 20480 2 kvmgt,vfio_mdev vfio 32768 3 kvmgt,vfio_mdev,vfio_iommu_type1 kvm 737280 2 kvmgt,kvm_intel irqbypass 16384 1 kvm
If the command returns nothing, the module needs to be loaded manually; see Kernel modules#Manual module handling.
Tip: If modprobing kvm_intel or kvm_amd fails but modprobing kvm succeeds, and lscpu claims that hardware acceleration is supported, check the BIOS settings. Some vendors, especially laptop vendors, disable these processor extensions by default. To determine whether there is no hardware support or whether the extensions are disabled in BIOS, the output from dmesg after having failed to modprobe will tell.
Para-virtualization with Virtio
Para-virtualization provides a fast and efficient means of communication for guests to use devices on the host machine. KVM provides para-virtualized devices to virtual machines using the Virtio API as a layer between the hypervisor and guest.
All Virtio devices have two parts: the host device and the guest driver.
Kernel support
Use the following command to check if the VIRTIO modules are available in the kernel inside the virtual machine:
$ zgrep VIRTIO /proc/config.gz
Then, check if the kernel modules are automatically loaded with the command:
In case the above commands return nothing, you need to load the kernel modules manually.
List of para-virtualized devices
- network device (virtio-net)
- block device (virtio-blk)
- controller device (virtio-scsi)
- serial device (virtio-serial)
- balloon device (virtio-balloon)
How to use KVM
Tips and tricks
Nested virtualization
Nested virtualization enables existing virtual machines to be run on third-party hypervisors and on other clouds without any modifications to the original virtual machines or their networking.
On host, enable nested feature for kvm_intel :
# modprobe -r kvm_intel # modprobe kvm_intel nested=1
/etc/modprobe.d/kvm_intel.conf
options kvm_intel nested=1
Verify that feature is activated:
$ systool -m kvm_intel -v | grep nested
Enable the «host passthrough» mode to forward all CPU features to the guest system:
- If using QEMU, run the guest virtual machine with the following command: qemu-system-x86_64 -enable-kvm -cpu host .
- If using virt-manager, change the CPU model to host-passthrough .
- If using virsh, use virsh edit vm-name and change the CPU line to
Boot the virtual machine and check if the vmx flag is present:
$ grep -E --color=auto 'vmx|svm' /proc/cpuinfo
Enabling huge pages
This article or section is a candidate for merging with QEMU.
Notes: qemu-kvm no longer exists. After the above issue is cleared, I suggest merging this section into QEMU. (Discuss in Talk:KVM)
You may also want to enable hugepages to improve the performance of your virtual machine. With an up to date Arch Linux and a running KVM, you probably already have everything you need. Check if you have the directory /dev/hugepages . If not, create it. Now we need the right permissions to use this directory. The default permission is root’s uid and gid with 0755, but we want anyone in the kvm group to have access to hugepages.
hugetlbfs /dev/hugepages hugetlbfs mode=01770,gid=kvm 0 0
Instead of specifying the group name directly, with gid=kvm , you can of course specify the gid as a number, but it must match the kvm group. The mode of 1770 allows anyone in the group to create files but not unlink or rename each other’s files. Make sure /dev/hugepages is mounted properly:
# umount /dev/hugepages # mount /dev/hugepages $ mount | grep huge
hugetlbfs on /dev/hugepages type hugetlbfs (rw,relatime,mode=1770,gid=78)
Now you can calculate how many hugepages you need. Check how large your hugepages are:
$ grep Hugepagesize /proc/meminfo
Normally that should be 2048 kB ≙ 2 MB. Let us say you want to run your virtual machine with 1024 MB. 1024 / 2 = 512. Add a few extra so we can round this up to 550. Now tell your machine how many hugepages you want:
# echo 550 > /proc/sys/vm/nr_hugepages
If you had enough free memory, you should see:
$ grep HugePages_Total /proc/meminfo
If the number is smaller, close some applications or start your virtual machine with less memory (number_of_pages x 2):
$ qemu-system-x86_64 -enable-kvm -m 1024 -mem-path /dev/hugepages -hda [. ]
Note the -mem-path parameter. This will make use of the hugepages.
Now you can check, while your virtual machine is running, how many pages are used:
$ grep HugePages /proc/meminfo
HugePages_Total: 550 HugePages_Free: 48 HugePages_Rsvd: 6 HugePages_Surp: 0
Now that everything seems to work, you can enable hugepages by default if you like. Add to your /etc/sysctl.d/40-hugepage.conf :
Secure Boot
KVM Secure boot has a few requirements before it can be enabled:
- You must use a UEFI with secure boot support compiled in.
- The UEFI must have keys enrolled.
Note: Arch Linux does not currently have a secure boot key unlike distributions like Fedora. If you intend to secure boot Arch Linux you must create your own signing key and sign your kernel after following the steps below. See Unified Extensible Firmware Interface/Secure Boot for more information.
To enable UEFI with secure boot support, install edk2-ovmf and set your virtual machine to use the secure boot enabled UEFI. If you are using libvirt, you can do this by adding the following to the XML configuration of your virtual machine.
/usr/share/edk2/x64/OVMF_CODE.secboot.4m.fd
Next you need to enroll some keys. In this example we will enroll Microsoft and Redhat’s secure boot keys. Install virt-firmware and run the following. Replace vm_name with the name of your virtual machine.
$ virt-fw-vars --input /var/lib/libvirt/qemu/nvram/vm_name_VARS.fd --output /var/lib/libvirt/qemu/nvram/vm_name_SECURE_VARS.fd --secure-boot --enroll-redhat
Then edit the libvirt XML configuration of your virtual machine to point to the new VARS file.
/usr/share/edk2/x64/OVMF_CODE.secboot.4m.fd /var/lib/libvirt/qemu/nvram/ _SECURE_VARS.fd
After this secure boot should automatically be enabled. You can double check by entering the virtual machine’s BIOS by pressing F2 when you see the UEFI boot logo.
See also
Общие принципы работы QEMU-KVM

KVM (Kernel-based Virtual Machine) – гипервизор (VMM – Virtual Machine Manager), работающий в виде модуля на ОС Linux. Гипервизор нужен для того, чтобы запускать некий софт в несуществующей (виртуальной) среде и при этом, скрывать от этого софта реальное физическое железо, на котором этот софт работает. Гипервизор работает в роли «прокладки» между физическим железом (хостом) и виртуальной ОС (гостем).
Поскольку KVM является стандартным модулем ядра Linux, он получает от ядра все положенные ништяки (работа с памятью, планировщик и пр.). А соответственно, в конечном итоге, все эти преимущества достаются и гостям (т.к. гости работают на гипервизоре, которые работает на/в ядре ОС Linux).
KVM очень быстрый, но его самого по себе недостаточно для запуска виртуальной ОС, т.к. для этого нужна эмуляция I/O. Для I/O (процессор, диски, сеть, видео, PCI, USB, серийные порты и т.д.) KVM использует QEMU.
2) QEMU
QEMU (Quick Emulator) – эмулятор различных устройств, который позволяет запускать операционные системы, предназначенные под одну архитектуру, на другой (например, ARM –> x86). Кроме процессора, QEMU эмулирует различные периферийные устройства: сетевые карты, HDD, видео карты, PCI, USB и пр.
Инструкции/бинарный код (например, ARM) конвертируются в промежуточный платформонезависимый код при помощи конвертера TCG (Tiny Code Generator) и затем этот платформонезависимый бинарный код конвертируется уже в целевые инструкции/код (например, x86).
ARM –> промежуточный_код –> x86
По сути, вы можете запускать виртуальные машины на QEMU на любом хосте, даже со старыми моделями процессоров, не поддерживающими Intel VT-x (Intel Virtualization Technology) / AMD SVM (AMD Secure Virtual Machine). Однако в таком случае, это будет работать весьма медленно, в связи с тем, что исполняемый бинарный код нужно перекомпилировать на лету два раза, при помощи TCG (TCG – это Just-in-Time compiler).
Т.е. сам по себе QEMU мега крутой, но работает очень медленно.
3) Protection rings
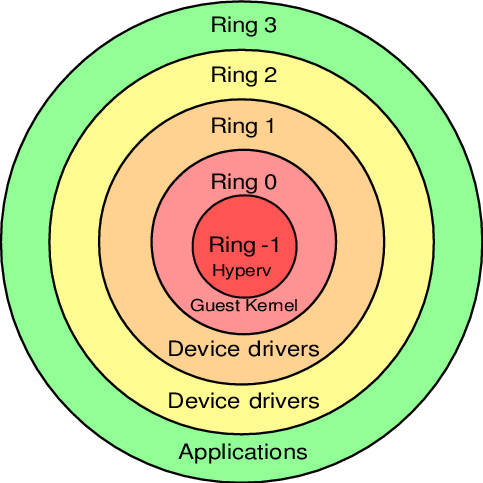
Бинарный программный код на процессорах работает не просто так, а располагается на разных уровнях (кольцах / Protection rings) с разными уровнями доступа к данным, от самого привилегированного (Ring 0), до самого ограниченного, зарегулированного и «с закрученными гайками» (Ring 3).
Операционная система (ядро ОС) работает на Ring 0 (kernel mode) и может делать с любыми данными и устройствами все, что угодно. Пользовательские приложения работают на уровне Ring 3 (user mode) и не в праве делать все, что захотят, а вместо этого каждый раз должны запрашивать доступ на проведение той или иной операции (таким образом, пользовательские приложения имеют доступ только к собственным данным и не могут «влезть» в «чужую песочницу»). Ring 1 и 2 предназначены для использования драйверами.
До изобретения Intel VT-x / AMD SVM, гипервизоры работали на Ring 0, а гости работали на Ring 1. Поскольку у Ring 1 недостаточно прав для нормального функционирования ОС, то при каждом привилегированном вызове от гостевой системы, гипервизору приходилось на лету модифицировать этот вызов и выполнять его на Ring 0 (примерно так, как это делает QEMU). Т.е. гостевой бинарный код НЕ выполнялся напрямую на процессоре, а каждый раз на лету проходил несколько промежуточных модификаций.
Накладные расходы были существенными и это было большой проблемой и тогда производители процессоров, независимо друг от друга, выпустили расширенный набор инструкций (Intel VT-x / AMD SVM), позволяющих выполнять код гостевых ОС НАПРЯМУЮ на процессоре хоста (минуя всякие затратные промежуточные этапы, как это было раньше).
С появлением Intel VT-x / AMD SVM, был создан специальный новый уровень Ring -1 (минус один). И теперь на нем работает гипервизор, а гости работают на Ring 0 и получают привилегированный доступ к CPU.
- хост работает на Ring 0
- гости работают на Ring 0
- гипервизор работает на Ring -1
4) QEMU-KVM
KVM предоставляет доступ гостям к Ring 0 и использует QEMU для эмуляции I/O (процессор, диски, сеть, видео, PCI, USB, серийные порты и т.д., которые «видят» и с которыми работают гости).
Отсюда QEMU-KVM (или KVM-QEMU) 🙂
P.S. Текст этой статьи изначально был опубликован в Telegram канале @RU_Voip в качестве ответа на вопрос одного из участников канала.
Напишите в комментариях, в каких местах я не правильно понимаю тему или если есть, что дополнить.