- Делаем Linux терминал красивым и удобным
- Добавляем функциональность
- Командная оболочка
- Настройка Zsh
- Настраиваем внешний вид
- Результат
- Источники
- 5 Tweaks to Customize the Look of Your Linux Terminal
- Customizing Linux Terminal
- Tip 0: Use separate terminal profiles for your customization
- Tip 1: Use a dark/light terminal theme
- Tip 2: Change the font and size
- Tip 3: Change the color pallet and transparency
- Tip 4: Tweaking the bash prompt variables
- Tip 5: Changing the font and color of the bash prompt (for advanced users)
- Bonus Tip: Change the terminal color pallet based on your wallpaper
- Wrapping Up
Делаем Linux терминал красивым и удобным
Все дистрибутивы Linux поставляются с функциональным и кастомизируемым эмулятором терминала. В интернете, а порой даже в самом терминале, есть масса готовых тем, чтоб он красиво выглядел. Однако, чтоб сделать из стандартного терминала (в любом DE, любого дистрибутива) нечто красивое и одновременно удобное и простое в использовании я потратил много времени. Итак, как же сделать дефолтный терминал удобным и приятным в использовании?
Добавляем функциональность
Командная оболочка
Большинство дистрибутивов поставляется со встроенным Bash. Используя дополнения можно сделать из него все что захотите, но гораздо проще этого добиться с Zsh. Почему?
- Продвинутая механика автодополнения команд по нажатию или . В отличие от Bash, вам не нужно это настраивать, все работает на высшем уровне прямо «из коробки».
- Множество готовых тем, модулей, плагинов и прочего. Настраиваемость через фреймворки (oh-my-zsh, prezto и др.), которые значительно расширяют возможности кастомизации и улучшения терминала. Опять же, всего этого можно добиться и в Bash, но для Zsh масса уже готовых материалов. Для Bash их значительно меньше, а некоторых вовсе нет.
Настройка Zsh
Для начала, установим Zsh (если он уже установлен, например, как в Manjaro, можете пропустить этот пункт):
Когда вам предложат установить Zsh как оболочка по-умолчанию, нажмите Y , чтоб подтвердить.
Oh-My-Zsh — популярный и активно развивающийся фреймворк Zsh, который позволяет гибко настроить оболочку терминала. Установим его:
sh -c "$(curl -fsSL https://raw.github.com/ohmyzsh/ohmyzsh/master/tools/install.sh)"Подсветка синтаксиса. Гораздо проще ориентироваться по содержимому терминала, когда разные части команд подсвечены разными цветами. Например, директории будут подчеркиваться, а команды — выделяться цветом, отличным от обычного текста. Установим плагин zsh-syntax-highlighting :
git clone https://github.com/zsh-users/zsh-syntax-highlighting.git $ZSH_CUSTOM/plugins/zsh-syntax-highlightingЧтоб плагин заработал, его надо подключить.
В файле ~/.zshrc меняем строку с plugins= :
plugins=(git zsh-syntax-highlighting)Если такой строки нет — добавьте её.
Готово! Получаем удобный и функциональный терминал. Теперь сделаем его визуально приятным.
Настраиваем внешний вид
git clone https://github.com/romkatv/powerlevel10k.git $ZSH_CUSTOM/themes/powerlevel10kСкачиваем и добавляем в систему шрифт JetBrains Mono Nerd (c иконками):
Выберитеодин из списка, в папке шрифт/complete выберите шрифт без «Windows Compatible», с окончанием «Mono».
Если в файле эти строки уже есть — замените их.
ZSH_THEME="powerlevel10k/powerlevel10k"POWERLEVEL9K_MODE="nerdfont-complete"[colors] # special foreground = #e6e6e6 foreground_bold = #e6e6e6 cursor = #fff background = #000 # black color0 = #75715e color8 = #272822 # red color1 = #f92672 color9 = #f92672 # green color2 = #a6e22e color10 = #a6e22e # yellow color3 = #434648 color11 = #7ea35f # blue color4 = #66d9ef color12 = #66d9ef # magenta color5 = #ae81ff color13 = #ae81ff # cyan color6 = #adb3b9 color14 = #62ab9d # white color7 = #2AA198 color15 = #2AA198 В разных терминалах по-разному меняется цветовая схема (обычно, это делается через настройки терминала), но порядок цветов везде одинаковый. Вы можете импортировать этот шаблон в формате Termite и экспортировать его для вашего терминала через terminal.sexy
Запускаем конфигурацию темы: p10k configure .
Настройте тему, выбирая варианты отображения, которые вам больше нравятся.
Финальный штрих — меняем конфиг темы и заменяем встроенные цвета.
Если в файле эти строки уже есть — замените их. Коды цветов можно получить командой
for i in ; do print -Pn \"%K %k%F$%f \" $:+$'\n'>; done- Отображение только текущей директории:
typeset -g POWERLEVEL9K_SHORTEN_STRATEGY=truncate_to_lasttypeset -g POWERLEVEL9K_DIR_BACKGROUND=33typeset -g POWERLEVEL9K_PROMPT_CHAR_OK__FOREGROUND=2typeset -g POWERLEVEL9K_PROMPT_CHAR_ERROR__FOREGROUND=1typeset -g POWERLEVEL9K_VCS_CLEAN_BACKGROUND=15Результат

Ошибка: 
GIT: 
Источники
5 Tweaks to Customize the Look of Your Linux Terminal
Want a beautiful-looking Linux terminal? Here are several ways to tweak the look and feel of your current terminal and make it look beautiful.
The terminal emulator or simply the terminal is an integral part of any Linux distribution. When you change the theme of your distribution, the terminal often gets a makeover automatically. But that doesn’t mean you cannot customize the terminal further. Many It’s FOSS readers have asked us how come the terminal in our screenshots or videos look so cool, what fonts do we use, etc. To answer this frequent question, I’ll show you some simple and some complex tweaks to change the appearance of the terminal. You can compare the visual difference in the image below:
Customizing Linux Terminal
This tutorial utilizes a GNOME terminal on Pop!_OS to customize and tweak the look of the terminal. But, most of the advice should apply to other terminals as well.
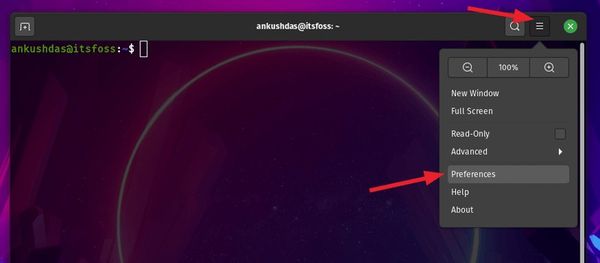
For most elements like color, transparency, and fonts, you can utilize the GUI to tweak it without requiring you to enter any special commands. Open your terminal. In the top right corner, look for the hamburger menu. Here, click on “Preferences” as shown in the screenshot below: This is where you’ll find all the settings to change the appearance of the terminal.
Tip 0: Use separate terminal profiles for your customization
I would advise you to create a new profile for your customization. Why? Because this way, your changes won’t impact the main terminal profile. Suppose you make some weird changes and cannot recall the default value. Profiles help separate the customization. As you can see, Abhishek has separate profiles for taking screenshots and making videos. 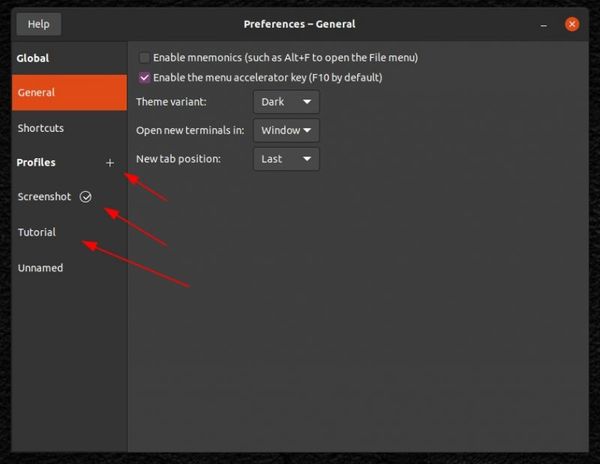 You can easily change the terminal profiles and open a new terminal window with the new profile.
 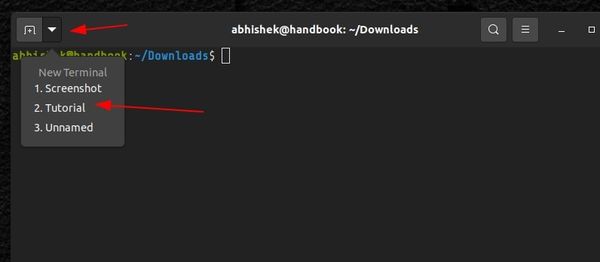 That was the suggestion I wanted to put forward. Now, let’s see those tweaks.
Tip 1: Use a dark/light terminal theme
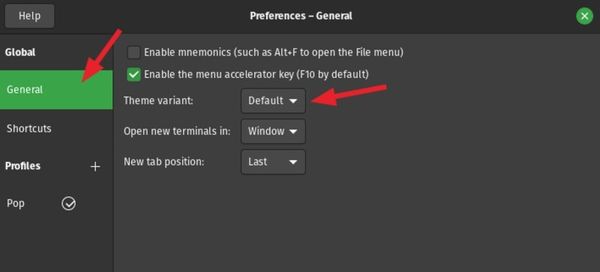
You may change the system theme and the terminal theme gets changed. Apart from that, you may switch between the dark or light theme, if you do not want to change the system theme. Once you head into the preferences, you will notice the General options to change the theme and other settings.
Tip 2: Change the font and size
Select the profile that you want to customize. Now you’ll get the option to customize the text appearance, font size, font style, spacing, cursor shape, and toggle the terminal bell sound as well. For changing the terminal font, you can only change to what’s available on your system. If you want something different, download and install the font on your Linux system first.
One more thing! Use monospaced fonts otherwise, fonts might overlap and the text may not be clearly readable. If you want suggestions, go with Share Tech Mono (open source) or Larabiefont (not open source).
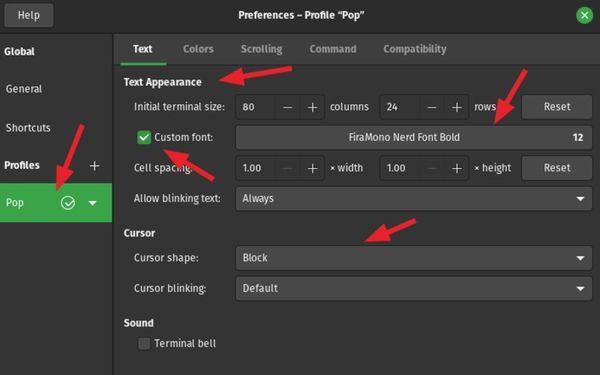
Under the Text tab, select Custom font and then change the font and size (if required).
Tip 3: Change the color pallet and transparency
Apart from the text and spacing, you can access the “Colors” tab and change the color of the text and background of your terminal. You can also adjust the transparency to make it look even cooler. As you can notice, you can change the color palette from a set of pre-configured options or tweak it yourself. 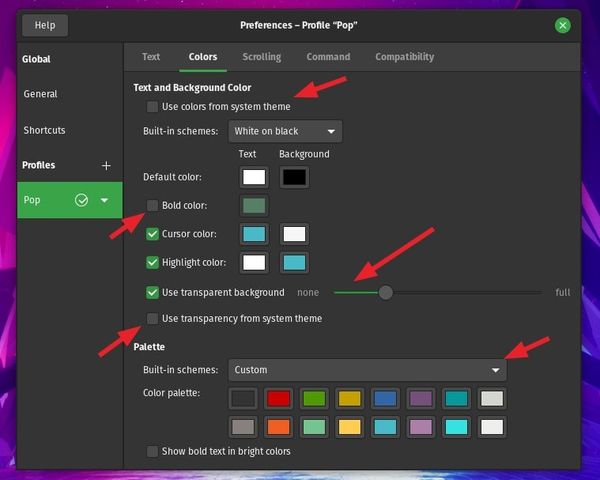 If you want to enable transparency just like I did, you click on “Use transparent background” option. You can also choose to use colors from your system theme if you want a similar color setting to your theme.
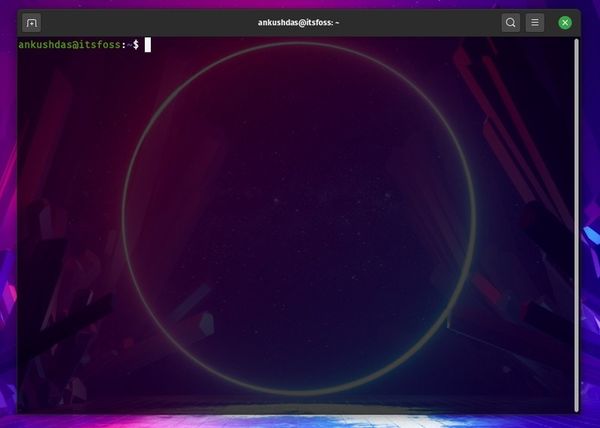
Tip 4: Tweaking the bash prompt variables
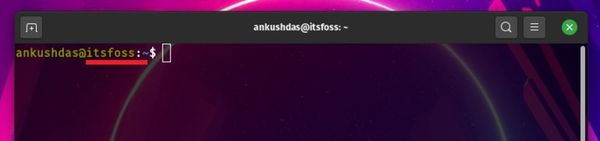
Usually, you will see your username and hostname (your distribution) as the bash prompt when launching the terminal without any changes. For instance, it would be “ankushdas@pop-os:~$” in my case. However, I permanently changed the hostname to “itsfoss“, so now it looks like this: To change the hostname, you can type in the following:
However, this will be applicable only to the current sessions. So, when you restart, it will revert to the default. To permanently change the hostname, you need to type in the following:
sudo hostnamectl set-hostname CUSTOM_NAMESimilarly, you can also change your username, but it requires some additional configuration that includes killing all the current processes associated with the active username, so we’ll avoid it to change the look/feel of the terminal.
Tip 5: Changing the font and color of the bash prompt (for advanced users)
You can tweak the font and color of the bash prompt ([email protected]:~$) using commands. You will need to utilize the PS1 environment variable which controls what is being displayed as the prompt. You can learn more about it on the man page. For instance, when you type in:
\[\e]0;\[email protected]\h: \w\a\]$\[\033[01;32m\]\[email protected]\h\[\033[00m\]:\[\033[01;34m\]\w\[\033[00m\]\$- \e is a special character that denotes the start of a color sequence
- \u indicates the username followed by the @ symbol
- \h denotes the hostname of the system
- \w denotes the base directory
- \a indicates the active directory
- $ indicates non-root user
The output in your case can be different, but the variables will be the same, so you need to play with the commands mentioned below depending on your output.
Before you do that, keep these in mind:
- Codes for text format: 0 for normal text, 1 for bold, 3 for italic and 4 for underline text
- Color range for background colors: 40-47
- Color range for text color: 30-37
You just need to type in the following to change the color and font:
This is how your bash prompt will look like after typing the command:
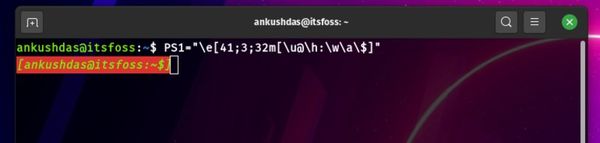
If you notice the command properly, as mentioned above, \e helps us assign a color sequence.
In the command above, I’ve assigned a background color first, then the text style, and then the font color followed by “m“.
Here, “m” indicates the end of the color sequence.
So, all you have to do is, play around with this part:
The rest of the command should remain the same, you just need to assign different numbers to change the background color, text style, and text color.
Do note that this is in no particular order; you can assign the text style first, background color next, and the text color at the end as “3;41;32“, where the command becomes:

As you can notice, the color customization is the same no matter the order. So, keep the codes for customization in mind and play around with it until you’re sure you want this as a permanent change.
The above command that I mentioned temporarily customizes the bash prompt for the current session. If you close the session, you will lose the customization.
So, to make this a permanent change, you need to add it to .bashrc file (this is a configuration file that loads up every time you load up a session).
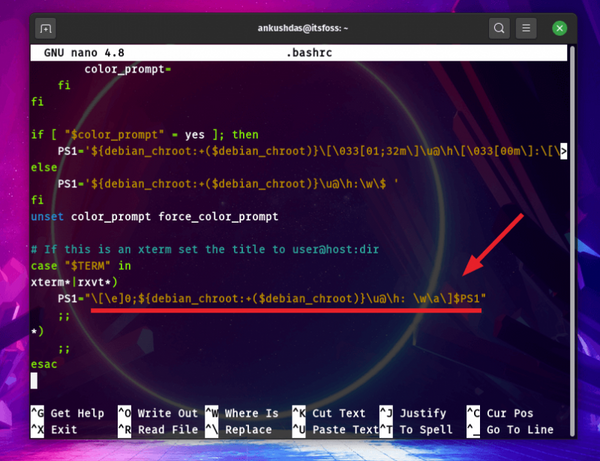
You can access the file by simply typing:
Unless you’re sure what you’re doing, do not change anything. And, just for the sake of restoring the settings back, you should keep a backup of the PS1 environment variable (copy-paste what’s in it by default) to a text file.
So, even if you need the default font and color, you can again edit the .bashrc file and paste the PS1 environment variable.
Bonus Tip: Change the terminal color pallet based on your wallpaper
If you want to change the terminal’s background and text color but are unsure which colors to pick, you can use a Python-based tool, Pywal. It automatically changes the color of the terminal based on your wallpaper or the image you provide to it.
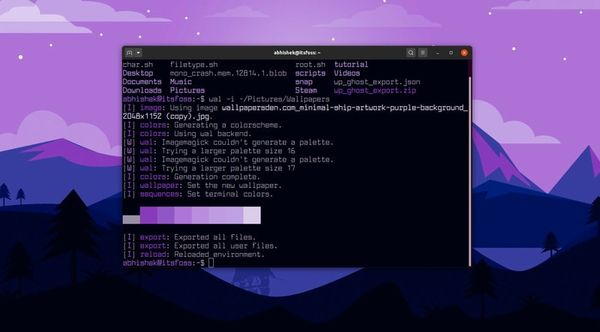
If you are interested in using this tool, I have written about it in detail.
Wrapping Up
Of course, it is easy to customize using the GUI while getting better control of what you can change. But, knowing the commands is also necessary in case you start using WSL or access a remote server using SSH; you can customize your experience no matter what.
If you are not much into customizing, you can try using other Linux terminals like Tilix or Terminator.
How do you customize the Linux terminal? Share your secret ricing recipe with us in the comments.