- How to configure network bridge for KVM virtual machines in Linux
- Know more about KVM virtual machines
- How to configure a network bridge for KVM virtual machines
- Method 1: Creating Bridge Network using Virtual Machine Manager
- Method 2: Create KVM bridge with virsh command
- Method 3: Create a bridge by editing network-scripts (CentOS/RHEL/Fedora)
- Method 4: Create a bridge by editing network-scripts (Debian/Ubuntu)
- Conclusion
- PREVENT YOUR SERVER FROM CRASHING!
- Как создать и настроить Bridge Networking для KVM в Linux
- Шаг 1. Создание мостовой сети с помощью диспетчера виртуальных машин.
- Шаг 2: Создайте мост KVM с помощью команды virsh.
- Шаг 3: Создайте мост, отредактировав сетевые скрипты (CentOS / RHEL / Fedora):
- Шаг 4: Создайте мост, отредактировав сетевые сценарии (Debian / Ubuntu):
- Шаг 5: Использование инструмента Nmcli
- Шаг 6. Подключите сетевой мост
How to configure network bridge for KVM virtual machines in Linux
Trying to configure a network bridge for KVM virtual machines? Here’s how we do it.
Here at Bobcares, we have seen several such KVM related queries as part of our Server Management Services for web hosts and online service providers.
Today we’ll take a look at configuring network bridge for KVM virtual machines.
Know more about KVM virtual machines
When a Linux bridge is used in KVM, it allows a virtual machine to access external networks and services outside of the virtual environment. Bridged networking is a dedicated network card to a virtual machine that provides a communication path to the outside networks. Also, this must be set up before creating a virtual machine using Virtual Manager.
Moreover, there are different ways to configure the Bridge Networking in Linux for use in KVM. By default, the Virtual Machine launched in KVM uses a NAT network.
Once you configure and use Bridged networking, guest operating systems access the external network connected directly to the host machine. Also, you can create a bridge either using Virtual Machine Manager, using virsh command-line tool, by directly editing network-scripts or using Linux Network management tools.
How to configure a network bridge for KVM virtual machines
Now let’s take a look at how to configure the network bridge.
Method 1: Creating Bridge Network using Virtual Machine Manager
Here are the steps to create a Linux bridge from Virtual Machine Manager (GUI). Make sure that you have installed KVM on your system.
1. Firstly, open Virtual Machine Manager, and go to Edit > Connection Details > Virtual Networks. Suppose the device name is virbr.
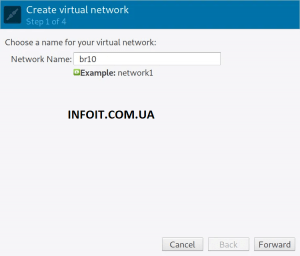
2. Next, click the + at the bottom of the window to configure a new network interface. Here, give the virtual network a name. For example, br1.
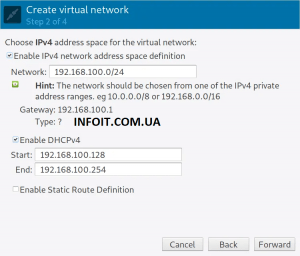
3. Then click the Forward button, in the next window, provide virtual network information.
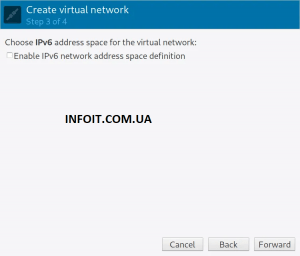
4. After that, click forward and choose if to enable IPv6.
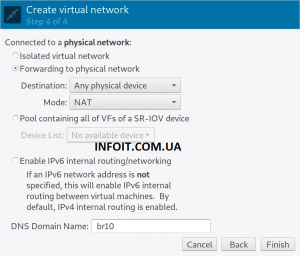
5. Now select the network type and forwarding policy.
6. Finish the setting and save the configurations. As a result, the new Virtual network must display on the overview page.
7. Finally, a bridge on the host system is automatically created for the network.
$ brctl show virbr bridge name bridge id STP enabled interfaces virbr 8000.525400c2410a yes virbr-nicMethod 2: Create KVM bridge with virsh command
First, create a new bridge XML file.
Then add the below details in the file.
To define a network from an XML file without starting it. So run the below command.
$ sudo virsh net-define br1.xml Network br1 defined from br1.xmlTo start a (previously defined) inactive network, run the below command.
$ sudo virsh net-start br1 Network br1 startedTo set network to autostart at service start, run the below command.
$ sudo virsh net-autostart br1 Network br1 marked as autostartedThen, confirm if the autostart flag is turned to yes. In the result, the Persistent should read yes as well.
Also, make sure to confirm bridge creation and IP address.
Method 3: Create a bridge by editing network-scripts (CentOS/RHEL/Fedora)
Here is a script that creates a bridge called br1.
$ sudo vim /etc/sysconfig/network-scripts/ifcfg-br1DEVICE=br1 STP=no TYPE=Bridge BOOTPROTO=none DEFROUTE=yes NAME=br1 ONBOOT=yes DNS1=8.8.8.8 DNS2=192.168.30.1 IPADDR=192.xxx.xx.x PREFIX=24 GATEWAY=192.xxx.xx.xHere is the configuration of eth0 interface to which br1 will be bridged:
$ cat /etc/sysconfig/network-scripts/ifcfg-eno1 DEVICE=eth0 TYPE=Ethernet ONBOOT=yes BRIDGE=br1Finally, restart the network daemon.
$ sudo systemctl disable NetworkManager && sudo systemctl stop NetworkManager $ sudo systemctl restart network.serviceMethod 4: Create a bridge by editing network-scripts (Debian/Ubuntu)
To configure the bridging interface, run the below command.
$ sudo vim /etc/network/interfaces auto br1 iface br1 inet static address 192.xxx.xx.xx network 192.xxx.x.x netmask 255.255.255.0 broadcast 192.xxx.x.xxx gateway 192.xxx.x.x dns-nameservers 192.xxx.x.x bridge_ports eth0 bridge_stp offThen disable all the lines on eth0 interface section so that it looks something like below:
auto eth0 iface eth0 inet manual
Finally, restart the networking service.
$ sudo systemctl restart networking.service[Need any further assistance with KVM queries? – We’re available to help you]
Conclusion
Today, we saw how to configure a network bridge for KVM virtual machines.
PREVENT YOUR SERVER FROM CRASHING!
Never again lose customers to poor server speed! Let us help you.
Our server experts will monitor & maintain your server 24/7 so that it remains lightning fast and secure.
Как создать и настроить Bridge Networking для KVM в Linux

В сегодняшнем руководстве мы рассмотрим, как создать и настроить мостовую сеть для KVM в Linux — RHEL / CentOS / Ubuntu / Debian / Arch Linux и т. д. Мост Linux при использовании в KVM позволяет виртуальной машине получать доступ к внешней сети и службам вне Виртуальная среда.
Существуют различные способы настройки мостовой сети в Linux для использования в KVM. Сеть по умолчанию, используемая виртуальной машиной, запущенной в KVM, — это сеть NAT. В сети NAT создается виртуальная сеть для гостевых машин, которая затем сопоставляется с сетью хоста для обеспечения подключения к Интернету.
Когда вы настраиваете и используете мостовую сеть, гостевые операционные системы получают доступ к внешней сети, подключенной непосредственно к хост-машине. Мост можно создать либо с помощью диспетчера виртуальных машин, либо с помощью инструмента командной строки virsh , либо путем прямого редактирования сетевых сценариев, либо с помощью инструментов управления сетью Linux.
Шаг 1. Создание мостовой сети с помощью диспетчера виртуальных машин.
Выполните следующие действия, чтобы создать мост Linux из диспетчера виртуальных машин (GUI). В вашей системе должен быть установлен KVM.
Откройте диспетчер виртуальных машин и перейдите в меню «Правка»> «Сведения о подключении»> «Виртуальные сети».
Настройте новый сетевой интерфейс, щелкнув + в нижней части окна. Дайте виртуальной сети имя.
Нажмите кнопку «Вперед», в следующем окне укажите информацию о виртуальной сети.
Щелкните «Вперед» и выберите, следует ли включить IPv6.
Выберите тип сети и политику пересылки.
Завершите настройку и сохраните свои конфигурации. Новая виртуальная сеть должна отображаться на странице обзора.
Для сети автоматически создается мост в хост-системе.
$ brctl show virbr4 bridge name bridge id STP enabled interfaces virbr4 8000.525400c2410a yes virbr4-nic Шаг 2: Создайте мост KVM с помощью команды virsh.
Создайте новый XML-файл моста.
Добавьте в файл детали моста.
Чтобы определить сеть из файла XML без его запуска, используйте:
$ sudo virsh net-define br10.xml Network br1 defined from br10.xml
Чтобы запустить (ранее определенную) неактивную сеть, используйте:
$ sudo virsh net-start br10 Network br10 started
Чтобы настроить автоматический запуск сети при запуске службы:
$ sudo virsh net-autostart br10 Network br10 marked as autostartedУстановите флажок «Подтвердить», если флаг автозапуска установлен на yes — Постоянный также должен читать «да».
$ sudo virsh net-list --all Name State Autostart Persistent ---------------------------------------------------- br10 active yes yes default active yes yes docker-machines active yes yes fed290 active no yes vagrant-libvirt active no yesПодтвердите создание моста и IP-адрес.
$ ip addr show dev br10 28: br10: mtu 1500 qdisc noqueue state DOWN group default qlen 1000 link/ether 52:54:00:94:00:f5 brd ff:ff:ff:ff:ff:ff inet 192.168.30.1/24 brd 192.168.30.255 scope global br10 valid_lft forever preferred_lft foreverШаг 3: Создайте мост, отредактировав сетевые скрипты (CentOS / RHEL / Fedora):
Ниже скрипт создаст мост под названием br10.
$ sudo vim /etc/sysconfig/network-scripts/ifcfg-br10
DEVICE=br10 STP=no TYPE=Bridge BOOTPROTO=none DEFROUTE=yes NAME=br10 ONBOOT=yes DNS1=8.8.8.8 DNS2=192.168.30.1 IPADDR=192.168.30.3 PREFIX=24 GATEWAY=192.168.30.1Конфигурация интерфейса eth0, к которому я подключаюсь, будет следующей:
$ cat /etc/sysconfig/network-scripts/ifcfg-eno1 DEVICE=eth0 TYPE=Ethernet ONBOOT=yes BRIDGE=br10Перезагрузите сетевой демон.
sudo systemctl disable NetworkManager && sudo systemctl stop NetworkManager sudo systemctl restart network.service
Шаг 4: Создайте мост, отредактировав сетевые сценарии (Debian / Ubuntu):
Настроить интерфейс Bridging:
$ sudo vim /etc/network/interfaces auto br10 iface br10 inet static address 192.168.1.10 network 192.168.1.1 netmask 255.255.255.0 broadcast 192.168.1.255 gateway 192.168.1.1 dns-nameservers 192.168.1.1 bridge_ports eth0 bridge_stp offОтключите все строки в разделе интерфейса eth0, чтобы они выглядели примерно так:
auto eth0 iface eth0 inet manualПерезапустите сетевую службу.
sudo systemctl restart networking.service Шаг 5: Использование инструмента Nmcli
Используйте nmcli инструмент командной строки управления сетью, чтобы создать мост Linux на желаемом интерфейсе. Давайте сначала перечислим все доступные подключения.
$ sudo nmcli connection show NAME UUID TYPE DEVICE enp1s0 498869bb-0d88-4a4c-a83a-c491d1040b0b ethernet enp1s0 Wired connection 1 0977f29f-fa2e-3d7f-831c-6f41f8782be3 ethernet enp7s0
Поскольку мой мост будет создан на втором устройстве enp7s0 , я удалю существующее соединение, а затем создам мост с этим устройством.
$ sudo nmcli connection delete 0977f29f-fa2e-3d7f-831c-6f41f8782be3 Connection 'Wired connection 1' (0977f29f-fa2e-3d7f-831c-6f41f8782be3) successfully deleted.
1. Сохраните информацию, связанную с мостом, в переменных.
BR_NAME="br10" BR_INT="enp7s0" SUBNET_IP="192.168.30.10/24" GW="192.168.30.1" DNS1="8.8.8.8" DNS2="8.8.4.4"
- BR_NAME: имя создаваемого моста.
- BR_INT: физическое сетевое устройство, которое будет использоваться в качестве ведомого моста.
- SUBNET_IP: IP-адрес и подсеть, назначенные созданному мосту.
- GW: IP-адрес шлюза по умолчанию.
- DNS1 и DNS2: IP-адреса DNS-серверов, которые будут использоваться.
2. Определите новое мостовое соединение.
sudo nmcli connection add type bridge autoconnect yes con-name $ ifname $
Connection 'br0' (be6d4520-0257-49c6-97c2-f515d6554980) successfully added.
3. Измените мост, чтобы добавить IP-адрес, шлюз и DNS
sudo nmcli connection modify $ ipv4.addresses $ ipv4.method manual sudo nmcli connection modify $ ipv4.gateway $ sudo nmcli connection modify $ ipv4.dns $ +ipv4.dns $
4. Добавьте сетевое устройство как подчиненное устройство моста.
sudo nmcli connection delete $ sudo nmcli connection add type bridge-slave autoconnect yes con-name $ ifname $ master $
Connection 'enp7s0' (f033dbc9-a90e-4d4c-83a9-63fd7ec1cdc1) successfully added.
$ sudo nmcli connection show NAME UUID TYPE DEVICE br0 be6d4520-0257-49c6-97c2-f515d6554980 bridge br0 enp1s0 498869bb-0d88-4a4c-a83a-c491d1040b0b ethernet enp1s0 enp7s0 f033dbc9-a90e-4d4c-83a9-63fd7ec1cdc1 ethernet enp7s0
Шаг 6. Подключите сетевой мост
После того, как соединение с сетевым мостом будет создано, активируйте его.
$ sudo nmcli connection up br10 Connection successfully activated (master waiting for slaves) (D-Bus active path: /org/freedesktop/NetworkManager/ActiveConnection/5)
Просмотрите детали моста, запустив его.
sudo nmcli connection show br10
Команда ip addr должна выдать результат, аналогичный приведенному ниже.
$ ip ad 3: enp7s0: mtu 1500 qdisc fq_codel master br10 state UP group default qlen 1000 link/ether 52:54:00:a2:f6:a8 brd ff:ff:ff:ff:ff:ff 4: br10: mtu 1500 qdisc noqueue state UP group default qlen 1000 link/ether 52:54:00:a2:f6:a8 brd ff:ff:ff:ff:ff:ff inet 192.168.122.10/24 brd 192.168.122.255 scope global noprefixroute br10 valid_lft forever preferred_lft forever inet6 fe80::4f2f:ce6d:dc6b:2101/64 scope link noprefixroute valid_lft forever preferred_lft forever
Поздравляю . Вы успешно создали и настроили мостовую сеть для KVM в системе Linux.