- Saved searches
- Use saved searches to filter your results more quickly
- jabas06/l2tp-ipsec-vpn-client
- Name already in use
- Sign In Required
- Launching GitHub Desktop
- Launching GitHub Desktop
- Launching Xcode
- Launching Visual Studio Code
- Latest commit
- Git stats
- Files
- README.md
- How to Setup an L2TP/IPsec VPN Client on Linux
- How to Setup L2TP VPN Connection in Linux
- Как настроить VPN-клиент L2TP/IPsec в Linux
- Как настроить L2TP VPN-подключение в Linux
Saved searches
Use saved searches to filter your results more quickly
You signed in with another tab or window. Reload to refresh your session. You signed out in another tab or window. Reload to refresh your session. You switched accounts on another tab or window. Reload to refresh your session.
Configure a Linux VPN client using the command line.
jabas06/l2tp-ipsec-vpn-client
This commit does not belong to any branch on this repository, and may belong to a fork outside of the repository.
Name already in use
A tag already exists with the provided branch name. Many Git commands accept both tag and branch names, so creating this branch may cause unexpected behavior. Are you sure you want to create this branch?
Sign In Required
Please sign in to use Codespaces.
Launching GitHub Desktop
If nothing happens, download GitHub Desktop and try again.
Launching GitHub Desktop
If nothing happens, download GitHub Desktop and try again.
Launching Xcode
If nothing happens, download Xcode and try again.
Launching Visual Studio Code
Your codespace will open once ready.
There was a problem preparing your codespace, please try again.
Latest commit
Git stats
Files
Failed to load latest commit information.
README.md
Configure a Linux VPN client using the command line.
Install the following packages:
sudo apt-get update sudo apt-get -y install strongswan xl2tpd yum -y install epel-release yum --enablerepo=epel -y install strongswan xl2tpd yum -y install strongswan xl2tpd Replace the file content with the following (replace n.n.n.n with your VPN Server Address):
config setup conn %default ikelifetime=60m keylife=20m rekeymargin=3m keyingtries=1 keyexchange=ikev1 authby=secret ike=aes128-sha1-modp1024,3des-sha1-modp1024! esp=aes128-sha1-modp1024,3des-sha1-modp1024! conn L2TP-PSK keyexchange=ikev1 left=%defaultroute auto=add authby=secret type=transport leftprotoport=17/1701 rightprotoport=17/1701 # set this to the ip address of your vpn server right=n.n.n.n sudo nano /etc/ipsec.secrets Replace the file content with the following (replace your_pre_shared_key with your PSK value):
Additionaly, run the following only if you are using CentOS/RHEL or Fedora:
mv /etc/strongswan/ipsec.conf /etc/strongswan/ipsec.conf.old 2>/dev/null mv /etc/strongswan/ipsec.secrets /etc/strongswan/ipsec.secrets.old 2>/dev/null ln -s /etc/ipsec.conf /etc/strongswan/ipsec.conf ln -s /etc/ipsec.secrets /etc/strongswan/ipsec.secrets sudo nano /etc/xl2tpd/xl2tpd.conf Append the following to the file (replace n.n.n.n with your VPN Server Address):
[lac myVPN] ; set this to the ip address of your vpn server lns = n.n.n.n ppp debug = yes pppoptfile = /etc/ppp/options.l2tpd.client length bit = yes sudo nano /etc/ppp/options.l2tpd.client Replace the file content with the following (replace your_user_name and your_password with your VPN credentials):
ipcp-accept-local ipcp-accept-remote refuse-eap require-mschap-v2 noccp noauth logfile /var/log/xl2tpd.log idle 1800 mtu 1410 mru 1410 defaultroute usepeerdns debug connect-delay 5000 name your_user_name password your_password Run the following command each time you want to start the ipsec and l2tp connection:
sudo mkdir -p /var/run/xl2tpd sudo touch /var/run/xl2tpd/l2tp-control sudo service strongswan restart sudo service xl2tpd restart sudo service ipsec restart sleep 8 sudo ipsec up L2TP-PSK sleep 8 sudo bash -c 'echo "c myVPN" > /var/run/xl2tpd/l2tp-control' sleep 8 ifconfig sudo mkdir -p /var/run/xl2tpd sudo touch /var/run/xl2tpd/l2tp-control sudo service strongswan restart sudo service xl2tpd restart sleep 8 sudo strongswan up L2TP-PSK sleep 8 sudo bash -c 'echo "c myVPN" > /var/run/xl2tpd/l2tp-control' sleep 8 ifconfig Check the output. You should now see a new interface ppp0. Interface ppp0 is needed to continue to the next step.
Routing traffic to an IP address in your internal network. Replace x.x.x.x with the addres you wish to communicate with through the tunnel device:
sudo ip route add x.x.x.x via $(ip address show dev ppp0 | grep -Po '(?\.)4\b)') dev ppp0 Error: Unable to resolve host on EC2 instances
If you did run the route command on an EC2 instance and got the error «unable to resolve host : Resource temporarily unavailable» , do the following and then rerun the commands from the Connect and Router sections.
Copy the hostname, from the error message, which will contain the private IP address in the form ip-x-x-x-x . For instance ip-172-31-26-197
Add a new entry within the hosts file to include the hostname:
The VPN connection is now complete. Verify that your traffic is being routed properly. Repalce x.x.x.x with the addres you wish to communicate with through the tunnel device:
To disconnect run the following:
sudo bash -c 'echo "d myVPN" > /var/run/xl2tpd/l2tp-control' ipsec down L2TP-PSK sudo bash -c 'echo "d myVPN" > /var/run/xl2tpd/l2tp-control' sudo strongswan down L2TP-PSK dmesg | less /var/log/xl2tpd.log How to Setup an L2TP/IPsec VPN Client on Linux
L2TP (which stands for Layer 2 Tunneling Protocol) is a tunneling protocol designed to support virtual private networks (VPN connections) over the internet. It is implemented in most if not all modern operating systems including Linux and VPN-capable devices.
The L2TP does not provide any authentication or encryption mechanisms directly to traffic that passes through it, it is usually implemented with the IPsec authentication suite (L2TP/IPsec) to provide encryption within the L2TP tunnel.
In this article, we will show how to set up an L2TP/IPSec VPN connection in Ubuntu and its derivatives and Fedora Linux.
This guide assumes that the L2TP/IPsec VPN server has been set up and that you have received the following VPN connection details from your organization’s or company’s system administrator.
Gateway IP address or hostname Username and Password Pre-shared Key (Secret)
How to Setup L2TP VPN Connection in Linux
To add an L2TP/IPsec option to the NetworkManager, you need to install the NetworkManager-l2tp VPN plugin which supports NetworkManager 1.8 and later. It provides support for L2TP and L2TP/IPsec.
To install the L2TP module on Ubuntu and Ubuntu-based Linux distributions, use the following PPA.
$ sudo add-apt-repository ppa:nm-l2tp/network-manager-l2tp $ sudo apt-get update $ sudo apt-get install network-manager-l2tp network-manager-l2tp-gnome
On RHEL/CentOS and Fedora Linux, use the following dnf command to install L2TP module.
# dnf install xl2tpd # dnf install NetworkManager-l2tp # dnf install NetworkManager-l2tp-gnome OR # yum install xl2tpd # yum install NetworkManager-l2tp # yum install NetworkManager-l2tp-gnome
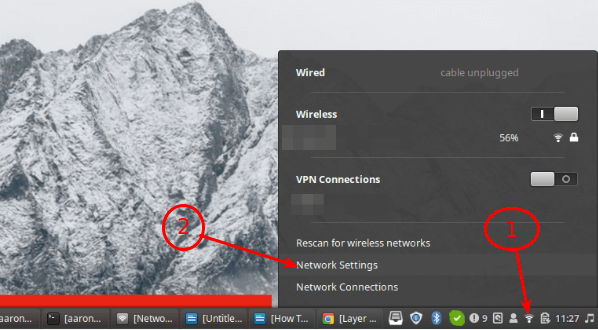
Once the package installation is complete, click on your Network Manager icon, then go to Network Settings.
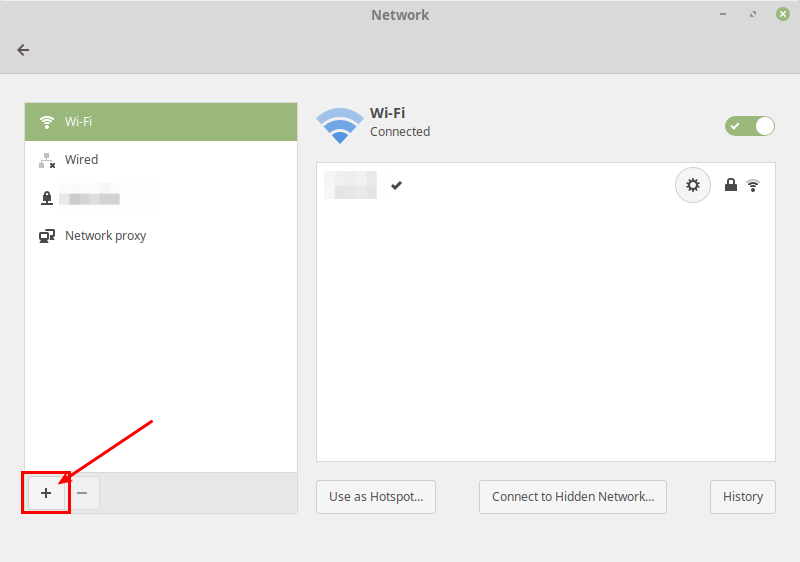
Next, add a new VPN connection by clicking on the (+) sign.
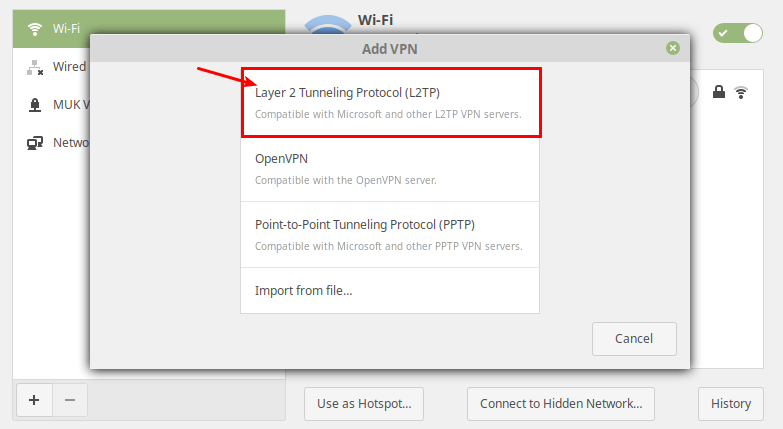
Then select Layer 2 Tunneling Protocol (L2TP) option from the pop-up window.
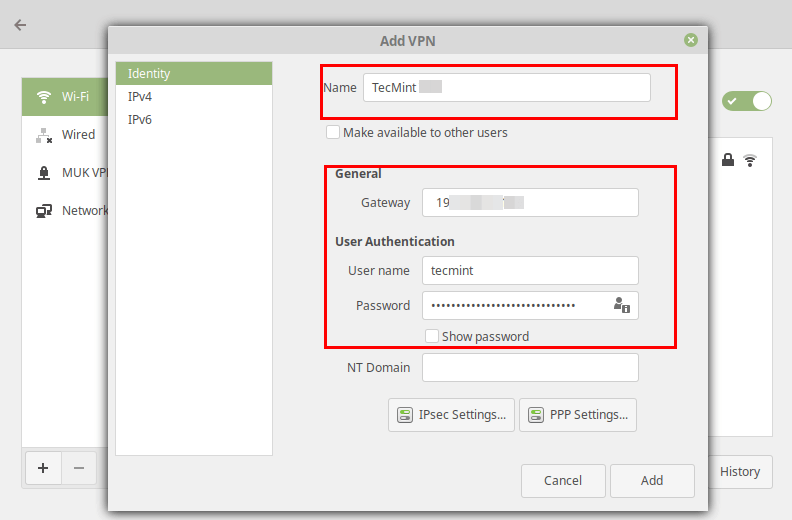
Next, enter the VPN connection details (gateway IP address or hostname, username and password) you received from the system administrator, in the following window.
Next, click IPsec Settings to enter the pre-shared key for the connection. Then enable IPsec tunnel to L2TP host, enter (or copy and paste the) the Pre-shared key and click Ok.

After that, click Add. Now your new VPN connection should be added.
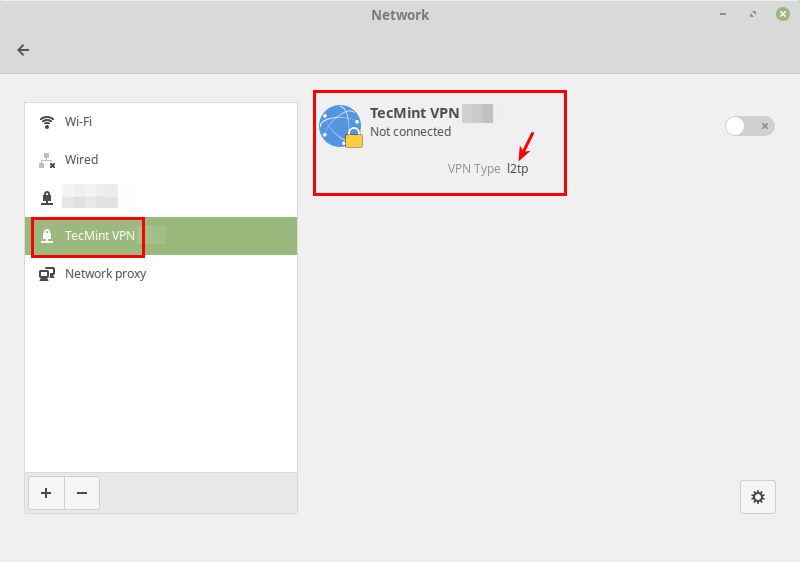
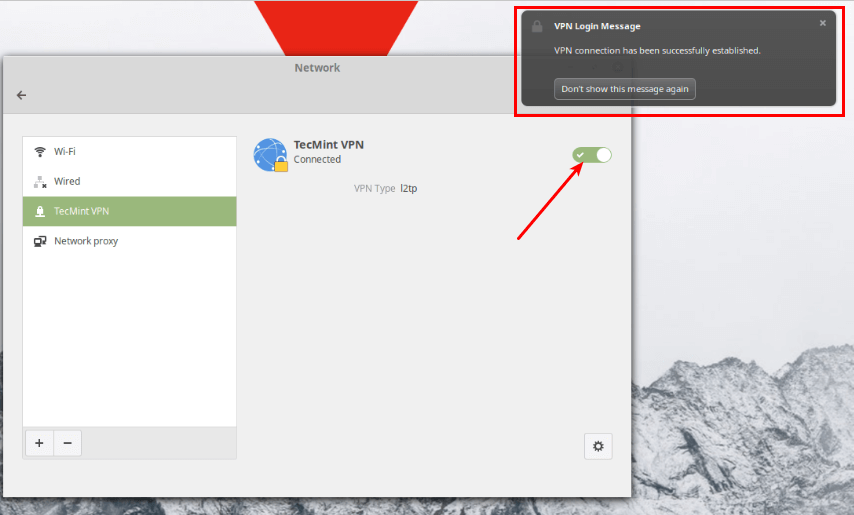
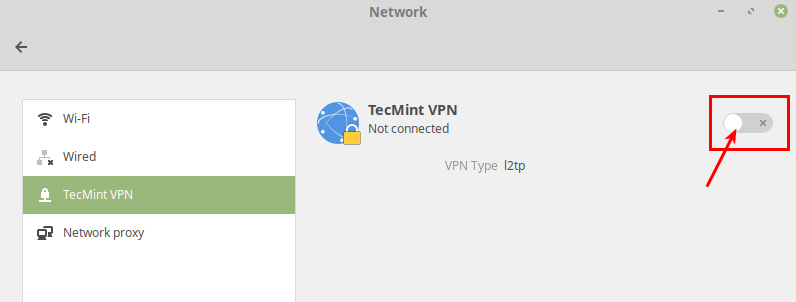
Next, turn on the VPN connection to start using it. If the connection details are correct, the connection should be established successfully.
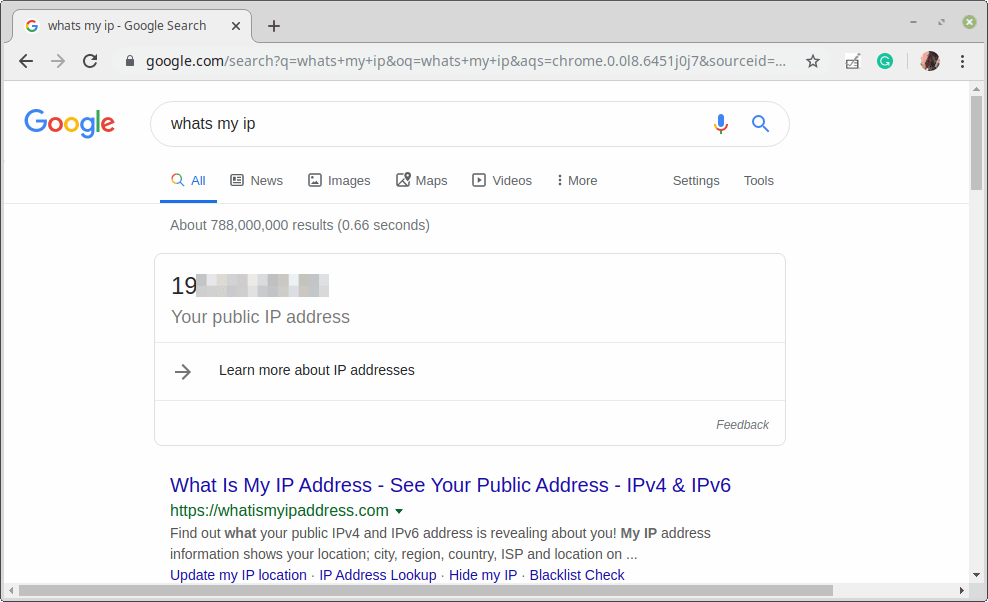
Last but not least, test if the VPN is working fine. You can check your computer’s public IP address to confirm this from a web browser: it should now point to the IP of the gateway.
That’s the end of this article. If you have any queries or thoughts to share, reach us via the feedback form below.
Как настроить VPN-клиент L2TP/IPsec в Linux
L2TP (расшифровывается как Протокол туннелирования уровня 2) – это протокол туннелирования, предназначенный для поддержки виртуальных частных сетей (подключений VPN) через Интернет. Он реализован в большинстве, если не во всех современных операционных системах, включая Linux и устройства с поддержкой VPN.
L2TP не предоставляет каких-либо механизмов аутентификации или шифрования непосредственно для проходящего через него трафика. Обычно он реализуется с помощью пакета аутентификации IPsec (L2TP/IPsec) для обеспечения шифрования внутри туннель L2TP.
В этой статье мы покажем, как настроить подключение L2TP/IPSec VPN в Ubuntu и ее производных, а также в Fedora Linux.
В этом руководстве предполагается, что сервер L2TP/IPsec VPN настроен и вы получили следующие сведения о VPN-подключении от системного администратора вашей организации или компании.
Gateway IP address or hostname Username and Password Pre-shared Key (Secret)
Как настроить L2TP VPN-подключение в Linux
Чтобы добавить параметр L2TP/IPsec в NetworkManager, необходимо установить подключаемый модуль NetworkManager-l2tp VPN, который поддерживает NetworkManager 1.8 и более поздние версии. Он обеспечивает поддержку L2TP и L2TP/IPsec.
Чтобы установить модуль L2TP в Ubuntu и дистрибутивах Linux на основе Ubuntu, используйте следующий PPA-репозиторий.
$ sudo add-apt-repository ppa:nm-l2tp/network-manager-l2tp $ sudo apt-get update $ sudo apt-get install network-manager-l2tp network-manager-l2tp-gnome
В RHEL/CentOS и Fedora Linux используйте следующую команду dnf для установки модуля L2TP.
# dnf install xl2tpd # dnf install NetworkManager-l2tp # dnf install NetworkManager-l2tp-gnome OR # yum install xl2tpd # yum install NetworkManager-l2tp # yum install NetworkManager-l2tp-gnome
После завершения установки пакета щелкните значок Диспетчер сети и перейдите в раздел Настройки сети.

Затем добавьте новое VPN-подключение, нажав на значок (+) .

Затем выберите параметр Протокол туннелирования уровня 2 (L2TP) во всплывающем окне.

Затем введите данные VPN-подключения (IP-адрес шлюза или имя хоста, имя пользователя и пароль), которые вы получили от системного администратора, в следующем окне.

Затем нажмите Настройки IPsec, чтобы ввести общий ключ для подключения. Затем включите туннель IPsec для хоста L2TP, введите (или скопируйте и вставьте) общий ключ и нажмите «ОК».

После этого нажмите Добавить. Теперь ваше новое VPN-подключение должно быть добавлено.

Затем включите VPN-подключение, чтобы начать его использовать. Если сведения о соединении верны, соединение должно быть установлено успешно.


И последнее, но не менее важное: проверьте, нормально ли работает VPN. Вы можете проверить общедоступный IP-адрес вашего компьютера, чтобы подтвердить это в веб-браузере: теперь он должен указывать на IP-адрес шлюза.

Это конец этой статьи. Если у вас есть какие-либо вопросы или мысли, чтобы поделиться, свяжитесь с нами через форму обратной связи ниже.