- How do I check where devices are mounted?
- 3 Answers 3
- Linux mount Command with Examples
- Linux mount Command Syntax
- mount Command Options
- Linux mount Command Examples
- List Mounted File Systems
- List Specific File Systems
- Mount a File System
- Mount File System with /etc/fstab
- Mount USB Drive
- Mount a CD-ROM
- Mount ISO Files
- Mount an NFS
- Non-Superuser Mounting
- Move a Mount
- How to Unmount a File System
- Lazy Unmount
- Forced Unmount
How do I check where devices are mounted?
What is the command that lets me see what and where devices are mounted? I’m having trouble changing songs on my old iPod, and I have a feeling it’s because of the mount point.
3 Answers 3
There are at least three programs I know of that list device mount points:
- mount — mount a filesystem (used for general mount info too):
$ mount /dev/sda3 on / type ext4 (rw,errors=remount-ro) proc on /proc type proc (rw,noexec,nosuid,nodev) sysfs on /sys type sysfs (rw,noexec,nosuid,nodev) . /dev/mapper/lvmg-homelvm on /home type btrfs (rw,relatime,compress=lzo,space_cache) /dev/sda5 on /home/muru/arch type btrfs (rw,relatime,compress=lzo,space_cache) binfmt_misc on /proc/sys/fs/binfmt_misc type binfmt_misc (rw,noexec,nosuid,nodev) systemd on /sys/fs/cgroup/systemd type cgroup (rw,noexec,nosuid,nodev,none,name=systemd) $ df Filesystem 1K-blocks Used Available Use% Mounted on /dev/sda3 30832636 11993480 17249912 42% / none 4 0 4 0% /sys/fs/cgroup . /dev/sda5 31457280 3948600 25396496 14% /home/bro3886/arch $ lsblk NAME MAJ:MIN RM SIZE RO TYPE MOUNTPOINT sda 8:0 0 465.8G 0 disk ├─sda1 8:1 0 100M 0 part ├─sda2 8:2 0 58.5G 0 part ├─sda3 8:3 0 30G 0 part / ├─sda4 8:4 0 1K 0 part ├─sda5 8:5 0 30G 0 part ├─sda6 8:6 0 339.2G 0 part │ └─lvmg-homelvm (dm-0) 252:0 0 1.2T 0 lvm └─sda7 8:7 0 8G 0 part [SWAP] sdb 8:16 0 931.5G 0 disk └─sdb1 8:17 0 931.5G 0 part └─lvmg-homelvm (dm-0) 252:0 0 1.2T 0 lvm Of these three, mount lists all the mountpoints, AFAICT. The others have their weaknesses.
- findmnt suggested by @webwurst is now my favourite tool for the job. It’s a Swiss Army knife when it comes to output control (newer versions can output in JSON too):
$ findmnt / TARGET SOURCE FSTYPE OPTIONS / /dev/sda1 ext4 rw,relatime,errors=remount-ro,data=ordered $ findmnt / -no source /dev/sda1 $ findmnt / --json < "filesystems": [ ] > $ findmnt / --df SOURCE FSTYPE SIZE USED AVAIL USE% TARGET /dev/sda1 ext4 40.2G 25.8G 12.5G 64% / Linux mount Command with Examples
The Linux file system hierarchy is arranged in a tree, with the file system starting from the root directory ( / ). All other child file systems branch out from the root directory.
The mount command allows users to mount, i.e., attach additional child file systems to a particular mount point on the currently accessible file system. The command passes the mount instructions to the kernel, which completes the operation.
This tutorial will teach you the basics of attaching file systems in Linux using the mount command.

- A system running Linux.
- Access to the terminal (Ctrl + Alt + T).
- A user account with administrator privileges.
Linux mount Command Syntax
The standard mount command syntax is:
The command instructs the kernel to attach the file system found on [device] at the [dir] directory. The -t [type] option is optional, and it describes the file system type (EXT3, EXT4, BTRFS, XFS, HPFS, VFAT, etc.).
If the destination directory is omitted, it mounts the file systems listed in the /etc/fstab file.
While the file system is mounted, the previous contents, owner, and mode of the [dir] directory are invisible, and the [dir] pathname refers to the file system root.
Exit Status
The mount command returns one of the following values that indicate the process completion status:
- 0 . Success.
- 1 . Incorrect command invocation or insufficient permissions.
- 2 . System error.
- 4 . Internal mount bug.
- 8 . Operation interrupted by user.
- 16 . Issues with writing or locking the /etc/mtab file.
- 32 . Mount failure.
- 64 . At least one mount operation succeeded, but not all.
mount Command Options
The mount command options further specify file system types, mount location, and type. The following table shows the most common mount options:
| Option | Description |
|---|---|
| -a | Mounts all file systems listed in /etc/fstab. |
| -F | Forks a new incarnation of mount for each device. Must be used in combination with the -a option. |
| -h | Displays the help file with all command options. |
| -l | Lists all the file systems mounted and adds labels to each device. |
| -L [label] | Mounts the partition with the specified [label] . |
| -M | Moves a subtree to another location. |
| -O [opts] | Used in combination with -a , it limits the file system set that -a applies to. The [opts] refers to options specified in the options field of the /etc/fstab file. The command accepts multiple options specified in a comma-separated list (without spaces). |
| -r | Mounts the file system in read-only mode. |
| -R | Remounts a subtree in a different location, making its contents available in both places. |
| -t [type] | Indicates the file system type. |
| -T | Used to specify an alternative /etc/fstab file. |
| -v | Mounts verbosely, describing each operation. |
| -V | Displays the program version information. |
Run the man mount command for a complete list of options, syntax forms, and filesystem-specific mount options.
Linux mount Command Examples
Outlined below are the most common use cases of the mount command.
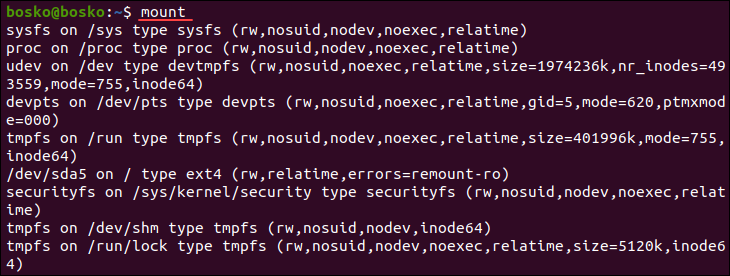
List Mounted File Systems
Run the mount command without any options to display all currently mounted file systems. The output also displays the mount points and mount options.
List Specific File Systems
The -t option allows users to specify which file systems to display when running the mount command. For example, to show only ext4 file systems, run the following command:

Mount a File System
Mounting a file system requires the user to specify the directory or mount point to which the file system will be attached. For example, to mount the /dev/sdb1 file system to the /mnt/media directory, run:
sudo mount /dev/sdb1 /mnt/mediaTo specify additional file system-specific mount options, pass the -o flag followed by the options before the device name. Use the following syntax:
mount -o [options] [device] [dir]See the man page or help file for a complete list of available options.
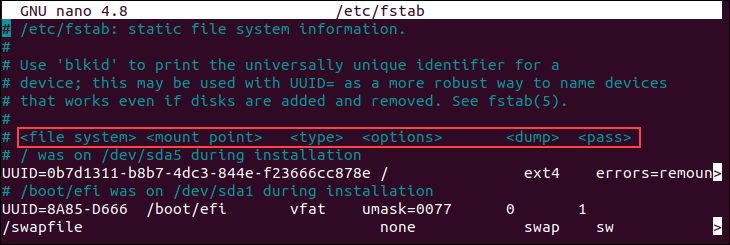
Mount File System with /etc/fstab
The /etc/fstab file contains lines describing the mount location of system devices and the options they are using. Generally, fstab is used for internal devices, such as CD/DVD devices, and network shares (samba/nfs/sshfs). Removable devices are typically mounted by the gnome-volume-manager .
Providing only one parameter (either [dir] or [device] ) causes mount to read the contents of the /etc/fstab configuration file to check if the specified file system is listed in it. If the given file system is listed, mount uses the value for the missing parameter and the mount options specified in the /etc/fstab file.
The defined structure in /etc/fstab is:
The following screenshot shows the contents of the /etc/fstab file:
To mount a file system specified in the /etc/fstab file, use one of the following syntaxes:
- For [dir] , specify the mount point.
- For [device] , specify the device identifier.
See the mount command man page or run man mount for a comprehensive list of file system-specific and file system-independent options.
Mount USB Drive
Modern Linux distributions automatically mount removable drives after insertion. However, if the automatic mount fails, follow the steps below to mount the USB drive manually:
1. Create a mount point using the mkdir command:
2. Find the USB device and file system type. Run:
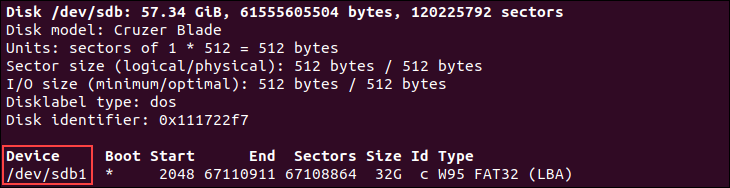
3. Using the device identifier from fdisk output, mount the USB drive using the following syntax:
sudo mount [identifier] /media/usb-driveFor example, if the device is listed as /dev/sdb1 , run:
sudo mount /dev/sdb1 /media/usb-driveMount a CD-ROM
Being a removable device, Linux automatically mounts CD-ROMs as well. However, if mounting fails, mount a CD-ROM manually by running:
mount -t iso9660 -o ro /dev/cdrom /mntMake sure that the /mnt mount point exists for the command to work. If it doesn’t, create one using the mkdir command.
iso9660 is the standard file system for CD-ROMs, while the -o ro options cause mount to treat it as a read-only file system.
Mount ISO Files
Mounting an ISO file requires mapping its data to a loop device. Attach an ISO file to a mount point using a loop device by passing the -o loop option:
sudo mount /image.iso /media/iso-file -o loopMount an NFS
A Network File System (NFS) is a distributed file system protocol for sharing remote directories over a network. Mounting an NFS allows you to work with remote files as if they were stored locally.
Follow the steps below to mount a remote NFS directory on your system:
Important: Mounting an NFS requires having the NFS client package installed. See how to install the NFS server on Ubuntu.
1. Create a mount point using the mkdir command:
2. Mount the NFS share by running:
3. To automatically mount the remote NFS share at boot, edit the /etc/fstab file using a text editor of your choice:
Add the following line to the file and replace remote.server:/dir with the NFS server IP address or hostname and the exported directory:
remote.server:/dir /media/nfs nfs defaults 0 0Non-Superuser Mounting
Although only a superuser can mount file systems, file systems in the /etc/fstab file containing the user option can be mounted by any system user.
Edit the /etc/fstab file using a text editor and under the field specify the user option. For example:
/dev/cdrom /cd iso9660 ro,user,noauto,unhideAdding the line above to /etc/fstab allows any system user to mount the iso9660 file system from a CD-ROM device.
Specifying the users option instead of user allows any user to unmount the file system, not only the user that mounted it.
Move a Mount
If you decide to move a mounted file system to another mount point, use the -M option. The syntax is:
For [olddir] , specify the current mount point. For [newdir] , specify the mount point to which you want to move the file system.
Moving the mounted file system to another mount point causes its contents to appear in the [newdir] directory but doesn’t change the physical location of the files.
How to Unmount a File System
To unmount, i.e., detach an attached file system from the system tree, use the umount command. Detach the file system by passing either its mount point or the device name.
For example, to detach a USB device listed as /dev/sdb1 , run:
While busy with open files or ongoing processes, a file system cannot be detached, and the process fails. If you aren’t sure what’s using the file system, run the fuser command to find out:
For [dir] , specify the file system mount point. For example:
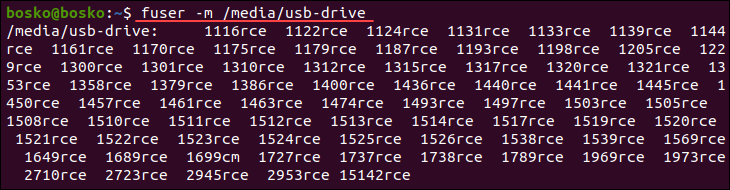
The output lists the PIDs of processes currently accessing the device. Stop the processes and unmount the file system.
Lazy Unmount
If you don’t want to stop the processes manually, use the lazy unmount, which instructs the unmount command to detach the file system as soon as its activities stop. The syntax is:
Forced Unmount
The -f ( —force ) option allows users to force an unmount. However, be cautious when force unmounting a file system as the process may corrupt the data on it.
This tutorial showed how to use the mount command to attach various file systems to the directory tree and provided other practical examples. The tutorial also showed how to use the umount command to detach a file system.
Next, we recommend you to read about the fsck command for checking and repairing file systems, or see how to check disk space in Linux.