- GParted Live on USB
- USB setup with Windows
- Windows Method A: Unetbootin
- Windows Method B: Manual
- Windows Method C: LinuxLive USB Creator
- Windows Method D: Tuxboot
- USB setup with GNU/Linux
- GNU/Linux Method A: Unetbootin
- GNU/Linux Method B: Manual
- GNU/Linux Method C: Manual — Overwrite
- GNU/Linux Method D: Tuxboot
- Как создать Live USB-накопитель GParted в Ubuntu, Linux Mint
- Почему Live USB-накопитель GParted?
- Создание USB-накопителя GParted Live в Ubuntu
- Загрузитесь с USB-накопителя GParted Live
- How to create a GParted live USB drive in Ubuntu, Linux Mint
- Why a GParted live USB drive?
- Creating a GParted Live USB drive on Ubuntu
- Boot into GParted Live USB drive
- Downloads
- Download Links
GParted Live on USB
The bootable GParted Live image can also be installed on a USB flash drive.
Following are instructions on how to setup GParted Live on your USB flash drive using either MS Windows or GNU/Linux.
NOTE: These installation methods only work when the USB flash drive is formatted with a FAT file system. Some users have reported that only the FAT16 file system worked for them. For other file systems you might try to use grub or some other boot loader.
USB setup with Windows
Choose one of the following methods to setup GParted Live on your USB flash drive using MS Windows:
Windows Method A: Unetbootin
- If you already have Unetbootin installed on your computer then skip to the next step (2).
Otherwise download and install Unetbootin on your MS Windows computer. - Download the GParted Live iso file.
- From Windows, run the Unetbootin program and follow the instructions in the GUI to install GParted Live on your USB flash drive.
Windows Method B: Manual
WARNING! DO NOT RUN makeboot.bat from your local hard drive!
Doing so could cause your MS windows not to boot.
- Download the GParted Live zip file.
- If you already have a partition of at least 300 MB in size on your USB flash drive formatted with a FAT file system then skip to the next step (3).
Windows Method C: LinuxLive USB Creator
- If you already have LinuxLive USB Creator installed on your computer then skip to the next step (2).
Otherwise download and install LinuxLive USB Creator on your MS Windows computer. - Download the GParted Live iso file.
- From Windows, install then run the LinuxLive USB Creator program and follow the instructions in the GUI to install GParted Live on your USB flash drive.
Windows Method D: Tuxboot
- Download Tuxboot on your MS Windows computer.
- Follow the USB setup with MS Windows instructions to install GParted Live on your USB flash drive.
USB setup with GNU/Linux
Choose one of the following methods to setup GParted Live on your USB flash drive using GNU/Linux:
GNU/Linux Method A: Unetbootin
- If you already have Unetbootin installed on your computer then skip to step 2.
Otherwise install Unetbootin on your GNU/Linux computer. - Download the GParted Live iso file.
- From GNU/Linux, run the Unetbootin program and follow the instructions in the GUI to install GParted Live on your USB flash drive.
GNU/Linux Method B: Manual
WARNING! Confirm you have the correct path name before executing commands!
Failure to do so could cause loss of data or your GNU/Linux not to boot.
/dev/sde is a device path name
/dev/sde1 is a partition path name
- Download the GParted Live zip file.
- If you already have a FAT16 or FAT32 partition on your USB flash drive then skip to the next step (3).
Otherwise prepare at least a 300 MB partition formatted with either a FAT16 or FAT32 file system.
The partition must be large enough to hold the extracted contents of the GParted Live zip file.
If the USB flash drive or USB hard drive does not have any partition, you can use a partitioning tool (e.g. gparted, parted, fdisk, cfdisk or sfdisk) to create a partition with a size of 300 MB or more.
Here we assume your USB flash drive or USB hard drive is /dev/sdd ( You have to confirm your device name, since it’s _NOT_ always /dev/sdd ) on your GNU/Linux, so the partition table is like:
# fdisk -l /dev/sdd Disk /dev/sdd: 12.8 GB, 12884901888 bytes 15 heads, 63 sectors/track, 26630 cylinders Units = cylinders of 945 * 512 = 483840 bytes Disk identifier: 0x000c2aa7 Device Boot Start End Blocks Id System /dev/sdd1 * 1 26630 12582643+ b W95 FAT32
Then format the partition as FAT with a command such as «mkfs.vfat -F 32 /dev/sdd1»
WARNING! Executing the mkfs.vfat command on the wrong partition or device could cause your GNU/Linux not to boot. Be sure to confirm the command before you run it.
# mkfs.vfat -F 32 /dev/sdd1 mkfs.vfat 2.11 (12 Mar 2005)
TIP: If your USB flash drive or USB hard drive is not able to boot, check the following:
- Ensure that your USB flash drive contains at least one FAT partition.
- Ensure that the partition is marked as «bootable» in the partition table.
- Ensure that the partition starts on a cylinder boundary.
For the first partition this is usually sector 63.
GNU/Linux Method C: Manual — Overwrite
WARNING: Confirm you have the correct device path name before executing commands!
This method will overwrite the destination device. Hence it is critical to select the proper USB flash device.
Since GParted Live is based on Debian Live and this image is a isohybrid, the GParted Live CD image can be written directly to a USB flash drive.
NOTE: This method is only bootable with BIOS/MBR (Legacy), not uEFI/GPT.
- Download the GParted Live iso file.
- Insert the USB flash drive your Linux computer and wait a few seconds. Next, from a terminal window run the command:
GNU/Linux Method D: Tuxboot
NOTE: Tuxboot requires older libqt4 libraries.
Use for Ubuntu 18.04 and older, or Debian 10 and older.
- Download Tuxboot on your GNU/Linux computer.
- Follow the USB setup with GNU/Linux instructions to install GParted Live on your USB flash drive.
Как создать Live USB-накопитель GParted в Ubuntu, Linux Mint
г Parted Partition Editor — одна из лучших программ для создания разделов жесткого диска, изменения их размера и управления ими. Великолепие бесплатной программы с открытым исходным кодом в том, что ее можно использовать для работы в Linux, Windows или Mac OS X.
Он поддерживает все популярные форматы жестких дисков, включая btrfs, ext2 / ext3 / ext4, fat16 / fat32, NTFS и другие. В этой статье я объясню, как сделать загрузочный USB-накопитель GParted live, который можно использовать для изменения размера и разбиения любого жесткого диска.
Почему Live USB-накопитель GParted?
Если вам интересно, зачем создавать Live USB-накопитель GParted, если вы можете установить GParted в свой дистрибутив Linux. Проблема в том, что вы не можете изменить размер активного раздела, с которого вы загрузили свой компьютер. Используя Live USB-накопитель GParted, ваш жесткий диск можно использовать бесплатно, и вы можете свободно изменять размер и легко разбивать его на разделы.
Создание USB-накопителя GParted Live в Ubuntu
ШАГ 1. Загрузите GParted Live ISO с здесь . Доступны 32-битные и 64-битные версии.
ШАГ 2: Вставьте чистую флешку в свой компьютер. Я рекомендую минимум 512 МБ. Флэш-накопитель USB будет отформатирован во время процесса. Поэтому убедитесь, что вы сделали резервную копию данных в нем.
ШАГ 3: Запустите утилиту «Диски». «Диски» по умолчанию упакованы в Ubuntu и Linux Mint. Пользователи Elementary OS могут бесплатно загрузить его из AppCenter.
ШАГ 4. Выберите USB-накопитель на левой панели окна «Диски», а затем щелкните значок «Навигация», расположенный справа. Выберите «Восстановить образ диска…».

ШАГ 5: Найдите и выберите файл ISO GParted Live USB, который вы загрузили на ШАГЕ 1.
ШАГ 6: Нажмите «Начать восстановление».

ШАГ 7: Подтвердите и введите пароль root.
Вот и все. Ваш USB-накопитель GParted Live (также называемый редактором разделов GNOME) готов! Вы можете сразу загрузиться в него, чтобы изменить размер и разбить жесткий диск.
Загрузитесь с USB-накопителя GParted Live
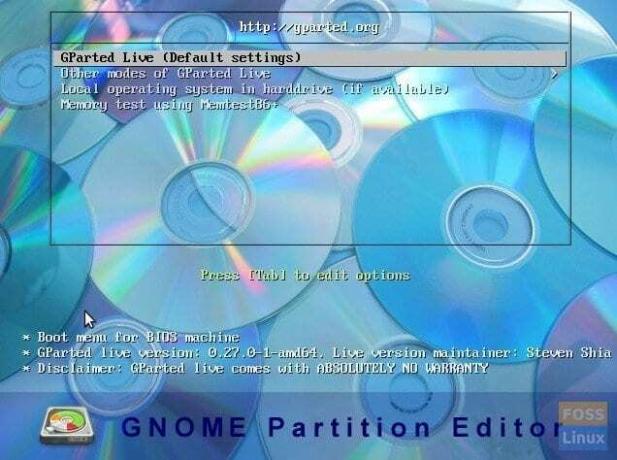
1. Как только вы загрузите свой компьютер с живого USB-накопителя, вы увидите это окно. Выберите первый вариант (выделен по умолчанию) и нажмите клавишу ввода.
2. В следующем окне выберите «Не трогать раскладку клавиатуры» и нажмите Enter.

4. Наконец, вы увидите пользовательский интерфейс GParted. Вы можете выбрать нужный раздел и изменить размер / создать / форматировать разделы.
How to create a GParted live USB drive in Ubuntu, Linux Mint

G Parted Partition Editor is one of the best programs to create, resize, and manage hard disk partitions. The greatness of free and opensource program is it can be used to work on Linux, Windows, or Mac OS X.
It supports all the popular hard disk formats, including btrfs, ext2 / ext3 / ext4, fat16 / fat32, NTFS, and more. In this article, I will explain how to make a bootable GParted live USB drive, which can be used to resize and partition any hard disk.
Why a GParted live USB drive?
If you are wondering what’s the need to create a GParted live USB drive when you can install GParted on your Linux distro. The problem is you can’t resize an active partition from which you have booted your computer. By using a GParted live USB drive, your hard disk is free to use, and you can have the freedom to resize and partition easily.
Creating a GParted Live USB drive on Ubuntu
STEP 1: Download GParted Live ISO from here. There are 32-bit and 64-bit versions available.
STEP 2: Insert a blank USB flash drive to your PC. I recommend a minimum of 512 MB capacity. The USB flash drive will get formatted during the process. So make sure you took a backup of the data in it.
STEP 3: Launch ‘Disks’ utility. ‘Disks’ come packaged in Ubuntu and Linux Mint by default. Elementary OS users can download it from the AppCenter for free.
STEP 4: Select the USB flash drive in the left pane of the ‘Disks’ window and then click on the ‘Navigation’ icon located on the right side. Select ‘Restore Disk Image…’.

STEP 5: Browse and select the GParted Live USB ISO file, which you had downloaded in STEP 1.
STEP 6: Click ‘Start Restoring’.

STEP 7: Confirm and enter the root password.
That’s it. Your GParted Live USB drive (also called GNOME Partition Editor) is now ready! You can boot into it right away to resize and partition your hard disk.
Boot into GParted Live USB drive
1. Once you boot your computer into the USB live drive, you will see this window. Select the first option (highlighted by default) and hit the enter key.

2. In the next window, select ‘Don’t touch keymap’ and hit enter.

4. Finally, you will see the GParted user interface. You can select the desired partition and resize/create/format partitions.
Downloads
GParted is a free partition manager that enables you to resize, copy, and move partitions without data loss.
The best way to access all of the features of the GParted application is by using the GParted Live bootable image. GParted Live enables you to use GParted on GNU/Linux as well as other operating systems, such as Windows or Mac OS X.
CAUTION: Editing partitions has the potential to cause LOSS of DATA.
You are advised to BACKUP your DATA before using gparted.
Download Links
If you use GParted and it helps you with your task, then please consider making a donation to help us make GParted better.
NOTE: GParted Live is available in three different architectures
| Architecture | Description |
| amd64 | 64-bit version runs on x86-64 based computers, with ability to access more than 4 gigabytes of memory, and supports use of multiple processor cores. Works with UEFI secure boot. |
| i686 | 32-bit version runs on x86 and x86-64 based computers, limited to physical address space of 4 gigabytes, and uses one processor only. |
| i686-PAE | 32-bit version runs on x86 (i686 and higher) and x86-64 based computers, with Physical Address Extension to access more than 4 gigabytes of memory, and supports use of multiple processor cores. |
TIP: Problems booting GParted Live image? See Tips on Booting GParted Live.
sudo apt-get install gparted
sudo zypper install gparted
sudo apt-get install gparted
* NOTE: Distribution packages might not contain the most recent versions of GParted.