- Как создать и настроить LUN с помощью LVM в «Целевом сервере iSCSI» в RHEL/CentOS/Fedora — Часть II
- Почему используются LUNS?
- Требования
- Создание LUN с помощью LVM в iSCSI Target Server
- Шаг 1: Создание диска LVM для LUN
- Шаг 2. Создание логических томов для LUN
- Шаг 3. Определите LUN на целевом сервере
- How to Create and Setup LUNs using LVM in “iSCSI Target Server” on RHEL/CentOS/Fedora – Part II
- Why LUNS are Used?
- Requirements
- Creating LUNs using LVM in iSCSI Target Server
- Step 1: Creating LVM Drive for LUNs
- Step 2: Creating Logical Volumes for LUNs
- Step 3: Define LUNs in Target Server
Как создать и настроить LUN с помощью LVM в «Целевом сервере iSCSI» в RHEL/CentOS/Fedora — Часть II
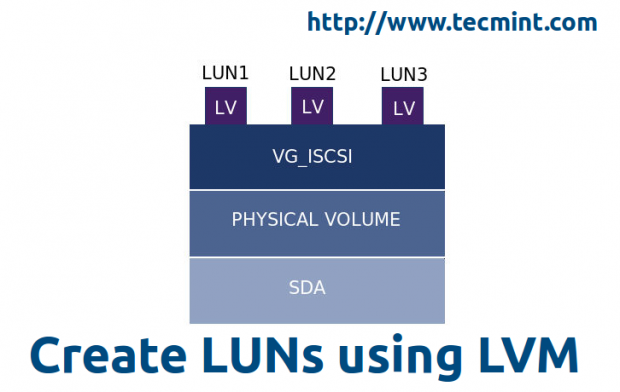
LUN — это номер логического устройства, который используется совместно с сервером хранения iSCSI. Физический диск целевого сервера iSCSI делится своим диском с инициатором по сети TCP/IP. Набор дисков, называемых LUN, для формирования большого хранилища в виде SAN (сети хранения данных). В реальной среде LUN определяются в LVM, если это так, его можно расширять в соответствии с требованиями к пространству.

Почему используются LUNS?
LUNS используются для хранения, хранилища SAN состоят в основном из групп LUNS, которые становятся пулом, а LUN — это фрагменты физического диска с целевого сервера. Мы можем использовать LUNS в качестве физического диска нашей системы для установки операционных систем, LUNS используются в кластерах, виртуальных серверах, SAN и т. д. Основная цель использования LUNS на виртуальных серверах для хранения ОС. Производительность и надежность LUNS будут зависеть от того, какой тип диска мы используем при создании целевого сервера хранения.
Требования
Чтобы узнать о создании целевого сервера ISCSI, перейдите по ссылке ниже.
Настройка главного сервера
Системная информация и настройка сети такие же, как и у iSCSI Target Server, как показано в части I, поскольку мы определяем LUN на одном сервере.
- Операционная система — CentOS версии 6.5 (последняя)
- Целевой IP-адрес iSCSI — 192.168.0.200
- Используемые порты: TCP 860, 3260
- Файл конфигурации: /etc/tgt/targets.conf
Создание LUN с помощью LVM в iSCSI Target Server
Во-первых, узнайте список дисков с помощью команды fdisk -l, это позволит манипулировать длинным списком информации о всех разделах в системе.
Приведенная выше команда дает только информацию о диске базовой системы. Чтобы получить информацию об устройстве хранения, используйте приведенную ниже команду, чтобы получить список устройств хранения.
# fdisk -l /dev/vda && fdisk -l /dev/sda

ПРИМЕЧАНИЕ. Здесь vda — жесткий диск виртуальной машины, так как я использую виртуальную машину для демонстрации, /dev/sda добавляется дополнительно для хранения.
Шаг 1: Создание диска LVM для LUN
Мы собираемся использовать диск /dev/sda для создания LVM.

Теперь давайте разделим диск с помощью команды fdisk, как показано ниже.
- Опция ‘-c’ отключает режим совместимости с DOS.
- Опция ‘-u‘ используется для вывода таблиц разделов, задавая размеры в секторах, а не в цилиндрах.
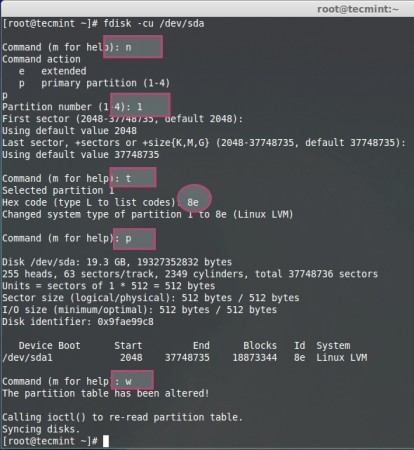
Выберите n, чтобы создать новый раздел.
Выберите p, чтобы создать основной раздел.
Command action e extended p primary partition (1-4)
Укажите номер раздела, который нам нужно создать.
Как и здесь, мы собираемся настроить диск LVM. Итак, нам нужно использовать настройки по умолчанию, чтобы использовать полный размер диска.
First sector (2048-37748735, default 2048): Using default value 2048 Last sector, +sectors or +size (2048-37748735, default 37748735): Using default value 37748735
Выберите тип раздела. Здесь нам нужно настроить LVM, поэтому используйте 8e. Используйте опцию l, чтобы просмотреть список типов.
Выберите, какой раздел хотите изменить тип.
Selected partition 1 Hex code (type L to list codes): 8e Changed system type of partition 1 to 8e (Linux LVM)
После изменения типа установите флажок «Изменения путем печати» (p), чтобы просмотреть таблицу разделов.
Command (m for help): p Disk /dev/sda: 19.3 GB, 19327352832 bytes 255 heads, 63 sectors/track, 2349 cylinders, total 37748736 sectors Units = sectors of 1 * 512 = 512 bytes Sector size (logical/physical): 512 bytes / 512 bytes I/O size (minimum/optimal): 512 bytes / 512 bytes Disk identifier: 0x9fae99c8 Device Boot Start End Blocks Id System /dev/sda1 2048 37748735 18873344 8e Linux LVM
Запишите изменения, используя w, чтобы выйти из утилиты fdisk. Перезагрузите систему, чтобы внести изменения.
Для справки я прикрепил снимок экрана ниже, который даст вам четкое представление о создании диска LVM.

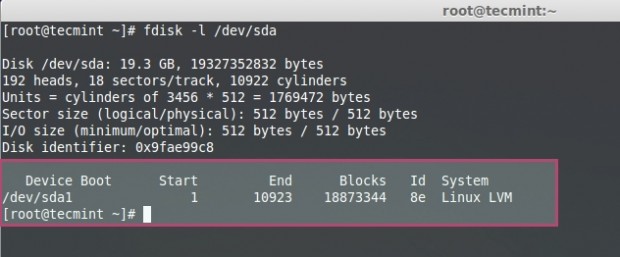
После перезагрузки системы просмотрите таблицу разделов, используя следующую команду fdisk.

Шаг 2. Создание логических томов для LUN
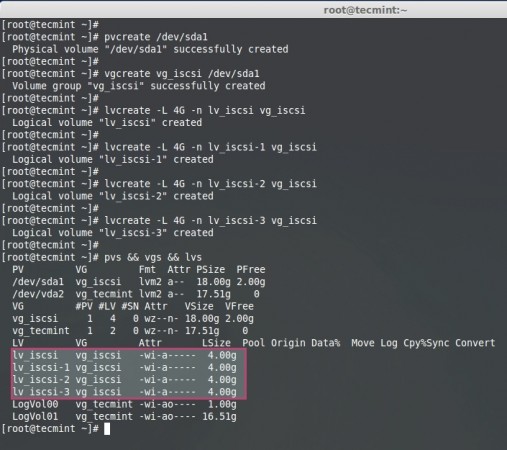
Теперь мы собираемся создать физический том с помощью команды «pvcreate».
Создайте группу томов с именем iSCSI, чтобы идентифицировать группу.
# vgcreate vg_iscsi /dev/sda1
Здесь я определяю 4 логических тома, если это так, то на нашем целевом сервере iSCSI будет 4 LUN.
# lvcreate -L 4G -n lv_iscsi vg_iscsi # lvcreate -L 4G -n lv_iscsi-1 vg_iscsi # lvcreate -L 4G -n lv_iscsi-2 vg_iscsi # lvcreate -L 4G -n lv_iscsi-3 vg_iscsi
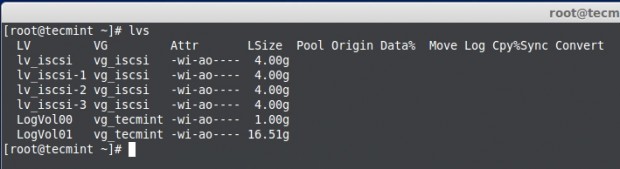
Перечислите физический том, группу томов, логические тома для подтверждения.
Для лучшего понимания приведенной выше команды, для справки, я включил скриншот ниже.

Шаг 3. Определите LUN на целевом сервере
Мы создали логические тома и готовы к использованию с LUN, здесь мы определяем LUN в целевой конфигурации, если это так, только они будут доступны для клиентских машин (инициаторов).
Откройте и отредактируйте файл конфигурации Targer, расположенный в «/etc/tgt/targets.conf», с помощью редактора по вашему выбору.
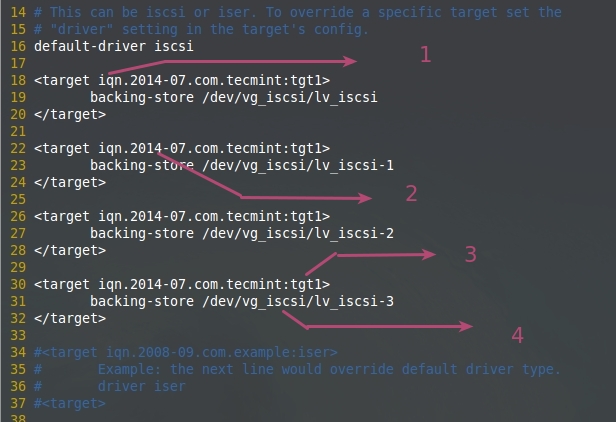
Добавьте следующее определение тома в целевой файл конфигурации. Сохраните и закройте файл.
backing-store /dev/vg_iscsi/lv_iscsi backing-store /dev/vg_iscsi/lv_iscsi-1 backing-store /dev/vg_iscsi/lv_iscsi-2 backing-store /dev/vg_iscsi/lv_iscsi-3
- Полное имя iSCSI (iqn.2014-07.com.tecmint:tgt1).
- Используйте все, что хотите.
- Определить с помощью цели, первой цели на этом сервере.
- 4. LVM используется совместно для определенного LUN.
Затем перезагрузите конфигурацию, запустив службу tgd, как показано ниже.
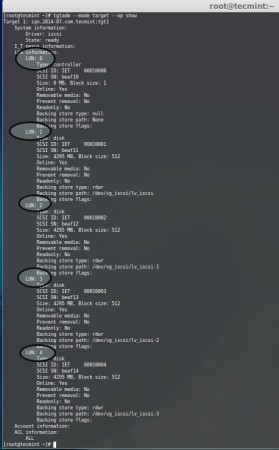
Затем проверьте доступные LUN с помощью следующей команды.
# tgtadm --mode target --op show
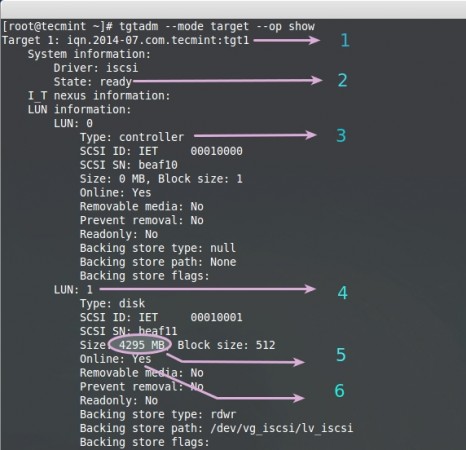
Приведенная выше команда выдаст длинный список доступных LUN со следующей информацией.
- Полное имя iSCSI
- iSCSI готов к использованию
- По умолчанию LUN 0 будет зарезервирован для контроллера.
- LUN 1, что мы определили на целевом сервере
- Здесь я определил 4 ГБ для одного LUN
- Онлайн: да, он готов к использованию LUN
Здесь мы определили LUN для целевого сервера с помощью LVM, его можно расширять и поддерживать многие функции, такие как моментальные снимки. Давайте посмотрим, как пройти аутентификацию на целевом сервере в ЧАСТИ-III и смонтировать удаленное хранилище локально.
How to Create and Setup LUNs using LVM in “iSCSI Target Server” on RHEL/CentOS/Fedora – Part II
LUN is a Logical Unit Number, which shared from the iSCSI Storage Server. The Physical drive of iSCSI target server shares its drive to initiator over TCP/IP network. A Collection of drives called LUNs to form a large storage as SAN (Storage Area Network). In real environment LUNs are defined in LVM, if so it can be expandable as per space requirements.
Why LUNS are Used?
LUNS used for storage purpose, SAN Storage’s are build with mostly Groups of LUNS to become a pool, LUNs are Chunks of a Physical disk from target server. We can use LUNS as our systems Physical Disk to install Operating systems, LUNS are used in Clusters, Virtual servers, SAN etc. The main purpose of Using LUNS in Virtual servers for OS storage purpose. LUNS performance and reliability will be according to which kind of disk we using while creating a Target storage server.
Requirements
To know about creating a ISCSI Target Server follow the below link.
Master Server Setup
System information’s and Network setup are same as iSCSI Target Server as shown in Part – I, As we are defining LUNs in same server.
- Operating System – CentOS release 6.5 (Final)
- iSCSI Target IP – 192.168.0.200
- Ports Used : TCP 860, 3260
- Configuration file : /etc/tgt/targets.conf
Creating LUNs using LVM in iSCSI Target Server
First, find out the list of drives using fdisk -l command, this will manipulate a long list of information of every partitions on the system.
The above command only gives the drive information’s of base system. To get the storage device information, use the below command to get the list of storage devices.
# fdisk -l /dev/vda && fdisk -l /dev/sda
NOTE: Here vda is virtual machines hard drive as I’m using virtual machine for demonstration, /dev/sda is added additionally for storage.
Step 1: Creating LVM Drive for LUNs
We going to use /dev/sda drive for creating a LVM.
Now let’s Partition the drive using fdisk command as shown below.
- The option ‘-c‘ switch off the DOS compatible mode.
- The option ‘-u‘ is used to listing partition tables, give sizes in sectors instead of cylinders.
Choose n to create a New Partition.
Choose p to create a Primary partition.
Command action e extended p primary partition (1-4)Give a Partition number which we need to create.
As here, we are going to setup a LVM drive. So, we need to use the default settings to use full size of Drive.
First sector (2048-37748735, default 2048): Using default value 2048 Last sector, +sectors or +size (2048-37748735, default 37748735): Using default value 37748735Choose the type of partition, Here we need to setup a LVM so use 8e. Use l option to see the list of type.
Choose which partition want to change the type.
Selected partition 1 Hex code (type L to list codes): 8e Changed system type of partition 1 to 8e (Linux LVM)After changing the type, check the changes by print (p) option to list the partition table.
Command (m for help): p Disk /dev/sda: 19.3 GB, 19327352832 bytes 255 heads, 63 sectors/track, 2349 cylinders, total 37748736 sectors Units = sectors of 1 * 512 = 512 bytes Sector size (logical/physical): 512 bytes / 512 bytes I/O size (minimum/optimal): 512 bytes / 512 bytes Disk identifier: 0x9fae99c8 Device Boot Start End Blocks Id System /dev/sda1 2048 37748735 18873344 8e Linux LVMWrite the changes using w to exit from fdisk utility, Restart the system to make changes.
For your reference, I’ve attached screen shot below that will give you a clear idea about creating LVM drive.
After system reboot, list the Partition table using the following fdisk command.
Step 2: Creating Logical Volumes for LUNs
Now here, we going to create Physical volume using using ‘pvcreate’ command.
Create a Volume group with name of iSCSI to identify the group.
# vgcreate vg_iscsi /dev/sda1Here I’m defining 4 Logical Volumes, if so there will be 4 LUNs in our iSCSI Target server.
# lvcreate -L 4G -n lv_iscsi vg_iscsi # lvcreate -L 4G -n lv_iscsi-1 vg_iscsi # lvcreate -L 4G -n lv_iscsi-2 vg_iscsi # lvcreate -L 4G -n lv_iscsi-3 vg_iscsiList the Physical volume, Volume group, logical volumes to confirm.
For better understanding of the above command, for your reference I’ve included a screen grab below.

Step 3: Define LUNs in Target Server
We have created Logical Volumes and ready to use with LUN, here we to define the LUNs in target configuration, if so only it will be available for client machines (Initiators).
Open and edit Targer configuration file located at ‘/etc/tgt/targets.conf’ with your choice of editor.
Append the following volume definition in target conf file. Save and close the file.
backing-store /dev/vg_iscsi/lv_iscsi backing-store /dev/vg_iscsi/lv_iscsi-1 backing-store /dev/vg_iscsi/lv_iscsi-2 backing-store /dev/vg_iscsi/lv_iscsi-3
- iSCSI qualified name (iqn.2014-07.com.tecmint:tgt1).
- Use what ever as your wish.
- Identify using target, 1st target in this Server.
- 4. LVM Shared for particular LUN.
Next, reload the configuration by starting tgd service as shown below.
Next verify the available LUNs using the following command.
# tgtadm --mode target --op show

The above command will give long list of available LUNs with following information.
- iSCSI Qualified Name
- iSCSI is Ready to Use
- By Default LUN 0 will be reserved for Controller
- LUN 1, What we have Defined in the Target server
- Here i have defined 4 GB for a single LUN
- Online : Yes, Its ready to Use the LUN
Here we have defined the LUNs for target server using LVM, this can be expandable and support for many features such as snapshots. Let us see how to authenticate with Target server in PART-III and mount the remote Storage locally.