- How to resize a logical volume with 5 simple LVM commands
- Process summary
- Create a Physical Volume
- Identify the Volume Group
- Extend the Volume Group
- Cloud services
- Identify the Logical Volume
- Extend the Logical Volume
- Extend the filesystem
- Wrap up
- How to Extend/Reduce LVM’s (Logical Volume Management) in Linux – Part II
- Requirements
- How to Extend Volume Group and Reduce Logical Volume
- Logical Volume Extending
- Extending Volume Group
- Reducing Logical Volume (LVM)
How to resize a logical volume with 5 simple LVM commands

Have you ever wondered how to extend your root or home directory filesystem partition using LVM? You might have low storage space and you need to increase the capacity of your partitions. This article looks at how to extend storage in Linux using Logical Volume Manager (LVM).
Process summary
The process is straightforward. Attach the new storage to the system. Next, create a new Physical Volume (PV) from that storage. Add the PV to the Volume Group (VG) and then extend the Logical Volume (LV).
Look at the picture below. The red line mark shows the original size of the root mount point. The xvdc disk is the new disk attached to it. Extend the root partition to make it 60G in size.

[ Want to test your sysadmin skills? Take a skills assessment today. ]
Create a Physical Volume

[root@redhat-sysadmin ~]# pvcreate /dev/xvdc Physical volume "/dev/xvdc" successfully created.When you attach the new storage /dev/xvdc , you need to use the pvcreate command in order for the disk to be initialized and be seen by the Logical Volume Manager (LVM).
Identify the Volume Group
Next, you need to identify the Volume Group (VG) to which you are extending the new disk with the vgs command. Mine is called centos, and that’s the only VG available currently on my LVM.

Extend the Volume Group
The vgextend command allows you to add one or more initialized Physical Volumes to an existing VG to extend its size.
As you can see, you want to extend the centos Volume Group.

After extending it, type the vgs or vgdisplay commands for a more detailed overview of the VG.
The vgs command shows only the VG in with a few lines.

The vgdisplay shows all the VGs in the LVM and displays the complete information about them.

Cloud services
As you can see from the image above, marked with red, you have 10GB free. You can decide to extend all or some amount of storage size to it.
Identify the Logical Volume
The lvs or lvdisplay command shows the Logical Volume associated with a Volume Group. Use the lvs command, and the Logical Volume you’re trying to extend is the root, which belongs to the centos VG. As you can see above, you’ve already extended the VG. Next, extend the Logical Volume.

Extend the Logical Volume
Extend the LV with the lvextend command. The lvextend command allows you to extend the size of the Logical Volume from the Volume Group.

[root@redhat-sysadmin ~]# lvextend -l +100%FREE /dev/centos/root.Extend the filesystem
You need to confirm the filesystem type you’re using, Red Hat uses the XFS filesystem, but you can check the filesystem with lsblk -f or df -Th .
Resize the filesystem on the Logical Volume after it has been extended to show the changes. Resize the XFS filesystem by using the xfs_growfs command.

Finally, verify the size of your extended partition.

Wrap up
You can extend any other partition with the steps shown. You just have to ensure you’re using LVM and know the partition you’re extending. If you want to learn more about LVM, check out other articles from Enable Sysadmin by searching LVM.
How to Extend/Reduce LVM’s (Logical Volume Management) in Linux – Part II
Previously we have seen how to create a flexible disk storage using LVM. Here, we are going to see how to extend volume group, extend and reduce a logical volume. Here we can reduce or extend the partitions in Logical volume management (LVM) also called as flexible volume file-system.

Requirements
When do we need to reduce volume?
May be we need to create a separate partition for any other use or we need to expand the size of any low space partition, if so we can reduce the large size partition and we can expand the low space partition very easily by the following simple easy steps.
My Server Setup – Requirements
How to Extend Volume Group and Reduce Logical Volume
Logical Volume Extending
Currently, we have One PV, VG and 2 LV. Let’s list them one by one using following commands.

There are no free space available in Physical Volume and Volume group. So, now we can’t extend the lvm size, for extending we need to add one physical volume (PV), and then we have to extend the volume group by extending the vg. We will get enough space to extend the Logical volume size. So first we are going to add one physical volume.
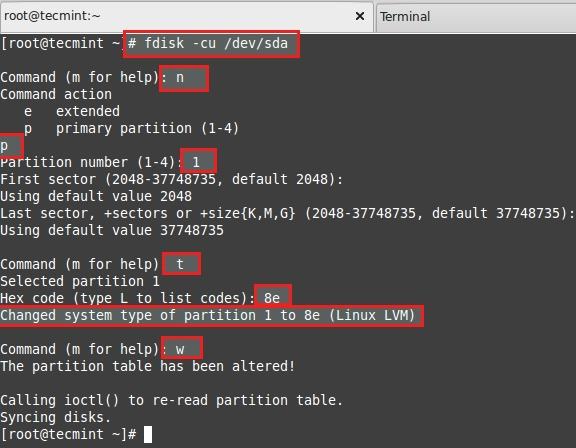
For adding a new PV we have to use fdisk to create the LVM partition.
- To Create new partition Press n.
- Choose primary partition use p.
- Choose which number of partition to be selected to create the primary partition.
- Press 1 if any other disk available.
- Change the type using t.
- Type 8e to change the partition type to Linux LVM.
- Use p to print the create partition ( here we have not used the option).
- Press w to write the changes.
Restart the system once completed.
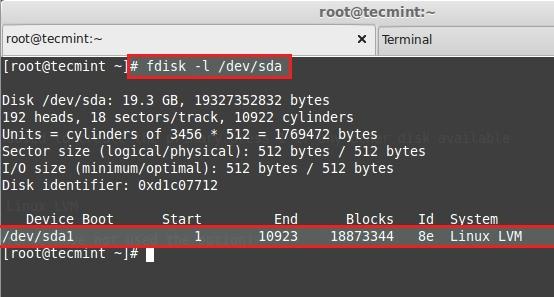
List and check the partition we have created using fdisk.
Next, create new PV (Physical Volume) using following command.
Verify the pv using below command.

Extending Volume Group
Add this pv to vg_tecmint vg to extend the size of a volume group to get more space for expanding lv.
# vgextend vg_tecmint /dev/sda1
Let us check the size of a Volume Group now using.
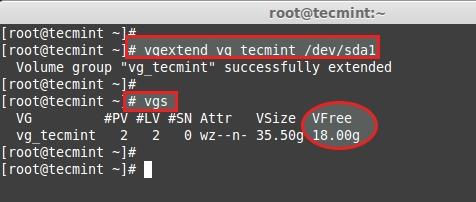
We can even see which PV are used to create particular Volume group using.

Here, we can see which Volume groups are under Which Physical Volumes. We have just added one pv and its totally free. Let us see the size of each logical volume we have currently before expanding it.
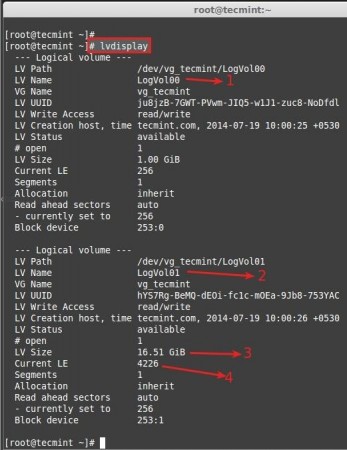
- LogVol00 defined for Swap.
- LogVol01 defined for /.
- Now we have 16.50 GB size for / (root).
- Currently there are 4226 Physical Extend (PE) available.
Now we are going to expand the / partition LogVol01. After expanding we can list out the size as above for confirmation. We can extend using GB or PE as I have explained it in LVM PART-I, here I’m using PE to extend.
For getting the available Physical Extend size run.
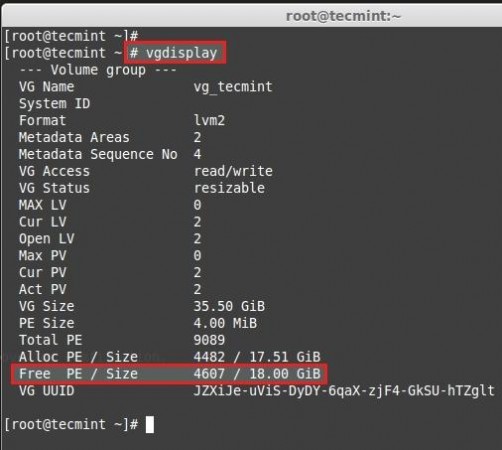
There are 4607 free PE available = 18GB Free space available. So we can expand our logical volume up-to 18GB more. Let us use the PE size to extend.
# lvextend -l +4607 /dev/vg_tecmint/LogVol01
Use + to add the more space. After Extending, we need to re-size the file-system using.
# resize2fs /dev/vg_tecmint/LogVol01
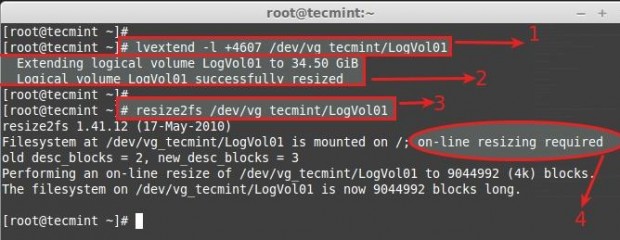
- Command used to extend the logical volume using Physical extends.
- Here we can see it is extended to 34GB from 16.51GB.
- Re-size the file system, If the file-system is mounted and currently under use.
- For extending Logical volumes we don’t need to unmount the file-system.
Now let’s see the size of re-sized logical volume using.
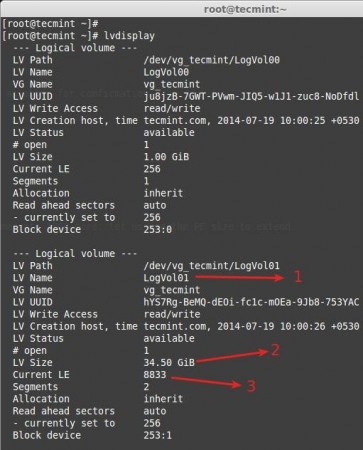
- LogVol01 defined for / extended volume.
- After extending there is 34.50GB from 16.50GB.
- Current extends, Before extending there was 4226, we have added 4607 extends to expand so totally there are 8833.
Now if we check the vg available Free PE it will be 0.
See the result of extending.
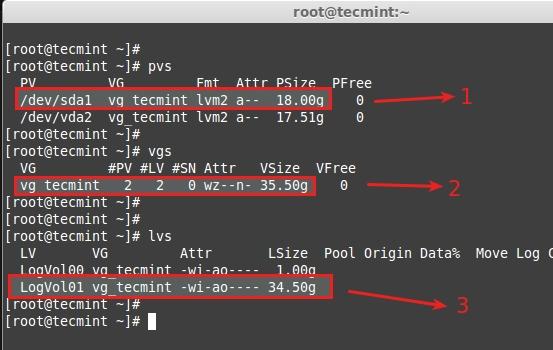
- New Physical Volume added.
- Volume group vg_tecmint extended from 17.51GB to 35.50GB.
- Logical volume LogVol01 extended from 16.51GB to 34.50GB.
Here we have completed the process of extending volume group and logical volumes. Let us move towards some interesting part in Logical volume management.
Reducing Logical Volume (LVM)
Here we are going to see how to reduce the Logical Volumes. Everyone say its critical and may end up with disaster while we reduce the lvm. Reducing lvm is really interesting than any other part in Logical volume management.
- Before starting, it is always good to backup the data, so that it will not be a headache if something goes wrong.
- To Reduce a logical volume there are 5 steps needed to be done very carefully.
- While extending a volume we can extend it while the volume under mount status (online), but for reduce we must need to unmount the file system before reducing.
Let’s wee what are the 5 steps below.
- unmount the file system for reducing.
- Check the file system after unmount.
- Reduce the file system.
- Reduce the Logical Volume size than Current size.
- Recheck the file system for error.
- Remount the file-system back to stage.
For demonstration, I have created separate volume group and logical volume. Here, I’m going to reduce the logical volume tecmint_reduce_test. Now its 18GB in size. We need to reduce it to 10GB without data-loss. That means we need to reduce 8GB out of 18GB. Already there is 4GB data in the volume.
While reducing size, we need to reduce only 8GB so it will roundup to 10GB after the reduce.

Here we can see the file-system information.
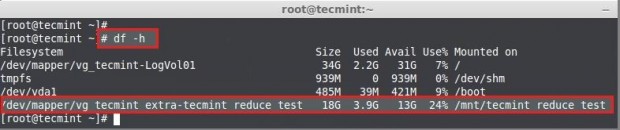
- The size of the Volume is 18GB.
- Already it used upto 3.9GB.
- Available Space is 13GB.
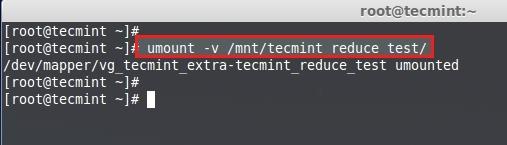
First unmount the mount point.
# umount -v /mnt/tecmint_reduce_test/
Then check for the file-system error using following command.
# e2fsck -ff /dev/vg_tecmint_extra/tecmint_reduce_test
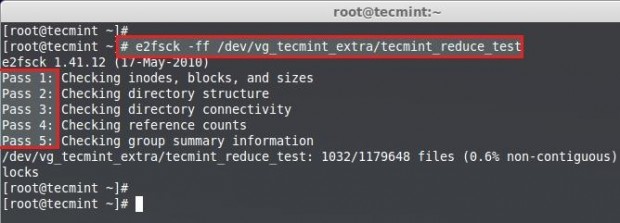
Note: Must pass in every 5 steps of file-system check if not there might be some issue with your file-system.
Next, reduce the file-system.
# resize2fs /dev/vg_tecmint_extra/tecmint_reduce_test 10G

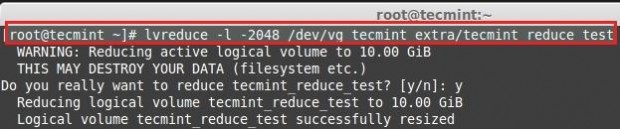
Reduce the Logical volume using GB size.
# lvreduce -L -8G /dev/vg_tecmint_extra/tecmint_reduce_test

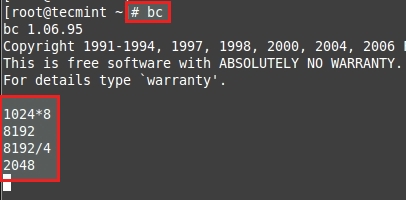
To Reduce Logical volume using PE Size we need to Know the size of default PE size and total PE size of a Volume Group to put a small calculation for accurate Reduce size.
# lvdisplay vg_tecmint_extra
Here we need to do a little calculation to get the PE size of 10GB using bc command.
1024MB x 10GB = 10240MB or 10GB 10240MB / 4PE = 2048PE
Press CRTL+D to exit from BC.
# lvreduce -l -2048 /dev/vg_tecmint_extra/tecmint_reduce_test
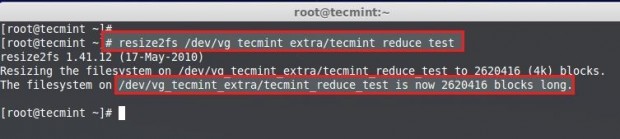
Re-size the file-system back, In this step if there is any error that means we have messed-up our file-system.
# resize2fs /dev/vg_tecmint_extra/tecmint_reduce_test
Mount the file-system back to same point.
# mount /dev/vg_tecmint_extra/tecmint_reduce_test /mnt/tecmint_reduce_test/
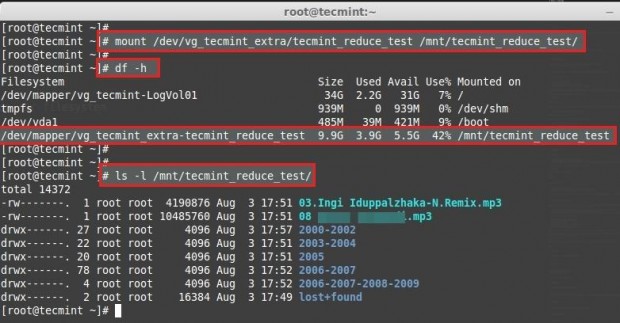
Check the size of partition and files.
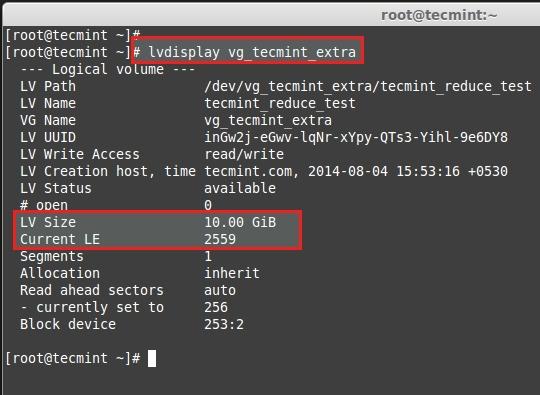
# lvdisplay vg_tecmint_extra
Here we can see the final result as the logical volume was reduced to 10GB size.
In this article, we have seen how to extend the volume group, logical volume and reduce the logical volume. In the next part (Part III), we will see how to take a Snapshot of logical volume and restore it to earlier stage.