- MAC address spoofing
- Manually
- iproute2
- macchanger
- Automatically
- systemd-udevd
- systemd.link
- udev rule
- systemd unit
- Creating unit
- Enabling service
- netctl interfaces
- NetworkManager
- wpa_supplicant
- iwd
- Troubleshooting
- Connection to DHCPv4 network fails
- See also
- How to Change Network MAC Address in Linux
- Why Change Your MAC Address?
- Install MAC Changer in Linux
- Changing Linux MAC Address
MAC address spoofing
This article gives several methods to spoof a Media Access Control (MAC) address.
Manually
There are two methods for spoofing a MAC address: installing and configuring either iproute2 or macchanger . Both of them are outlined below.
iproute2
First, you can check your current MAC address with the command:
# ip link show interface
where interface is the name of your network interface.
The section that interests us at the moment is the one that has «link/ether» followed by a 6-byte number. It will probably look something like this:
The first step to spoofing the MAC address is to bring the network interface down. It can be accomplished with the command:
# ip link set dev interface down
Next, we actually spoof our MAC. Any hexadecimal value will do, but some networks may be configured to refuse to assign IP addresses to a client whose MAC does not match up with any of known vendors. Therefore, unless you control the network(s) you are connecting to, use MAC prefix of any real vendor (basically, the first three bytes), and use random values for next three bytes. For more information please read Wikipedia:Organizationally unique identifier.
To change the MAC, we need to run the command:
# ip link set dev interface address XX:XX:XX:XX:XX:XX
Where any 6-byte value will suffice for XX:XX:XX:XX:XX:XX .
The final step is to bring the network interface back up. This can be accomplished by running the command:
# ip link set dev interface up
If you want to verify that your MAC has been spoofed, simply run ip link show interface again and check the value for ‘link/ether’. If it worked, ‘link/ether’ should be whatever address you decided to change it to.
macchanger
Another method uses macchanger (a.k.a., the GNU MAC Changer). It provides a variety of features such as changing the address to match a certain vendor or completely randomizing it.
The spoofing is done on per-interface basis, specify network interface name as interface in each of the following commands.
The MAC address can be spoofed with a fully random address:
# macchanger -r interface
To randomize only device-specific bytes of current MAC address (that is, so that if the MAC address was checked it would still register as being from the same vendor), you would run the command:
# macchanger -e interface
To change the MAC address to a specific value, you would run:
# macchanger --mac=XX:XX:XX:XX:XX:XX interface
Where XX:XX:XX:XX:XX:XX is the MAC you wish to change to.
Finally, to return the MAC address to its original, permanent hardware value:
# macchanger -p interface
Note: A device cannot be in use (connected in any way or with its interface up) while the MAC address is being changed.
Automatically
systemd-udevd
udev allows you to perform MAC address spoofing by creating systemd.link(5) files or udev rules.
systemd.link
To set a static spoofed MAC address:
/etc/systemd/network/01-mac.link
[Match] PermanentMACAddress=original MAC [Link] MACAddress=spoofed MAC
To randomize the MAC address on every boot, set MACAddressPolicy=random instead of MACAddress=spoofed MAC .
udev rule
Use address attribute to match the correct device by its original MAC address and change it using the ip command:
/etc/udev/rules.d/81-mac-spoof.rules
ACTION=="add", SUBSYSTEM=="net", ATTR= , RUN+
systemd unit
Creating unit
Below you find two examples of systemd units to change a MAC address at boot, one sets a static MAC using ip and one uses macchanger to assign a random MAC address. The systemd network-pre.target is used to ensure the MAC is changed before a network manager like Netctl or NetworkManager, systemd-networkd or dhcpcd service starts.
iproute2
systemd unit setting a predefined MAC address:
/etc/systemd/system/macspoof@.service
[Unit] Description=MAC Address Change %I Wants=network-pre.target Before=network-pre.target BindsTo=sys-subsystem-net-devices-%i.device After=sys-subsystem-net-devices-%i.device [Service] Type=oneshot ExecStart=/usr/bin/ip link set dev %i address 36:aa:88:c8:75:3a ExecStart=/usr/bin/ip link set dev %i up [Install] WantedBy=multi-user.target
macchanger
systemd unit setting a random address while preserving the original NIC vendor bytes. Ensure that macchanger is installed:
/etc/systemd/system/macspoof@.service
[Unit] Description=macchanger on %I Wants=network-pre.target Before=network-pre.target BindsTo=sys-subsystem-net-devices-%i.device After=sys-subsystem-net-devices-%i.device [Service] ExecStart=/usr/bin/macchanger -e %I Type=oneshot [Install] WantedBy=multi-user.target
A full random address can be set using the -r option, see #macchanger.
Enabling service
Append the desired network interface to the service name (e.g. eth0 ) and enable the service (e.g. macspoof@eth0.service ).
Reboot, or stop and start the prerequisite and requisite services in the proper order. If you are in control of your network, verify that the spoofed MAC has been picked up by your router by examining the static, or DHCP address tables within the router.
netctl interfaces
You can use a netctl hook to run a command each time a netctl profile is re-/started for a specific network interface. Replace interface accordingly:
/etc/netctl/interfaces/interface
#!/usr/bin/env sh /usr/bin/macchanger -r interface
NetworkManager
wpa_supplicant
wpa_supplicant can use random MAC address for each ESS connection(AP) (see [1] for details).
Add this to your configuration:
/etc/wpa_supplicant/wpa_supplicant-wlan0.conf
mac_addr=1 preassoc_mac_addr=1 gas_rand_mac_addr=1
iwd
To randomize the MAC address when iwd starts (see iwd.config(5) for details):
[General] AddressRandomization=once AddressRandomizationRange=nic
Specifying AddressRandomizationRange enables control over which part of the address is randomized. If set to nic , only the NIC specific octets (last three octets) are randomized. The permanent mac address of the network interface is used for the initial 3 octets. If set to full , all six octets of the address are randomized.
Troubleshooting
Connection to DHCPv4 network fails
If you cannot connect to a DHCPv4 network and you are using dhcpcd, which is the default for NetworkManager, you might need to modify the dhcpcd configuration to obtain a lease.
See also
How to Change Network MAC Address in Linux
Every network interface on your Linux operating system distribution is associated with a unique number called MAC (Media Access Control). The wireless and Ethernet network modules are examples of commonly used network interfaces on a Linux operating system. MAC serves a unique role in identifying these network interfaces through system protocols and programs.
For example, through DHCP (Dynamic Host Control Protocol), a network interface is assigned an IP address by a network router automatically. In this case, the MAC address acts as a reference manual for networking devices like the router so that these devices know the identity of the other network devices they are communicating with or, in this case, assigning IP addresses.
Why Change Your MAC Address?
The MAC address is different from an IP address such that it is hardware-oriented whereas an IP address is software-oriented. Therefore, an IP address can be permanently changed whereas changing a MAC address is only temporary. If you restart your machine it will default to its original manufacturer’s value.
Three prime reasons as to why you might need to temporarily change your MAC address stand out:
- You do not trust the public network you are using and therefore don’t want your MAC address to be exposed as it can be used to permanently identify your machine whenever you are on a network.
- A firewall or router has been used to block your original MAC address to deny you access to a specific network.
- Airport WiFi and other public networks operate on the “Limited Time Access” rule when it comes to gifting free internet to their clients. Changing the MAC address can bypass this limitation.
Install MAC Changer in Linux
This Linux operating system software package will help us meet the objective of this article guide. We need to make sure that macchanger is installed on your Linux distribution.
Reference the following installation commands in regards to your Linux distribution:
$ sudo apt-get install macchanger [On Debian, Ubuntu and Mint] $ sudo yum install macchanger [On RHEL/CentOS/Fedora and Rocky Linux/AlmaLinux] $ sudo emerge -a sys-apps/macchanger [On Gentoo Linux] $ sudo pacman -S macchanger [On Arch Linux] $ sudo zypper install macchanger [On OpenSUSE]
You are bound to run into the following prompt during the installation process.
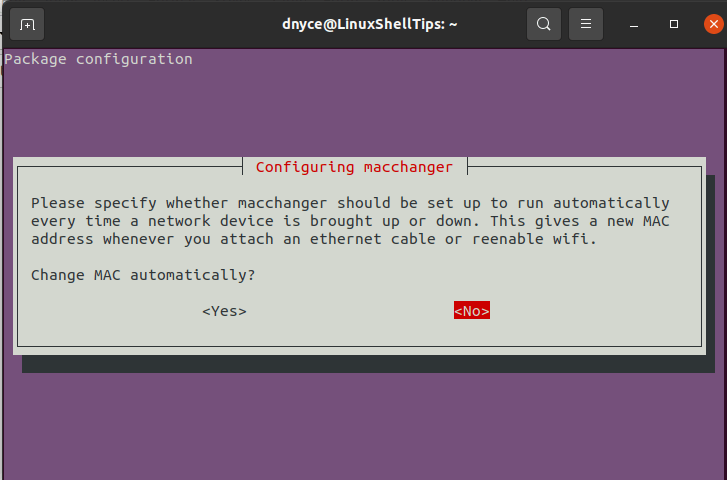
If you choose yes , all your online presence will be associated with a new MAC address even after a successful system reboot. If you only need to change your MAC address occasionally, you should proceed with an option no .
Wait for the macchanger installation process to complete.
Changing Linux MAC Address
The use of the macchanger command should be associated with a network interface. The first step is to identify the available interfaces on your network which most of the time include loopback, wireless, and wired.
We will use the following IP command:
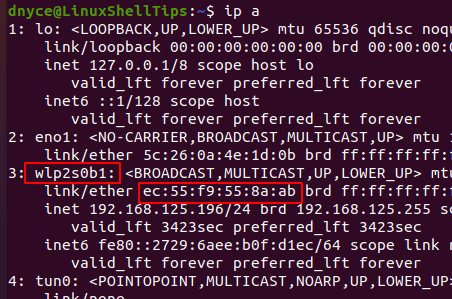
From the screen capture above, the wireless interface wlp2s0b1 is associated with the MAC address ec:55:f9:55:8a:ab. To temporarily change this MAC address, you will need to be a root user or have sudo privileges on your Linux machine.
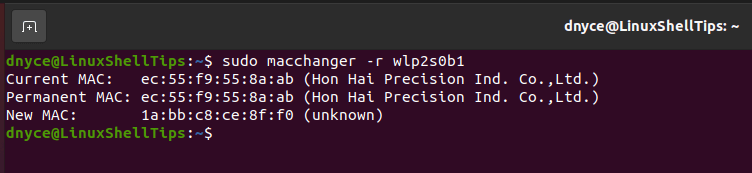
To change the above MAC address, we will use the macchanger command together with the -r option and point to the network interface whose MAC address we need to temporarily change.
$ sudo macchanger -r wlp2s0b1

To avoid the above [ERROR] that says:
[ERROR] Could not change MAC: interface up or insufficient permissions: Device or resource busy
1. Stop your network manager.
$ sudo service network-manager stop
2. Take down the targeted network interface.
3. Now change your MAC address.
$ sudo macchanger -r wlp2s0b1
4. Restart your network manager and the associated network interface.
$ sudo service network-manager start $ sudo ifconfig wlp2s0b1 up
Let us now recheck the existence of the new MAC address:
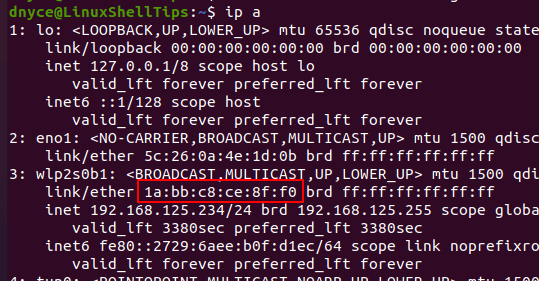
The temporary new MAC address has been configured and implemented as expected.
If you want your network identity to be associated with a specific MAC address, you can reference the following macchanger command syntax:
$ sudo macchanger -m [your_custom_MAC_address] [Targeted_network_interface]
An example implementation would be:
$ sudo macchanger -m f7:ed:56:0e:aa:b2 enp0s3
Changing the MAC address on a Linux operating system environment gives you the flexibility of bypassing the limitation of various network administration rules and also the anonymity advantage. You get to play by your own network rules.