- How to Configure Network Between Guest VM and Host in Oracle VirtualBox
- Requirements
- Create a Network For Guests and Host Machine
- Configure Virtual Machine Network Settings
- Configure Adapter to Connect Virtual Machine to Host
- Configure Adapter to Connect Virtual Machine to Internet
- Setup Static IP Address for Guest Virtual Machine
- Manage Virtual Machines From Host Using SSH
- Building an Internal Network in VirtualBox
- Create a Base Linux Machine
- Clone Base to Client, Router and Server
- Enable Internal Networking
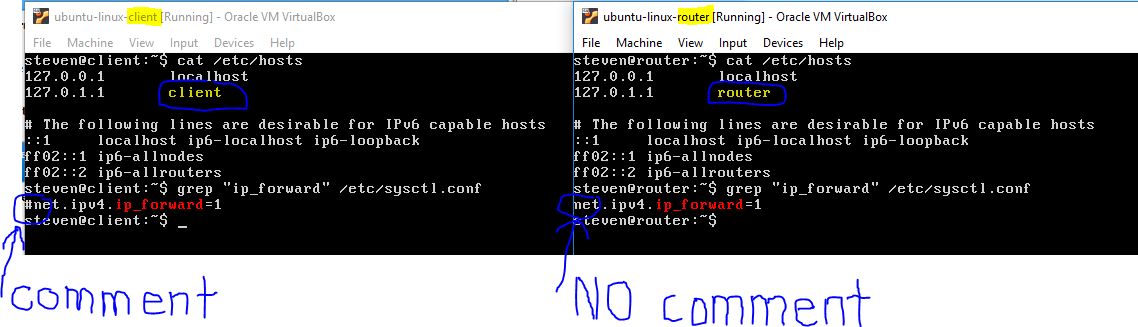
- Set the Hostnames
- Configure Interfaces
- Client
- Router
- Server
- Enable Forwarding on the Router
- Reboot the VMs
- Test the Internal Network
- Test the Real Internet
- Port Forwarding
- Create More Servers
How to Configure Network Between Guest VM and Host in Oracle VirtualBox
Once you have installed different operating systems in Oracle VirtualBox, you may want to enable communication between the host and the virtual machines.
In this article, we will describe the simplest and direct method of setting up a network for guest virtual machines and the host in Linux.
For the purpose of this tutorial:
- Host Operating System – Linux Mint 18
- Virtual Machine OS – CentOS 7 and Ubuntu 16.10
Requirements
- A working Oracle Virtualbox installed on Host machine.
- You must have installed a guest operating system such as Ubuntu, Fedora, CentOS, Linux Mint or any of your choice in the Oracle virtual box.
- Power off the virtual machines as you perform the configurations up to the step where your required to turn them on.
In order for the guest and host machines to communicate, they need to be on the same network and by default, you can attach up to four network cards to your guest machines.
The default network card (Adapter 1) is normally used to connect the guest machines to the Internet using NAT via the host machine.
Important: Always set the first adapter to communicate with the host and the second adapter to connect to the Internet.
Create a Network For Guests and Host Machine
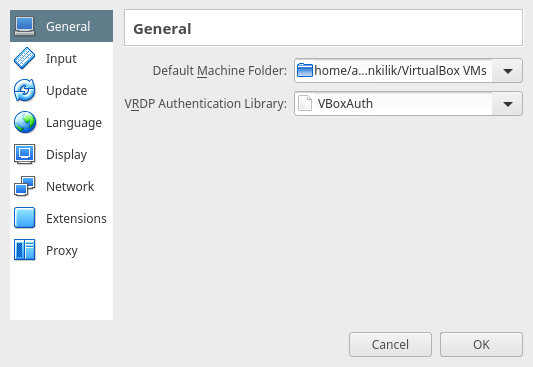
At the Virtualbox manager interface below, start by creating a network on which the host and guests will operate.
Go to File –> Preferences or hit Ctrl + G :

From the following interface, there are two options; choose Host-only Networks by clicking on it. Then use the + sign on the right to add a new host-only network.
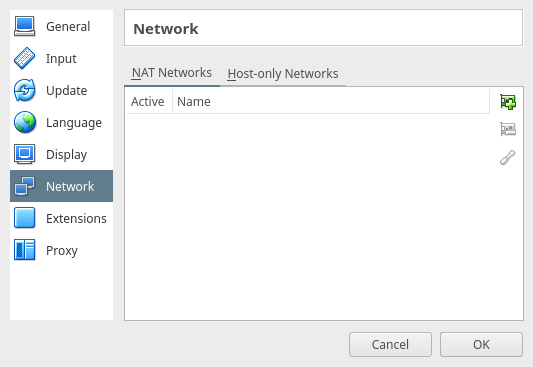
Below is a screen shot showing a new host-only network has been created called vboxnet0.
If you want, you can remove it by using the — button in the middle and to view the network details/settings, click on the edit button.
You can as well change the values as per your preferences, such as the network address, network mask, etc.
Note: The IPv4 address in the interface below is the IP address of your host machine.
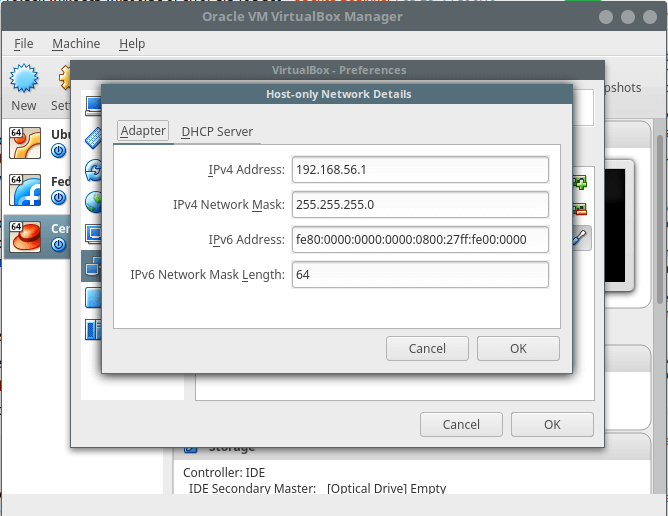
In the next interface, you can configure the DHCP server that is if you want the guest machines to use a dynamic IP address (make sure it is enabled before using it). But I recommend using a static IP address for the virtual machines.
Now click OK on all network settings interfaces below to save the changes.

Configure Virtual Machine Network Settings
Note: You can follow the steps below for every virtual machine that you want to add on the network to communicate with the host machine.
Back at the virtual box manager interface, select your guest virtual machine such as Ubuntu 16.10 server or CentOS 7 and click on the Settings menu.

Configure Adapter to Connect Virtual Machine to Host
Choose the Network option from the interface above. Afterwards, configure first network card (Adapter 1) with the following settings:
- Check the option: “Enable Network Adapter” to turn it on.
- In the field Attached to: select Host-only Adapter
- Then select the Name of the network: vboxnet0
As in the screen shot below and click OK to save the settings:

Configure Adapter to Connect Virtual Machine to Internet
Then add a second network card (Adapter 2) to connect virtual machine to the Internet via the host. Use the settings below:
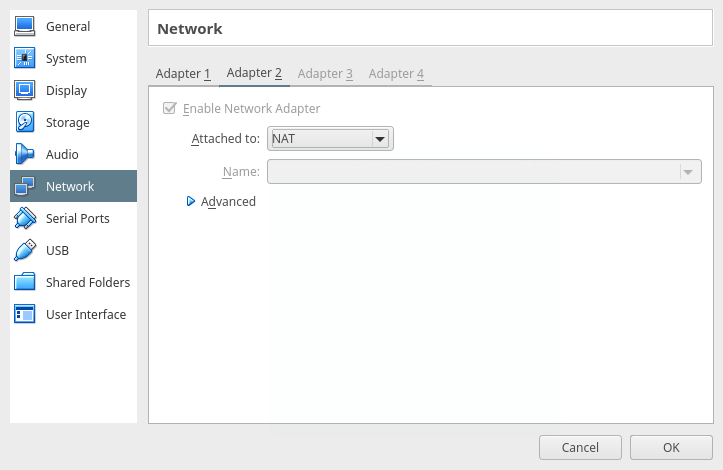
- Check the option: “Enable Network Adapter” to activate it.
- In the field Attached to: select NAT
Setup Static IP Address for Guest Virtual Machine
At this stage, power on the guest virtual machine, login and configure static IP address. Run the command below to show all the interfaces on the guest machine and allocated IP addresses:

From the screen shot above, you can see that there are three interfaces enabled on the virtual machine:
- lo – loopback interface
- enp0s3 (Adapter 1) – for host-only communication which is using the DHCP as set in one of the previous steps and later configured with a static IP address.
- enp0s8 (Adapter 2) – for connection to the Internet. It will use DHCP by default.
On Debian/Ubuntu/Linux Mint
Important: Here, I used Ubuntu 16.10 Server: IP address: 192.168.56.5.
Open the file /etc/network/interfaces using your favorite editor with super user privileges:
$ sudo vi /etc/network/interfaces
Use the following settings for the interface enp0s3 (use your preferred values here):
auto enp0s3 iface enp0s3 inet static address 192.168.56.5 network 192.168.56.0 netmask 255.255.255.0 gateway 192.168.56.1 dns-nameservers 8.8.8.8 192.168.56.1
Then restart network services like so:
$ sudo systemctl restart networking
Alternatively, reboot the system and closely, check if the interface is using the new ip addresses:
On RHEL/CentOS/Fedora
Important: For this section, I used CentOS 7: IP address: 192.168.56.10.
Begin by opening the file for enp0s3 – host-only network interface; /etc/sysconfig/network-scripts/ifcfg-enp0s3 using your favorite editor with super user privileges:
$ sudo vi /etc/sysconfig/network-scripts/ifcfg-enp0s3
Create/modify the following settings (use your preferred values here):
BOOTPROTO=static ONBOOT=yes IPADDR=192.168.56.10 NETWORK=192.168.56.0 NETMASK=255.255.255.0 GATEWAY=192.168.56.1 DNS=8.8.8.8 192.168.56.1 NM_CONTROLLED=no #use this file not network manager to manage interface
Save the file and exit. Then restart network service as follows (you can as well reboot):
$ sudo systemctl restart network.service
Check if the interface is using the new IP addresses as follows:
Manage Virtual Machines From Host Using SSH
On the host machine, use SSH to manage your virtual machines. In the following example, am accessing the CentOS 7 (192.168.56.10)server using SSH:

That’s it! In this post, we described a straightforward method of setting up a network between a guest virtual machines and the host. Do share your thoughts about this tutorial using the feedback section below.
Building an Internal Network in VirtualBox
The aim is to create a (virtual) Internet of 3 Linux VMs within VirtualBox using internal networking, and also allow those VMs access to the real Internet via NAT. The final network configuration is:
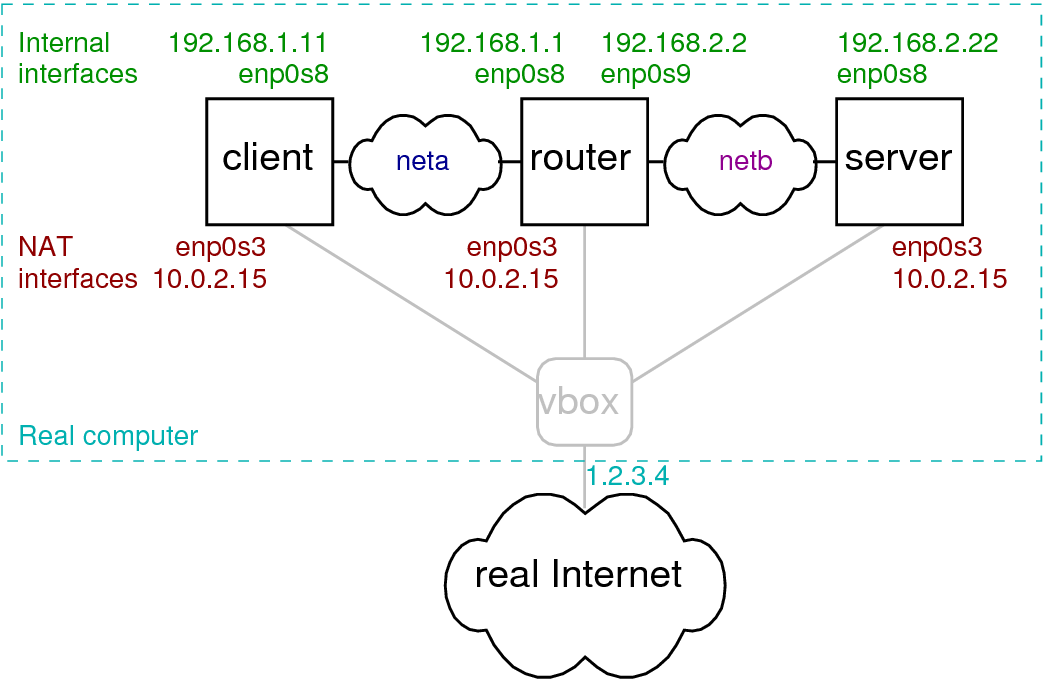
You may use different IP addresses, but be sure to make the corresponding changes in /etc/network/interfaces.
A 32 minute video demonstrating and explaining the steps below is also available:
Create a Base Linux Machine
Setup a base Linux machine using NAT networking (NOT using bridged or internal networking). Install any software that is necessary on all machines, e.g.
sudo apt install openssh-server man manpages manpages-dev nano
sudo apt update
sudo apt upgrade
Clone Base to Client, Router and Server
Create full clones of the base VM to produce three (3) machines, referred to as client, router and server. Be sure to re-initialise the MAC address for each.
Enable Internal Networking
The client VM must have two (2) network adapters, one using NAT and the other using an internal network, e.g. named neta.
The router VM must have three (3) network adapters: NAT, internal network neta, and internal network netb.
The server VM must have two (2) network adapters: NAT and internal network netb.
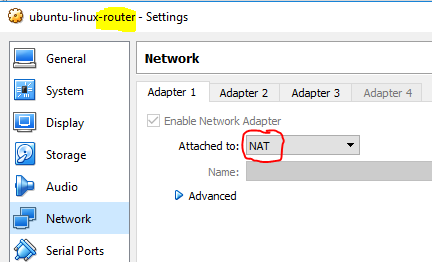
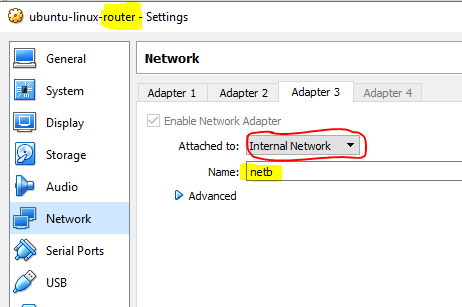
Below are screenshots of the settings for router adapter 1 (NAT) and router adapter 3 (internal). Settings for other machines/adapters are similar.
Set the Hostnames
Start each VM and set the hostname using:
sudo hostnamectl set-hostname
sudo vi /etc/hosts
In the hosts file, change the name for 127.0.1.1 to , where is either client, router or server.
Configure Interfaces
In each VM, edit /etc/network/interfaces to setup static IP addresses for the internal interfaces. Be sure that the interface names are correct as in the example by running:
Client
Add the following to /etc/network/interfaces:
# The internal interface on neta
auto enp0s8
iface enp0s8 inet static
address 192.168.1.11
netmask 255.255.255.0
network 192.168.1.0
broadcast 192.168.1.255
post-up route add -net 192.168.0.0 netmask 255.255.0.0 gw 192.168.1.1 dev enp0s8
pre-down route del -net 192.168.0.0 netmask 255.255.0.0 gw 192.168.1.1 dev enp0s8
Router
Add the following to /etc/network/interfaces:
# The internal interface on neta
auto enp0s8
iface enp0s8 inet static
address 192.168.1.1
netmask 255.255.255.0
network 192.168.1.0
broadcast 192.168.1.255

# The internal interface on netb
auto enp0s9
iface enp0s9 inet static
address 192.168.2.2
netmask 255.255.255.0
network 192.168.2.0
broadcast 192.168.2.255
Server
Add the following to /etc/network/interfaces:
# The internal interface on netb
auto enp0s8
iface enp0s8 inet static
address 192.168.2.22
netmask 255.255.255.0
network 192.168.2.0
broadcast 192.168.2.255
post-up route add -net 192.168.0.0 netmask 255.255.0.0 gw 192.168.2.2 dev enp0s8
pre-down route del -net 192.168.0.0 netmask 255.255.0.0 gw 192.168.2.2 dev enp0s8
Enable Forwarding on the Router
and uncomment (remove the hash #) the line referring to ip_forward to be:
The output of /etc/hosts and /etc/sysctl.conf for both client and router is illustrated below.
Reboot the VMs
Test the Internal Network
Use ping to test the internal network:
- From client, ping 192.168.1.1
- From client, ping 192.168.2.2
- From client, ping 192.168.2.22
If all pings work, then the internal network is working successfully. You may also test by SSHing from client to server.
Test the Real Internet
Each VM should still have access to the real Internet. Test by pinging an external website, e.g. ping www.google.com, or installing software with sudo apt install . .
Port Forwarding
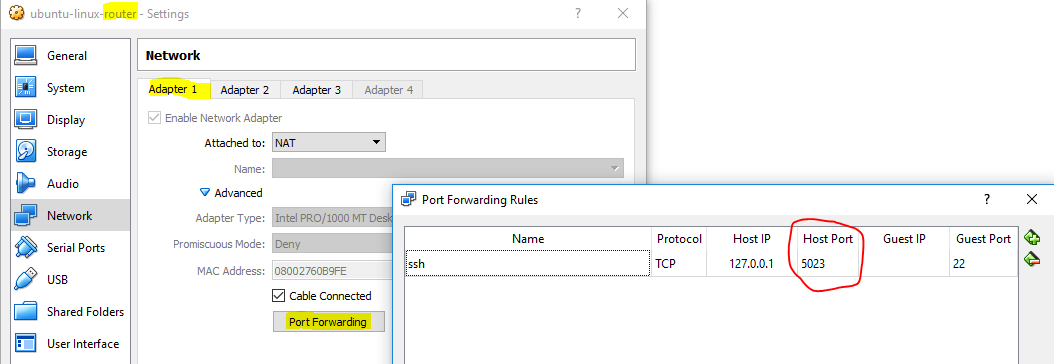
Each VM should have port forwarding for SSH enabled on the NAT adapter. However it is important that the Host Port is different for each VM, e.g. 5022, 5023, 5024 for client, router, server, respectively. Then you can connect to each VM (with PuTTY or FileZilla) at the same time, simply by specifying a different port. The image below shows the port forward settings on the router NAT adapter 1 — the red circled Host Port should be different than that of client and server.
Create More Servers
To create more servers, simply clone the server (or clone the base and setup as per the server), but ensuring they have different names when setting the hostname and IP addresses in /etc/network/interfaces. E.g. instead of server and 192.168.2.22, set to webserver/192.168.2.22, sshserver/192.168.2.23, fileserver/192.168.2.24. If they all have internal network on netb, then they are all in the same (virtual) LAN.
Created on Tue, 22 May 2018, 3:54pm
Last changed on Thu, 16 Aug 2018, 8:43am