- How to install «make» in ubuntu? [closed]
- How to install make on Ubuntu
- How to install the Make package on Ubuntu
- Conclusion
- About the author
- Taimoor Mohsin
- Компиляция и установка пакетов из исходного кода с помощью Make
- Требования
- Извлечение и компилирование исходного кода на VPS
- Загрузка Tarball
- Конфигурирование и компилирование исходного кода
- How To Install make on Kali Linux
- What is make
- Install make Using apt-get
- Install make Using apt
- Install make Using aptitude
- How To Uninstall make on Kali Linux
- Uninstall make And Its Dependencies
- Remove make Configurations and Data
- Remove make configuration, data, and all of its dependencies
- References
- Summary
How to install «make» in ubuntu? [closed]
I’m trying to install «yum» or «apt-get» into my system «ubuntu centOS». I did download the binary files for these two programs from the internet using the command wget. but after decompressing the files using the command «tar -zxvf «filename» ,then configuring the file «./configuring», and then when I want to use the command «make» I get the following error «make: not found». I have searched for a method to download the «make» command but all the methods I found on the net use either the command «yum» or «apt-get» and I don’t have any of them.
You have this slightly wrong. Make is not a program you need to download. it’s a utility that comes integrated into nearly every distribution of linux.
Wait, what? «ubuntu centOS»? Those are two different flavors with their own (often radically different) ways of doing things. It’s almost certainly either one or the other, unless there’s some freakish mashup of the two i haven’t seen or heard of yet. Either way, this is a question about installing software, and seems more suited to Super User.
Just for future reference, there are a couple of major flavors of Linux. I personally count 4: Debian (which includes Ubuntu), RedHat (which includes CentOS), Slackware (including SuSE), and Gentoo. (Some would argue with Gentoo being «major», but IMO it’s popular enough to earn a place, and it’s definitely its own flavor.) Most of the big distros are derived (indirectly or indirectly) from one of those main lines; the ones that aren’t are typically specialized or indie-type stuff. And the main flavors are different enough that you’ll typically only derive from one of them.
How to install make on Ubuntu
![]()
The ”make” command in Linux is used to compile and manage a collection of applications and files from source code. It allows developers to use the terminal to install and collect a variety of programs. It also manages and reduces the amount of time that is required for the compilation. The make command’s primary goal is to break down a huge program into smaller pieces and assess whether or not it needs to be recompiled. It also gives the essential instructions for recompiling them.
The make command is used to execute the makefile which is a unique file that includes the shell commands we write to keep the project running. It includes executable targets and instructions and is not permitted to generate several makefiles. It’s best if you make a separate directory for it. It maintains track of recently updated files, so only update those that are needed. As a result, this article will show you how to install the make package on Ubuntu.
How to install the Make package on Ubuntu
Before installing the make package, it is better to update your already installed packages; otherwise, you may find compatibility issues with some software. You can do that by typing.
This command will provide you with the information of all outdated packages that can be upgraded to the newer version, so this is highly recommended before installing any new package. Make package comes in default in the Ubuntu OS, so you should verify if it is already installed before considering installing it. You can verify it by typing the below-mentioned command in the terminal.

If the make package is not installed in Ubuntu due to any reason, you will get the error as shown below.

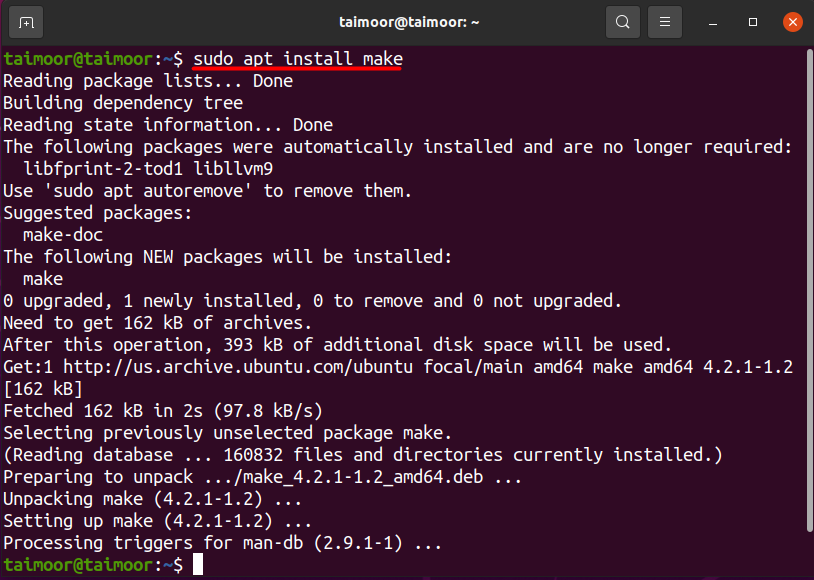
You can install the make package by typing.
Your system should have a make directory; otherwise, you cannot use the make package. You can verify that by typing.

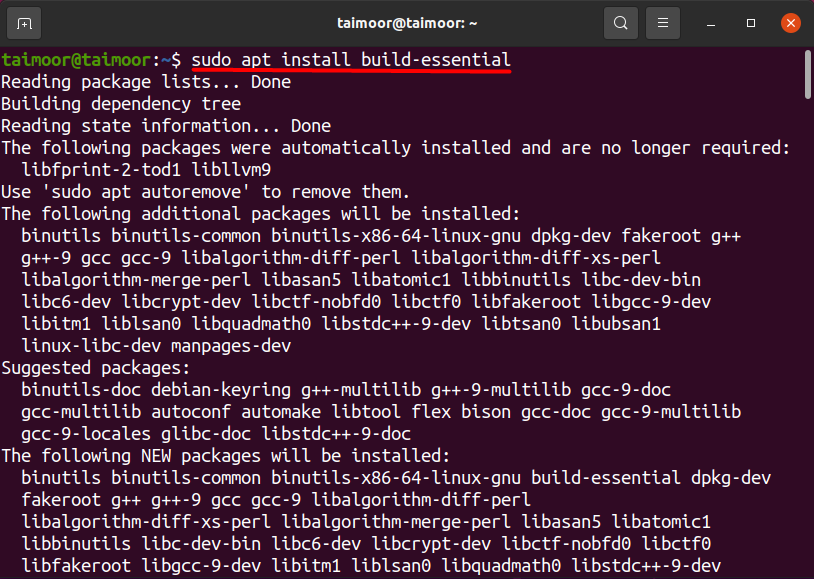
If the directory is available then you can use the “make” utility; if it displays an error as shown below then there is a way to solve this problem as well:

By installing the build-essential package you get rid of this error. It is also known as a meta-package, and you can use it to install a make package and several other packages as well. Many packages are dependent and linked with this package, and you can’t install them without installing the meta-package first. For its installation, you need to type the following command in the terminal.
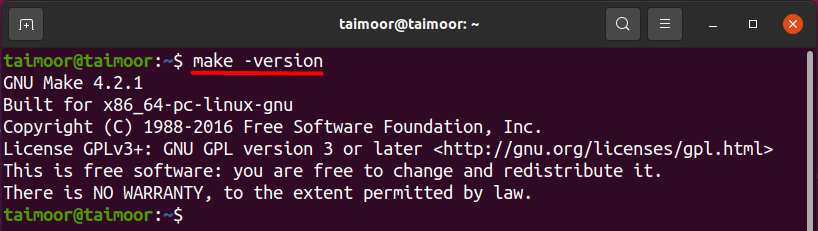
After its installation, you should check the make version to verify if it is properly installed or not. You can also verify the make directory that you won’t see if it is not working correctly before. You can check the version as discussed before by typing the command.
And you can check the make directory, use:
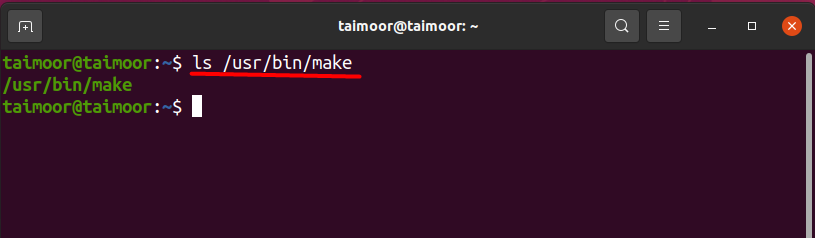
As of now, you can see both the version and the directory, the make package is now correctly installed, and you can use it as per your requirement.
Conclusion
The make command in Linux is used to compile and manage a collection of applications and files from source code. It allows developers to use the terminal to install and collect a variety of programs. It also manages and reduces the time that is required for the compilation process for large projects. In this article, we have shown you how you can install the make package, and some of the solutions have also been discussed if you are not able to install this package
About the author
Taimoor Mohsin
Hi there! I’m an avid writer who loves to help others in finding solutions by writing high-quality content about technology and gaming. In my spare time, I enjoy reading books and watching movies.
Компиляция и установка пакетов из исходного кода с помощью Make
При работе с компьютером или сервером Linux большинство необходимых пакетов можно получить при помощи apt или другого менеджера пакетов. Но иногда нужен пакет или более современная версия программы, которых нет в репозиториях.
Данное руководство охватывает вопросы компиляции и установки cURL из исходного кода. Использованный здесь синтаксис применим на большинстве дистрибутивов.
Требования
Для компиляции исходного кода в Linux нужен пакет «build-essential» (в системах на основе Debian) или «Development Tools» (CentOS); данные пакеты содержат компиляторы и библиотеки gcc/g++.
Чтобы установить пакет на Debian и Ubuntu, используйте:
apt-get install build-essential
yum groupinstall «Development Tools»
Некоторые пакеты требуют для компилирования или запуска установки дополнительных зависимостей. Apt и другие менеджеры пакетов обычно устанавливают их. При компилировании пакетов самостоятельно нужно всегда проверять документацию, а также заранее устанавливать необходимые пакеты.
Перед компилированием cURL установите все необходимые зависимости. Также на используемом сервере нужно иметь привилегии root или sudo для установки и компилирования исходного кода.
Извлечение и компилирование исходного кода на VPS
Загрузка Tarball
Для начала нужно скачать исходный код cURL. Существует множество способов это сделать, но в данном руководстве используется tarball, доступный на сайте cURL. При желании URL в следующей команде можно заменить на URL текущей версии cURL, но при этом нужно помнить, что это должна быть ссылка на файл «tar.gz». Запустите:
Это скачает и сохранит исходный код как curl.tar.gz в текущем каталоге.
Теперь нужно извлечь tarball. Для этого запустите:
Исходный код будет расположен в папке по имени «curl-» с номером версии. При вводе:
будет выведен подобный результат:
пользователь@сервер:~/curl ls
curl-7.32.0 curl.tar.gz
В данном случае папка называется «curl-7.32.0», следовательно, чтобы войти в эту папку, нужно ввести:
Конфигурирование и компилирование исходного кода
В этой папке можно найти множество разных файлов. На данный момент нужно обратить внимание на файл «configure». Это скрипт, созданный для того, чтобы помочь запустить программу на различных компьютерах. Запустите:
Это автоматически использует переменные текущей системы, чтобы подготовить исходный код для данного VPS. В основном эта команда проверяет, соответствуют ли библиотеки, установленные в системе, тем, что нужны программе. Данное действие указывает компилятору, где искать библиотеки, нужные исходному коду, в данном случае cURL. Кроме того, данное действие определяет, куда впоследствии установить пакет. По завершению будет создан файл Makefile со всей нужной в нем информацией. Теперь все готово для компилирования исходного кода. Для этого запустите команду:
В результате этого действия будет выведено много лишней и непонятной информации на консоль. Подождите, пока это закончится. Это займет около минуты. По завершению нужно установить исходный код. Запустите как root:
Теперь make будет следовать инструкциям в «Makefile», чтобы установить скомпилированные пакеты. В большинстве случаев это все, что нужно для установки. Теперь можно ввести curl. Если cURL был установлен верно, будет выведен примерно такой результат:
curl: try ‘curl —help’ or ‘curl —manual’ for more information
При извещении об ошибке bash введите:
ln -s /usr/local/bin/curl /usr/bin/curl
Это создаст ссылку на /usr/bin/curl, которая соединяется с /usr/local/bin/curl. Это позволит запустить cURL, просто введя curl в консоль. Обычно это выполняется автоматически, но в некоторых случаях скрипт конфигурации не может найти нужное местоположение установки. Теперь можно ввести:
Это запустит текущую версию cURL. Выведенный результат имеет примерно такой вид:
пользователь@сервер:~/curl curl -V
curl 7.32.0 (x86_64-unknown-linux-gnu) libcurl/7.26.0 OpenSSL/1.0.1e zlib/1.2.7 libidn/1.25 libssh2/1.4.2 librtmp/2.3
Protocols: dict file ftp ftps gopher http https imap imaps ldap pop3 pop3s rtmp rtsp scp sftp smtp smtps telnet tftp
Features: Debug GSS-Negotiate IDN IPv6 Largefile NTLM NTLM_WB SSL libz TLS-SRP
Готово! cURL был успешно скомпилирован и установлен из исходного кода.
Действия, описанные в данном руководстве, подходят для большинства дистрибутивов, следовательно, их можно выполнить для компилирования исходного кода других пакетов. Тем не менее, всегда нужно заранее знакомиться с документацией пакета. Она, как правило, содержит информацию о необходимых зависимостях, и даже иногда подсказывает, какие команды нужно использовать.
Запомните последовательность: ./configure, затем make, а затем make install.
How To Install make on Kali Linux
In this tutorial we learn how to install make on Kali Linux.
What is make
GNU Make is a utility which controls the generation of executables and other target files of a program from the program’s source files. It determines automatically which pieces of a large program need to be (re)created, and issues the commands to (re)create them. Make can be used to organize any task in which targets (files) are to be automatically updated based on input files whenever the corresponding input is newer — it is not limited to building computer programs. Indeed, Make is a general purpose dependency solver.
There are three ways to install make on Kali Linux . We can use apt-get , apt and aptitude . In the following sections we will describe each method. You can choose one of them.
Install make Using apt-get
Update apt database with apt-get using the following command.
After updating apt database, We can install make using apt-get by running the following command:
sudo apt-get -y install make Install make Using apt
Update apt database with apt using the following command.
After updating apt database, We can install make using apt by running the following command:
Install make Using aptitude
If you want to follow this method, you might need to install aptitude first since aptitude is usually not installed by default on Kali Linux. Update apt database with aptitude using the following command.
After updating apt database, We can install make using aptitude by running the following command:
sudo aptitude -y install make How To Uninstall make on Kali Linux
To uninstall only the make package we can use the following command:
Uninstall make And Its Dependencies
To uninstall make and its dependencies that are no longer needed by Kali Linux, we can use the command below:
sudo apt-get -y autoremove make Remove make Configurations and Data
To remove make configuration and data from Kali Linux we can use the following command:
Remove make configuration, data, and all of its dependencies
We can use the following command to remove make configurations, data and all of its dependencies, we can use the following command:
sudo apt-get -y autoremove --purge make References
Summary
In this tutorial we learn how to install make using different package management tools like apt, apt-get and aptitude.