- How do «apt-get clean» and «apt-get clean all» differ?
- The 10 Easiest Ways to Keep Ubuntu System Clean
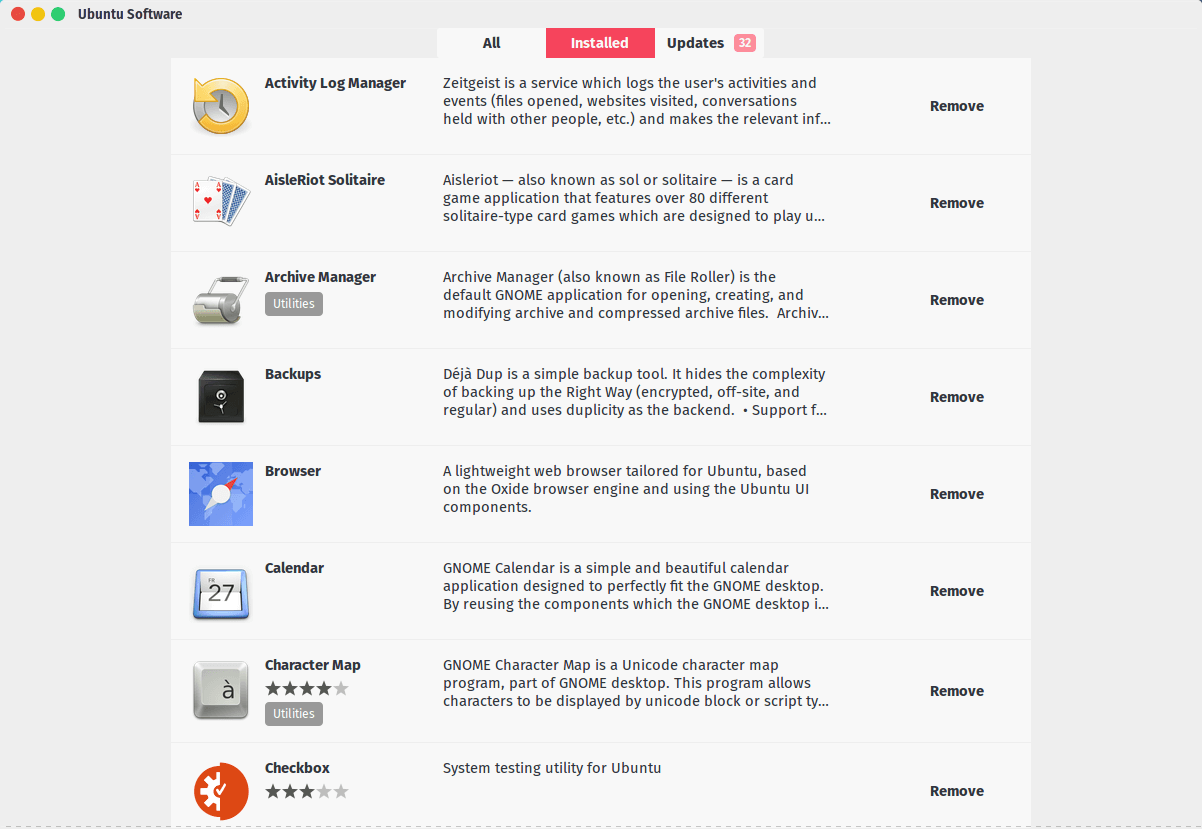
- 1. Uninstall Unnecessary Applications
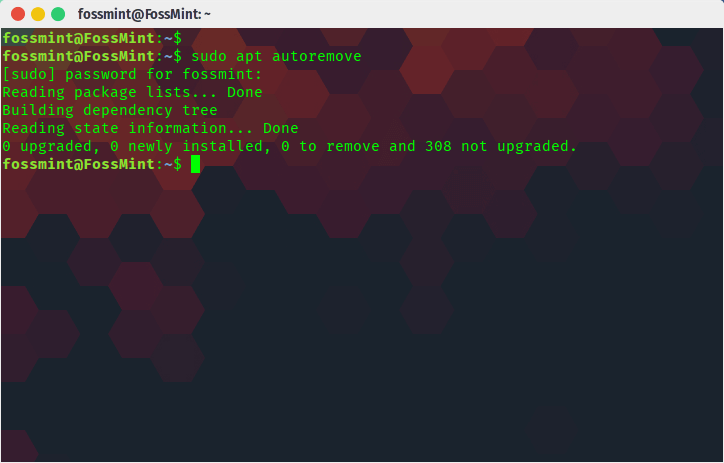
- 2. Remove Unnecessary Packages and Dependencies
- 3. Clean Thumbnail Cache
- 4. Remove Old Kernels
- 5. Remove Useless Files and Folders
- 6. Clean Apt Cache
- 7. Synaptic Package Manager
- 8. GtkOrphan (orphaned packages)
- 9. Stacer
- 10. Conscious File Organization
- How to properly clean in a Makefile?
- 2 Answers 2
How do «apt-get clean» and «apt-get clean all» differ?
ek@Apok:~$ apt-get -s clean NOTE: This is only a simulation! apt-get needs root privileges for real execution. Keep also in mind that locking is deactivated, so don't depend on the relevance to the real current situation! Del /var/cache/apt/archives/* /var/cache/apt/archives/partial/* Del /var/cache/apt/pkgcache.bin /var/cache/apt/srcpkgcache.bin ek@Apok:~$ apt-get -s clean all NOTE: This is only a simulation! apt-get needs root privileges for real execution. Keep also in mind that locking is deactivated, so don't depend on the relevance to the real current situation! Del /var/cache/apt/archives/* /var/cache/apt/archives/partial/* Del /var/cache/apt/pkgcache.bin /var/cache/apt/srcpkgcache.bin ek@Apok:~$ Is there ever any difference in apt-get ‘s behavior with clean and clean all ? If so, what is the difference, under what circumstances is it relevant, and how should I choose between the two? If there is no difference, then why does clean all exist? If they’re the same, then clean all would still make sense if clean could ordinarily take a package name as an argument. But this is not the case—attempting to pass a package name to clean doesn’t alter clean ‘s behavior at all, the whole cache still gets deleted:
ek@Apok:~$ apt-get -s clean nano NOTE: This is only a simulation! apt-get needs root privileges for real execution. Keep also in mind that locking is deactivated, so don't depend on the relevance to the real current situation! Del /var/cache/apt/archives/* /var/cache/apt/archives/partial/* Del /var/cache/apt/pkgcache.bin /var/cache/apt/srcpkgcache.bin This does make me wonder, though, if perhaps clean all doesn’t really exist (and that what’s happening is that all is ignored, just as nano was in the above example). Is clean all just an urban legend?
The 10 Easiest Ways to Keep Ubuntu System Clean
The first time I knew anything about cleaning my PC Windows was the only OS I had used and was the only one I knew about. Back then I periodically emptied my recycle bin and accounted for special times to allow my computer’s disk defragment.
And even though all Operating Systems, including Windows, have improved their data management techniques now, one still needs to know how to manually initiate disk cleaning and management processes. If it is not to create more space (maybe you have too much space you can be bothered about), it is to improve your computer’s performance.
It would be a misconception to think Windows and MacOS are the only Operating Systems with fancy system cleaning apps. Linux has a lot of them under its belt. But today, I will tell you of just 10 ways to keep your system clean and free of unnecessary cache.
1. Uninstall Unnecessary Applications
If there are applications that you don’t use on your Ubuntu workstation, uninstall them using your default Ubuntu Software manager.
2. Remove Unnecessary Packages and Dependencies
After removing certain apps and packages some data is left every now and then, automatically bestowing upon the user the responsibility of rooting out the remnant data and deleting them. Thankfully, Ubuntu has an inbuilt cleaner you can access via your terminal with the command:
3. Clean Thumbnail Cache
You might already know that your computer uses thumbnails to make certain operations on your computer to execute faster. They are kind of like cache and cookies in your browsers.
The bad news is over time the thumbnails increase and the computer doesn’t automatically take care of them. The good news is that Ubuntu has an inbuilt command to help you with this issue.
$ sudo rm -rf ~/.cache/thumbnails/*
You can check the size of your system’s thumbnail before deleting them using the command:

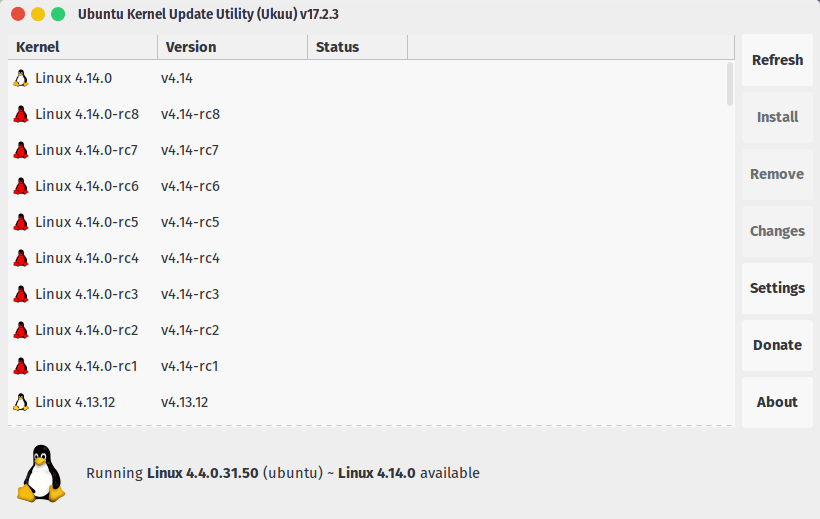
4. Remove Old Kernels
Every now and then the Linux kernel gets updates and bug fixes. Depending on how your system is set up, the old kernel versions remain on your disk or they can even be older versions you manually installed.
You can use the command line to manage your kernels:
$ sudo dpkg --list 'linux-image*' $ sudo apt-get remove linux-image-VERSION
If you would rather use a GUI app, Ukuu Kernel Manager is an excellent pick.
5. Remove Useless Files and Folders
This one is easiest to implement so far. Manually go through your directories using either your terminal or file manager and select which files remain and which you will send to the recycle bin.
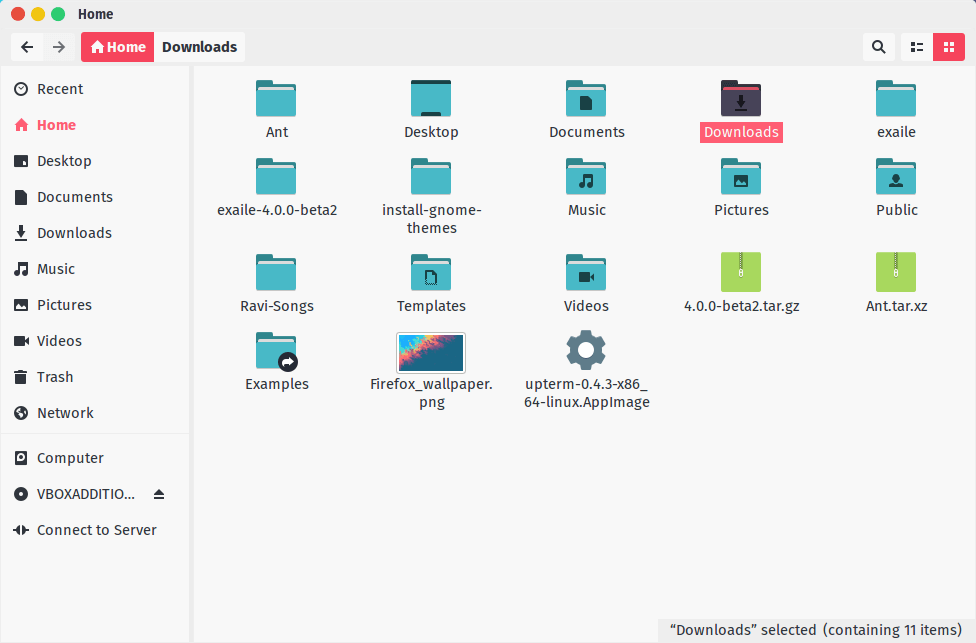
The ability to carry out this process every now and then is the beginning of wisdom.
6. Clean Apt Cache
This is another vital number in the system cleaning process and there are two roads you can take. You can either delete the unnecessary apt-cache or delete all the apt-cache entirely.
To give you a better perspective, let’s use Ubuntu for example.
The famous APT that Ubuntu as its software management stands for Advanced Package Tool and it generates a cache of downloaded apps and keeps them (in your /var/cache/apt/archives directory) even after those apps have been uninstalled.
Doubt me? Check the amount of apt-cache on your system with the command:
Now that you know how much cache is on your system, you can run the following command to remove everything completely.
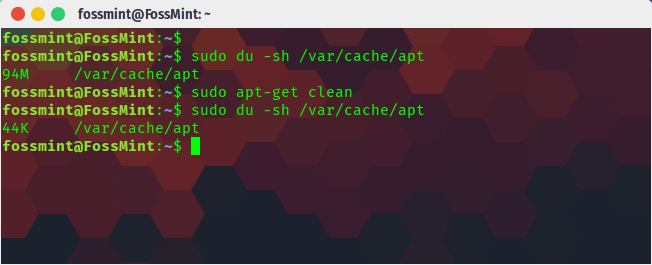
If you’re really interested in keeping your system clean then you should wipe your apt cache after every couple of months.
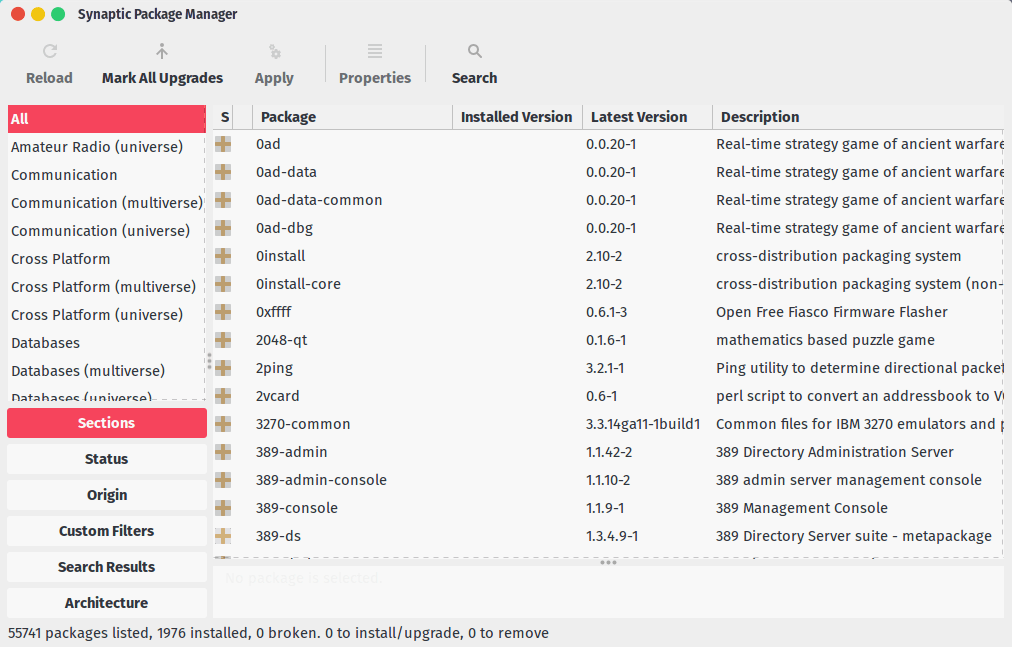
7. Synaptic Package Manager
If you don’t already know, Synaptic Package Manager is a graphical package management program for apt that is used to manage and organize any packages installed on your computer.
$ sudo apt-get install synaptic
With this package manager app, you can see all the packages (whether broken or not), and their dependencies.
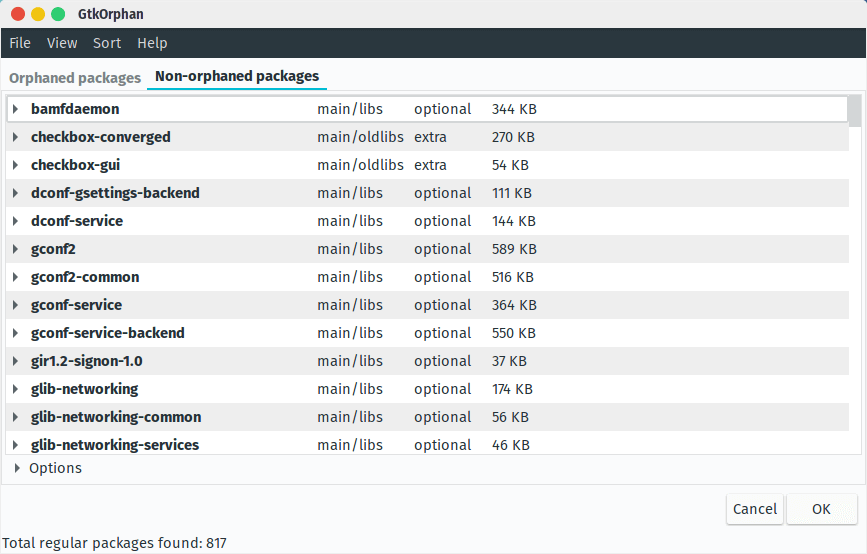
8. GtkOrphan (orphaned packages)
GtkOrphan is almost like Synaptic Package Manager except that it concentrates on package files that remained even after their parent apps were removed. It has an easy-to-use User Interface with just two panels, orphaned packages and un-orphanged package.
$ sudo apt-get install gtkorphan
9. Stacer
With Stacer, you can perform system diagnosis to check your CPU, memory, and disk usage, start-up apps, wipe cache and uninstall apps.
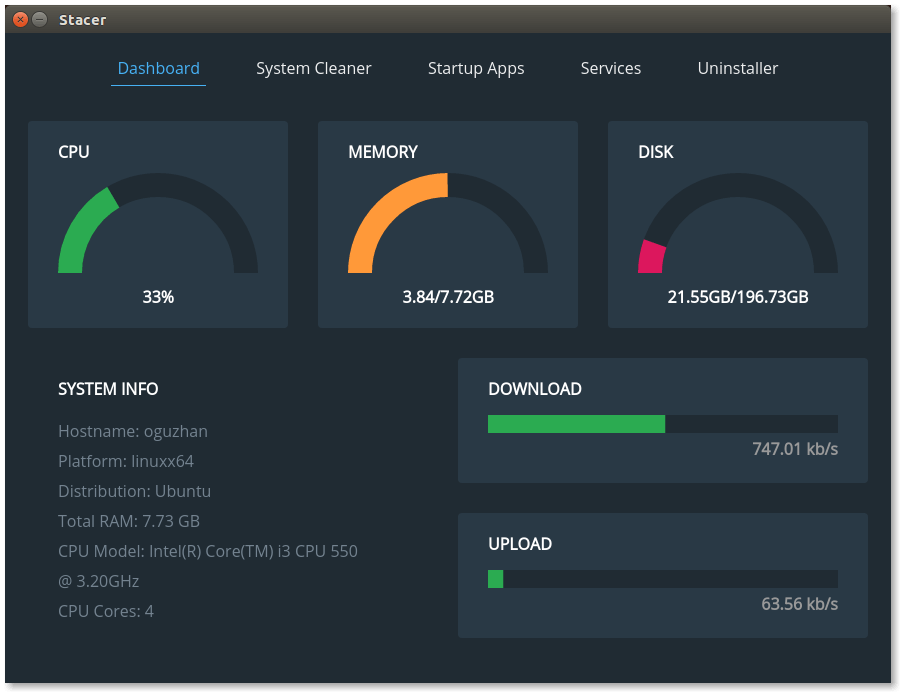
It is an Electron app that’s FOSS and features a clean UI. It is such a great app it made it to our list of the 20 Must-Have Ubuntu Apps in 2017.
It comprises of a dashboard with general system information, system cleaner, startup app and services manager, and an uninstaller.
10. Conscious File Organization
This point is not a digital tool but a mental one.
Most of the time we get a lot of clutter on our systems because we are not conscious of how much data we download and how we organize the data. Take me, for example. I set all my downloaders (browsers and torrent apps) to download content to my desktop and because my desktop is typically void of shortcuts etc, seeing files on it reminds me that I have files waiting to be reviewed. As soon as I am done using the file I decide where it goes – usually, the recycle bin.
Files for the cloud, pictures, music, PDFs etc. are saved in their respective folders – this way I manage to be a step ahead of many users in the world who randomly download and install stuff to random locations on their system.
Well, there you have it guys, the 10 easiest ways to keep Ubuntu system clean. I hope it is useful to you.
How often do you perform cleaning checks on your system and what has been your experience so far with whatever tools you have been using?
Remember, if there are any contributions you want to make your comments and suggestions are always welcome in the comments section below.
How to properly clean in a Makefile?
With even more subdirectories, it quickly becomes messy… So I realized I could use the find command like this:
clean: find . -name "*.o" -exec $(RM) <> \; find . -name "*~" -exec $(RM) <> \; However I saw that people often use find in conjunction with xargs instead of using -exec and I wonder why since it seems to work fine… What do you use and why? I know that for big projects, or for better compatibility, I should probably use cmake or autotools but I like the simplicity of a Makefile for small projects.
2 Answers 2
The version of ‘find’ I’m used to (GNU find) also supports a ‘-delete’ flag. I might do something like:
clean: find . -name '*.o' -delete because it’s effective, simple and clean.
If I have multiple patterns to delete, I normally repeat the command:
clean: rm -f a.out find . -name '*.o' -delete find . -name '*~' -delete Because exec creates one sub-process per file being deleted. xargs , on the other hand, batches them up.
It’s effectively the difference between:
rm src1/a.o rm src1/b.o rm src2/c.o It’s probably not going to matter that much unless you have a lot of files but it’s worth knowing for that use case.
But I don’t use either of those methods. I make each directory responsible for building itself (and it’s subordinate directories), by having a Makefile in there. Then, from the top level make, I have something like:
all: for i in module1 module2 \ do \ cd $i \ $(MAKE) all \ cd .. \ done Same deal for the clean target. I don’t assume that cleaning is the same action for every single subdirectory.
By doing that, the relevant actions are localised. If I have a directory where .o files are actually third party objects for me to link with (so I don’t have the source), I make sure that clean won’t delete them in that relevant makefile. The solution you have would hose them, causing much angst and gnashing of teeth 🙂