- How to Create a User in Linux Using the useradd Command
- Create a user in Linux with useradd
- Add a New Group Using The useradd command
- Creating Users with a Custom Home Directory
- Creating a User with Specific User ID
- Creating A Group With Specific Group ID
- Creating A User And Assign Multiple Groups
- Creating a User with Specific Login Shell
- Creating A User With Custom Comments
- Creating a User with an Expiry Date in Linux
- Creating a System User in Linux
- Adding Password to User in Linux
- Delete a User
- Summary
- Users and groups
- Overview
- Permissions and ownership
How to Create a User in Linux Using the useradd Command
There are multiple ways to create a user in Linux. The most common way is to use the useradd command. This command will add a new user to the system and create their home directory. In this article, let’s explore the useradd command in detail and understand the process of user creation in Linux.
Create a user in Linux with useradd
To use the useradd command, you must be logged in as root or have sudo privileges. Then, you can run the following command to add a new user:
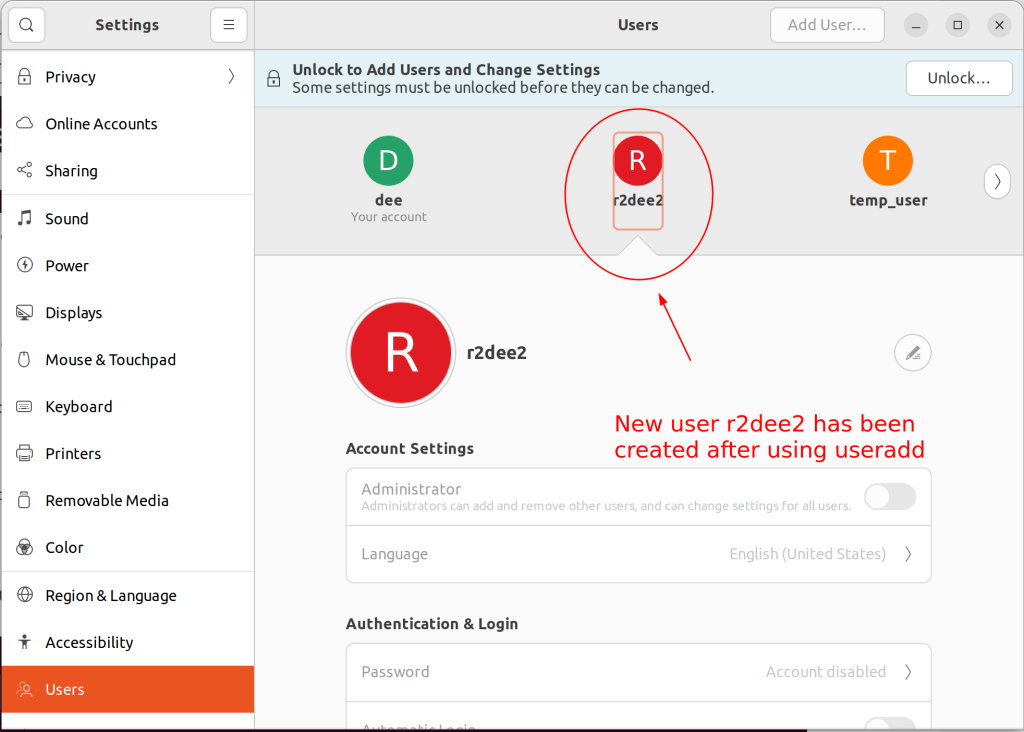
Substitute [username] with the name of the user you want to add. For example, this command would add a new user named r2dee2:
This command will create r2dee2’s home directory at /home/r2dee2/. It will also assign the user to the default group for new users (usually Users).
You can view all of the available options for this command by running man useradd.

Add a New Group Using The useradd command
You can add groups just like you add users but, instead of the useradd command, we use groupadd. For example, to create a new group called managers, you would type:

Creating Users with a Custom Home Directory
By default, the useradd command will create the user’s home directory at /home/[username].
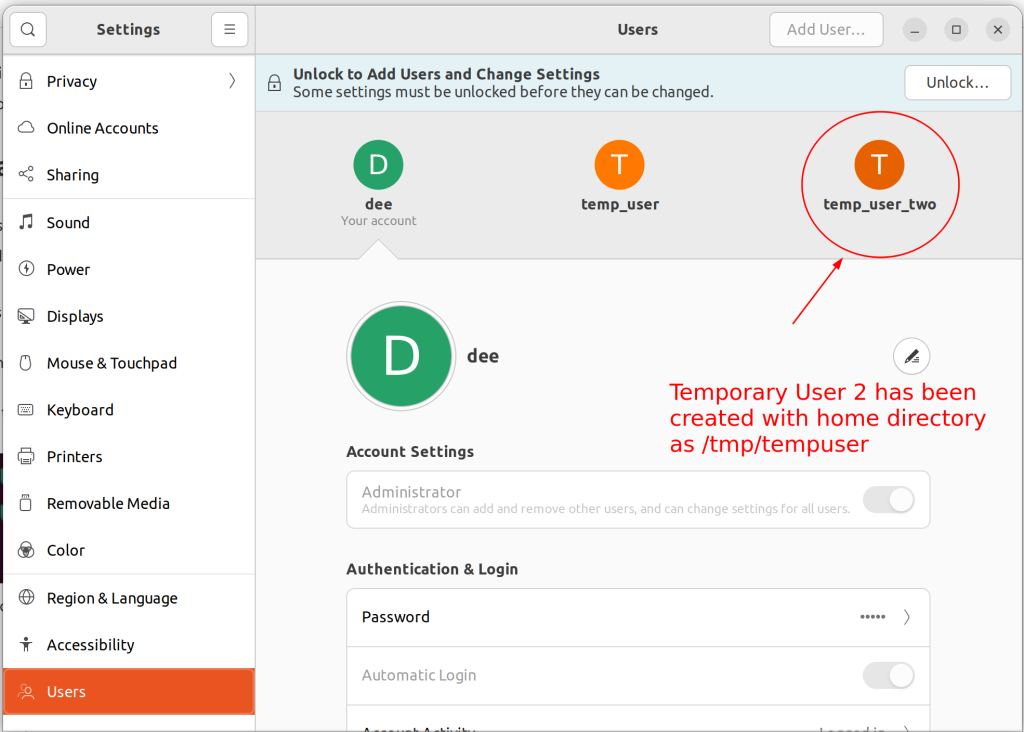
If you want to specify a different location for the user’s home directory, you can use the -d option. For example, this command will create a new user named John with his home directory at /tmp/tempuser:
useradd -d /tmp/tempuser temp_user_two
Keep in mind that you must create the destination directory before running this command. Otherwise, the command will fail.

Creating a User with Specific User ID
sudo useradd -u 1001 username
The -u option allows you to specify the user ID (UID) for the new user. This can be useful if you have a set organizational structure and want to standardize how the UIDs are set for each user. Here we can replace 1001 with any permissible UID we like. The username can be changed as per the requirement as well.

Now, let’s check the uid of the specific user, the username will be replaced with the username that exists in the system.

Creating A Group With Specific Group ID
Just like every user has their own unique numeric identifier (UID), every group also has its own numeric identifier called GID or Primary Group Identifier.
By default, when creating groups without explicitly assigning any particular GID, most Linux distributions assign them sequential GIDs starting from 1000.
Let’s move on ahead and see how we can add additional groups for our newly created account along with specifying custom GIDs for each group!
Every group also has a unique numeric identifier called a GID. By default, new groups are assigned the next available GID. However, you can use the -g option to specify a custom GID for a new group.
For example, this command will create a new group named developers with GID 0935:
groupadd -g 0935 extinctspecies
This is useful if you are migrating users from another system and need to preserve their existing GIDs. It can also be helpful when setting up certain applications that require specific GIDs.

Creating A User And Assign Multiple Groups
We’ve now learned how to add groups for our newly created account along with custom values. But what if we wanted to go one step further by actually assigning multiple groups to our users?
Luckily! Linux provides us with the usermod command which makes managing groups a whole lot easier.
You can assign multiple groups to a user by using the usermod command with the -a (append) option and -G (secondary group) option followed by a comma-separated list of desired groups. For example, this command will add the dinosaur user to both the sudo and extinctspecies groups:
usermod -aG sudo,extinctspecies dinosaur

We can check what all groups a user belong to by using:

If you want to remove a user from one or more groups, you can use the gpasswd command with the -d (delete) option followed by the username and group name. For example, this command would remove dinosaur from the sudo group:
gpasswd --delete dinosaur sudo
Adding/removing users from additional groups might prove quite useful in multi-user environments where common tasks can be easily automated by making use of cron jobs hence every Linux power user can definitely benefit from knowing this particular technique.

Now that we have removed dinosaur from the sudo group let’s check what all group dinosaur is associated with,

Creating a User with Specific Login Shell
Every user on a Linux system has their own personal login shell. This is the shell that is started when the user logs into the system. By default, new users are assigned the /bin/bash shell.
However, you can use the -s option to specify a different login shell for the user. For example, this command would create a new user named trex with the /bin/zsh shell:
Now let’s try implementing this,
![]()
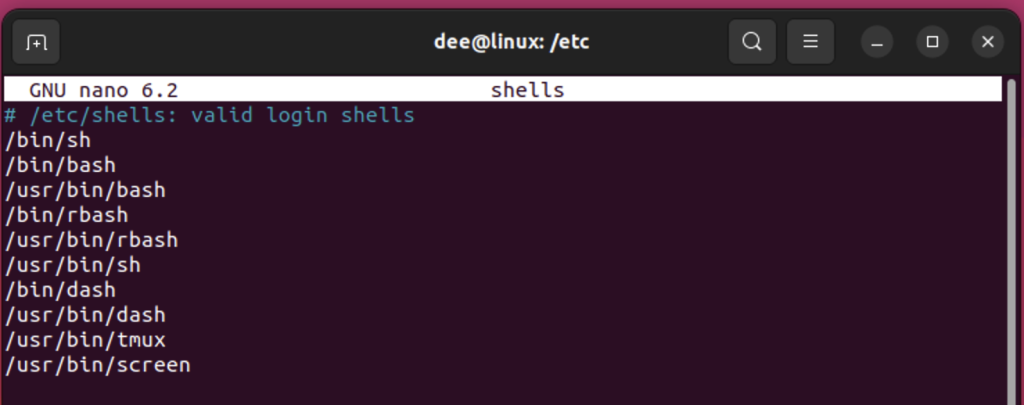
We need to check what all shells are installed in the system. You can view all of the available shells on your system by looking in the /etc/shells file.

Let’s go with /bin/bash for our user trex
![]()
Creating A User With Custom Comments
Up until now, we’ve pretty much focused on managing regular accounts. What if we wanted to add some sort of description or “comment” associated with each individual account?
Luckily most popular Linux distributions including Ubuntu make it possible to do so using the following command:
useradd -c 'crocodile' sarcosuchus
The -c option allows you to specify a comment for the user. This is useful if you want to add additional information about the user such as their full name or job title.

Creating a User with an Expiry Date in Linux
It is often desirable to create a user that has a limited lifespan. This might be the case when you want to give someone temporary access to your system. To do this, you can use the -e option with the useradd command. The format for this option is:
For example, the following command would create a user called tempuser that would expire on May 31st, 2019:
sudo useradd -e 2022-09-29 velociraptor

Creating a System User in Linux
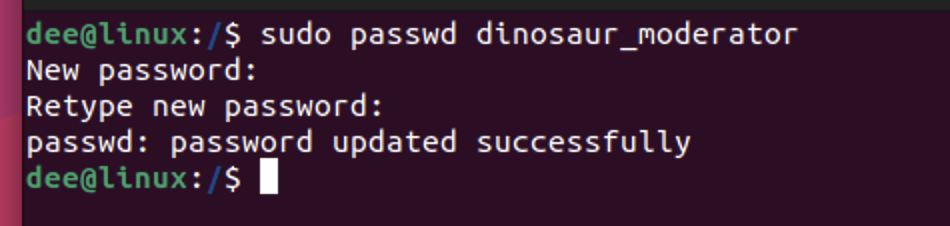
System users are those that are used by system processes and services rather than by human beings. It is therefore important that they have very restricted permissions. To create a system user, you use the –system option with useradd like this:
sudo useradd --system dinosaur_moderator

Adding Password to User in Linux
If we want our new users to actually be able to log into our system, we need to give them passwords. We can do this using the passwd command like so:
Once again, you will be prompted for your password and then asked twice to enter a password for your new user. Be sure not to choose something too easy!
We have now added our first regular non-root user account but there’s still one more thing we should do before logging out of our root account – add our new user account to the sudo group so that it can perform administrative tasks.
We can do this with the usermod command like so:
sudo usermod -aG sudo dinosaur_moderator

Delete a User
Deleting a user account is just as easy as creating one. The command to use is userdel and, again, we need to be logged in as root or have superuser privileges. The basic syntax for deleting a user account is:

Summary
In this article, we have looked at how to add and delete user accounts on a Linux system as well as how to create groups. We have also seen how to change passwords and modify group memberships.
Users and groups
Users and groups are used on GNU/Linux for access control—that is, to control access to the system’s files, directories, and peripherals. Linux offers relatively simple/coarse access control mechanisms by default. For more advanced options, see ACL, Capabilities and PAM#Configuration How-Tos.
Overview
A user is anyone who uses a computer. In this case, we are describing the names which represent those users. It may be Mary or Bill, and they may use the names Dragonlady or Pirate in place of their real name. All that matters is that the computer has a name for each account it creates, and it is this name by which a person gains access to use the computer. Some system services also run using restricted or privileged user accounts.
Managing users is done for the purpose of security by limiting access in certain specific ways. The superuser (root) has complete access to the operating system and its configuration; it is intended for administrative use only. Unprivileged users can use several programs for controlled privilege elevation.
Any individual may have more than one account as long as they use a different name for each account they create. Further, there are some reserved names which may not be used such as «root».
Users may be grouped together into a «group», and users may be added to an existing group to utilize the privileged access it grants.
Note: The beginner should use these tools carefully and stay away from having anything to do with any other existing user account, other than their own.
Permissions and ownership
The UNIX operating system crystallizes a couple of unifying ideas and concepts that shaped its design, user interface, culture and evolution. One of the most important of these is probably the mantra: «everything is a file,» widely regarded as one of the defining points of UNIX. This key design principle consists of providing a unified paradigm for accessing a wide range of input/output resources: documents, directories, hard-drives, CD-ROMs, modems, keyboards, printers, monitors, terminals and even some inter-process and network communications. The trick is to provide a common abstraction for all of these resources, each of which the UNIX fathers called a «file.» Since every «file» is exposed through the same API, you can use the same set of basic commands to read/write to a disk, keyboard, document or network device.
A fundamental and very powerful, consistent abstraction provided in UNIX and compatible operating systems is the file abstraction. Many OS services and device interfaces are implemented to provide a file or file system metaphor to applications. This enables new uses for, and greatly increases the power of, existing applications — simple tools designed with specific uses in mind can, with UNIX file abstractions, be used in novel ways. A simple tool, such as cat, designed to read one or more files and output the contents to standard output, can be used to read from I/O devices through special device files, typically found under the /dev directory. On many systems, audio recording and playback can be done simply with the commands, » cat /dev/audio > myfile » and » cat myfile > /dev/audio ,» respectively.
Every file on a GNU/Linux system is owned by a user and a group. In addition, there are three types of access permissions: read, write, and execute. Different access permissions can be applied to a file’s owning user, owning group, and others (those without ownership). One can determine a file’s owners and permissions by viewing the long listing format of the ls command:
total 13740 drwxr-xr-x 2 root root 4096 Jan 12 00:33 grub -rw-r--r-- 1 root root 8570335 Jan 12 00:33 initramfs-linux-fallback.img -rw-r--r-- 1 root root 1821573 Jan 12 00:31 initramfs-linux.img -rw-r--r-- 1 root root 1457315 Jan 8 08:19 System.map26 -rw-r--r-- 1 root root 2209920 Jan 8 08:19 vmlinuz-linux
The first column displays the file’s permissions (for example, the file initramfs-linux.img has permissions -rw-r—r— ). The third and fourth columns display the file’s owning user and group, respectively. In this example, all files are owned by the root user and the root group.
total 16 drwxrwx--- 1 root vboxsf 16384 Jan 29 11:02 sf_Shared
In this example, the sf_Shared directory is owned by the root user and the vboxsf group. It is also possible to determine a file’s owners and permissions using the stat command: