- How to Create a New Sudo User & Manage Sudo Access on Ubuntu 20.04
- Step 2: Create a new user
- Step 3: Add the new user to the sudo group
- Step 4: Test sudo
- Understanding the sudoers file
- How to restrict sudo users from executing certain commands
- How to run specific sudo commands without a password
- Conclusion
- How to Create Sudo User in RHEL, CentOS, Rocky & AlmaLinux
- Creating a New Sudo/Sudoer User in Linux
- Option 1: Add User to Sudo Wheel Group
- Option 2: Editing /etc/sudoers File
- Testing Sudoer User Access in Linux
How to Create a New Sudo User & Manage Sudo Access on Ubuntu 20.04
You probably have heard of the concept “In Linux, everything is a file”. This sounds somewhat puzzling since the Linux system comprises various entities and not just files. We have directories, symbolic links, processes, pipes, and sockets just to mention a few. The oversimplification simply gives a high-level overview of the Linux architecture. It implies that in a Linux system, every single entity is considered a file. These entities are represented by a file descriptor which is a unique identifier for a file or other resources such as directories, network sockets, or processes – hence the concept “everything is a file”.
This oversimplification then leads us to the concept of file permissions and directories. By default, each file in Linux has its own permissions and directories. These permissions determine access rights or privileges that users have on the file. If you own a file or a directory, you can pretty much do anything you want with it – you can access it, edit it, rename and even delete it.
But not all users are the same. One unique user in the Linux system is the root user. The root user is an administrative user with the highest privileges and is not bound by any permission restrictions. The user can do pretty much anything. This includes installing and uninstalling programs, accessing and modifying system files, and customizing the system. The root user can also break the system, whether intentionally or accidentally – which is why it’s not recommended to log in and run the system as the root user. It only takes one wrong command to crash the system. For this reason, it’s always recommended to run commands as a sudo user.

Step 2: Create a new user
Once logged in, create a new regular user using the adduser command. Here, jumpcloud is our new user.
The command does a couple of things. First, It creates a new user and primary group called jumpcloud , and then adds the user to the group. Next, a home directory for the user is created and configuration files are copied into it. Thereafter, you will be prompted to type in the new user’s password. Be sure to provide a strong password and confirm it.
Once the user’s password is set, some additional information will be required of you. Fill in where necessary or leave it blank by hitting ENTER if the information is not applicable.

To confirm that the newly added user was created, view the /etc/passwd file using the cat command. This provides information such as the UID (User ID), GID (Group ID), and the path to the home directory.
# cat /etc/passwd | grep jumpcloud
Similarly, you can retrieve the user details using the id command.

Step 3: Add the new user to the sudo group
A sudo group is a group of superusers that have privileged access to root commands. With that in mind, proceed and add the new user to the sudo group using the usermod command as follows.
# usermod -aG sudo jumpcloud
To verify that the user has been added to the sudo group, use the id command.
From the output, we can see that the user now belongs to two groups: jumpcloud and sudo . Alternatively, you can also run the groups command to only display the groups that the user belongs to.

Perfect! The new user is now a sudo user and has unrestricted access to root privileges.
Step 4: Test sudo
With the sudo user already in place, we are going to proceed and test the user. So, switch to the sudo user using the su command.
The command places you in the user’s home directory path.The syntax for using sudo is indicated below
As an example, we are going to update the package lists of our system. So, invoke sudo followed by the command to be executed.
When prompted, type in the password of the user and hit ENTER. The command will execute successfully – a confirmation that the user has successfully been added to the sudo group and can now perform elevated system tasks.

Understanding the sudoers file
The sudo user that we have created assumes all the rights and privileges of the root user and can run virtually any command. However, good practice recommends that you employ the least privilege principle. This is a security concept whereby a user is only assigned minimum access rights or permissions to perform their role. Therefore, as a systems administrator, you should only grant the necessary permissions to the sudo user to allow them to perform their roles.
The sudoers file /etc/sudoers is a file that spells out which users can run what commands on the system. It comprises a set of rules that govern which users or groups can run elevated tasks. To grant or restrict root privileges to users, you need to edit this file.
You should never edit the sudoers file using a normal text editor like nano or vim as this could lead to a corrupted file which can potentially lock everyone out including the admin. As such, the sudoers file should be accessed by executing the command visudo as follows.
This opens the /etc/sudoers file using the nano editor as shown. All lines starting with a hash sign – # – are comments and do not have any effect or impact on the file.

By default, the file has 6 uncommented lines. Let’s skip to the user privilege line which is the fourth line.
- The first parameter points to the username – in this case root user.
- The first “ALL” indicates that the rule is applicable to all hosts.
- The second “ALL” indicates that the root user can execute all commands as all users.
- The third “ALL” shows that the root user can execute all commands as all the user groups.
- Finally, the last “ALL” indicates that the rules are applicable to all commands.
The next two lines define the sudo rules for groups. The “%” defines a group. Here, we have two groups that have been defined: admin and sudo groups.
The second line indicates that the admin group can run all commands as any user.
The third line indicates that the sudo user can run any command as any user and as any group.
Editing the sudoers file directly is not recommended. Instead, it is preferred to place the associated sudo rules in the /etc/sudoers.d directory. This makes it easy for sysadmins to keep track of which rules apply to which user accounts. Files placed in this directory will follow the same rules as the sudoers file.
How to restrict sudo users from executing certain commands
As we pointed out earlier, you might need to limit sudo users from running certain system commands. To accomplish this, you need to create a sudo rule in the /etc/sudoers.d directory.
For demonstration, we will create a rule called jumpcloud which restricts the sudo user from upgrading the packages to their latest versions.
Next, copy and paste the line shown and save the changes.
jumpcloud ALL=(ALL) !/usr/bin/apt upgrade
The rule indicates that the jumpcloud user can execute all commands as the root user with the exception of the apt upgrade command. Note that you need to provide the full path of the command prefixed by an exclamation mark.
To find the full path of a command, use the which command syntax as shown.
When the user tries to upgrade the packages, an error is splashed on the screen indicating that the user is not allowed to do so.

Where multiple commands are involved, list them in a single line separated by a comma. In the example below, the sudo user has been limited from shutting down and rebooting the system. Notably, there are multiple ways of shutting down or rebooting a Linux system, and the associated commands have been listed in a single line below.
jumpcloud ALL=(ALL) !/usr/sbin/shutdown,!/usr/sbin/poweroff, !/usr/sbin/reboot,!/usr/sbin/init,!/usr/sbin/halt
Any attempt to power off or reboot the system by the user will be thwarted by the system.


How to run specific sudo commands without a password
Sometimes, you might need to run some commands without being prompted for a password. This is particularly helpful if you are running a script containing a sudo command.
To achieve this, use the directive NOPASSWD followed by the full path to the command. In the example below, the user can update the package lists without a password prompt.
jumpcloud ALL=(ALL) NOPASSWD: /usr/bin/apt update

Conclusion
Managing user privileges is usually one of the top-of-mind tasks that every system administrator has to undertake. Sudo privileges should only be granted to trusted users such as support or operation teams.
It’s always recommended to restrict sudo users to a subset of system commands. By doing so, you provide them with the basic privileges that they need to perform their roles. Unrestricted sudo access can be detrimental as this can lead to the sudo user performing some unauthorized operations which can wreak havoc on the system. Or worse, unrestricted sudo access privileges can make it that much easier for a malicious actor to take over the system.
That being said, managing the process to assign specific permissions to specific users can be overly time consuming and quickly overwhelm your priorities, especially if you are facing a growing environment and a growing team. JumpCloud’s Linux device management capabilities make it easier to manage sudo access across entire fleets through its user security settings and permissions. To see how this works, along with a number of other device security and management features, sign up for a free demo today.
How to Create Sudo User in RHEL, CentOS, Rocky & AlmaLinux
The Redhat Enterprise Linux (RHEL) ecosystem hosts several interesting Linux-based OS distributions. The OS pair AlmaLinux and Rocky Linux are exciting replacements for the discontinued CentOS distribution.
RHEL 8, AlmaLinux, and Rocky Linux systems are increasingly being sorted after by many Linux users due to the performance footprints they offer.
The main users of an operating system environment can be categorized into the root (Sudoer) users and non-root users. Root users have full control of the operating system environment and can create other users in addition to managing the OS’s applications, processes, and configurations. The non-root users have limited interactions with an operating system environment.
As the root user of your Linux system, you will at one point need to give other non-root users more OS privileges and execution power. For this step to happen, these normal OS users will need to be graduated to Sudo users.
Make sure you have Sudoer/root user access privileges on your system before proceeding with the article guide.
Creating a New Sudo/Sudoer User in Linux
The term Sudo is an abbreviation for the superuser do or substitute user do. The directory path /etc/sudoers hosts existing Sudoer users’ security policy associated with their warranted privileges.
To create a new user from scratch, execute the following command.
$ sudo adduser linuxshelltips_tutor
The above command will create a non-root user called linuxshelltips_tutor.

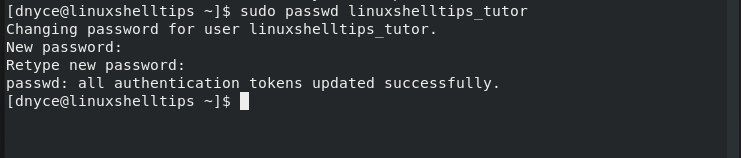
Next, we need to assign this new user a login password.
$ sudo passwd linuxshelltips_tutor
We now have two options of making your exiting/created Linux user a Sudoer-privileged user.
Option 1: Add User to Sudo Wheel Group
Only wheel group members are granted Sudo access and privileges. To make user linuxshelltips_tutor a member of this wheel group, we will implement the usermod command in the following manner.
$ sudo usermod -aG wheel linuxshelltips_tutor
With the above command execution, we have made linuxshelltips_tutor a Sudoer user.
Option 2: Editing /etc/sudoers File
This file lists all the users on your system and their customizable access and privileges. We can modify this file to make our newly created user a Sudoer user in the following manner.
First, open the file with your preferred command-line editor.
$ sudo nano /etc/sudoers file
At the bottom of this file, we will modify it in the following manner in order to make linuxshhelltips_tutor a Sudoer user.
linuxshelltips_tutor ALL=(ALL:ALL) NOPASSWD:ALL
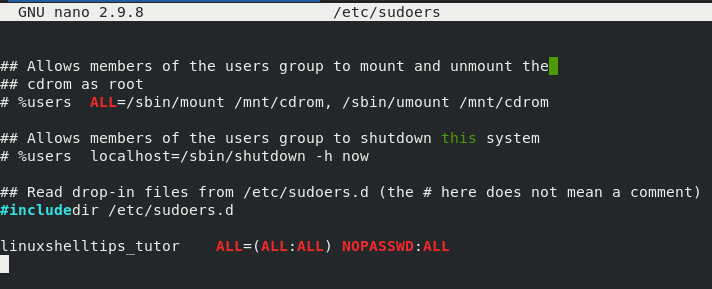
The NOPASSWD portion of the above entry will not require the linuxshelltips_tutor user to adhere to any password authentication protocol when executing sudo-associated terminal commands.
Testing Sudoer User Access in Linux
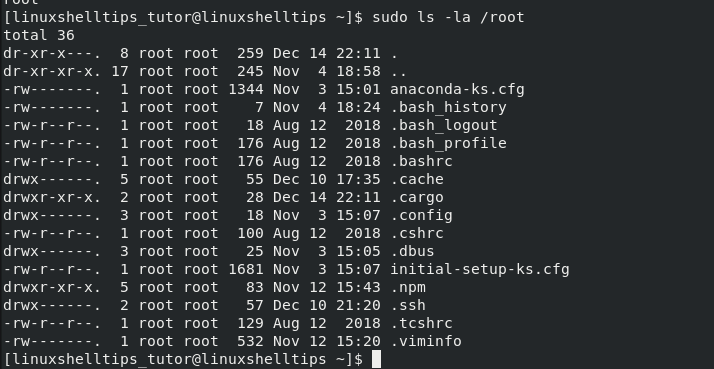
We need to confirm that we indeed created a Sudoer user. The first Sudoer user test can be performed with the following commands.
$ su linuxshelltips_tutor $ sudo whoami

You can even switch to the new user’s home directory before executing the whoami command.
As the command output suggests, we are dealing with a root user.
Alternatively, listing the contents under /root should also confirm that we are dealing with a root/sudo user. The content of the /root path cannot be displayed under a non-root user profile.
A Sudo/Sudoer user has exclusive Linux OS privileges which are not availed for a non-Sudo user. This user has more control in their assigned OS role.