- How to give a Linux user sudo access? [closed]
- 3 Answers 3
- How To Add User To Sudoers & Add User To Sudo Group on Ubuntu
- Steps to Add Sudo User on Ubuntu
- Step 1: Create New User
- Step 2: Add User to Sudo Group
- Step 3: Verify User Belongs to Sudo Group
- Step 4: Verify Sudo Access
- How to Add a User to Sudoers
- [#using-usermod]Add user to sudoers with the [.inline-code]usermod[.inline-code] command[#using-usermod]
- [#in-ubuntu-or-debian]Add users to sudoers in Ubuntu or Debian[#in-ubuntu-or-debian]
- [#in-centos-or-fedora]Add users to sudoers in CentOS or Fedora[#in-centos-or-fedora]
- [#verify-changes]Check whether adding users to sudoers was successful[#verify-changes]
- [#using-sudoers-file]Add users to sudoers using the sudoers file[#using-sudoers-file]
- [#adding-a-group-to-sudoers]Adding a group to sudoers[#adding-a-group-to-sudoers]
- [#using-visudo]Use [.inline-code]visudo[.inline-code] to safely modify the sudoers file[#using-visudo]
How to give a Linux user sudo access? [closed]
If you like to reopen the question you should provide additional details that qualify it as a valid according the rules in the help center.
3 Answers 3
You need run visudo and in the editor that it opens write:
That line grants all permissions to user igor .
If you want permit to run only some commands, you need to list them in the line:
igor ALL=(ALL) /bin/kill, /bin/ps What would be the reason if one carried out the above, but the user (in this case igor ) still did not have full sudo access (ie. can issue sudo ls but not sudo mount -a )?
@puk it depends on the commands that you listed in /etc/sudoers; when you wrote ALL , user can run all commands
This answer will do what you need, although usually you don’t add specific usernames to sudoers . Instead, you have a group of sudoers and just add your user to that group when needed. This way you don’t need to use visudo more than once when giving sudo permission to users.
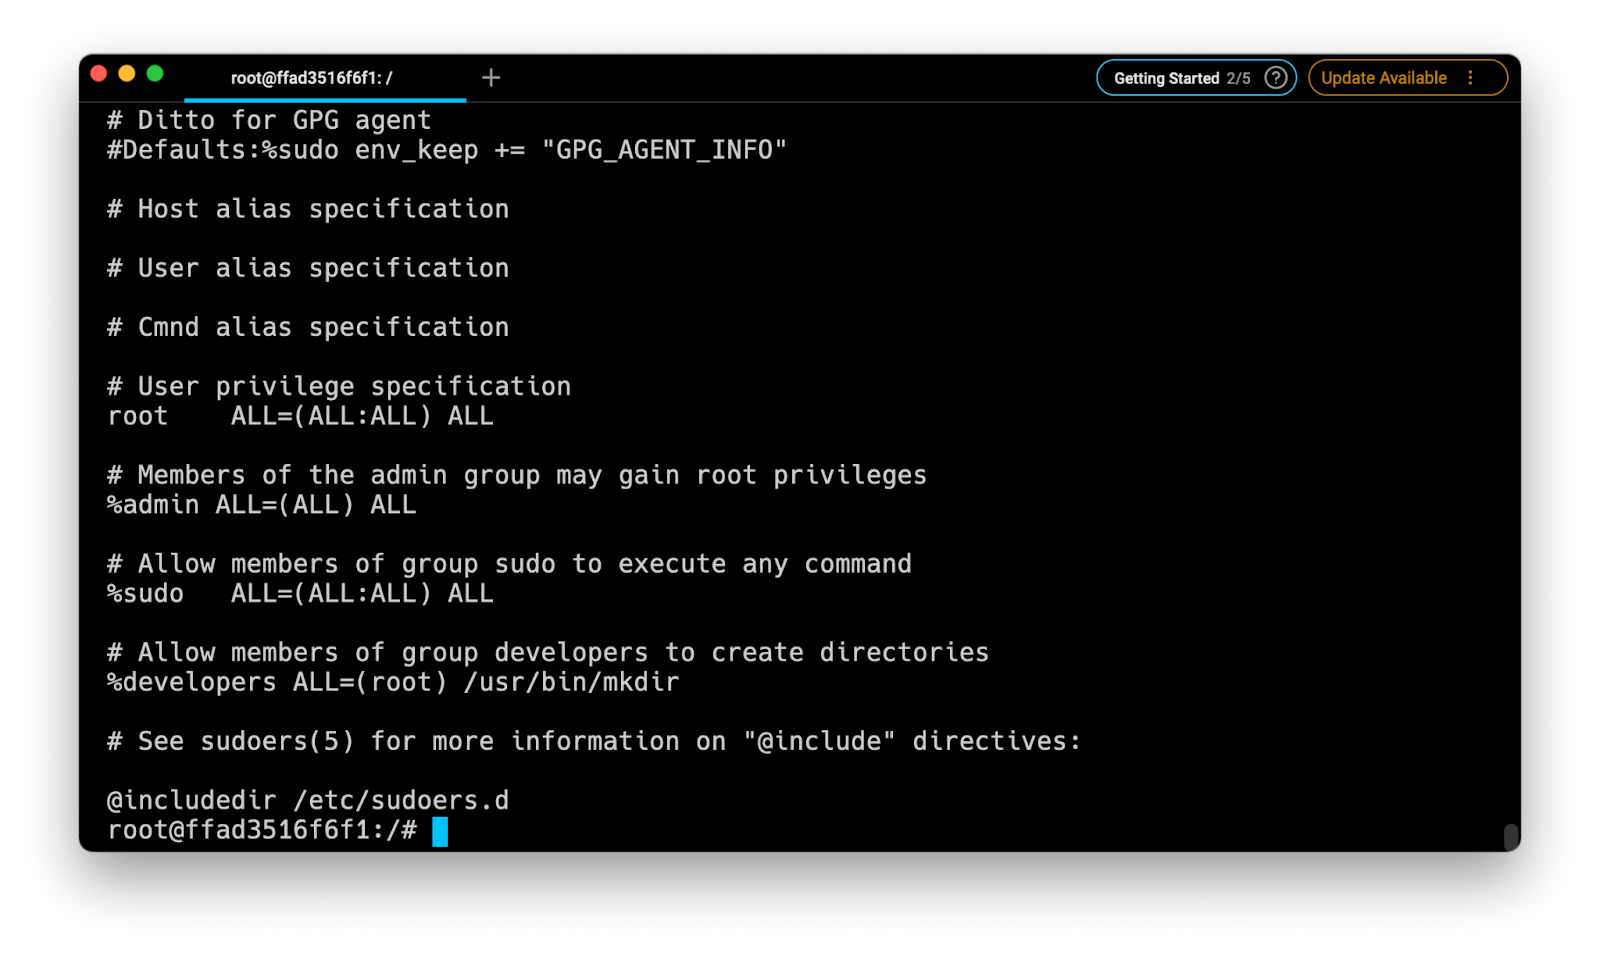
If you’re on Ubuntu, the group is most probably already set up and called admin :
$ sudo cat /etc/sudoers # # This file MUST be edited with the 'visudo' command as root. # # Members of the admin group may gain root privileges %admin ALL=(ALL) ALL # Allow members of group sudo to execute any command %sudo ALL=(ALL:ALL) ALL # See sudoers(5) for more information on "#include" directives: #includedir /etc/sudoers.d On other distributions, like Arch and some others, it’s usually called wheel and you may need to set it up: Arch Wiki
To give users in the wheel group full root privileges when they precede a command with «sudo», uncomment the following line: %wheel ALL=(ALL) ALL
Also note that on most systems visudo will read the EDITOR environment variable or default to using vi . So you can try to do EDITOR=vim visudo to use vim as the editor.
To add a user to the group you should run (as root):
# usermod -a -G groupname username where groupname is your group (say, admin or wheel ) and username is the username (say, john ).
How To Add User To Sudoers & Add User To Sudo Group on Ubuntu
The sudo command is the preferred means to handle elevated permissions. In supported versions of Ubuntu, using the sudo command will grant elevated permissions for 15 minutes.
Standard user accounts are restricted from performing sensitive tasks, such as viewing the contents of the /root directory. This prevents the accidental use of commands with massive consequences. It also makes it more difficult for intruders to compromise a system. However, sometimes you need to run an administrative command. Sudo – or Super User Do – grants you privileges to run sensitive tasks.
This simple tutorial will show you how to add a new user on Ubuntu and provide sudo access.

- A system running a supported version of Ubuntu
- Access to a root user account or another account with sudo privileges
- Access to a terminal window/command line (Ctrl–Alt–T)
Note: Linux Sudo Command tutorials also available for CentOS and Debian.
Steps to Add Sudo User on Ubuntu
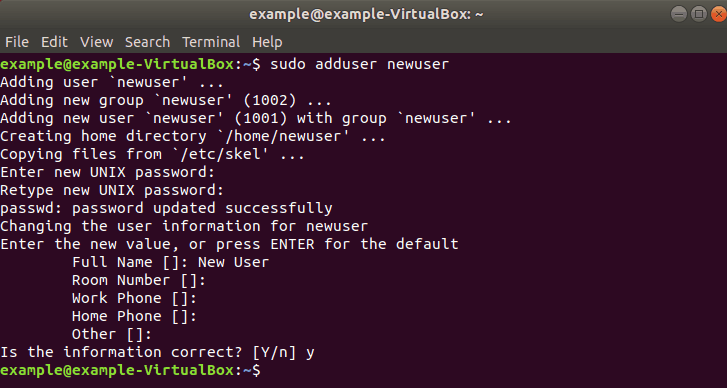
Step 1: Create New User
1. Log into the system with a root user or an account with sudo privileges.
2. Open a terminal window and add a new user with the command:
The adduser command creates a new user, plus a group and home directory for that user.
You may get an error message that you have insufficient privileges. (This typically only happens for non-root users.) Get around it by entering:
3. You can replace newuser with any username you wish. The system will add the new user; then prompt you to enter a password. Enter a great secure password, then retype it to confirm.
4. The system will prompt you to enter additional information about the user. This includes a name, phone numbers, etc. – these fields are optional, and can be skipped by pressing Enter.
Step 2: Add User to Sudo Group
Most Linux systems, including Ubuntu, have a user group for sudo users. To grant the new user elevated privileges, add them to the sudo group.
In a terminal, enter the command:
Replace newuser with the username that you entered in Step 1.
Again, if you get an error, run the command with sudo as follows:
sudo usermod -aG sudo newuserThe -aG option tells the system to append the user to the specified group. (The -a option is only used with G .)
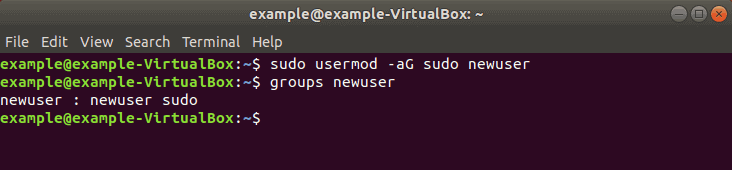
Note: Usermod command is a useful tool for user management. To learn more about its options, refer to our guide How To Use The Usermod Command In Linux.
Step 3: Verify User Belongs to Sudo Group
Enter the following to view the groups a user belongs to:
The system will respond by listing the username and all groups it belongs to, for example: newuser : newuser sudo
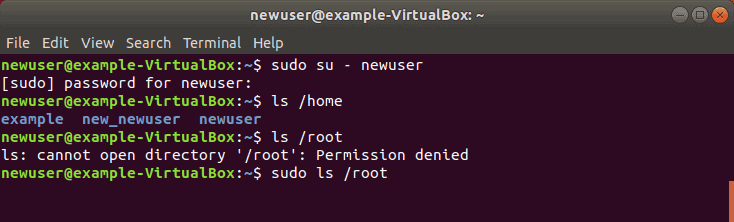
Step 4: Verify Sudo Access
Replace newuser with the username you entered in Step 1. Enter your password when prompted. You can run commands as normal, just by typing them.
However, some commands or locations require elevated privileges. If you try to list the contents of the /root directory, you’ll get an access denied error: ls /root
The command can be executed with:
The system will prompt for your password. Use the same password you set in Step 1. You should now see the contents of the /root directory.
Now you know how to add and create a user with sudo privileges on Ubuntu.
Before sudo, users would log in to their systems with full permissions over the entire system with the su command. This was risky as users could be exploited by tricking them into entering malicious commands. These vulnerabilities were solved by limiting account privileges. However, administrators still had to log out of their account and into an admin account to perform routine tasks.
The sudo command in Ubuntu strikes a balance – protecting user accounts from malicious or inadvertent damage while allowing a privileged user to run administrative tasks. To learn more about the difference between these commands, check out Sudo vs. Su.
How to Add a User to Sudoers

On Unix and Linux, the superuser account, also known as root, admin, or supervisor, is a special user account capable of making unrestricted, system-wide changes. It is mostly used for system administration tasks such as changing the ownership of files or binding network ports. However, it is sometimes necessary to allow standard user accounts to perform some of these sensitive actions, by granting them elevated privileges and access through the use of the [.inline-code]sudo[.inline-code] command.
In this article, we’ll cover two methods for adding a user, or a group of users, to the sudoers list.
[#using-usermod]Add user to sudoers with the [.inline-code]usermod[.inline-code] command[#using-usermod]
In Linux, a group is a collection of accounts that can be given special or elevated permissions on the system. For example, a group can be given read permission on a file and another group read and write permissions on the same file.
To add a user account to a group, we can use the [.inline-code]usermod[.inline-code] command that essentially allows us to modify an existing account.
- The [.inline-code]-a[.inline-code] flag (short for append) is used to specify that we want to add a group to the specified user.
- The [.inline-code]-G[.inline-code] flag (short for groups) is used to specify which group we want to add.
Since most Linux distributions have a special group for sudoers, the easiest way to grant superuser privileges to a user account is to add it to this group.
[#in-ubuntu-or-debian]Add users to sudoers in Ubuntu or Debian[#in-ubuntu-or-debian]
On Ubuntu and Debian, this group is named [.inline-code]sudo[.inline-code].
[#in-centos-or-fedora]Add users to sudoers in CentOS or Fedora[#in-centos-or-fedora]
On CentOS and Fedora, this group is named [.inline-code]wheel[.inline-code].
[#verify-changes]Check whether adding users to sudoers was successful[#verify-changes]
To verify that a user was successfully added to the sudoers group, we can display the content of the [.inline-code]/etc/group[.inline-code] file using the [.inline-code]cat[.inline-code] command, which contains the list of groups (and their users) registered on the system.

[#using-sudoers-file]Add users to sudoers using the sudoers file[#using-sudoers-file]
In *nix systems, user accounts and groups with sudo privileges are stored into the [.inline-code]/etc/sudoers[.inline-code] file (sometimes called the “sudo file”), which contains a list of instructions called privilege lines, that can be edited to grant customized access to commands a user or a group can execute, or configure custom security policies.
The general syntax for a privilege line is the following:
user on_host=(as_user:as_group) allowed_commands
Which can be roughly translated to «who where=(whom) what».
For example, the following line can be read as «the root user can run any command as any user from any group on any host.»
And this line can be read as «the admin user can run the mkdir command as the root user on any host».
admin ALL=(root) /usr/bin/mkdir
[#adding-a-group-to-sudoers]Adding a group to sudoers[#adding-a-group-to-sudoers]
The sudoers file also allows us to grant superuser privileges to an entire group of users by specifying the group name prefixed with a percentage character ([.inline-code]%[.inline-code]).
%group on_host=(as_user:as_group) allowed_commands
[#using-visudo]Use [.inline-code]visudo[.inline-code] to safely modify the sudoers file[#using-visudo]
Because of the sensitive nature of its content, it is highly recommended to only open it using the [.inline-code]visudo[.inline-code] utility — which uses the [.inline-code]vim[.inline-code] text editor under the hood — as it will automatically check for syntax errors before the file is saved, preventing us from ending up with a broken system where it is impossible to obtain elevated privileges.
Note that if you are not particularly experienced with [.inline-code]vim[.inline-code], you can always change the default editor using the following syntax.