- The Simplest Way to Resize Ubuntu Partition Under Windows
- What Is Ubuntu
- Ubuntu Resize Partition
- Why Do You Choose MiniTool Partition Wizard Free Edtition
- How to Resize Ubuntu Partition with MiniTool Partition Wizard?
- Verdict
- About The Author
- Minitool partition wizard linux
- The Best Way to Free Create Swap Partition in Linux [Partition Manager]
- Summary :
- Quick Navigation :
- What Is Swap Partition
- Why to Create Swap Partition
- How to Create a Linux Swap Partition
- How to Create Linux Partition in 4K Hard Drive under Windows? [Partition Manager]
- Summary :
- Quick Navigation :
- What Is Linux?
- Why to Create Linux Partition in 4K Hard Drive
- How to Create Linux Partition in 4K Hard Drive under Windows?
- Bottom Line
The Simplest Way to Resize Ubuntu Partition Under Windows
Some users don’t know how to resize Ubuntu partition when they find the partition size is unreasonably. This article will show you how to resize Ubuntu partition under Windows.
What Is Ubuntu
Ubuntu is a kind of Linux operating system, and it is developed by Mark Shuttleworth on the basis of Debian. This operating system is developed to make it easy to use personal computer.Meanwhile, it also offers server edition for enterprise.
Users who have used Ubuntu know Ubuntu computer can be used once it opens instead of costing much time to install browser, media player, office suite, and other commonly used software, which promotes the ease of use of the system.
Besides, this operating system provides users with many drives of hardware device. Therefore, Ubuntu is preferred by many Linux fans and has become the best Linux operating system.
However, after you use it for a while, they may find the Ubuntu partitions on the device are unreasonable and want to change the sizes of the partitions. Under this situation, many users don’t know how to resize partition Ubuntu as Ubuntu operating system is different form Windows and some Windows disk partition resizer cannot be used in Ubuntu.
Since Ubuntu and Windows are different operating system platforms, the simplest way to resize Ubuntu partition is that you can resize the Ubuntu partition under Windows if your computer is dual-boot.
It is recommended to use reliable third-party tools to resize Ubuntu partition as Windows built-in Disk Management is much limited when you use its Extend Volume or Shrink Volume to resize partition. See: Why Extend Volume Grayed out and How to Quickly Fix It
Ubuntu Resize Partition
Why Do You Choose MiniTool Partition Wizard Free Edtition
As is known to all, there are many excellent partition managers on the market to help Windows users to resize partitions if there is insufficient space and manage disks and partitions. However, most of them do not support this feature.
Luckily, nowadays, dual booting Linux with Windows is always suggestible for the beginners. For this kind of users, they can resize Ubuntu partition under Windows operating system with a third-party partition manager.
You can choose MiniTool Partition Wizard Free Edition to resize Ubuntu partition or Windows partition as this partition manager won’t damage data on related partitions, and you can manage Windows partition and Ubuntu partition at ease with just one partition manager.
How to Resize Ubuntu Partition with MiniTool Partition Wizard?
Note: MiniTool Partition Wizard can only resize FAT and NTFS partition. NTFS data partition can be identified and used in both Windows operating system and Ubuntu, so you can resize a NTFS partition of Ubuntu with MiniTool Partition Wizard.
Step 1. Download MiniTool Partition Wizard Free Edition by clicking the following button. Install it on your Windows operating system and launch it to get the main interface.
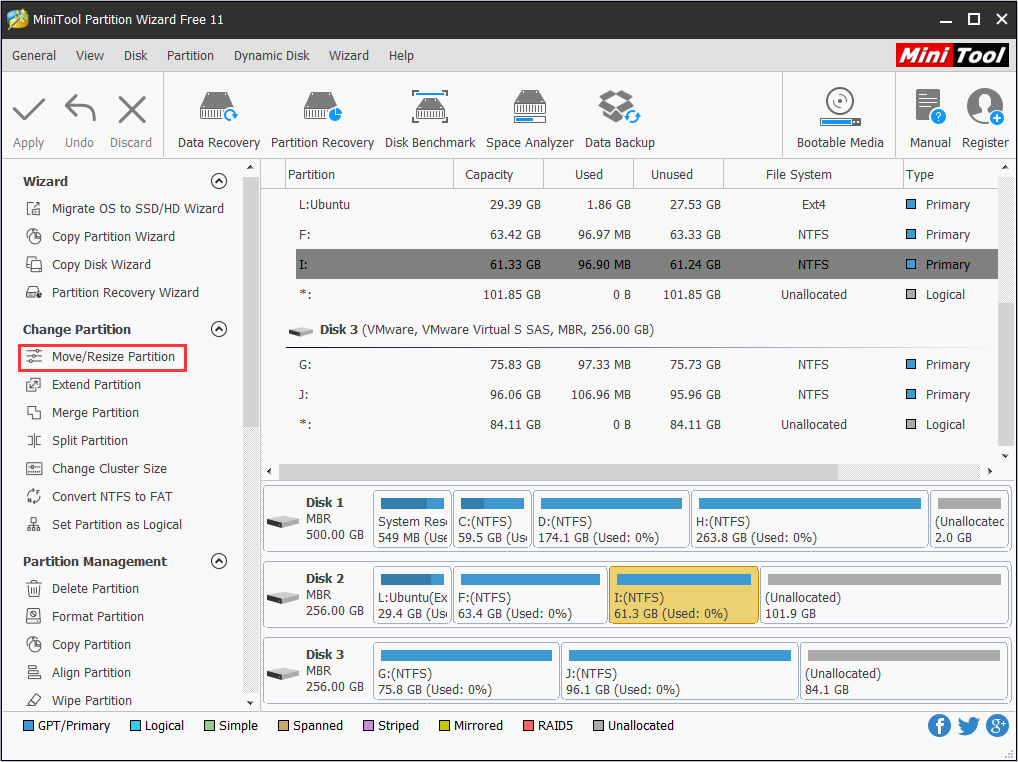
Step 2. This software will list all partitions on your computer. Then, you need to select the Ubuntu partition that you want to change sizes, and click Move/Resize Partition option from left action panel. You can see from the following image.
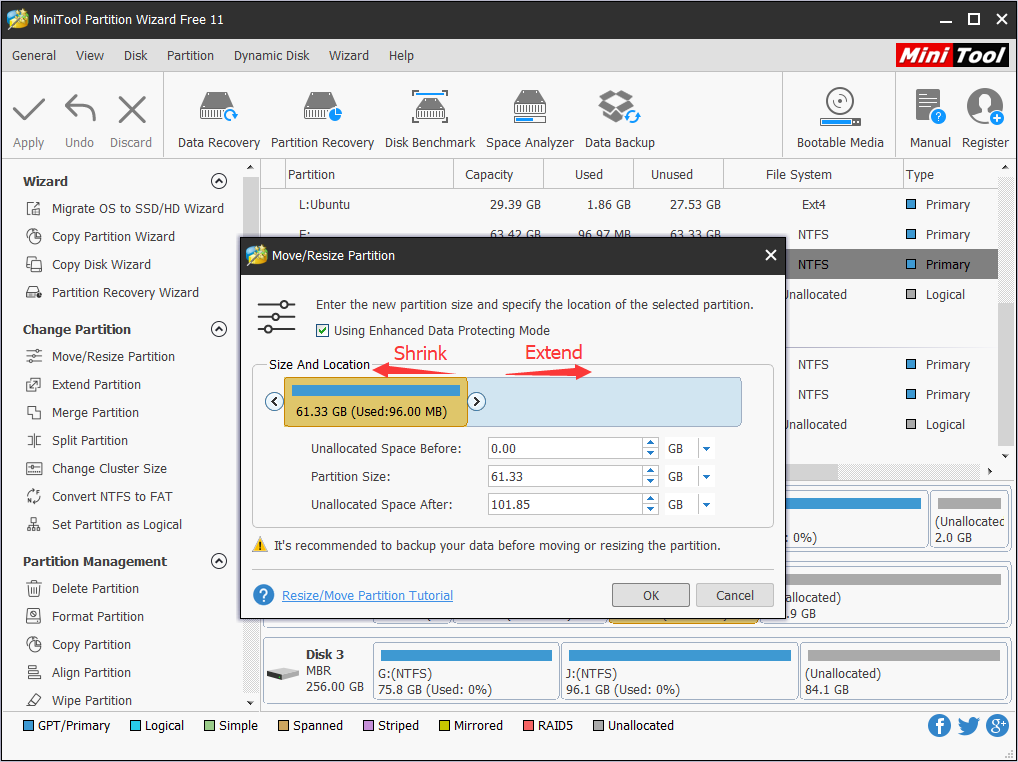
Step 3. In the following interface, drag the partition handle rightwards or leftwards to extend or shrink partition. Then, click OK to go back to the main interface.
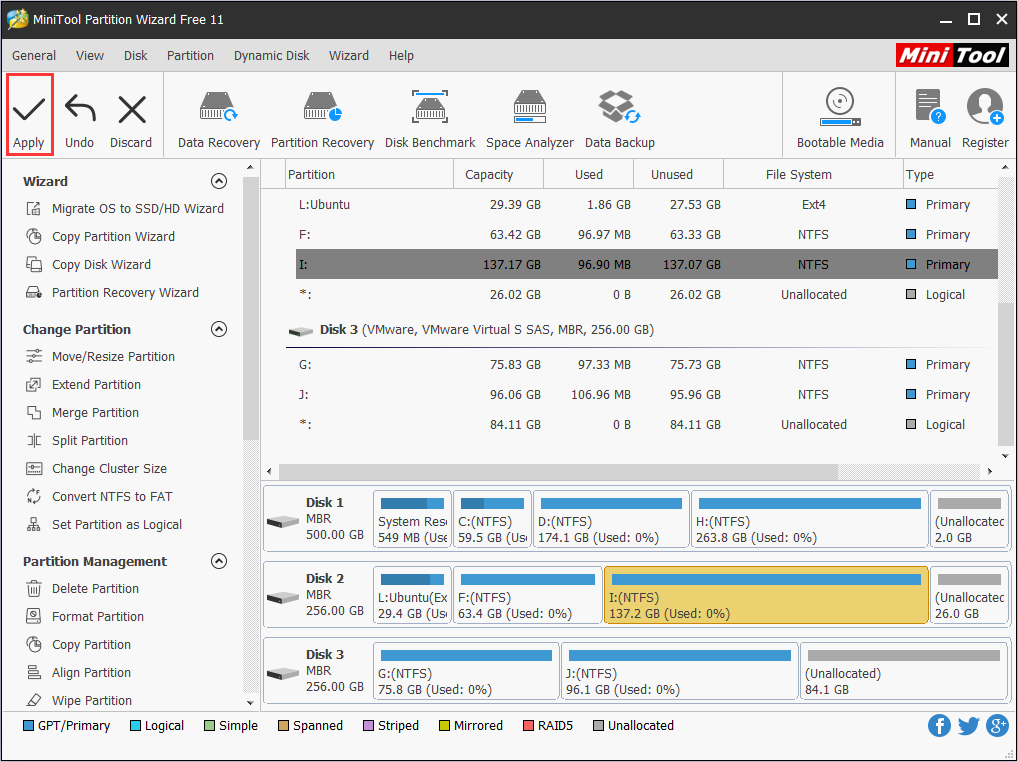
Step 3. Next, click Apply to perform the pending operation.
Note: If you want to complete Ubuntu extend partition task under Windows but there is not unallocated device space, you can use MiniTool Partition Wizard’s Extend Partition feature to extend partition by taking unused space from another partition.
Verdict
You see, it is not impossible to resize partition sizes in Ubuntu. If you are an Ubuntu and Windows dual-boot user, you can resize Ubuntu easily with MiniTool Partition Wizard under Windows.
If you have any question about Ubuntu resize partition with MiniTool Partition Wizard, you can leave a message on the following comment zone and we will reply as soon as possible. If you need any help when using MiniTool software, you can contact us via [email protected] .
About The Author
Irene joined MiniTool in 2018 and has since become a professional in the areas of disk management and Windows tricks. Irene’s expertise allows her to assist clients with managing their hard drives, optimizing their Windows operating system, and troubleshooting any technical issues that arise.
Minitool partition wizard linux
The Best Way to Free Create Swap Partition in Linux [Partition Manager]
Summary :
A Swap partition is very useful when your Linux is running out of memory. Here MiniTool tells you what a Swap partition is and how to create a Swap partition.
Quick Navigation :
What Is Swap Partition
As you know, swap partition is an important part of Linux. When installing Linux system, you may need to add a swap partition to your Linux. So, what is Swap Partition? In fact, Linux Swap partition refers to the virtual memory partition under Linux. When physical memory of the system is not enough, the Swap partition can release a part of the hard disk space so that the current running programs can use it. The disk space which is released may come from some procedures that are not used for a long time, and the released disk space is temporarily saved to the swap partition.
When running those procedures, it allows to recover data that is saved to memory from a Swap partition. In other words, when the operating system needs data from the disk, Swap partition exchanges a part of data in main memory with a portion of data on the disk. The virtual memory technique breaks the limitation of physical memory in function, and it enables a computer to execute programs and manipulate data larger than the actual physical memory space. What’s more, it can ensure that each process is not affected by other program. In Swap partition size, if Swap space is too large, disk space will be wasted, and if Swap space is too small, then the system may go wrong. Therefore, it is recommended to be 2 times larger than the physical memory. In Linux, it is limited to be at most 2 GB.
Why to Create Swap Partition
- It can leave some disk space when the computer memory is filled up completely.
- It can move some rarely-needed application and files away from the memory.
- It allows you to hibernate system. If there is no Swap partition, the computer is impossible to hibernate.
- The Swap partition can improve the performance of computer to some degrees.
Due to those merits, Swap partition is really useful and important in Linux. After installing system, you may want to create Linux partition. Here look at an example from forums.linuxmint:
«I just installed Linux mint 11 yesterday to solve my graphics chipset problem. But I forgot to create a swap partition. So my question is how can I create swap partition without reinstalling Linux mint? Also I have 4 GB ram on my laptop and I don’t use hibernation function on my laptop so do I really need swap? The space I reserved for swap partition is 4 GB & it is shown as unusable space in partition s/w. Thanks in advance.»
When encountering such a case, how to create a Swap partition? Don’t worry. Please read on and you can get a very easy way to achieve this aim.
How to Create a Linux Swap Partition
When searching «create Swap partition» in Google, you can find some methods, but it seems that some ways are a little complex. Fortunately, here is a very simple way introduced to you, that is to using a third-party partition and disk management software.
Thereinto, MiniTool Partition Wizard Free Edition is popular in managing Linux partition and disk for free. And it makes these Linux partitions intuitive on your computers so you can do Linux partition management easily. As a reliable and professional Swap partition manager, it can be used to copy partition, change partition type ID, do surface test, wipe partition and create partition.
Here are the steps about creating a Linux Swap partition.
Firstly you need to free download MiniTool Partition Wizard Free Edition and install it to your computer. Then launch this application to its main interface to do partition creation.
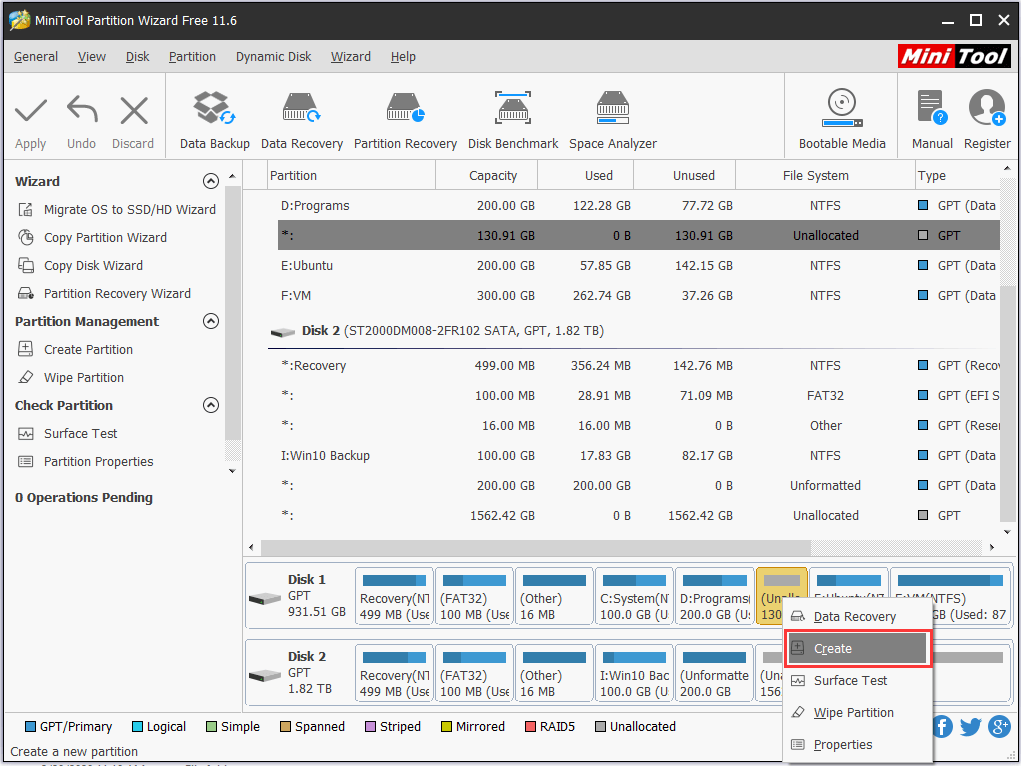
Step 1: Right click the unallocated space and select «Create» or click «Create Partition» from the left «Operations» menu after selecting the target unallocated space.
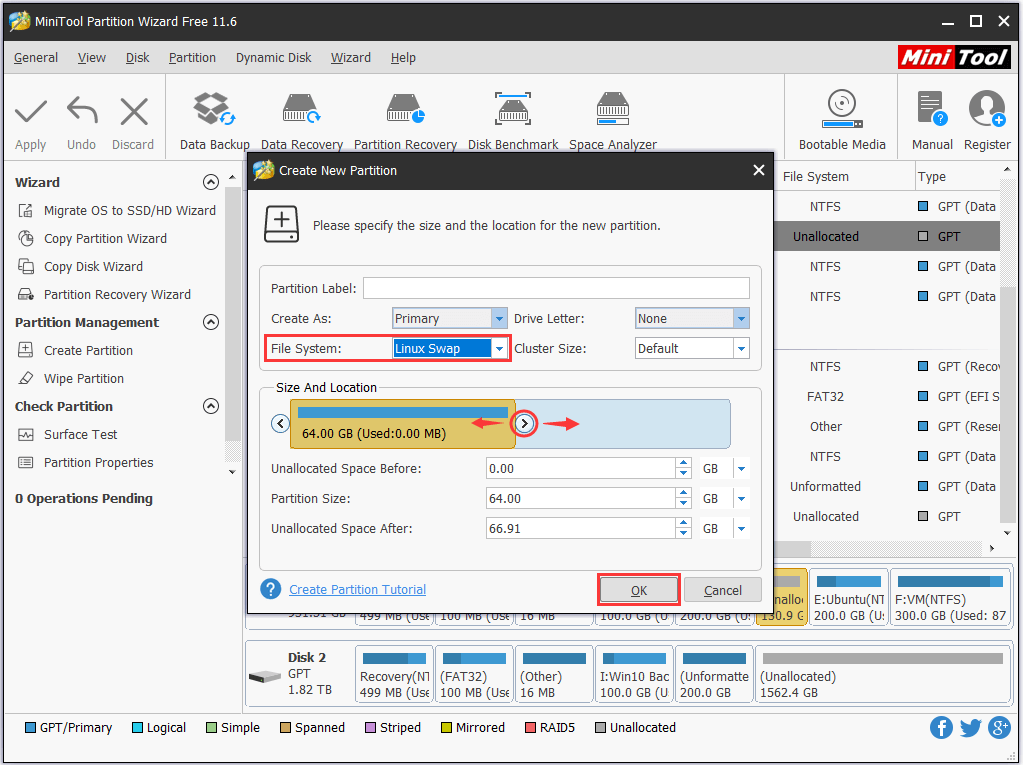
Step 2: Then you can select «Linux Swap» from the «File System» drop-down menu. Here you can set partition logical or primary and also set partition label. Moreover, during the process, you can change partition size. Here please set partition size as 4 GB by dragging the partition bar or by inputting 4096 in the «Partition Size» textbox.
Step 3: At last, click «Apply» to execute all operations.
In conclusion, with the assistance of MiniTool Partition Wizard Free Edition, you can create Swap partition quickly and easily. Just only with three steps, you are able to achieve your aim. Please try this freeware at once.
How to Create Linux Partition in 4K Hard Drive under Windows? [Partition Manager]
By Tina | Follow | Last Updated May 17, 2019
Summary :

What is Linux? Do you know how to create Linux partition in 4K hard drive in Windows? Why do you need to create Linux partition on 4k hard drive? This post will show you the solutions with a step-by-step guide.
Quick Navigation :
What Is Linux?
Linux is a Unix-like and mostly POSIX-compliant computer operating system (OS) which is assembled under the model of free and open-source software development and distribution. Moreover, you can get it via internet or other ways and its source code can be modified.
Linux is full free, and it is fully compatible with POSIX1.0 standard which can make you run Windows procedures via corresponding simulators. Moreover, Linux provides an X-Window system which is similar to Windows graphical interface. Linux has many different versions and they all use Linux kernel.
And Linux can be installed in many kinds of computer hardware equipments, such as panel computers, routers, video or game consoles, table top computers, and table top computers. Therefore, due to the advantages of Linux, Linux is widely used.
Why to Create Linux Partition in 4K Hard Drive
When mentioned creating Linux partitions in 4K hard drive, you should know what 4K hard drive is and why to create a Linux partition. Hard drive industry is facing a great revolution that the traditional sector size is changed from 512B to 4096B. In fact, 4K hard drive refers to the disk of which 4K sector and 4K cluster are aligned, namely 4K alignment which is specialized at SSD and the advanced formatted hard drive.
Consequently expanding sector size from 512B to 4096B will greatly improve hard drive performance as well as hard drive space usage rate. Therefore, you choose a 4K hard drive to make full use of disk space and improve computer performance.
Thus, do you know how to create Linux partition in 4K hard drive under Windows?
How to Create Linux Partition in 4K Hard Drive under Windows?
As to Linux creation partition, you can take a piece of professional partition software to create Linux partition in 4K hard drive. Thus, MiniTool Partition Wizard is strongly recommended.
MiniTool Partition Wizard is designed to optimize partition and disk use with its powerful features.
So create Linux partition in 4K hard drive under Windows, you can download MiniTool Partition Wizard Free to continue.
And we will show you how to create Linux partition in 4K hard drive under Windows with step-by-step guide.
Step 1: Launch MiniTool Partition Wizard
- Install MiniTool Partition Wizard and launch it.
- Enter the main interface of MiniTool Partition Wizard.
Step 2: Create partition Linux under Windows
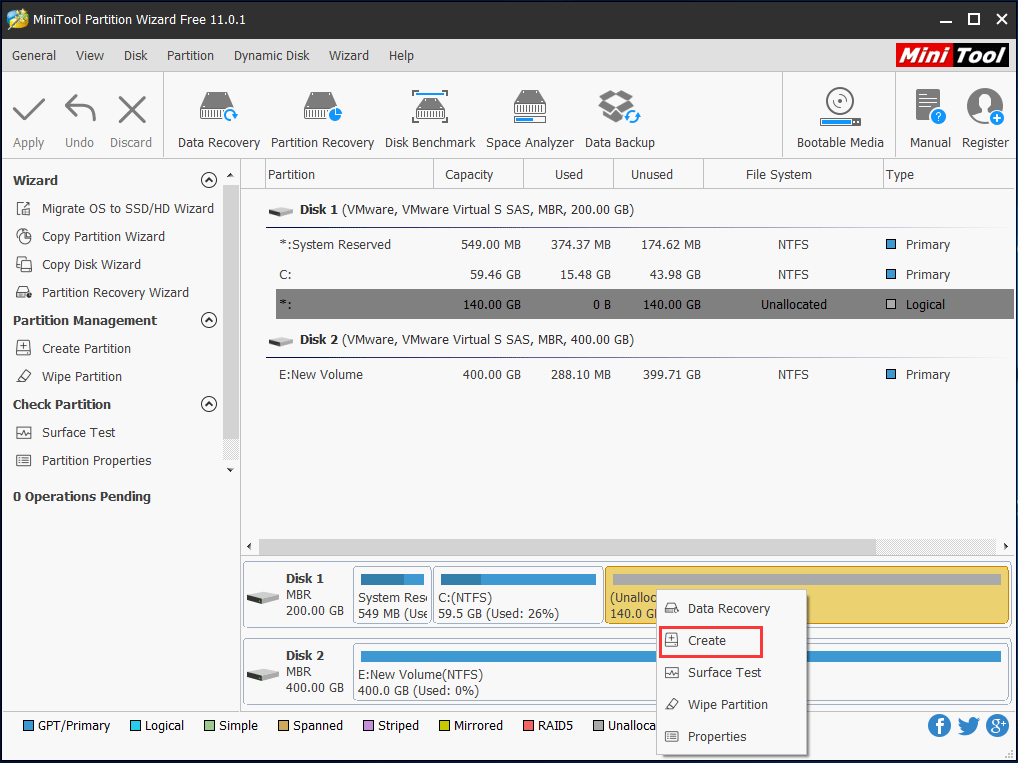
- Select the unallocated space on the hard drive.
- Right-click the unallocated space and choose Create from the context menu.
Step 3: Set partition parameters
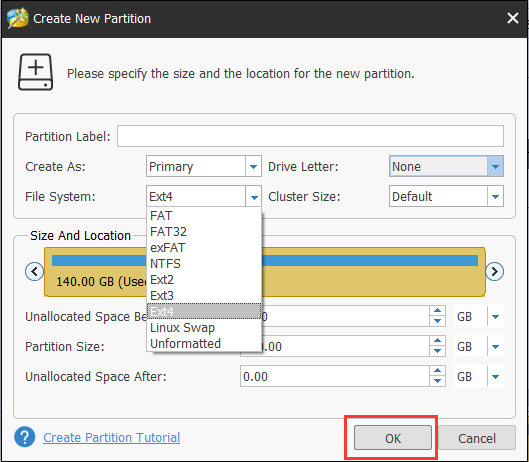
- In the popup window, please set some partition parameters.
- The File System of Linux partition should be Ext. And here we set the file system as Ext4 as an example.
- Click OK.
Step 4: Confirm the changes

When the process is finished, you have created Linux partition under Windows. And you can install Linux to this partition.
Bottom Line
In conclusion, do you know what the Linux is and how to create Linux partition in 4K hard drive under Windows?
And if you have any better solution to create Linux partition under Windows, you can share it on the comment zone.
And if you have any problem of MiniTool Partition Wizard, you can contact us via the email [email protected] and we will reply to you as soon as possible.