- Linux mint add to menu
- StasyakOFF Blog
- Как добавить приложение в Menu на Linux Mint
- How to Add Programs to the Linux Mint Menu
- Add applications to cinnamon menu in Linux Mint
- What application can we add?
- Method 1: Add custom applications in Mint menu.
- Method 2: Add item to menu by creating a launcher on the Desktop
- Linux Mint Forums
- [SOLVED> How to add program to Start Menu
- Re: How to add program to Start Menu, that starts from termi
- Re: How to add program to Start Menu, that starts from termi
- Re: [SOLVED> How to add program to Start Menu
Linux mint add to menu
Adding menu item can be done very simply by an application named alacarte or by other similiar softwares.
This tutorial is for those who prefer a more straight forward process without installing any additional software.
the steps are following (I will be creating a menu entry under programming section named eclipse luna) :
1. sudo gedit /usr/share/applications/eclipse-luna.desktop
eclipse-luna will be replaced by your app name
2. copy paste the following lines
[Desktop Entry]
Encoding=UTF-8
Exec=/home/user/eclipse-version/eclipse/eclipse
Icon=/home/user/eclipse-version/eclipse/icon.xpm
Type=Application
Terminal=false
Comment=Eclipse Integrated Development Environment
Name=Eclipse Luna
GenericName=eclipse-4.4 M4
StartupNotify=false
Categories=Development;IDE;Java;
user will be replaced by your user name.
if the execution and icon path is correct then the entry will be automatically added to the menu under the programming section.
- [Desktop Entry] — indicates that this file is a *.desktop file
- Encoding=encoding used
- Exec=path of a binary or script used to start the program
- Icon — path to the icon for the entry
- Type=Application — desktop file is starting an application
- Terminal=false — the program will not run in a terminal
- Comment=comment about the app
- Name= displayed name in the menu
- GenericName=description of the entry
- StartupNotify=false — Startup notification is turned off
- Categories — specifies the categories in which the entry will be placed in the menu (several categories are specified with a semicolon between them, e.g. ‘Game;Education’)
StasyakOFF Blog
Как добавить приложение в Menu на Linux Mint
Не все приложения, которые нам нужны для работы и отдыха есть в Менеджере программ, некоторые поставляются просто в виде архива со скриптами.
Если вы хотите запускать такие программы из Menu, то эта статья для Вас!
Рассмотрим процесс настройки на примере JetBrains WebStorm
1. Скачиваем и распаковываем архив в любую удобную нам директорию (в моем случае это будет /home/sy/program/webstorm)
2. Меню устроено так, что каждый пункт имеет свой файл конфигурации. Список пунктов находится в директории /usr/share/applications/
создадим в этой директории пустой файл с названием jetbrains-webstorm.desktop
3. Добавим конфигурацию для WebStorm. Вот пример (можно открыть любой другой файл конфигурации и подсмотреть как настроены различные пункты)
1 2 3 4 5 6 7 8 9 10 11 12
[Desktop Entry] Type=Application Name=JetBrains WebStorm GenericName=JetBrains WebStorm 223 X-GNOME-FullName=JetBrains WebStorm 223 Exec=/home/sy/program/WebStorm-223.8214.51/bin/webstorm.sh Icon=/home/sy/program/WebStorm-223.8214.51/bin/webstorm.png Comment=JetBrains WebStorm 223 Categories=Development; Terminal=false StartupNotify=true StartupWMClass=jetbrains-webstorm
строка 1: указывает что это конфигурация нового пункта меню
строка 2: тип пункта — запуск приложения
строка 3,4,5: название приложения сделал по аналогии с другими пунктами меню
строка 6: полный путь до исполняемого файла приложения, в моем случае это путь до скрипта bash
строка 7: полный путь до иконки приложения (необязательно, но лучше с иконкой)
строка 8: комментарий, который будет появляться при наведении курсора мышки на наш пункт меню
строка 9: это раздел, в который мы хотим добавить наш пункт, через точку с запятой можно указать несколько разделов и тогда наш пункт меню будет во всех этих разделах
строка 10: признак запуска в терминале — у нас оконное приложение, поэтому false
строка 11: просто скопировал )
строка 12: имя окна которое будет запущено (не уверен, что это обязательный параметр, но названием легко получить
для этого запускаем WebStorm, и в терминале команду
sy@nitro:~/program/WebStorm-223.8214.51/bin$ xprop WM_CLASS
и кликаем на заголовок окна WebStorm’a
WM_CLASS(STRING) = «jetbrains-webstorm», «jetbrains-webstorm»
выводом будет название окна, которое мы и вписываем в качестве значения параметра StartupWMClass
)
4. Сохраняем файл jetbrains-webstorm.desktop и наслаждаемся новым пунктом меню
How to Add Programs to the Linux Mint Menu
Although Linux Mint is built on top of Ubuntu, the menu functions a little bit differently. When you install programs, they should appear in the Mint menu automatically. If this doesn’t happen, you can easily add programs to the Linux Mint menu using the built-in menu editor. These steps were performed in Linux Mint 19.1 “Tessa” MATE.
Right-click on the Menu icon, and then click the Edit Menu item in the context menu.

The Main Menu dialog will appear. Click on any category on the left to see which programs are available.

For example, here I have selected the System Tools category. To add existing items to the Main Menu, just click on the check box beside them.

To add a new launcher for a program, click New Item. type the name of the program, the correct command to start the program (typically, the same command you might run in the run box or the terminal, with any options or arguments you want). The comment is optional. Linux Mint may automatically choose an icon for you. To change the icon of your launcher, click on the icon button and navigate to the folder where icons are stored. On my Linux Mint system, they are in /usr/share/icons/.

To add a new Menu, click the New Menu button and click OK.

Type the name of the new menu directory, and add a comment if you like, then click OK. Then to add a program to the menu, create a new launcher.

Has this article been helpful? Have any questions? Feel free to post a comment below.
Add applications to cinnamon menu in Linux Mint
Linux Mint is a beautiful desktop operating system based on Ubuntu Linux with outstanding customization features..
In this tutorial we will add a custom application in the Linux Mint main menu or Mint menu.
Linux Mint gives you full control over the look of your system. You can customize it as much as you want. Make it look like Mac, Windows or design your custom look.
What application can we add?
You can add almost any application in the mint menu but the suggested one are Appimages, executable text (sh) and terminal commands.
There is no need to add installation packages like .deb to add in the menu as they automatically add themselves but if certain application don’t do so. Then follow this tutorial to add applications in Linux Mint menu.
Method 1: Add custom applications in Mint menu.
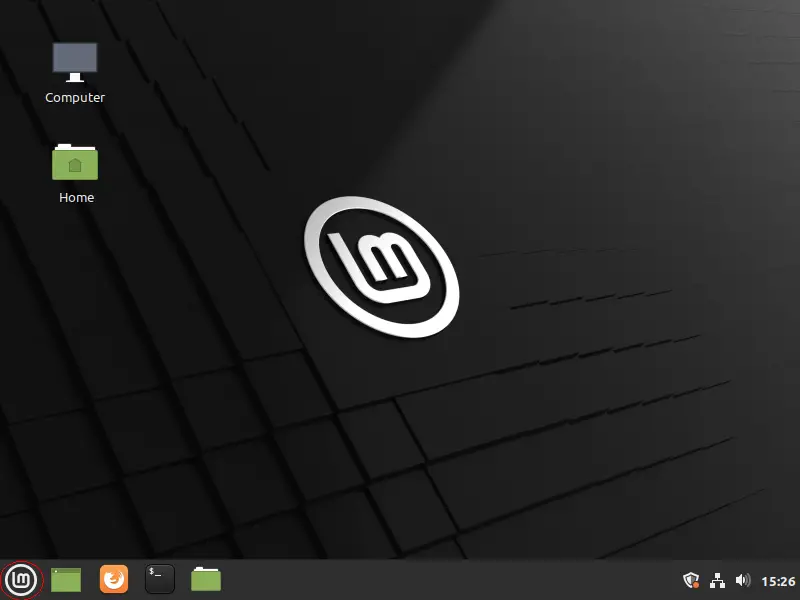
Step 1: On your Linux Mint desktop, find the Linux Mint menu and right click on it. It is on the bottom left of your screen or try pressing “Window” key on your keyboard.
I highlight this in the above picture.
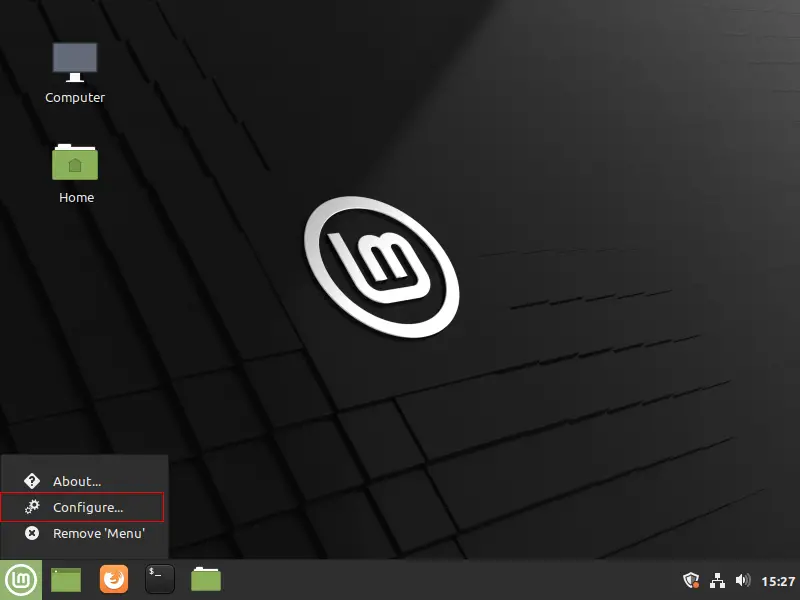
Step 2: Now click on the Configure… button as shown in the picture above. From here, we can easily configure Mint menu.
You will find all configurations for Linux mint menu here, from changing the default menu icon to adding new items.
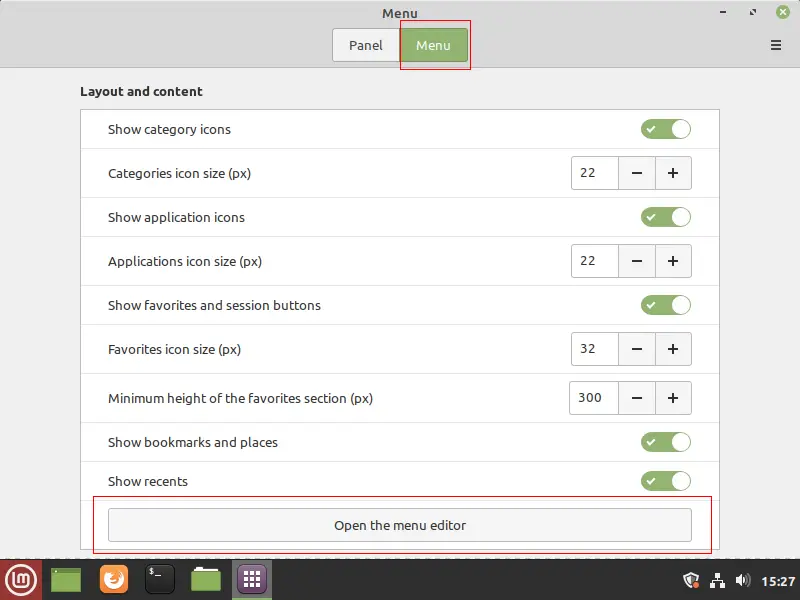
Step 3: Now, as we are in the Mint menu configuration, go to the Menu tab; it’s highlighted in the picture above and press Open the menu editor button.
Here we can see all the different categories available in the menu.
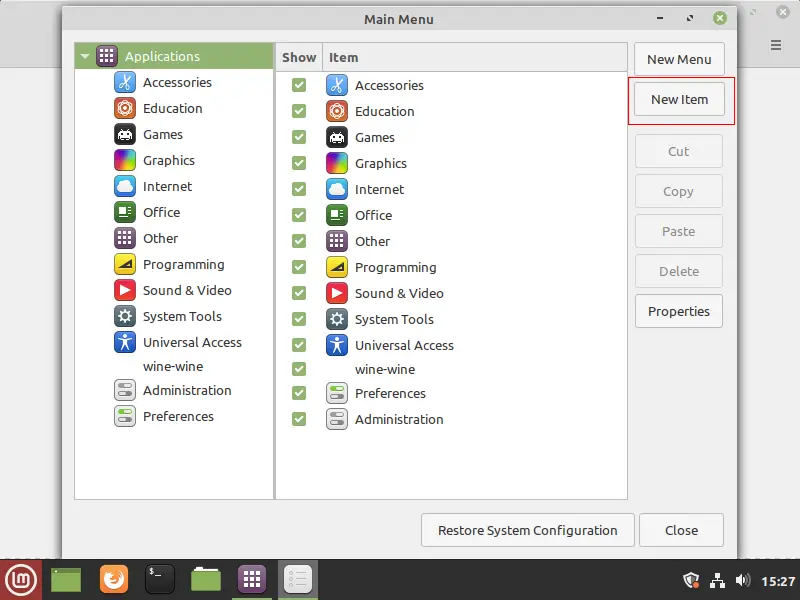
Step 4: If you want to create a new category, click New Menu and enter the name of the category. To add items, choose the suitable category and click on New Item.
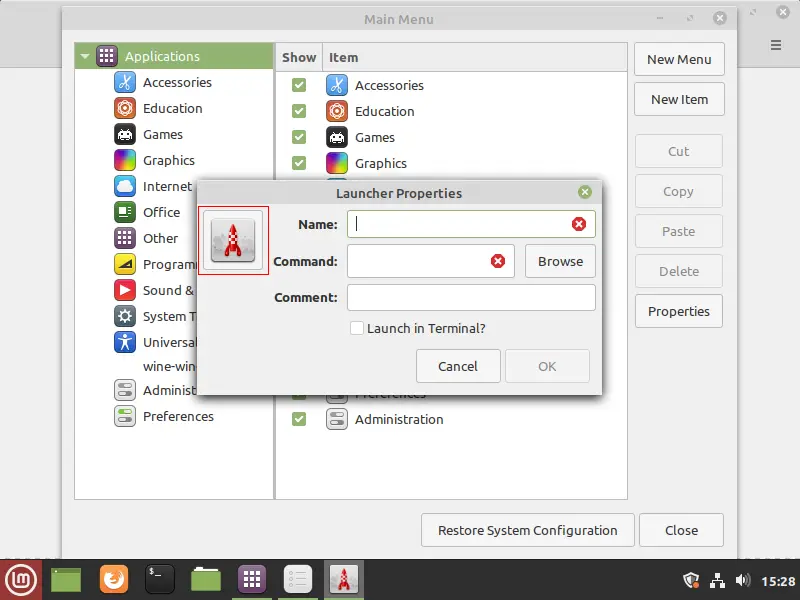
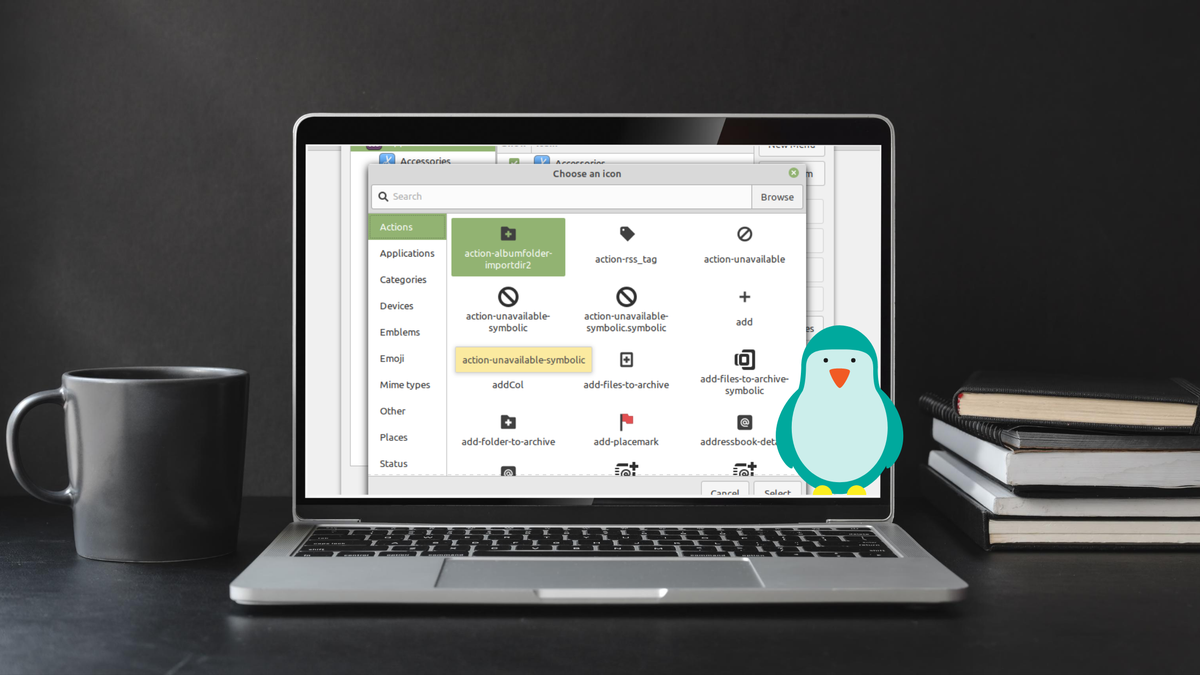
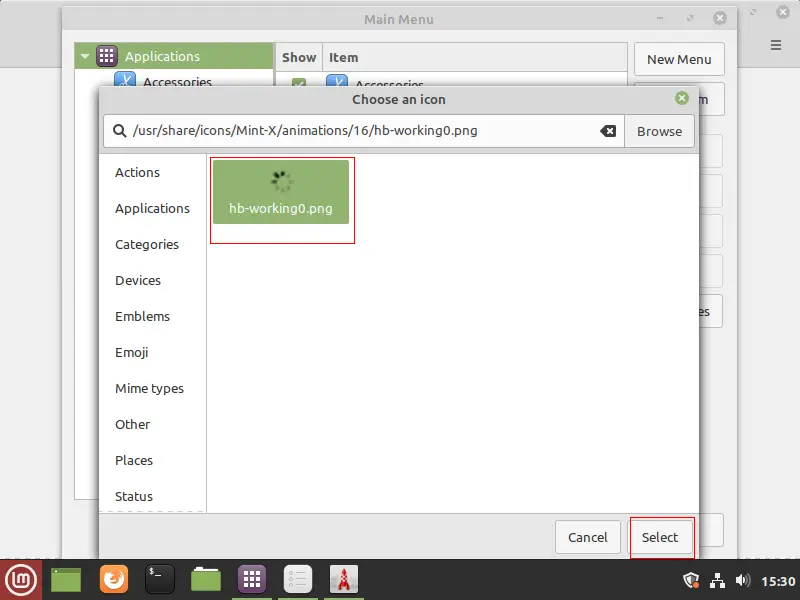
Step 4: Now click on the Rocket icon as shown in the picture above. We can now set the icon for our launcher.
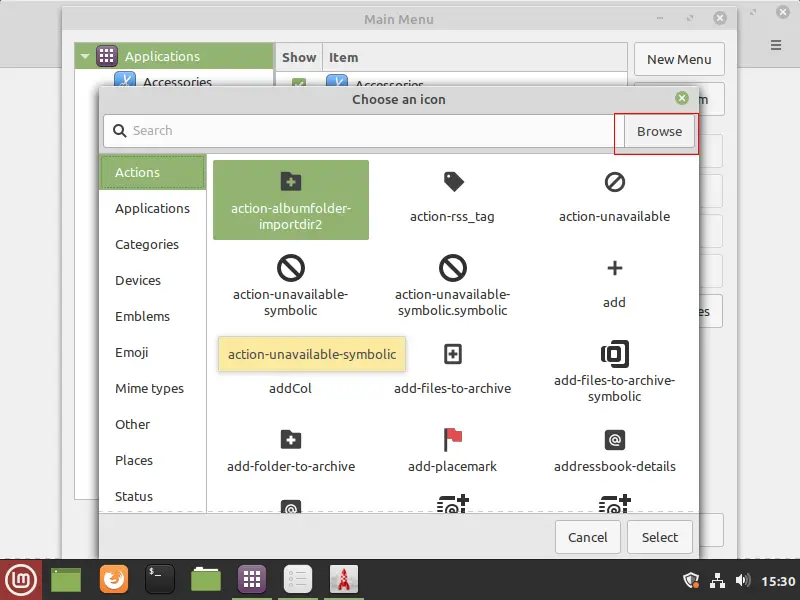
Step 5: From the catalogue of thousands of icons, choose one that matches your purpose or click Browse to choose a custom icon.
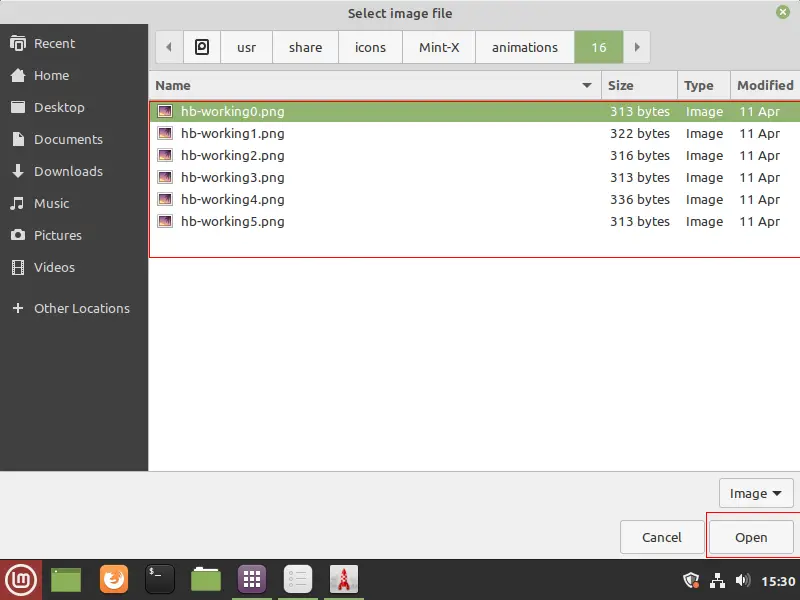
Step 6: Head to the directory where your icon is stored. It can be of any format including .ico, png, jpeg, jpg, etc..
Click on image that you want to use as the icon of your launcher in Linux mint menu and click open.
Step 7: Now your image will show in the menu, choose it and click Select to use it as the icon of your application.
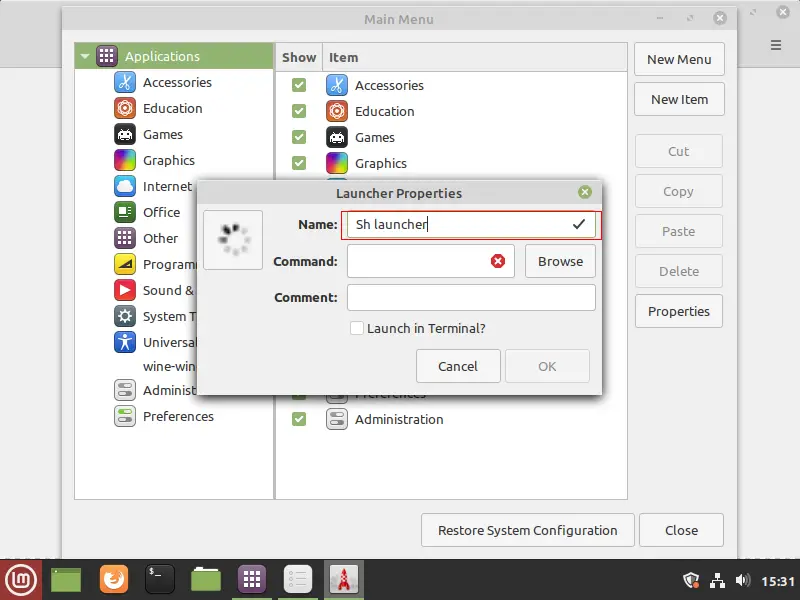
Step 8: Now, after choosing the Icon, it’s time to give our launcher a name. Enter the name of your application in the Name field.

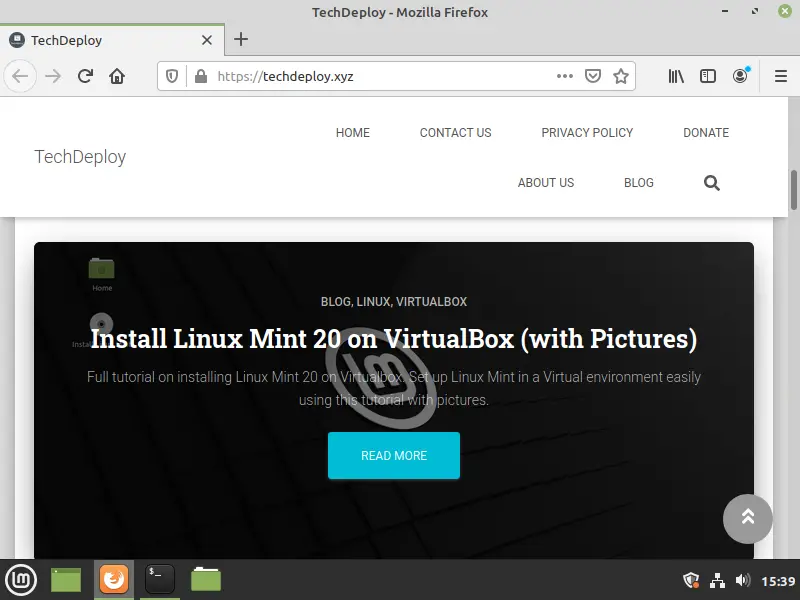
Step 9: Now if it’s an application that can be launched via terminal, enter the terminal command in the Command field. For example, I have entered:
This will start Firefox, and this website will load. You can leave the “Launch in Terminal?” checkbox empty as it is unnecessary.
You can also choose an application manually by clicking on the Browse button and choosing your application.
The comment field describes the purpose of this launcher, You can leave it empty if you want.
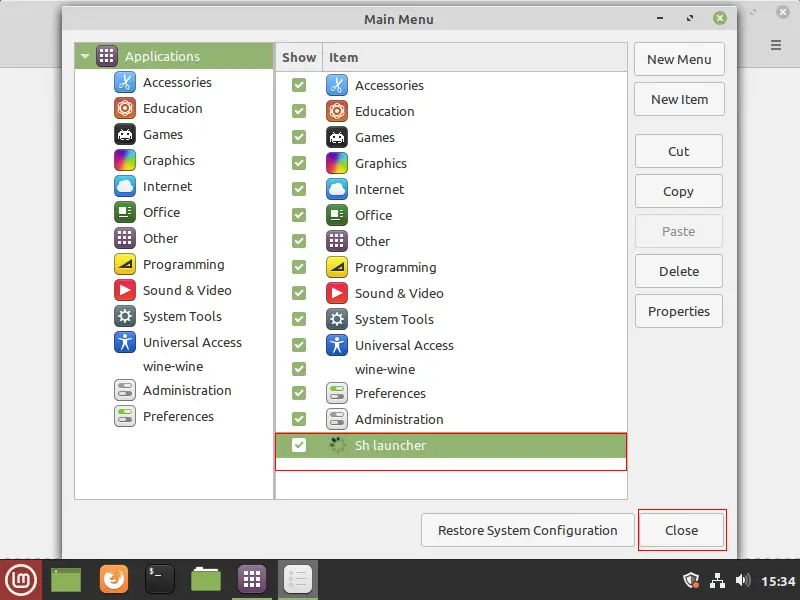
Step 10: After filling out all the required fields and the previous menu you can now see our application is listed in the Linux Mint menu. Now close the mint menu.
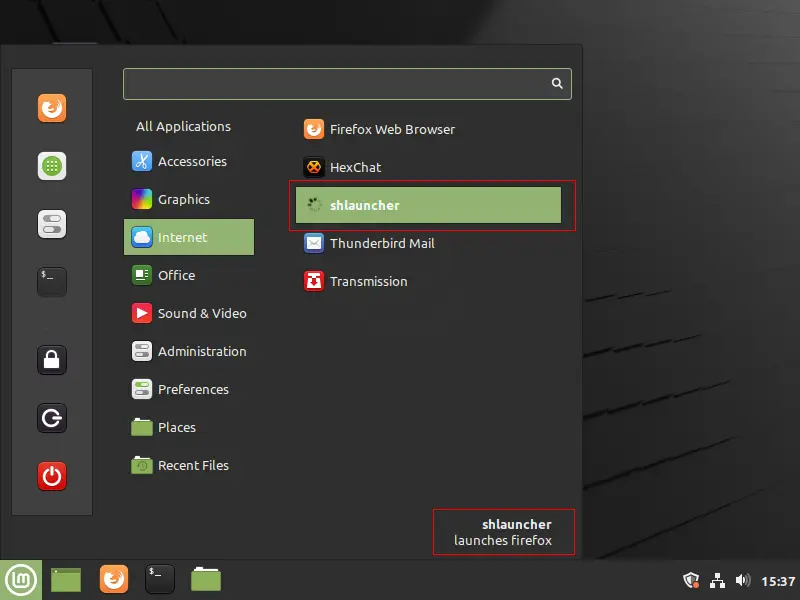
Step 11: Now open the menu and search for our application or go into the category you put it in and launch the application by clicking on it or by pressing Enter.
Method 2: Add item to menu by creating a launcher on the Desktop
This method is similar to the previous one, the only difference is that instead of adding items via mint menu, this time we will create a launcher on the desktop and add it to the menu.
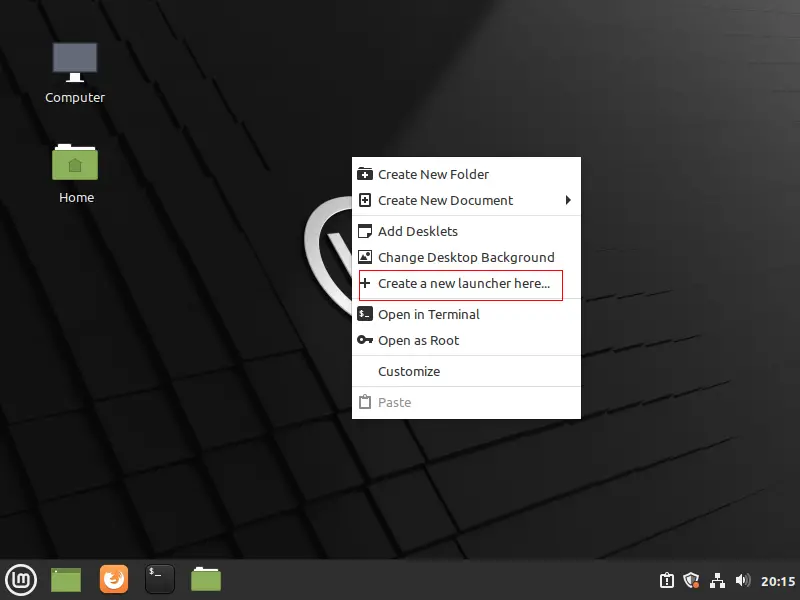
Step 1: Go to your desktop and right click, now a menu with desktop configurations will appear on this menu select and click Create a new launcher here…
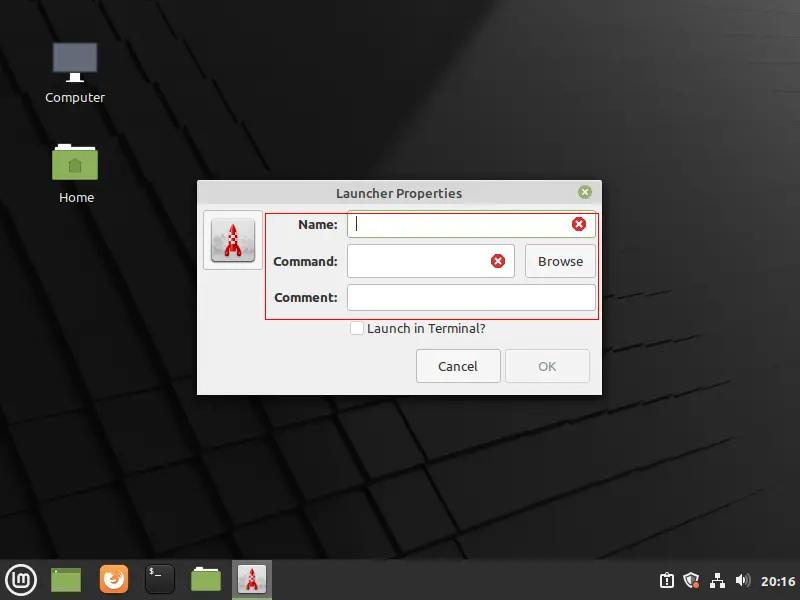
Step 2: Now choose an icon for your application or leave it as it is and fill in the Name and command for the launcher. I have explained this elaborately in Method 1.
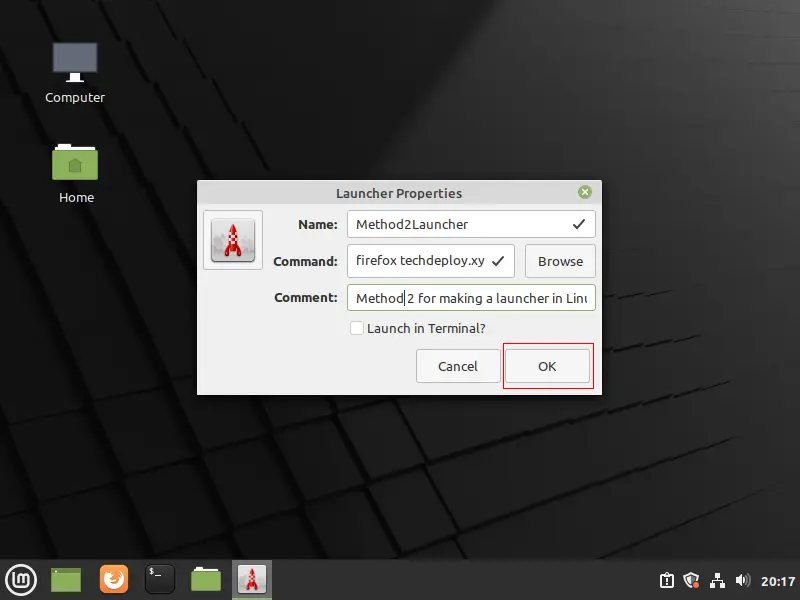
Step 3: After filling all the required fields, press OK to go the next step.
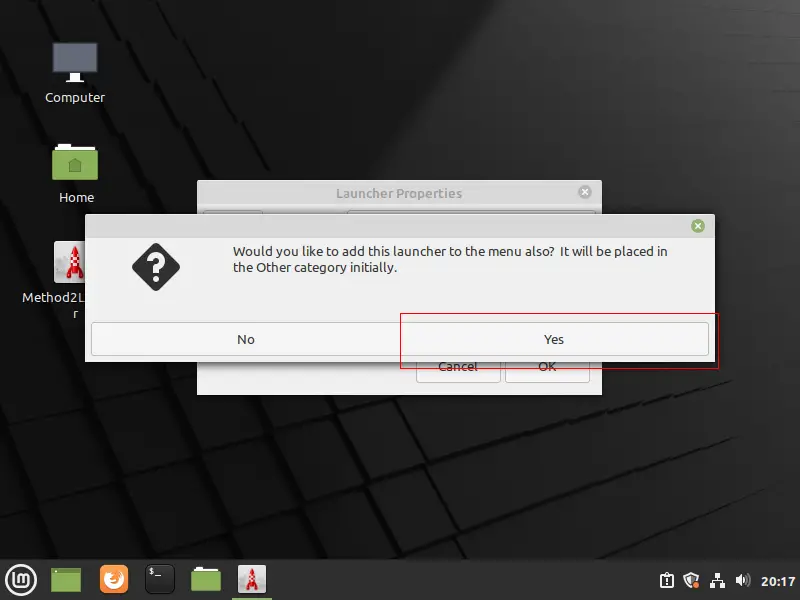
Step 4: Now it will ask you if you want to add this launcher to the menu as well. Click Yes, so it gets added to the menu too.
It will be placed in the Other category by default.
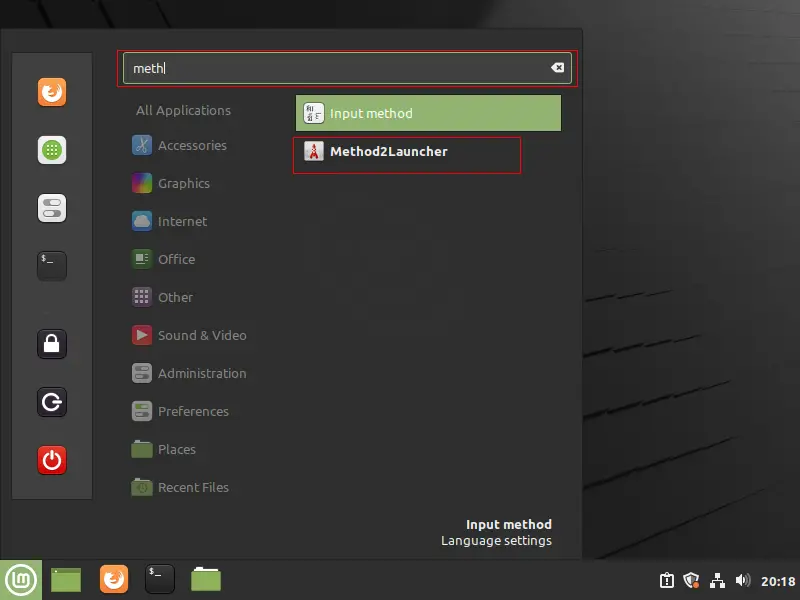
Step 5: We have now successfully added the launcher to the menu. Verify this by searching it in the menu.
You can now delete the launcher on the desktop without disturbing the one in the menu.
Linux Mint Forums
Forum rules
Before you post please read how to get help. Topics in this forum are automatically closed 6 months after creation.
[SOLVED> How to add program to Start Menu
Post by pht900 » Thu Dec 11, 2014 3:42 pm
I installed web browser PaleMoon as described here: http://linuxg.net/how-to-install-pale-m . x-systems/. Now I have to start it each time from command line by typing in «palemoon».
Is it possible to add it to Start menu and a Panel for a easier access? How?
Re: How to add program to Start Menu, that starts from termi
Post by xenopeek » Thu Dec 11, 2014 3:57 pm
Doesn’t Xfce also come with a menu editor? (checks) Yes it does. Just right-click the menu button, select to edit applications. Add a launcher and use «/usr/bin/palemoon» as the command.

Re: How to add program to Start Menu, that starts from termi
Post by pht900 » Sat Dec 13, 2014 8:09 am
Re: [SOLVED> How to add program to Start Menu
Post by irsatist » Tue Jan 19, 2021 2:31 am
Thanks a lot! I tried so many ways to see Opera in start menu. actually, after reading this post, I just right clicked start menu to selected ‘Edit Menu’. I see Opera selected in ‘Internet’ session right away while still not in start menu. I just simply moved Opera up in the ‘Internet’ session and it appeared Didn’t have to do anything else.
I guess something was stuck. My system is Linux Mint Mate 20.1 version . Kernel 5.4.0-62-generic.
- Important Notices
- ↳ Rules & Notices
- ↳ Releases & Announcements
- ↳ Main Edition Support
- ↳ Beginner Questions
- ↳ Installation & Boot
- ↳ Software & Applications
- ↳ Hardware Support
- ↳ Graphics Cards & Monitors
- ↳ Printers & Scanners
- ↳ Storage
- ↳ Sound
- ↳ Networking
- ↳ Virtual Machines
- ↳ Desktop & Window Managers
- ↳ Cinnamon
- ↳ MATE
- ↳ Xfce
- ↳ Other topics
- ↳ Non-technical Questions
- ↳ Tutorials
- Debian Edition Support
- ↳ LMDE Forums
- ↳ Beginner Questions
- ↳ Installation & Boot
- ↳ Software & Applications
- ↳ Hardware Support
- ↳ Networking
- ↳ Tutorials
- ↳ Other Topics & Open Discussion
- ↳ LMDE Archive
- Interests
- ↳ Gaming
- ↳ Scripts & Bash
- ↳ Programming & Development
- Customization
- ↳ Themes, Icons & Wallpaper
- ↳ Compiz, Conky, Docks & Widgets
- ↳ Screenshots
- ↳ Your Artwork
- Chat
- ↳ Introduce Yourself
- ↳ Chat about Linux Mint
- ↳ Chat about Linux
- ↳ Open Chat
- ↳ Suggestions & Feedback
- International
- ↳ Translations
- ↳ Deutsch — German
- ↳ Español — Spanish
- ↳ Français — French
- ↳ Italiano — Italian
- ↳ Nederlands — Dutch
- ↳ Português — Portuguese
- ↳ Русский — Russian
- ↳ Suomi — Finnish
- ↳ Other Languages
- ↳ Čeština-Slovenčina — Czech-Slovak
- ↳ Magyar — Hungarian
- ↳ 日本語 — Japanese
- ↳ Polski — Polish
- ↳ Svenska — Swedish
- ↳ Українська — Ukrainian
Powered by phpBB® Forum Software © phpBB Limited