Linux mint auto mount
This is simple way to make the system auto mount something without ever toching the cli on Mint 14 + Cinnamon.
Text(since apparently videos are suspicious):
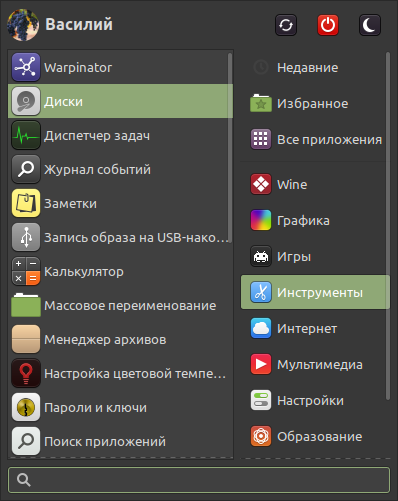
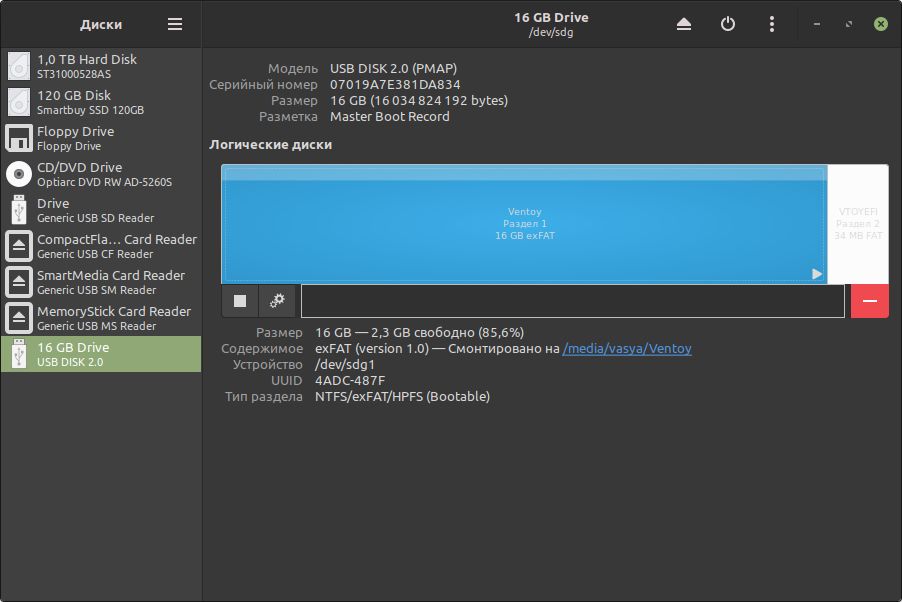
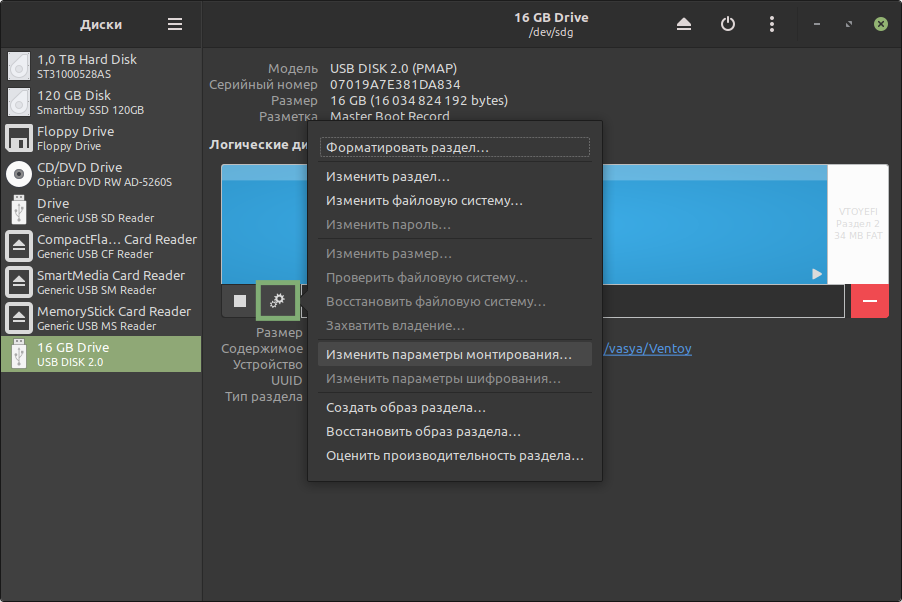
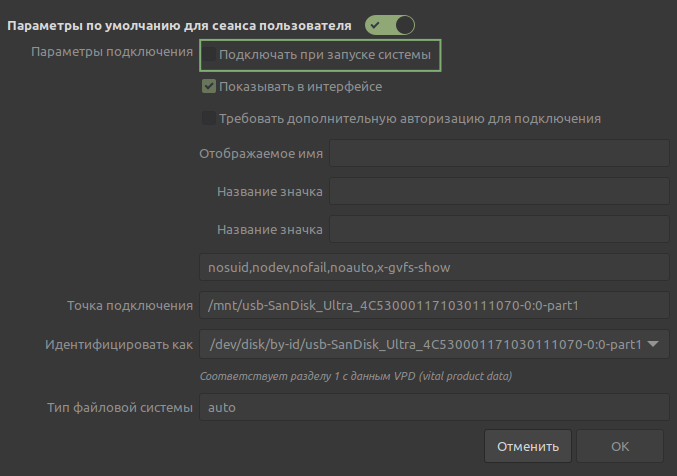
Go to Disks from the start menu, select the partition you want to mount, press the «more actions» button, then «edit mount options», uncheck the «automatic mount options» and make sure that «mount at startup» is ticked, press OK and restart the system.
Comments
How to auto-mount a partition as your home directory. This took hours of mucking around (because with a fresh install of Linux Mint. where the hell is the comprehensive in-depth user manual? It’s not like modern PC’s are short of hard drive space, so I’d prefer it on my HD rather than having to scour web pages and still not find the answer.)
Anyway, here’s how I did it:
Using the «disks» program under accessories, create the partition size you want. It helps to first create a Linux install disk on a USB stick so you can boot from that, which frees up your internal hard drive so that the «disks» program won’t complain that the internal drive you want to work on is «in use».
Once you’ve created the partition, highlight it and select the «additional partition options» button, which brings up a menu from which you select «edit mount options»
Here you turn off the «user session defaults» button, so that the options below become available for editing.
Make sure «Mount at system startup» is selected. (should be by default)
Make sure «Show in user interface» is not selected.
In the Mount Point text box type «/home/yourusername»
Click OK, and you’re done. When you re-boot and display your file system, your home directory will be the contents of that partition.
Your original home directory that was part of the same partition where you installed Linux will now be inaccessible, so before you mount the partition here, you may want to mount it somewhere else first and transfer your original home directory contents to it.
So the way it is on my system now is, when I click on file system, it shows all the directories there, and below it shows the free space on that partition (the one where the OS resides) and in my case it shows 37GB free. Then I select the home directory and it shows that it contains 1 item which has my user name. At this stage it still shows free space as 37GB. But when I click on that directory which has the same name as my username, it shows the contents of my home directory (currently pretty much empty except for the default items like Documents and Videos and Templates, etc) but now the amount of free space shows as 837GB which confirms that the auto-mount worked correctly.
Простое включение автомонтирования в Linux за 4 шага (через программу GNOME Disks)
Здравствуйте. Без лишних вступлений переходим к сути.
Примечание: Показано на примере Linux Mint c окружением XFCE (программа GNOME Disks — Диски).
Запустите программу «Диски»;
В левой части окна выбираем нужный диск (устройство);
Жмем на кнопку с шестеренками и выбираем «Изменить параметры монтирования»;
Выключаем «Параметры по умолчанию» и ставим галочку на «Подключать при запуске системы», жмем «ОК».
Смотрите также
- Gentoo
- GNOME
- GRUB
- Ubuntu
- Внешний вид
- Игры Linux
- Интернет и сети
- Командная строка
- Настройка Linux
- Оборудование и драйвера
- Программы Linux
- Файловая система
- Шрифты
- Общие темы
- Руководство по Ubuntu Linux для начинающих
- Elementary OS
- ArchLinux
- Команды Linux
Новое в галерее
Новые комментарии
Комментарии
Постоянная ссылка на комментарий
Постоянная ссылка на комментарий
Постоянная ссылка на комментарий
Автор мог бы добавить сюда же и простое автомонтирование через KDE Plasma, чтобы охватить всех любителей линукса. Там тоже всё довольно просто и делается в графическом интерфейсе с помощью галочек
Постоянная ссылка на комментарий
Постоянная ссылка на комментарий Родительский комментарий Алекс
Постоянная ссылка на комментарий Родительский комментарий Алекс
У xfce4 есть файловый менеджер — Thunar — и в его настройках установлено автоматическое монтирование всех сменных носителей. В настройках Thunar на одной из вкладок есть соответствующая «галка» — «Включить управление томами». Если галка стоит, всё монтируется в момент подключения в разъём, а стационарные диски сразу после форматирования. Чтобы автомонтирование работало, в системе должен быть установлен пакет gvfs-backends, актуально для deb-совместимых OS. Но вообще, автомонтирование сменных носителей это не true практика. Продвинутые админы предпочитают этой фичей управлять, ибо это совсем не сложно, и сменные носители монтируются либо тычком мыши в том же Thunar, либо в консоли с помощью udisksctl. Всё остальное — кривой велосипед. Как то так.
Постоянная ссылка на комментарий Родительский комментарий про XFCE4
Ну вот, в Thunar есть нюансы в виде gvfs-backends, но да, тоже можно было добавить в статью. Но думаю что статья автора не для Админов, а для начинающих линуксоидов которые переобуваются дома с винды)
Постоянная ссылка на комментарий Родительский комментарий Pr13rak
Постоянная ссылка на комментарий Родительский комментарий Pr13rak
Админами не рождаются, а становятся. Начинающие линуксоиды, которые переобуваются дома с винды, тоже админы, ибо свой домашний компьютер админят, а как иначе.
Linux mint auto mount
phd21 has the best advice if you have Petra (16) or later. I just want to note that under Accessories you want to select «Disks.» Great advice phd21. I can work with the terminal but a GUI is always appreciated by all.
Thank you everyone, very helpful.
Its easier to do the following:
— use the root command blkid to identify the partition/device mapping
— create a folder or mount point for the new partitions using mkdir /media/ command
— add an entry to the /etc/fstab file similar to the following
UUID=1CFC4ED83424EABB8 /media/partition1 ntfs relatime,rw,user,auto,exec,udi=777,gid=777 0 0
It’s all 1 line and tab or space separated columns for each partition you wish to automount. The uid and gid options indicate your user’s ID and Group ID, and are meant for you to be able to share folders through Samba, otherwise the contents of the partitions can be accessed, but the ownership is set to root.root, and you can only share opening a file explorer as root. HTH
I could not find PySDM in Software Manager, then I followed LinuxGreen’s idea, downloaded NTFS-config. As last I was confused that does enable write support for device means I can auto mount it? For this is the only option I can find using NTFS-config.
The KDE spin, which I was using till about 3 days ago, has the mount option available in System Settings. Isn’t there a way to have something similar in other Mint spins? Why do we need to take all these steps with program installation or edit files? USB drives are auto mounted, why can’t internal HDD do the same thing?
Thanks Ray Woods, the comment helped me on a different laptop.
I’m on Linux Debian. I downloaded NTFS Configuration Tool (from Software Manager). The icon appears in Administration. Easiest way to mount external or internal NTFS partitions
I personally have a adversity to script. So if a GUI is available to do the job then so be it.
Now! It would be nice if the author would rewrite this little tutorial and include some settings and pics so the laymen could better understand.
I have tried that applicatinon and since I am a noob on linux I had a lot of issues with that appication. It was great until I pluggd a USB drive.
Now I have learned about how the fstab file works.
For a noob on luinux thats an application that ca make lots of issues on how to OS works.
oops!
OK, I am a newbie to linux. But, I have been using Linux Mint since Helena. I have to say that this tutorial is not good for the n00bs. Why? Because I installed Julia and downloaded ntfs-config to auto mount partition at boot and it didn’t work. The program just would not load. So I deleted ntfs-config and ntfs-3g (didn’t know that was a separate program) and had a terrible time figuring out what went wrong. I could not mount my data partition with read/write access until looking at Ubuntu forums and saw that ntfs-3g was a program that gave read/write access to ntfs files. I have this partition so I can use files in Windows and Mint. If you use this program it will tick a checkbox that sets the drive/partition as read only. I could not get it to change no matter what I did. I love Linux Mint and I think I will use this OS for as long as it is stable.
So, a better way of doing an auto mount at boot is described here http://forums.linuxmint.com/viewtopic.php?f=90&t=60763 or better yet here http://forums.linuxmint.com/viewtopic.php?f=42&t=22093. Thanks Fred, you are the man, not dirt as you say. Although Man did come from dirt. I believe everyone should read as much as they can on the operation/use of the OS as they can. I also realise that some of us don’t have time to do that and that’s why Linux Mint is a good choice. It just works. Thank you for a great system that’s not Microsoft and is as cool as OS X.
—
cola
If you are using LMDE, install the package disk-manager from the debian repo’s.


