- Linux Mint Forums
- HOW-TO: Install LMDE with BTRFS and Snapshots
- HOW-TO: Install LMDE with BTRFS and Snapshots
- Re: HOW-TO: Install LMDE with BTRFS and Snapshots
- Anim Mouse
- A person who loves to harness the power of computers.
- Table of contents
- How to Install Linux Mint on Btrfs
- Install Linux Mint on B-tree file system
- Install Linux Mint on Btrfs
- UEFI
- GRUB always wait 30 seconds on boot
- BIOS
- 0. Intro
- 1. Bios Considerations
- 2. Install Linux Mint
- 2.1 Btrfs Options
- 2.2 Start Ubiquity Installer
- 2.3 Partitioning
- 2.3 Update and Upgrade your System
- 3. Install and Config snapper
- 3.1 Install
- 3.2 Config
- 4. Fstab
- 5. Install grub-btrfs
- 6. Start the Services
- 7. Your First Snapshot
Linux Mint Forums
HOW-TO: Install LMDE with BTRFS and Snapshots
HOW-TO: Install LMDE with BTRFS and Snapshots
Post by crossroadstech » Thu Apr 26, 2012 5:49 pm
Introduction
Wouldn’t it be great if after you did a apt-get dist-upgrade on your rolling (or semi-rolling) LMDE, and it hosed your install, you could undo it in a matter of seconds?
This article is a How-To to do a fresh LMDE install using the new «experimental» BTRFS and it’s «Snapshot» (similar to Windows System Restore) feature. After we install LMDE, we’ll also install the apt-btrfs-snapshot scripts from Ubuntu. It will automatically make snapshots when apt installs or uninstalls debs, and makes it easy to restore the file system to an earlier snapshot.
Disclaimer: If you lose all your data, your PC and house catches on fire, and/or your dog passes on. it’s not my fault! Use this article at your own risk!
How-To Revision History
25-May-2012: Added apt-get purge of live-* packages.
26-Apr-2012: Initial Release
About BTRFS
BTRFS is still considered an «experimental» file system, but as of April 2012, the file system design itself, and how it is implemented in the Linux kernel is complete. Work is still being done on the utilities to work with BTRFS, especially a FSCK program. BTRFS has matured enough that it is now an option in the OpenSUSE 12.1 installer and it may become the default file system for Fedora 17. OpenSUSE has even developed Snapper which does exactly what we are doing here. making it easy to rollback your install to a previous snapshot.
As this file system is experimental, please have a backup plan in place. If the file system crashes, and you lose your data, do you have a backup?
Also, from my research it seems that most errors in BTRFS are from power failures. I highly recommend and to reduce the risk of data loss that you have an Uninterruptable Power Supply (UPS) or battery backup for your PC.
BTRFS also supports RAID 0, 1, and 10, as well as shrinkable and growable volumes. Here’s some great web sites to find out more about the features of BTRFS:
Prerequisites
LMDE 201204 Cinnamon/Mate or LMDE 201204 XFCE DVD
Some or all of the information in this article may or may not apply to other distros.
Linux Kernel 3.2 or newer
Older kernels, especially the one that originally came with Debian Squeeze has issues with BTRFS
GRUB 2 and btrfs-tools
Already installed on the LMDE Live DVD.
Boot from the Live DVD and let’s get started.
1. Partitioning/Make File System
You can use GParted included on the DVD to create a new BTRFS file system. If you want to create a BTRFS using RAID, reference the links above, especially BTRFS Fun — Funtoo Linux to find out how to use the btrfs command from the terminal.
2. Create an «@» and «home» subvolumes
The apt-btrfs-snapshot tool that we are going to install at the end of this How-To, expects the root file system to be in a subvolume called «@». To create it from a root terminal (Replace sda1 with the name of your BTRFS partition):
mount /dev/sda1 /mnt/ btrfs subvolume create /mnt/@[Optional] You can also create a subvolume that you will mount /home to. You may want to create subvolumes for any directories that you do not want included in the Snapshot and Rollback feature (like MySQL databases, for example) to mount in their respective locations:
btrfs subvolume create /mnt/home3. Copy the Live DVD filesystem to the new «@» subvolume
(Credit: The steps to do a manual LMDE install I got from AkiraYB’s HOWTO: Install LMDE on a system with a Fake RAID (dmraid) post.)
Mount the Live DVD filesystem.squashfs:
mkdir /mnt/source mount -o -loop -t squashfs /live/image/casper/filesystem.squashfs /mnt/sourcemkdir /mnt/target mount -o subvol=@ /dev/sda1 /mnt/targetmkdir /mnt/target/home mount -o subvol=home /dev/sda1 /mnt/target/homersync -avz /mnt/source/ /mnt/target/Copying could take 5-10 minutes to complete.
4. CHROOT to the new «@» subvolume
mount --bind /dev /mnt/target/dev mount --bind /dev/pts /mnt/target/dev/pts mount --bind /dev/shm /mnt/target/dev/shm mount --bind /proc /mnt/target/proc mount --bind /sys /mnt/target/sys mount --bind /tmp /mnt/target/tmp cp -f /etc/resolv.conf /mnt/target/etc/resolv.conf chroot /mnt/target6. Remove the Live configuration
This removes the specific configuration used by the Live DVD from your install.
Remove the «live» environment specific packages:
apt-get remove --purge live-initramfs live-config live-config-sysvinit live-installer live-installer-slideshowTo remove the auto-login to the mint account, use nano to remove all entries under [daemon] in /etc/mdm/mdm.conf:
TimedLoginEnable=false
AutomaticLoginEnabled=true
TimedLogin=mint
AutomaticLogin=mint
TimedLoginDelay=30
usermod -a --groups=sudo,cdrom,floppy,audio,dip,video,plugdev crossroadstechFix the /etc/hosts file for your hostname. Substitute LMDE-PC for what you entered for your hostname.
sed -e 's/mint/LMDE-PC/' -i /etc/hosts7. Setup GRUB
Enter the following command from the root terminal:
Substitute sda for the name of the device your BTRFS file system is installed on. Notice no number at the end.
Your system should reboot and LMDE should load from your hard drive.
8. Install apt-btrfs-snapshot from Ubuntu
Once you are logged in and at the MATE or XFCE desktop, open Firefox and go to the following URL:
http://packages.ubuntu.com/precise/all/ . t/download
Click on one of the mirror links and open the file with GDebi.
9. Testing and using apt-btrfs-snapshot
You should be ready to go! Now to make sure apt-btrfs-snapshot is installed and working, go to a root terminal and enter the following command:
apt-btrfs-snapshot supportedIt should return «supported.» If it returns «unsupported», verify that your /etc/fstab has defaults,subvol=@ for the / mount point.
Now, let’s install something and rollback.
apt-get update apt-get install iceweaselOnce the file completes downloading and before unpacking the debs you should see something like this.
Create a snapshot of ‘/tmp/apt-btrfs-snapshot-mp-xSHqD9/@’ in ‘/tmp/apt-btrfs-snapshot-mp-xSHqD9/@apt-snapshot-2012-04-26_16:37:12’
This means a snapshot was created automatically! Notice in your menu, there is now Iceweasel.
To see what snapshots are available, enter the following command:
Now to roll back to how our filesystem was before Iceweasel was installed, enter the following command. Change the @apt-snapshot to match the exact name of the snapshot on your system.
apt-btrfs-snapshot set-default @apt-snapshot-2012-04-26_16:37:12Now reboot and magically Iceweasel never happened.
Conclusion
I hope you found this how-to useful and interesting. If you have any suggestions for improvement, please share. Happy testing!
Last edited by LockBot on Wed Dec 28, 2022 7:16 am, edited 3 times in total.
Reason: Topic automatically closed 6 months after creation. New replies are no longer allowed.
Re: HOW-TO: Install LMDE with BTRFS and Snapshots
Post by crossroadstech » Fri Apr 27, 2012 1:47 am
I’m not sure why or how, but after several package installs, snapshot restores, and reboots, I received the following error on a reboot and after GRUB tried to load the kernel.
Initramfs unpacking failed: LZMA data is corrupt
Kernel panic — not syncing: VFS: Unable to mount rootfs on unknown-block(0,0)
.
My theory is something is happening with GRUB. I was able to fix and boot again by booting with the Live DVD, doing the CHROOT section above, and dpkg-reconfigure grub-pc and grub-install /dev/sda. If anyone else sees this or has any idea what is happening, please share.
I’m confident it is not the filesystem. I ran btrfsck offline from the live DVD shell and it didn’t find any errors.
**UPDATE**
This would randomly occur on reboots. And if I keep rebooting or power-cycling, it eventually would stop erroring and boot.
I did find this Can 12.04 be installed using Btrfs only? and it mentioned that gzip is the default decompression tool in /etc/initramfs-tools/initramfs.conf in Ubuntu 12.04. I changed the following in /etc/initramfs-tools/initramfs.conf.
. and did a dpkg-reconfigure initramfs-tools. So far so good. I’ll keep this post «posted» if my system stops booting again!
Anim Mouse

A person who loves to harness the power of computers.
Table of contents

How to Install Linux Mint on Btrfs
Install Linux Mint on B-tree file system
Do you want to use Timeshift on Linux Mint just like System Restore in Windows? The B-tree file system or Btrfs is a file system on Linux that behaves like the NTFS on Windows . Btrfs is actually better than NTFS because it uses Copy-on-write while NTFS is just a Journaling Filesystem.
The ext4 file system is a pure file system, do it’s one job, no extra stuff like NTFS or Btrfs.
When you use Timeshift on ext4, it uses rsync to make copies of the files, above the file system, that is why it is slow.
When you use System Restore on NTFS, the copies of the files are made as an atomic transaction to the file system, that is why it is fast.
Timeshift on Btrfs behaves like System Restore in Windows.
Install Linux Mint on Btrfs
- Open Linux Mint installer and follow everything up to Installation Type.
- At installation type, click Something else.


UEFI


GRUB always wait 30 seconds on boot
A patch has been merged fixing grub timeout menu to 30 seconds for UEFI systems with /boot on Btrfs.
- Open Terminal.
- Type sudo xed /etc/default/grub .
- Add GRUB_RECORDFAIL_TIMEOUT=0 on the file. (If you are not sure that you can access UEFI settings, use 1 instead.)
- Type sudo update-grub to update GRUB settings.
BIOS


After installation, set-up Timeshift using the Btrfs option.
Screenshots taken on Linux Mint 20.2 using VirtualBox 6.1.26
Licensed under CC BY-NC-SA 4.0
Last updated on April 03, 2022 11:50:00 PM +0800
0. Intro
Hi all, in this video i show how to install Linux Mint 20.2 with btrfs, snapshots and grub-btrfs.
- The boot mode will be efi;
- I’m assuming you already have the latest usb stick with the Linux Mint ISO.
1. Bios Considerations
- Reset BIOS to factory default and reboot.
- Disable fastboot and secure boot in BIOS settings.
- Make sure that SATA controller is set to AHCI mode in BIOS settings.
2. Install Linux Mint
2.1 Btrfs Options
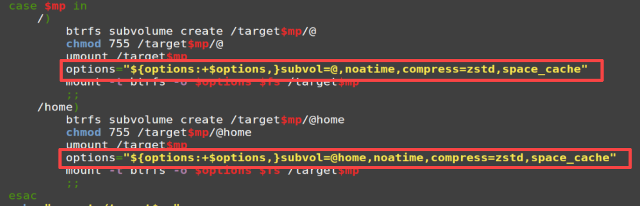
$ sudo nano /usr/lib/partman/mount.d/70btrfs And Change options for root and home subvolume to:
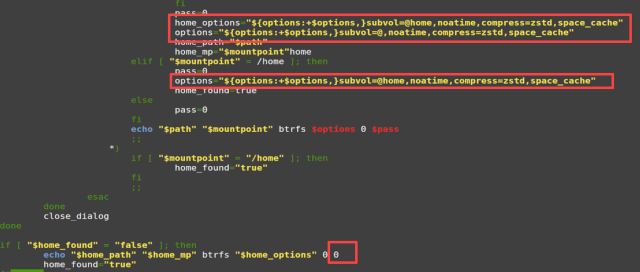
$ sudo nano /usr/lib/partman/fstab.d/btrfs And Change fstab options for root and home subvolume to:
2.2 Start Ubiquity Installer
2.3 Partitioning
[Subtitle 2.3.1] In Installation type choose “Something else”
I will create three partitions show in screen.
[Subtitle 2.3.2] /dev/sda1 “EFI System Partition”.
[Subtitle 2.3.3] /dev/sda2 “swap area”.
[Subtitle 2.3.4] /dev/sda3 “btrfs”, Mount point is /.
2.3 Update and Upgrade your System
$ sudo apt update $ sudo apt upgrade $ reboot 3. Install and Config snapper
3.1 Install
$ sudo apt install snapper snapper-gui 3.2 Config
$ sudo snapper -c root create-config / $ sudo btrfs subvolume list / $ echo "Delete every snapshots created" $ sudo btrfs subvolume delete /.snapshots/ etc etc $ sudo btrfs subvolume create /@snapshots $ sudo mkdir /.snapshots $ sudo chmod 750 /.snapshots $ sudo chown :theduckchannel /.snapshots $ sudo nano /etc/snapper/configs/root Change the folowing lines to:
TIMELINE_LIMIT_HOURLY="5" TIMELINE_LIMIT_DAYLY="7" TIMELINE_LIMIT_WEEKLY="0" TIMELINE_LIMIT_MONTHLY="0" TIMELINE_LIMIT-YEARLY="0" 4. Fstab
$ sudo mount -a $ lsblk $ sudo btrfs subvolume list / 5. Install grub-btrfs
$ sudo apt install git $ git clone https://github.com/Antynea/grub-btrfs $ cd grub-btrfs $ sudo make install $ $ sudo grub-install --target=x86_64-efi \ --efi-directory=/boot/efi \ --bootloader-id=GRUB $ sudo grub-mkconfig -o /boot/grub/grub.cfg 6. Start the Services
$ sudo systemctl enable --now snapper-timeline.timer $ sudo systemctl enable --now snapper-cleanup.timer $ sudo systemctl enable --now grub-btrfs.path