Темы Windows для Linux Mint
Пользователей, недавно сменивших Windows на Linux, порой мучает ностальгия по привычному интерфейсу. Да и тем, чей компьютер в течение долгих работает под управлением Linux Mint, может стать интересно превратить её в другую ОС, по крайней мере визуально.
Специально для таких случаев были созданы темы, имитирующие интерфейс других операционных систем, в частности Microsoft Windows. Наиболее популярные из них — темы Windows XP, 7 и 10.
Темы Windows для Linux Mint
1. Windows XP
Эта тема относится к стандартным темам Linux Mint. Установить её можно, открыв путь: Меню → Параметры → Темы → Добавить/Удалить. В списке тем она называется Mint-XP.
В сравнении с темами Windows 7 и Windows 10 тема Windows XP Linux Mint выглядит наиболее приближённо к оригиналу. Во многом такой эффект достигается за счёт хорошей прорисовки панели задач и подбора цветовой схемы. Если дополнить тему обоями, по умолчанию использовавшимися в Windows XP, внешний вид рабочего стола Linux Mint мало чем будет отличаться от его аналога в Windows.
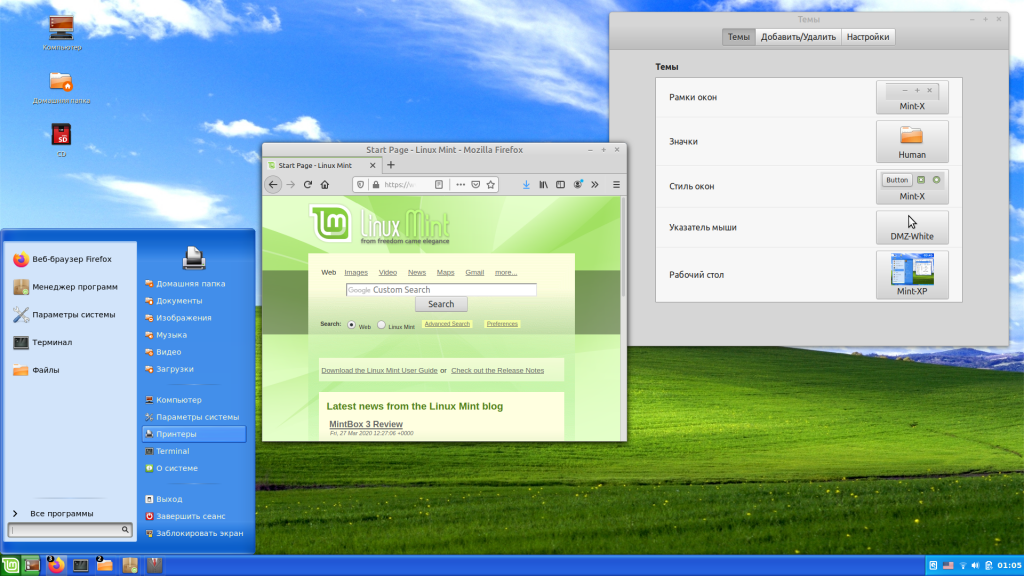
Впрочем, у пользователей Linux Mint Cinnamon 19.3 могут возникнуть проблемы с установкой обоев — предложенный автором темы стиль окон блокирует любые попытки сменить фон. Чтобы решить эту проблему, следует вместо стиля окон Mint-XP выбрать один из стандартных.
2. Windows 7
Тему Windows 7 для Linux пытались создать многие дизайнеры. Наилучшей схожести с прототипом удалось добиться команде B00merang-Project. Особой похвалы заслуживают рамки окон.
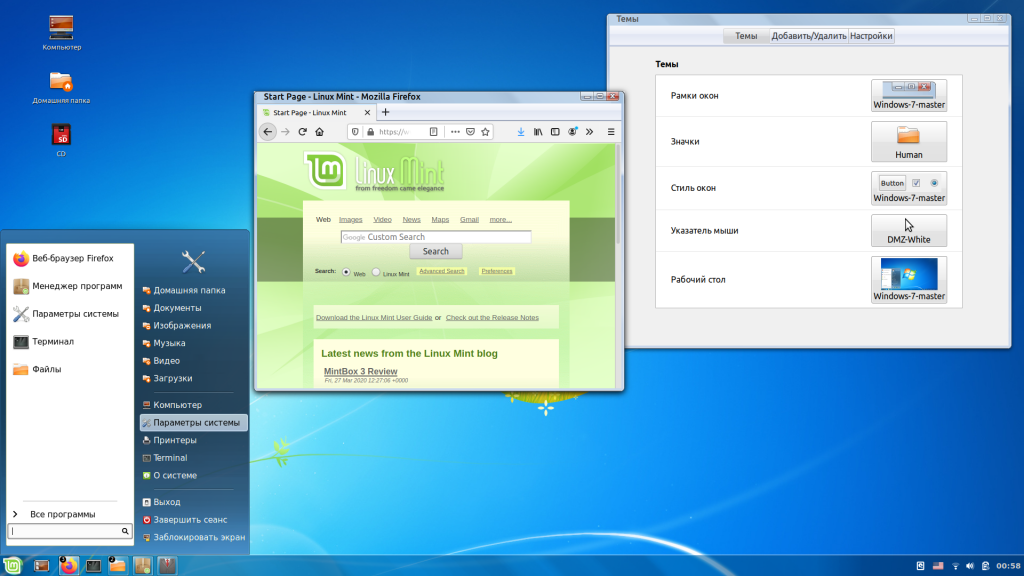
К сожалению, в перечне стандартных эта тема отсутствует. Windows 7 тема Linux Mint доступна для загрузки по ссылке. Полученный архив следует распаковать, а его содержимое переместить в папку /home/USERNAME/.themes.
3. Windows 10
В списке стандартных тем присутствует также тема windows linux mint под названием Windows 10 Light Theme. Почему она так называется понять сложно. Оформление основных элементов интерфейса имеет мало общего с оригинальным дизайном Windows 10.
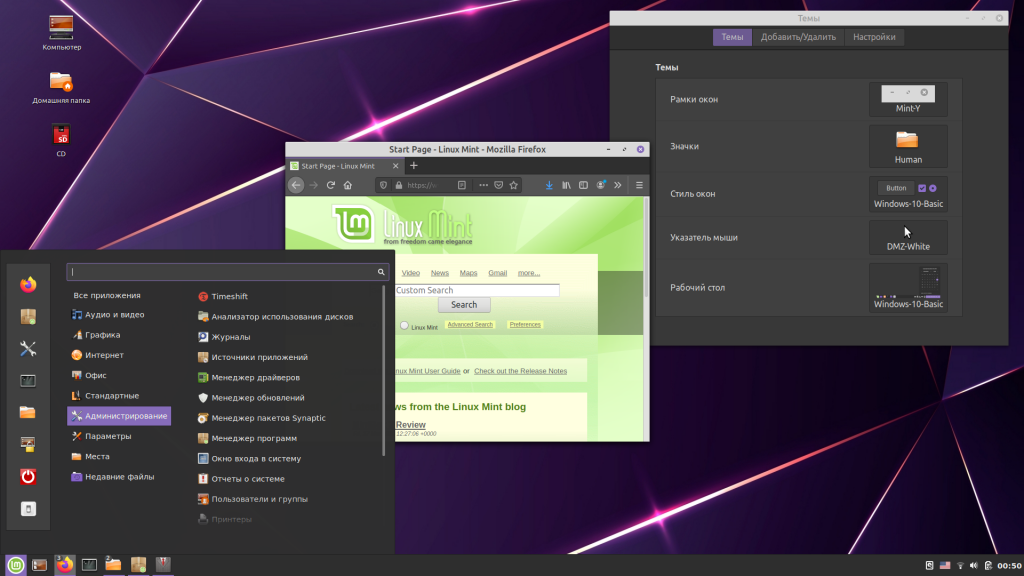
Пользователям, желающим придать своему рабочему столу схожесть с MS Windows 10, стоит обратить внимание на тему от уже упомянутого B00merang-Project. Она тоже неидеальна, но это лучшее, что имеется на данный момент (ссылка).
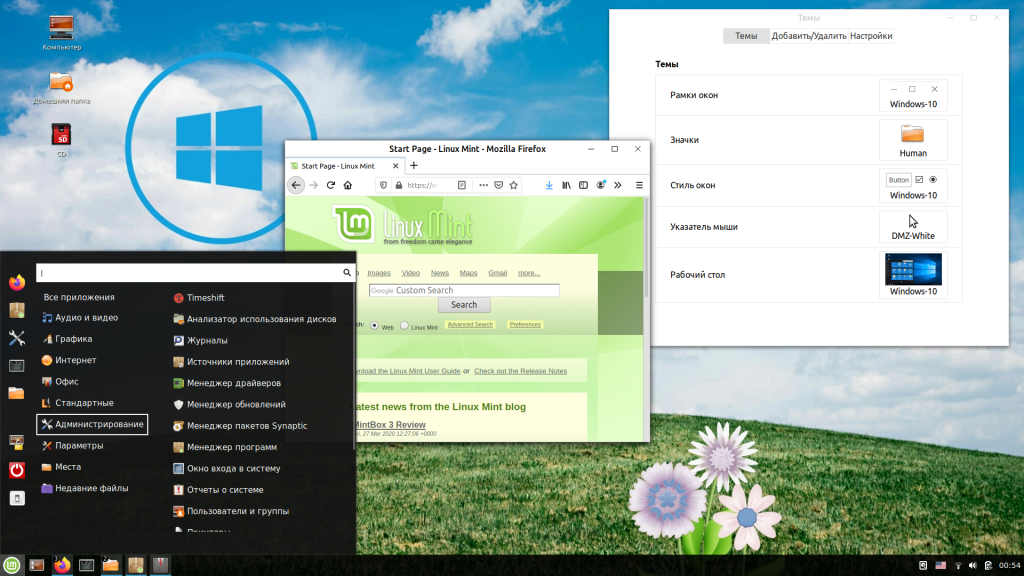
Меню Windows в Linux Mint
Даже если установить в Linux Mint Cinnamon тему Windows, меню останется прежним. Это не критично для Windows 10, а вот для Windows XP и Windows 7 желательно приблизить вид меню к оригинальному путём замены апплета Меню на CinnVIIStark Меню.
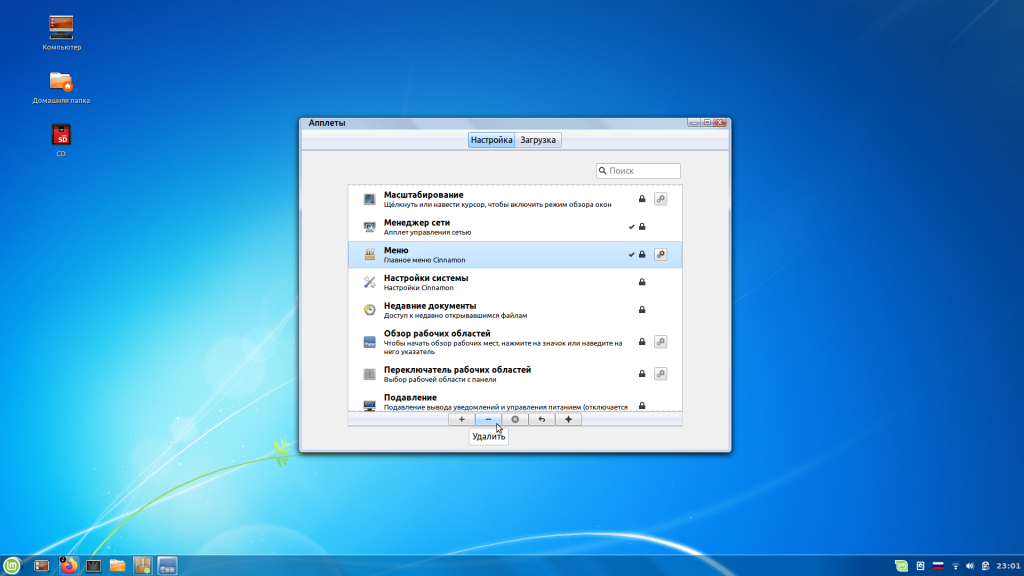
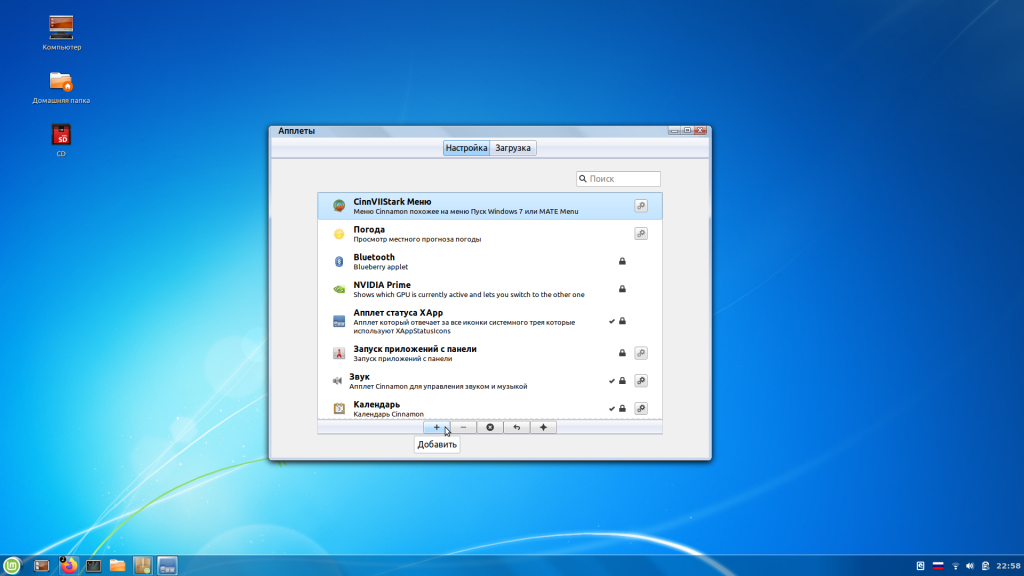
Сделать это несложно — достаточно навести курсор на Панель задач, щёлкнуть правой кнопкой и выбрать пункт Апплеты. На вкладке Настройка найти в списке строку-пункт Меню и выделить её, щёлкнув на нем левой кнопкой. Затем удалить эту строку-пункт Меню, воспользовавшись кнопкой «—» внизу. После этого перейти на вкладку Загрузка, найти в списке CinnVIIStark Меню и нажать на стрелку справа от названия.
Когда апплет загрузится, вернуться на вкладку Настройка, отыскать в списке CinnVIIStark Меню и выделить его, щёлкнув левой кнопкой мыши на названии. Далее добавить этот апплет, нажав на «+» внизу.
Если на Панели задач появился значок нового меню, значит, всё сделано правильно. Останется только переместить его на его привычное место — в левый угол. Для этого следует навести курсор на Панель задач, щёлкнуть правой кнопкой и включить режим редактирования панели. Потом захватить мышкой значок меню, перетащить туда, где ему положено быть, и выключить режим редактирования панели.
Выводы
Сымитировать интерфейс Windows в операционной системе Linux Mint Cinnamon гораздо проще, чем кажется большинству пользователей. В этой статье мы собрали три лучшие темы Windows Linux Mint. Если у вас остались вопросы об установке тем, задавайте их в комментариях.
Обнаружили ошибку в тексте? Сообщите мне об этом. Выделите текст с ошибкой и нажмите Ctrl+Enter.
How to Install Linux Mint 20 Alongside Windows 10 or 8 in Dual-Boot UEFI Mode
Linux Mint 20 has been released in wild by the Linux Mint project development team as a new long term support edition which will receive support and security updates until 2025.
This tutorial will guide you on how you can install Linux Mint 20 in dual-boot with a variant Microsoft Operating System, such as Windows 8, 8.1 or 10, on machines with EFI firmware and a pre-installed version of Microsoft OS.
If you’re looking for a non-dual-boot installation on Laptop, Desktop, or Virtual Machine, you should read: Installation Guide of Linux Mint 20 Codename ‘Ulyana’.
Assuming that your laptop or desktop system comes pre-installed with Windows 10 or Windows 8.1 or 8 you should enter the UEFI menu and disable the following settings: Secure Boot and Fast Boot features.
If the computer has no pre-installed OS and you intend to use Linux and Windows in dual-boot, first install Microsoft Windows and then proceed with Linux Mint 20 installation.
Download Linux Mint 20
In case you own a UEFI computer stay away from the 32-bit version of Linux Mint because it will only boot and work with BIOS machines, while the 64-bit ISO image can boot with BIOS or UEFI computers.
Step 1: Shrink HDD Space for Dual-Boot
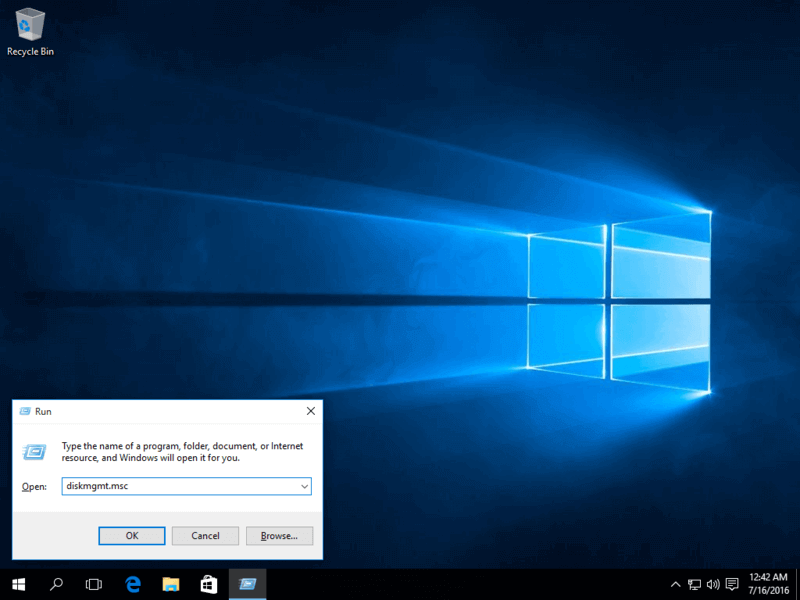
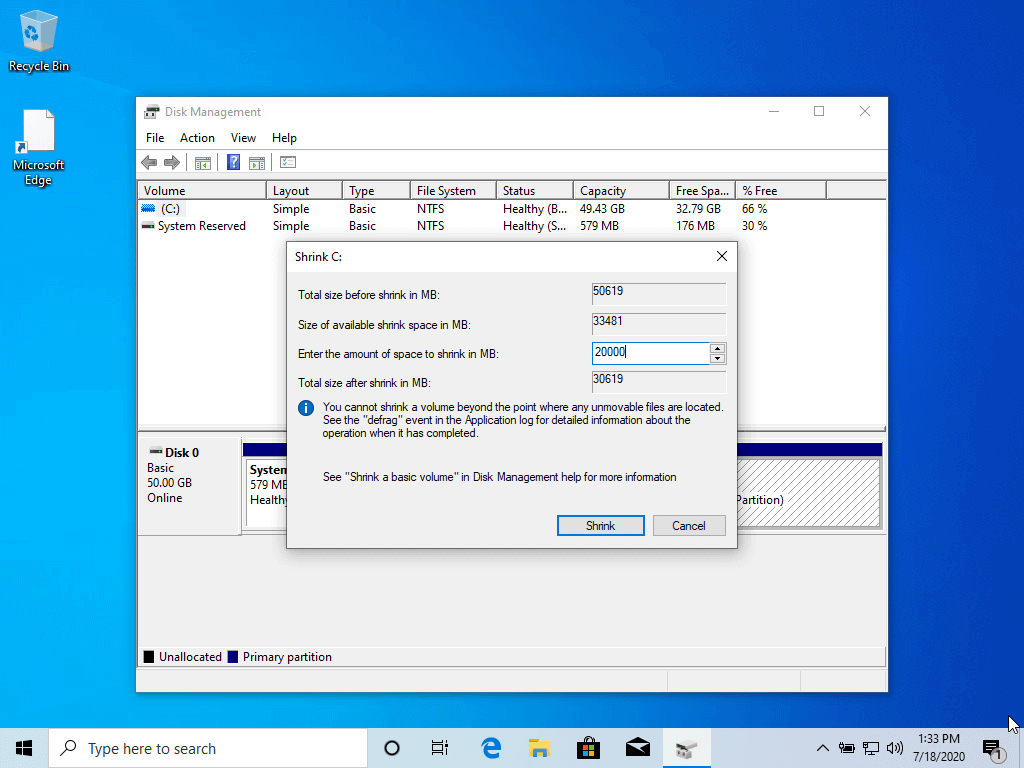
1. In case your computer comes pre-installed with Microsoft Windows on a single partition, logon to Windows system with a user who has administrator privileges, press [Win+r] keys to open run prompt and type the following command in order to open Disk Management tool.
2. Right-click on C: partition and select Shrink Volume in order to resize the partition. Use a value best-suited for you, depending on your HDD size, on the amount of space to shrink MB field (minimum 20000 MB recommended) and hit Shrink button to start the process of resizing the partition.
3. When the process finishes a new unallocated space will appear on the hard drive.
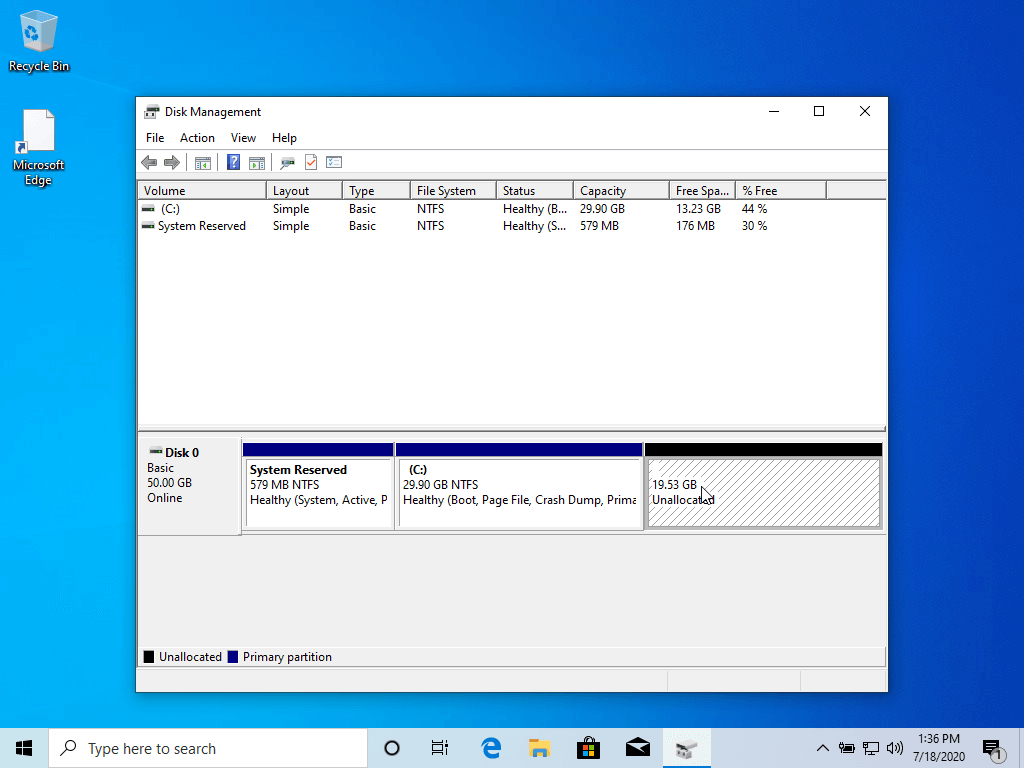
Close Disk Management utility, place Linux Mint DVD or USB bootable image in the appropriate drive, and reboot the computer in order to start with Linux Mint 20 installation.
In case you’re booting Linux Mint for installation from a USB dive in UEFI mode make sure you’ve created the bootable USB stick using a utility such as Rufus, which is UEFI compatible, otherwise your USB bootable drive won’t boot.
Step 2: Installation of Linux Mint 20
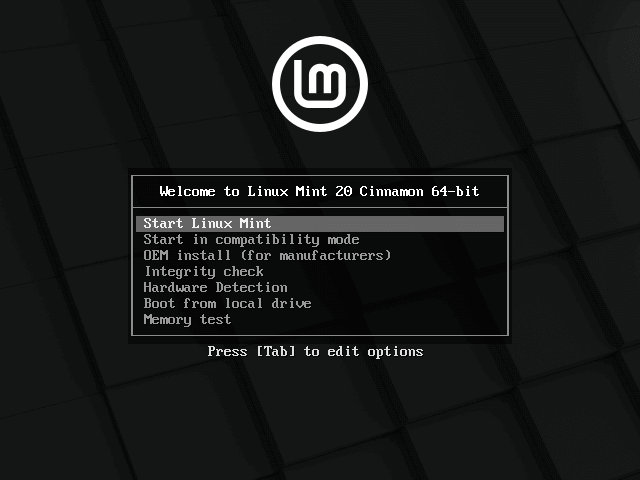
4. After reboot, press the special function key and instruct the machine firmware (UEFI) to boot-up from the appropriate DVD or USB drive (the special function keys usually are F12 , F10 or F2 depending on the motherboard manufacturer).
Once the media boot-up a new screen should appear on your monitor. Choose Start Linux Mint 20 Cinnamon and hit Enter to continue.
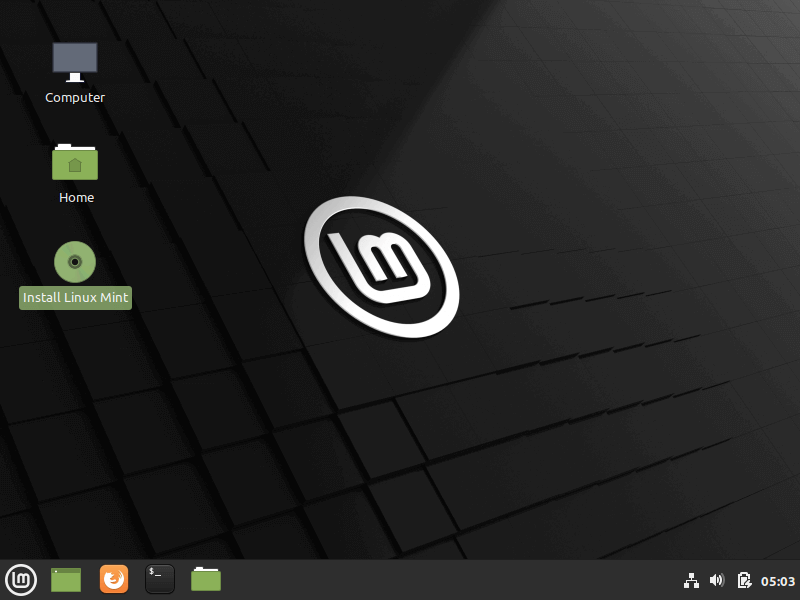
5. Wait until the system loads into RAM in order to run in live-mode and open the installer by double-clicking on Install Linux Mint icon.
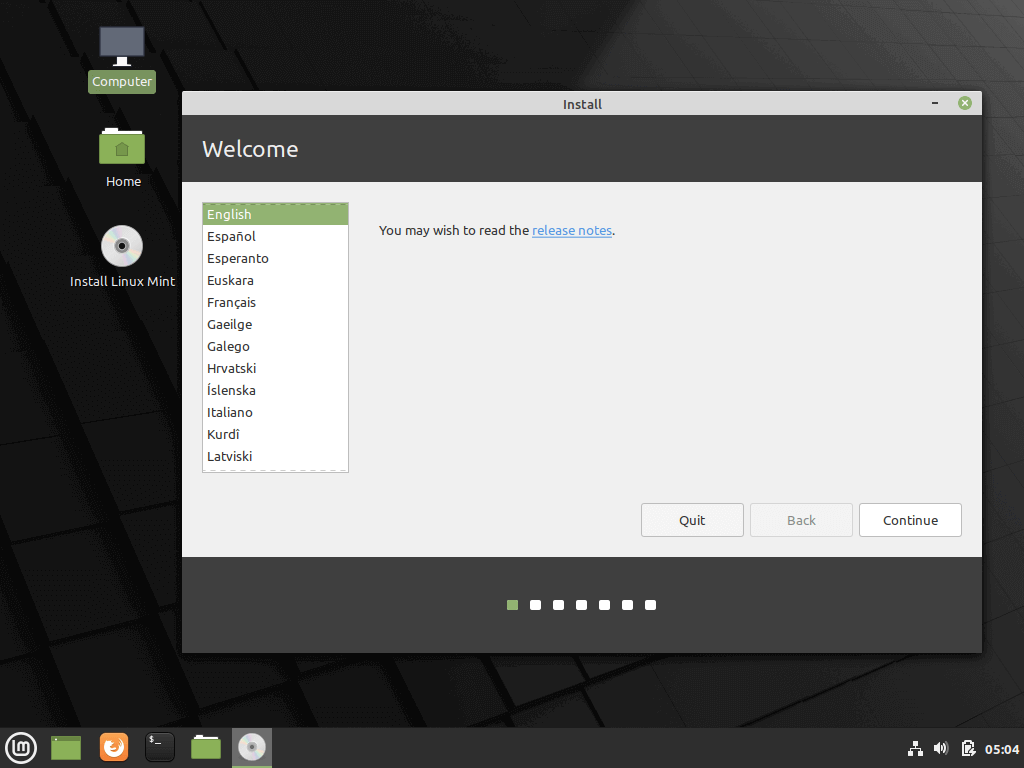
6. Choose the language you wish to perform the installation and click on the Continue button to proceed further.
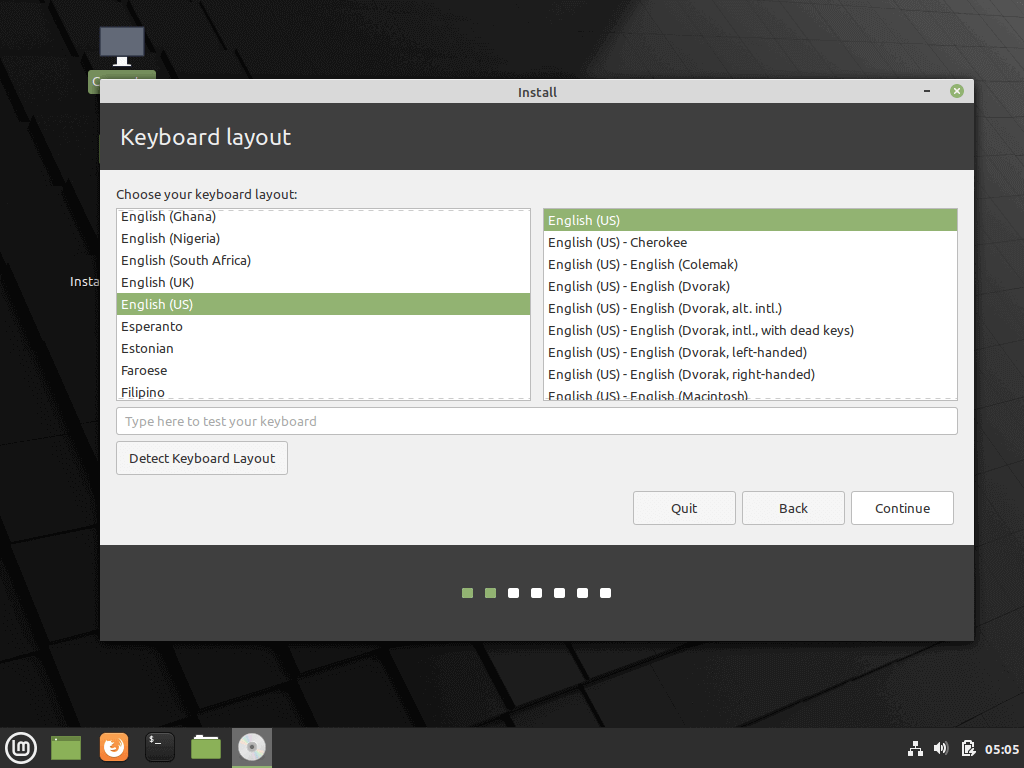
7. Next, you should select your keyboard layout and click on the Continue button.
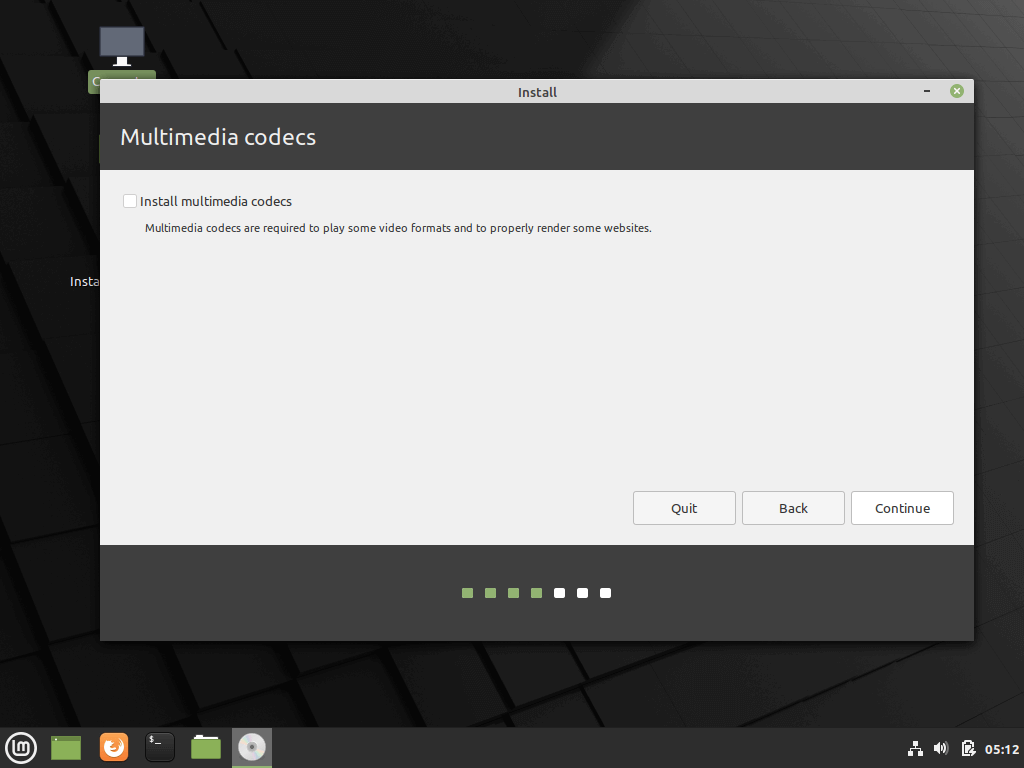
8. On the next screen hit on the Continue button to proceed further. Third-party software (multimedia codes) can be automatically downloaded and installed on this step by checking the check-box.
The recommendation would be to leave the box unchecked for the moment and manually install proprietary software later after the installation process completes.
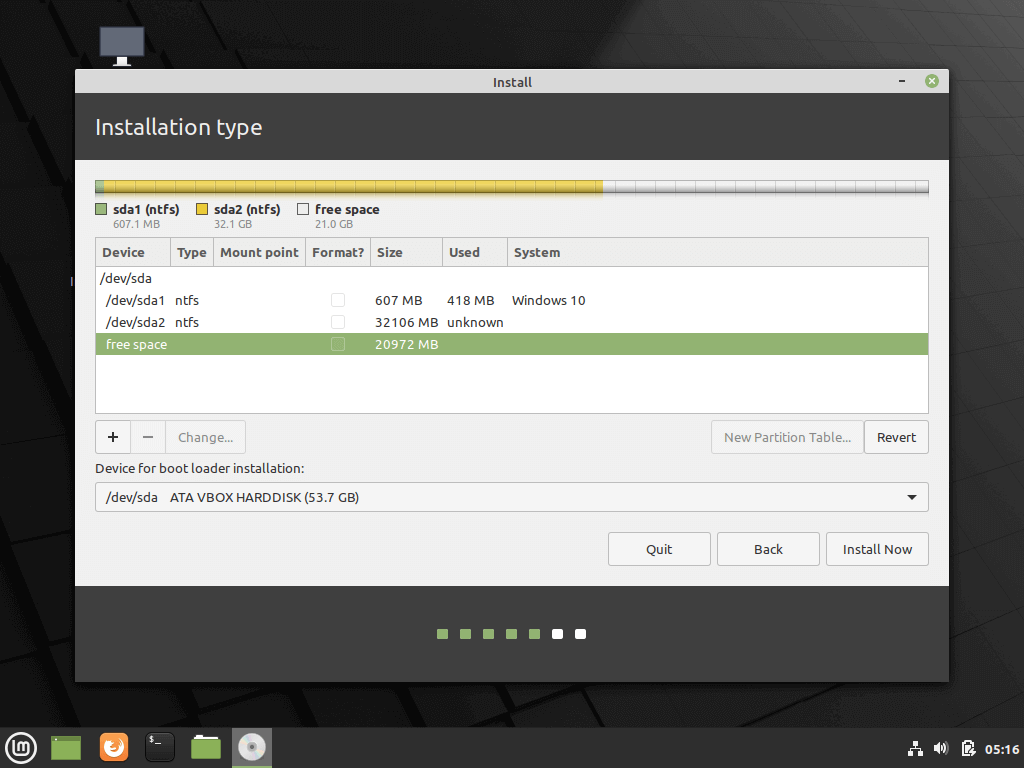
9. At the next screen, you can choose the Installation Type. If Windows Boot manager is automatically detected you can choose to Install Linux Mint alongside Windows Boot Manager. This option ensures that the HDD will be automatically partitioned by the installer without any data loss.
The second option, Erase disk and install Linux Mint, should be avoided for dual-boot because is potentially dangerous and will wipe out your disk.
For a more flexible partition layout, you should go with Something else option and hit on the Continue button to proceed further.

10. Now let’s create the partition layout for Linux Mint 20. I would recommend that you create three partitions, one for / (root) , one for /home accounts data and one partition for swap .
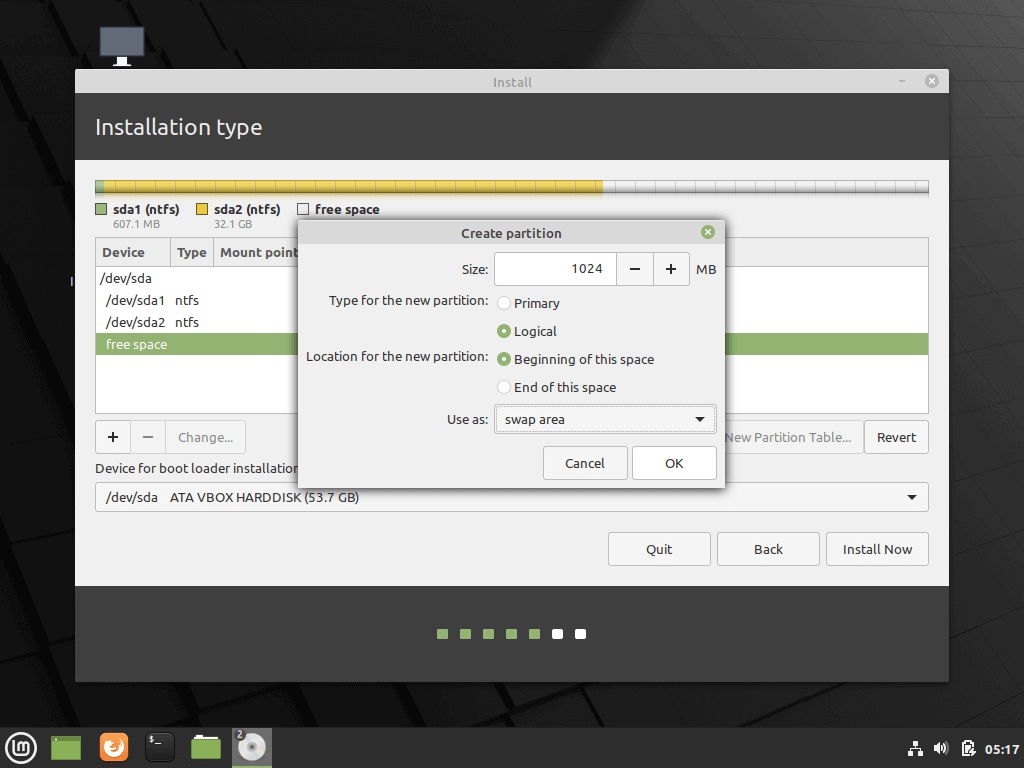
First, create the swap partition. Select the free space and hit on the + icon below. On this partition use the following settings and hit OK to create the partition:
Size = 1024 MB Type for the new partition = Primary Location for the new partition = Beginning of this space Use as = swap area
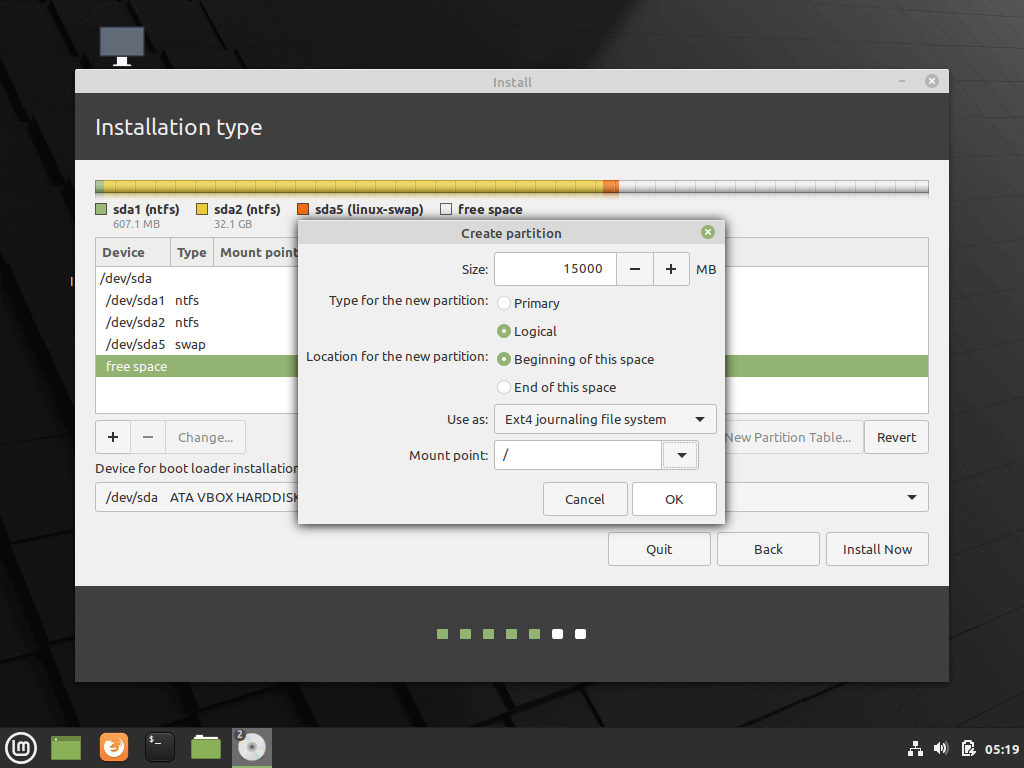
11. Using the same steps as above create the /(root) partition with the below settings:
Size = minimum 15 GB Type for the new partition = Primary Location for the new partition = Beginning of this space Use as = EXT4 journaling file system Mount point = /
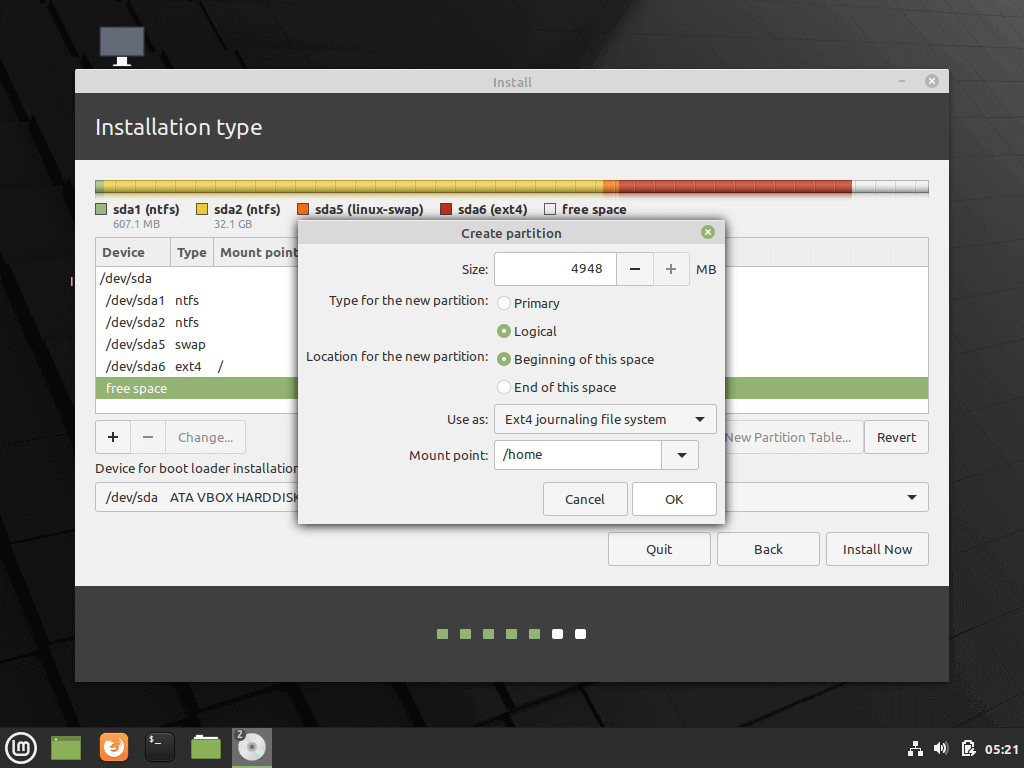
12. Finally, create the home slice with the below settings (use all the available free space to create home partition).
Home partition is the place where all documents for user accounts will be stored by default, except the root account. In case of system failure, you can reinstall the operating system for scratch without touching or losing the settings and documents of all users.
Size = remaining free space Type for the new partition = Primary Location for the new partition = Beginning Use as = EXT4 journaling file system Mount point = /home
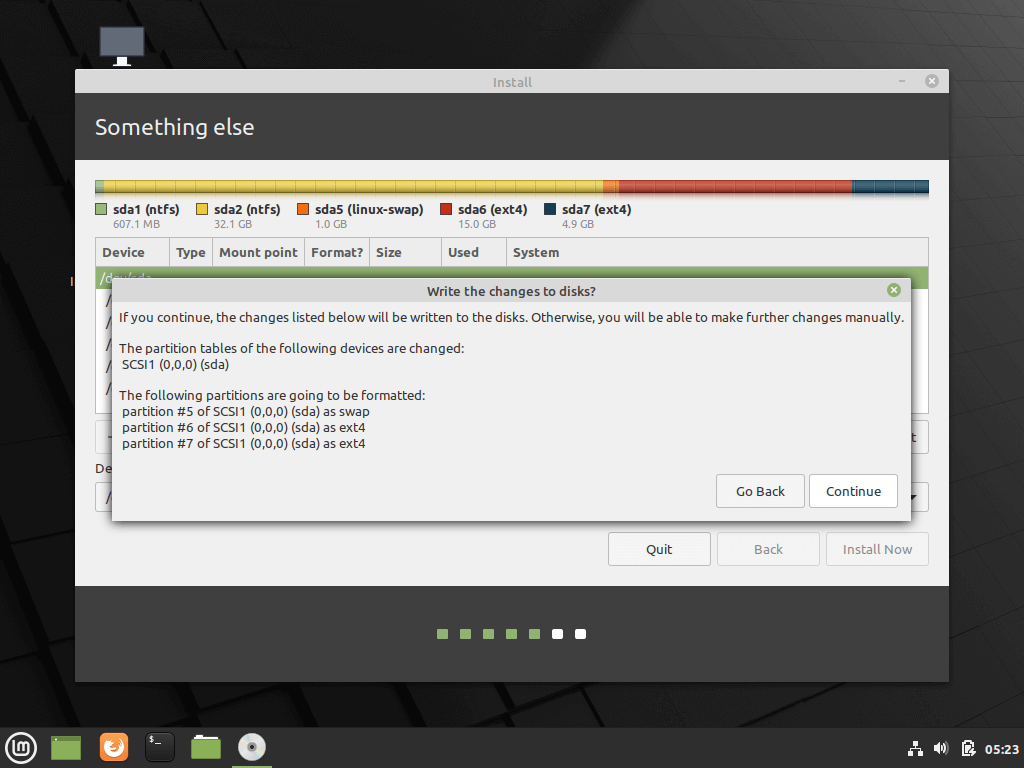
13. After finishing creating the partition layout, select the Windows Boot Manager as the device for installing the Grub boot loader and hit on Install Now button in order to commit changes to disk and proceed with the installation.
Next, a new pop-up window will ask you if you agree with committing changes to disk. Hit on Continue to accept changes and the installer will now start to write changes to disk.

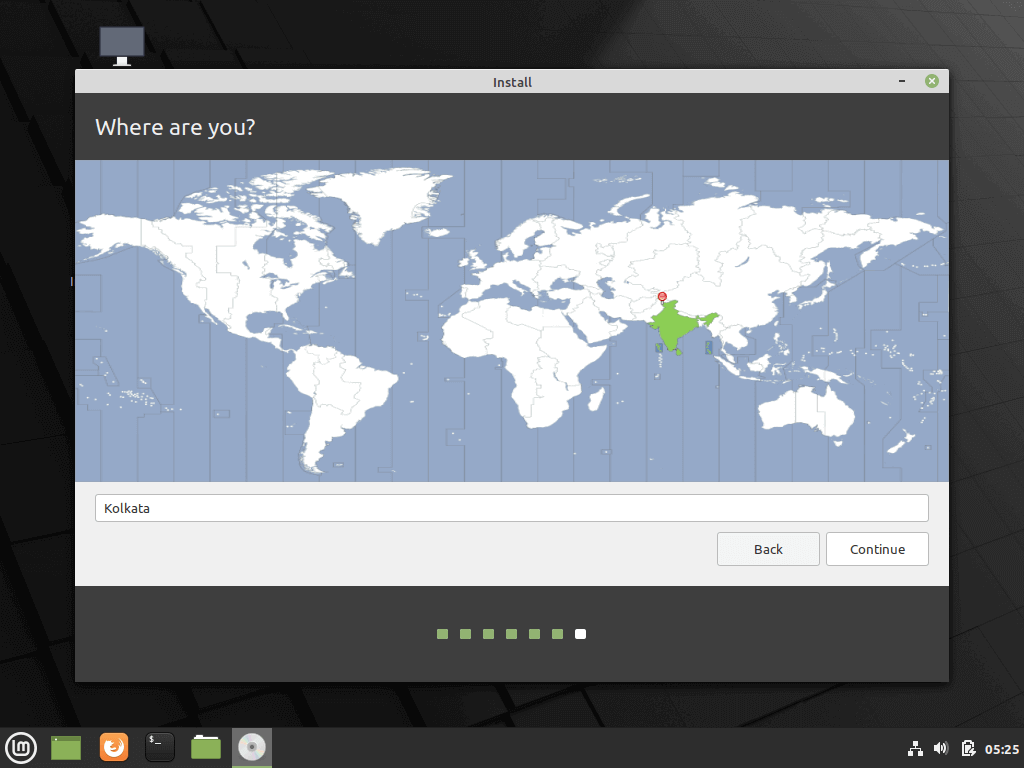
14. On the next screen choose your nearest physical location from the map and hit Continue.
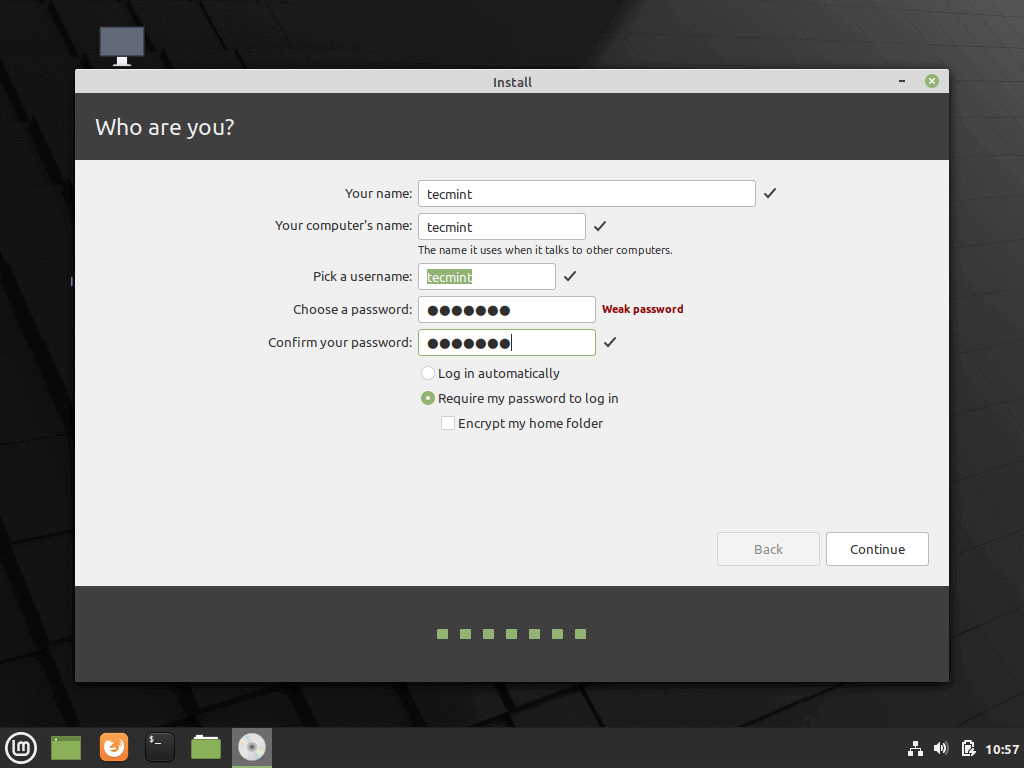
15. Enter a username and a password for the first account with root privileges, choose your system hostname by filling the computer’s name field with a descriptive value and hit Continue to finalize the installation process.
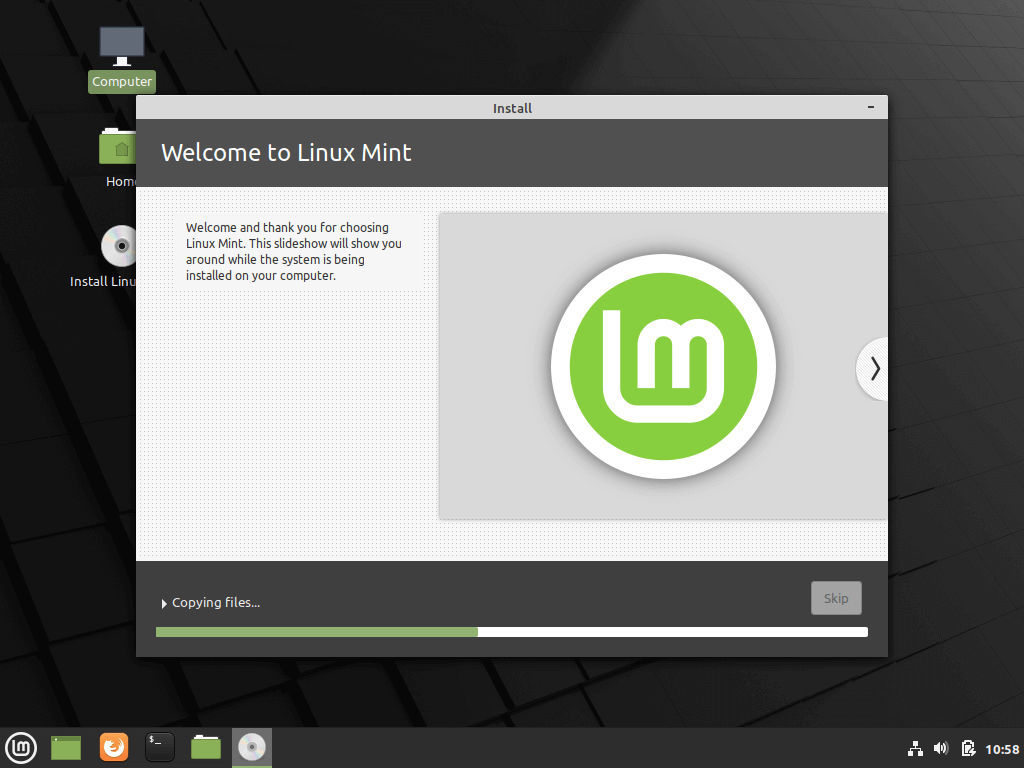
16. The installation process will take a while and when it reaches the final step it will ask you to hit on the Restart Now button to complete the installation.
17. After reboot, the system will first boot-up in Grub, with Linux Mint as the first boot option which will be automatically started after 10 seconds. From here you can further instruct the computer to boot in Windows or Linux.
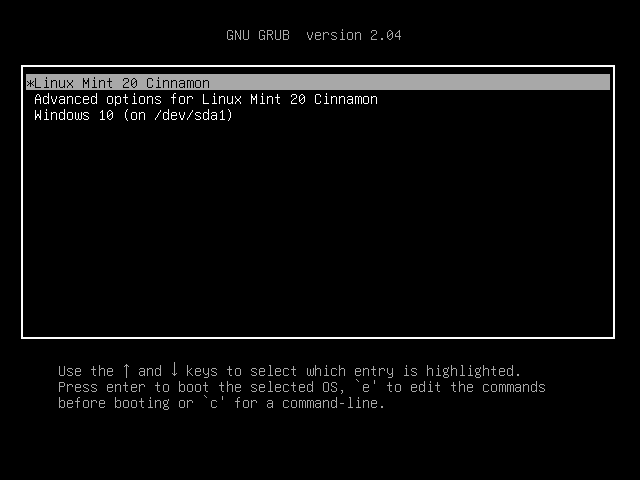
On computers, with newer UEFI firmware the Grub boot loader won’t be displayed by default and the machine will automatically boot-up in Windows.
In order to boot into Linux, you must press the special function boot key after the restart and from there to further select what OS you wish to start.
In order to change the default boot order enter UEFI settings, select your default OS and save the changes. Review the vendor’s manual in order to detect the special function keys used for boot or for entering UEFI settings.
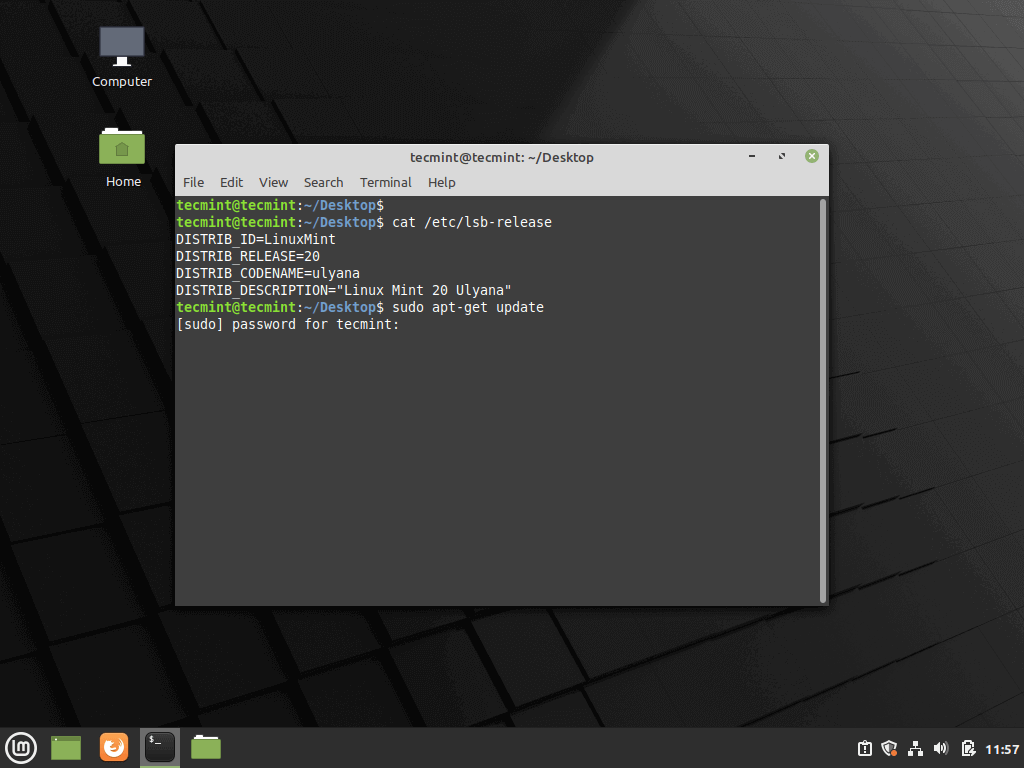
18. After the system finishes loading, log in to Linux Mint 20 by using the credentials created during the installation process. Fire-up a Terminal window and start the update process from the command line by running the following commands:
$ sudo apt-get update $ sudo apt-get upgrade
That’s it! You have successfully installed the latest version of Linux Mint 20 on your device. You will find the Linux Mint platform to be very robust, fast, flexible, enjoyable, easy to use, with a ton of software required for a normal user already installed and very stable.