- Linux Mint Forums
- Re: Windows10 and Samba File Sharing
- Install Samba on Linux Mint to share files with Windows
- Install and Configure Samba Server on Linux Mint 20
- 1. Run system update
- 2. Install Samba on Linux Mint
- 3. Allow samba in Linux Mint Firewall
- 4. Add your user to the Samba group
- 5. Share some Linux Mint folder
- 6. Access the shared folder on Windows or Linux
- Extra tip- Linux Mint SambaShare User
- 8 thoughts on “Install Samba on Linux Mint to share files with Windows”
Linux Mint Forums
Samba is used to connect Linux to Windows and has traditionally used NetBIOS to discover hosts by name ( netbios name ) but Win10 made some changes that affect how this works. On the client side ( accessing Linux from Win10 ):
Windows 10 Home and Windows 10 Professional still contain the SMBv1 client by default after a clean installation. If the SMBv1 client is not used for 15 days in total (excluding the computer being turned off), it automatically uninstalls itself.
SMBv1 and browsing for netbios hosts in Explorer are linked. You can’t have one without the other so it will never see your Linux samba server in Explorer.
You can still access the Linux machine by name or ip address but it has to be done explicitly in Explorer:
By name: \\mint-host-name
By ip address \\mint-ip-address
Another change Win10 made is that it can now use mDNS which Linux and MacOS use:
[Part 1a] Connecting to a Linux Samba server with an mDNS qualified host name works out of the box in Win10:
Open Run in Windows ( Windows Key + R ) and enter the Linux mDNS qualified host name like this:
And you can map a particular share at that point if you wish: Right click a shared folder > Map network drive:
[Part 1b] WSD = WS-Discovery
There is another option. Windows replaced NetBIOS years ago with WSD. There is no implementation of WSD in Samba yet but there is a way to implement it in Linux thanks to someone over at github: https://github.com/christgau/wsdd
You can use that to enable WSD on your box so that Win10 can discover it without the use of NetBIOS or SMBv1:
EDIT: If you are using Mint 21 enabling WS-Discovery manually is no longer required. It’s now an installable package:
wget https://github.com/christgau/wsdd/archive/master.zipsudo mv wsdd-master/src/wsdd.py wsdd-master/src/wsddsudo cp wsdd-master/src/wsdd /usr/binsudo cp wsdd-master/etc/systemd/wsdd.service /etc/systemd/systemsudo touch /etc/default/wsddsudo systemctl daemon-reloadsudo systemctl start wsddsudo systemctl enable wsddLast edited by SMG on Mon Dec 19, 2022 12:39 pm, edited 27 times in total.
Reason: Unlocked: Tutorial is still being updated.
Please add a [SOLVED] at the end of your original subject header if your question has been answered and solved.
Re: Windows10 and Samba File Sharing
Post by altair4 » Sat Jul 11, 2015 7:43 am
[Part 2] Connecting to a Win10 box from Linux
Microsoft made another change to SMBv1 on the server side:
Windows 10 Home and Windows 10 Professional no longer contain the SMBv1 server by default after a clean installation.
In the past Ubuntu could only access the network using SMB1 so it made a change that created this bug:
https://bugs.launchpad.net/ubuntu/+sour . mments=all
That bug was fixed but it created another bug:
https://bugs.launchpad.net/gvfs/+bug/1828107
All of this results in you being able to discover the Win10 box but unable to access it.
But just like in Windows you can still access it’s shares without adjusting the client max protocol but have to do so explicitly in nemo and you have to specify a share name because of a bug in gvfs:
By name: smb://win10-host-name/share-name
By ip address: smb://win10-ip-address/share-name
Note: Nemo needs to be closed and reopened before using the above.
[Part 2a] Connecting to a Win10 box with its mDNS qualified host name is also possible.
This section is no longer required:
Update: : Windows made this a little easier to set up in Win10:
Update2: : The last few install required no changes to the firewall. Works by default
Control Panel > Windows Defender Firewall > Allow an app or feature through Windows Defender Firewall > Change Settings. Then enable:
File and Printer Sharing —> Private
mDNS — Private
This should no longer be necessary:
Right Click the Start Button > Control Panel > System and Security > Windows Firewall > Advanced Settings > Inbound Rules > New Rule
Rule Type: Port
Protocol: UDP
Specific local ports: 5353
Action: Allow the connection
Profile: Private
Name: Allow mDNS for Samba on Private Network
*** On Linux open you your file manager and connect to the share using the Windows mDNS qualified host name and a share name:
nemo smb://vwin10.local/sharedWin10 / Linux samba file sharing may work for you without all this but if you have issues with it this mDNS method is another way.
Please add a [SOLVED] at the end of your original subject header if your question has been answered and solved.
Install Samba on Linux Mint to share files with Windows
Samba is a popular, open-source networking software that computers with a Unix or Linux – operating system allow the sharing of network resources from Windows -networks, such as files and printers. However, it is not limited to Windows only, we can install and use on Unix / Linux- based servers pr Desktop to share resources over the network. The common protocols Server Message Block (SMB) and Common Internet File System (CIFS, an open version of SMB) are the basis on which Samba is based. The name ” Samba ” is just a name given to represent “SMB”.
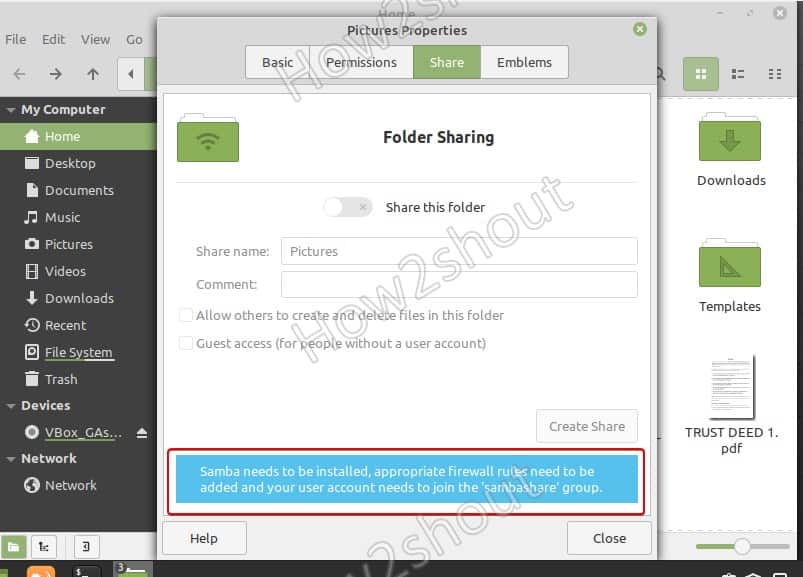
If you are using Linux Mint and want to share some folder, then right-click on it and select properties. And then the Share Tab. However, you will not able to enable this option because samba is not there yet. To confirm, you can see a message given at the bottom “Samba needs to be installed, appropriate firewall rules need to be added and your user account needs to join the ‘samba share group“.
To solve this let’s follow the given steps in this article…
Install and Configure Samba Server on Linux Mint 20
1. Run system update
Well, it is not a necessary step, however, run the system update command to rebuild the repo cache and make sure all the system installed packages are up to date.
2. Install Samba on Linux Mint
Next, in your command terminal use the APT package manager to install Samba on your Linux Mint. The packages to set it up are already there in the system repository, thus we don’t need to add anything extra.
Check its service is active and running:
sudo systemctl status smbd
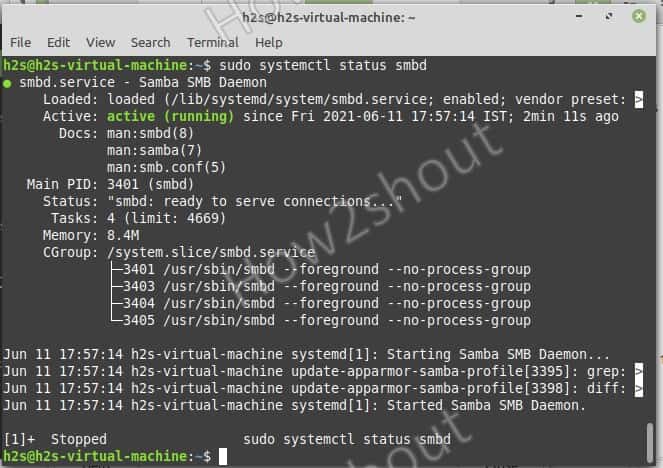
If it is not active then run:
sudo systemctl --enable now smbd
3. Allow samba in Linux Mint Firewall
To connect and access the shared files over SMB protocol, we have to first whitelist and allow its service to get accessed from the outside of the computer. Thus, allow it in the firewall
4. Add your user to the Samba group
Let’s add the current System user to the SambaShare group, so it can access all files and folders shared under it.
sudo usermod -aG sambashare $USER
set the password for share: This will be different from your system password.
Note: $USER means your current user, if you want to set some other user then change $USER with the particular user name. Also, the file or folder you want to share must be accessible to that particular user.
Alternatively, if you want to add some other users to the SAMBA group use:
sudo usermod -aG sambashare your-user
sudo smbpasswd -a your-user
5. Share some Linux Mint folder
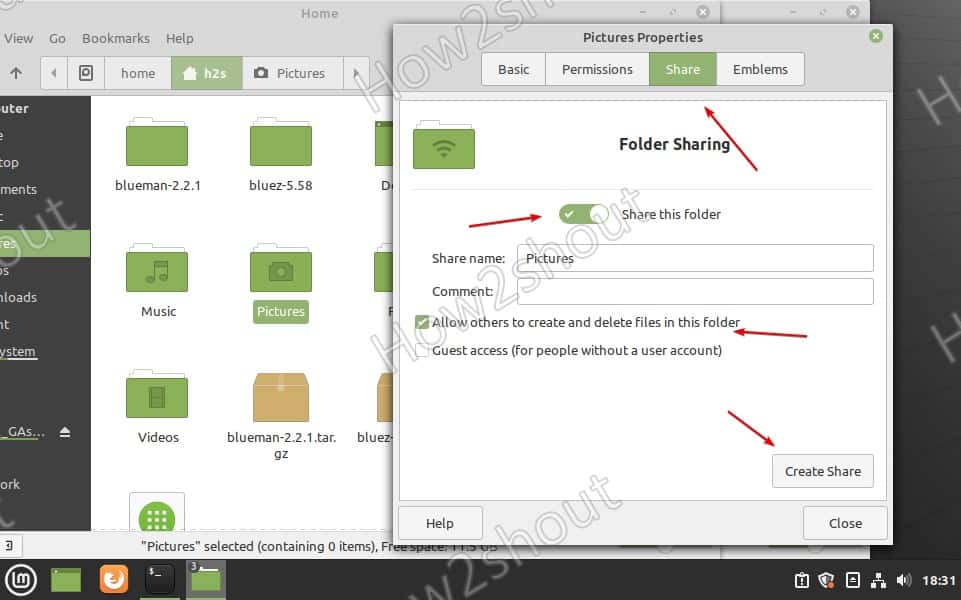
Lets’ say I want to share the Pictures folder or any other on my Linux Mint that is owned by my current user. So, for that simply go to that folder, right-click on it and select the Share tab.
6. Access the shared folder on Windows or Linux
Now, we can mount the Linux Mint shared folder on other Windows or Linux systems available in the same network or domain.
On Windows 10/8/7
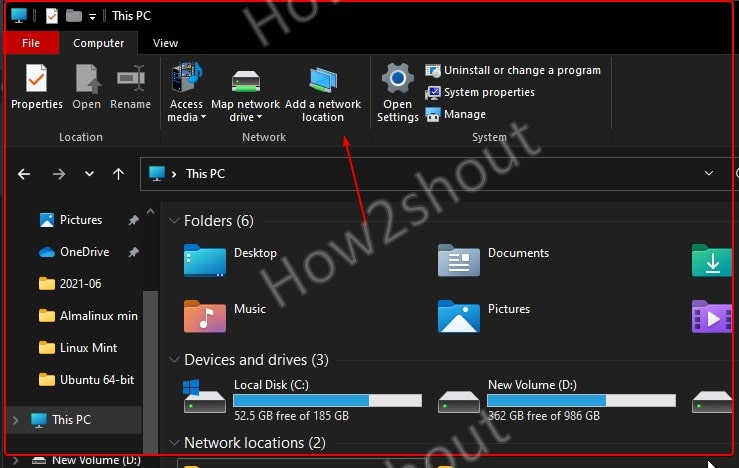
- Open My Computer or This PC
- Select Add network location icon given in the top menu.

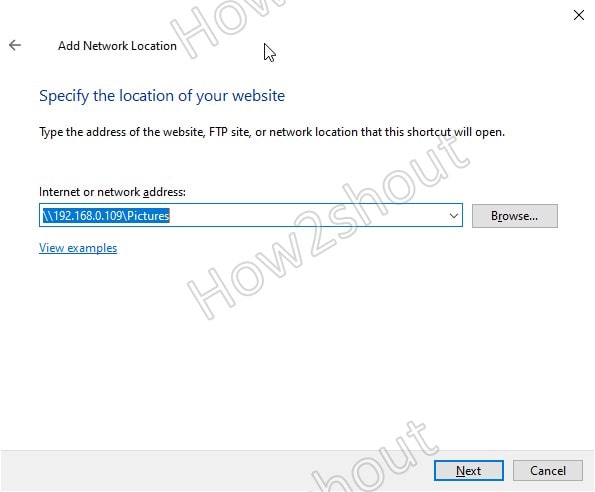
- Add your Linux Mint \\server-ipaddress\shared -folder-path– For example, here we have shared the Pictures folder, the path will be like this- \\192.168.0.109\Pictures

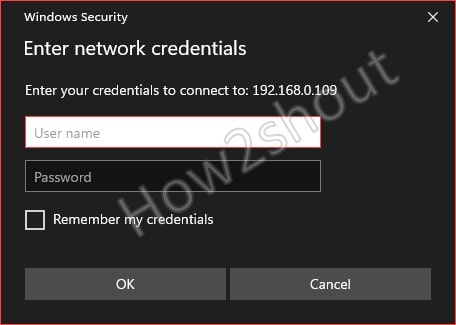
- Enter Samba User and password

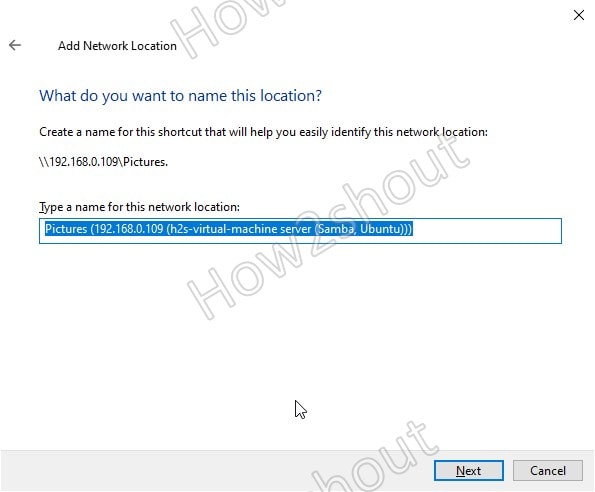
- The system will set a random name for your shared folder, however, you change to something easy to remember.
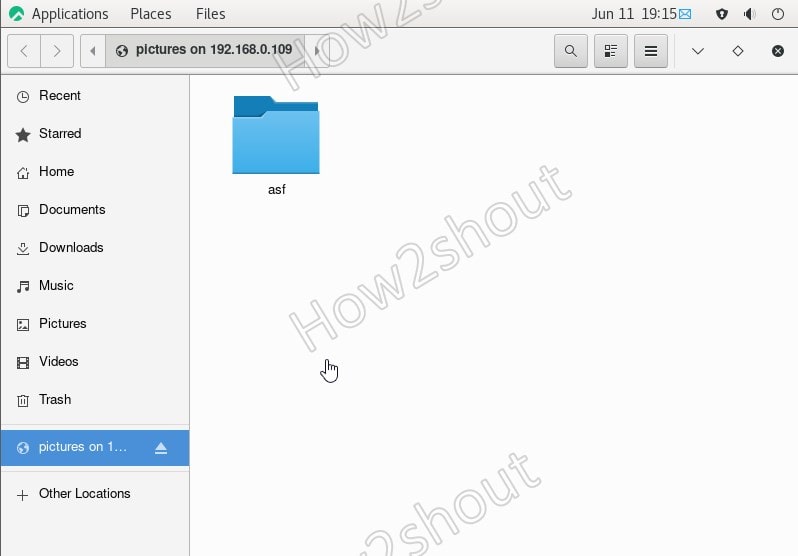
- Finally, you have the shared folder with read and write access.


On Linux systems such as Ubuntu, CentOS, and others…
The place to connect the samba server can be different from Linux to Linux, depending upon the desktop environment.
Here we are showing an example for Ubuntu and CentOS using GNOME.
- Open File Manager
- Select Other Locations from the right side given panel.
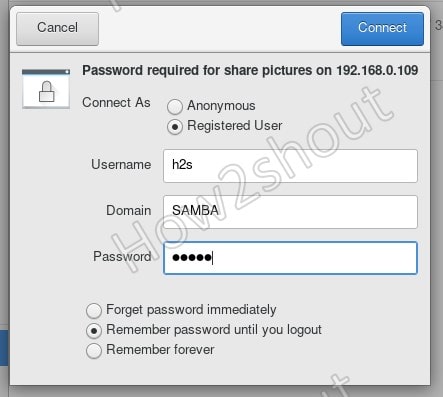
- At the bottom, in the “Connect Server” box type- smb://server-ip/shared-folder-path

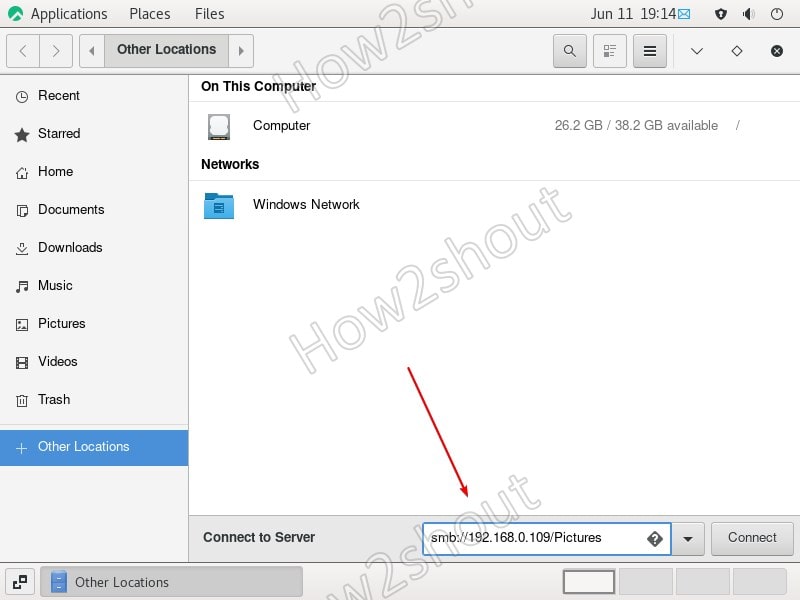
- Click on Connect.
- Select Registered User and enter that username and password


Extra tip- Linux Mint SambaShare User
If you want to create a new user to access the folder you want to share except it cannot access anything else then follow the below steps:
Create users:
Add user to Sambashare group
sudo usermode -aG new-user sambshare
Change the folder rights of a folder that you want to share to read and write for all users. So, that our new user can access that.
sudo chmod 777 folder-path
Now, you can access the shared folder using the new user and its password.
8 thoughts on “Install Samba on Linux Mint to share files with Windows”
I had to use “sudo smbpasswd -a $USER” otherwise I got the error “Failed to find the entry for user …”
Otherwise, a very straightforward setup. Many thanks. Reply
Awesome walkthrough, thank you!| One minor typo in the “Add user to Sambashare group” step:
Command should be `sudo usermod -aG sambashare new-user` …and then it might be good to set the password for that new user immediately following: `sudo smbpasswd -a new-user` Reply
For the command line “sudo systemctl –enable now smbd”
in my version – Linux Mint 17.3 “Rosa” Cinnamon – I had to shorton to “sudo enable now smbd” to work. Reply
Everything working fast, I have an old gateway DX4200 with 8 GB, and a tablet with Windows 10. Your tutorial was accurate and worked for me. Thanks so much, would please provide a xfer link and send you $ufficient grace. Reply
step 4 is missing instructions on how to create the user in the first place.
step 5 is bad. nemo sharing is terrible. it won’t let you specify who you share what with, it just shares it with everyone Reply