- How to Add a Package Repository to Debian, Ubuntu and Mint
- Understanding APT Repository on Debian and Ubuntu
- Automatic APT Repositories
- Non-Automatic or Trivial APT Repositories
- Manually Adding APT Repository on Debian and Ubuntu
- Adding APT Repository Using apt-add-repository Command
- Adding Personal Package Archives (PPAs)
- Removing a PPA Repository
- Adding a Package Repository Using GUI Utilities
- Как установить пакеты DEB в Ubuntu и Linux Mint
- Установка пакетов DEB в Ubuntu и Linux Mint
- Метод I: Установка пакетов Debian через командную строку
- Метод 2: Установка пакетов Debian через графический интерфейс пользователя
- Установка пакета Debian с помощью Software Center
- Установка пакета Debian с помощью приложения GDebi
How to Add a Package Repository to Debian, Ubuntu and Mint
A package repository (repo in short) is a location where software packages are stored and can be retrieved from. It is organized in a special directory tree, and usually contains an index file and the metadata needed by Linux package managers to access the packages in the repo and their dependencies.
Package managers such as APT (Advanced Packaging Tool – the default on Debian-like systems) enable you to automatically install and upgrade packages from a configured repo.
They also feature dependency resolution capabilities and software update checking. Besides, all package managers if not most, enable removing a package that is no longer needed.
Attention: Before we proceed, remember to only add software repositories from sources that you trust!
This guide shows how to add a package repository in Debian and Ubuntu Linux, as well as their derivatives such as Linux Mint.
Understanding APT Repository on Debian and Ubuntu
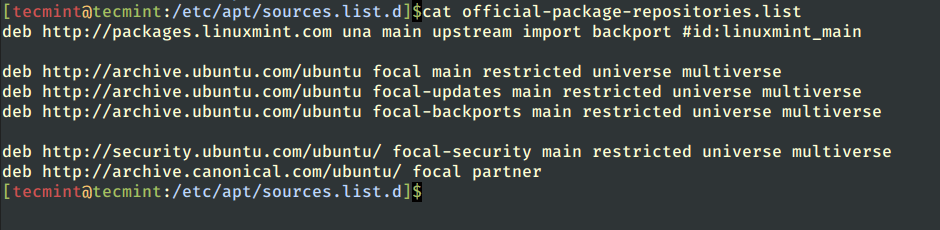
The APT package manager fetches packages from various repositories. A repository can be binary or source, and automatic or trivial. It can also be online or offline (for example on a CD-ROM) but the former is the more common use. Additionally, a repo can be official (maintained by Debian or Ubuntu/Canonical) or unofficial (third party).
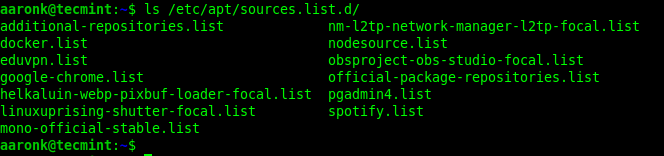
A repository is defined in the /etc/apt/sources.list configuration file or in a file stored under the /etc/apt/sources.list.d directory. Every repo file must end with the .list extension.
In a repository file, each line has the following syntax.
deb URI distribution component1 component2 … componentN OR deb-src URI distribution component1 component2 … componentN
The first parameter specifies the archive type (deb – for binary or deb-src – for source files), next is the URI – the root of the repository, then the distribution, and one or more components.
Automatic APT Repositories
To define an automatic repository, you must specify one distribution and one or more components and the distribution must not end with a slash.
The following are examples of automatic repo definitions:
deb http://repository.spotify.com stable non-free deb https://ftp.postgresql.org/pub/pgadmin/pgadmin4/apt/focal pgadmin4 main deb https://download.mono-project.com/repo/ubuntu stable-focal main
Non-Automatic or Trivial APT Repositories
For non-automatic repos, the distribution specifies the relative path to the index files and it must end with a slash. Besides, no components may be specified.
deb http://cloud.r-project.org/bin/linux/debian bullseye-cran40/ deb file:///home/tecmint/rep-exact binary/
Importantly, APT relies on the local package index, a database of available packages from the repositories defined in the /etc/apt/sources.list file and files under the /etc/apt/sources.list.d directory. You can find the package index files under the /var/lib/apt/lists/ directory.
After making changes to the repo configurations, you must always update the local package index before installing or updating packages.
$ sudo apt update OR $ sudo apt-get update
Note: Usually, software owners or maintainers will provide a means either manually or automatically to add the required repository from which you can install their package(s) on your Linux system.
Let’s look at how to add the apt repository, as explained below.
Manually Adding APT Repository on Debian and Ubuntu
To add a repository manually, simply create the repo file under the /etc/apt/sources.list.d directory. We don’t recommend adding all repositories in the /etc/apt/sources.list file.
This example shows how to add the R software environment packages repository.
$ sudo vim /etc/apt/sources.list.d/r-packages.list
Copy and paste the repo configuration into the file and make sure that the parameters such as URI and distribution and components match what is defined in the repository:
deb https://cloud.r-project.org/bin/linux/ubuntu focal-cran40/

Then add the repository key using the following wget command.
$ wget -qO- https://cloud.r-project.org/bin/linux/ubuntu/marutter_pubkey.asc | sudo tee -a /etc/apt/trusted.gpg.d/cran_ubuntu_key.asc
Alternatively, you can also add the repo using the echo and tee commands as follows:
$ echo "deb https://cloud.r-project.org/bin/linux/ubuntu focal-cran40/" | sudo tee /etc/apt/sources.list.d/r-packages.list $ wget -qO- https://cloud.r-project.org/bin/linux/ubuntu/marutter_pubkey.asc | sudo tee -a /etc/apt/trusted.gpg.d/cran_ubuntu_key.asc
Next, you need to update the local package index with the latest changes made in the repositories and then install a package from the repository, as follows:
$ sudo apt update $ sudo apt install --no-install-recommends r-base
To disable an apt repository, simply comment it out in the repository configuration file as shown in the following screenshot.

Adding APT Repository Using apt-add-repository Command
The add-apt-repository command-line utility is used to add a repository into the /etc/apt/sources.list file or /etc/apt/sources.list.d directory. If a repository already exists, it can remove it using the -r flag.
If the add-apt-repository utility is not available on your system, you can install the software-properties-common package which provides it:
$ sudo apt update $ sudo apt install software-properties-common
Let’s look at the following example. The first command adds the repo and the second one retrieves the repo key using the wget utility and saves it to the specified file using the tee utility:
$ sudo add-apt-repository "deb https://cloud.r-project.org/bin/linux/ubuntu $(lsb_release -cs)-cran40/" $ wget -qO- https://cloud.r-project.org/bin/linux/ubuntu/marutter_pubkey.asc | sudo tee -a /etc/apt/trusted.gpg.d/cran_ubuntu_key.asc
If you try to add a repo that already exists, the add-apt-repository command will show the message “Repository already exists” as shown in the following screenshot.

The next step is to update the apt package index and install a package from the repository, as shown before:
$ sudo apt update $ sudo apt install --no-install-recommends r-base
Adding Personal Package Archives (PPAs)
PPAs are software repositories for publishing user-contributed software packages via Launchpad. This example shows how to add the Shutter screenshot tool’s official PPA.
$ sudo add-apt-repository ppa:shutter/ppa $ sudo apt-get update $ sudo apt install shutter
Removing a PPA Repository
To remove a repo using the apt-add-repository utility, use its -r or —remove flag as mentioned earlier:
$ sudo add-apt-repository -r "deb https://cloud.r-project.org/bin/linux/ubuntu $(lsb_release -cs)-cran40/"
Adding a Package Repository Using GUI Utilities
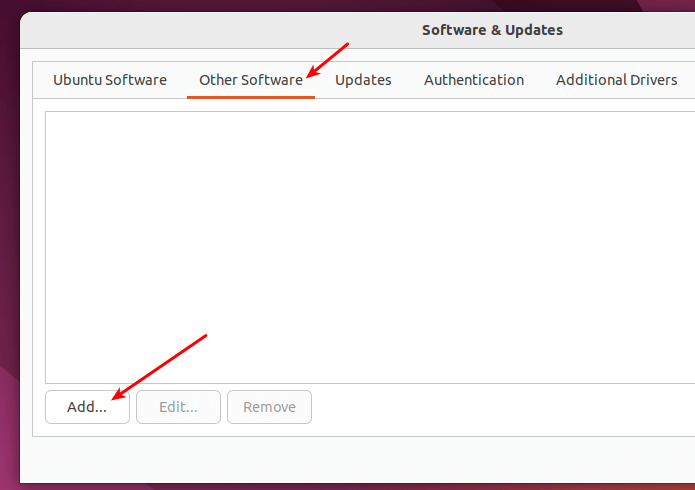
Last but not least, you can also add a repo to your system using a GUI application. On Ubuntu, open Software & Updates via the Activities search bar.
Then switch to the Other Software tab as highlighted in the following screenshot. Next, click Add and enter the repo configuration and follow the prompts.
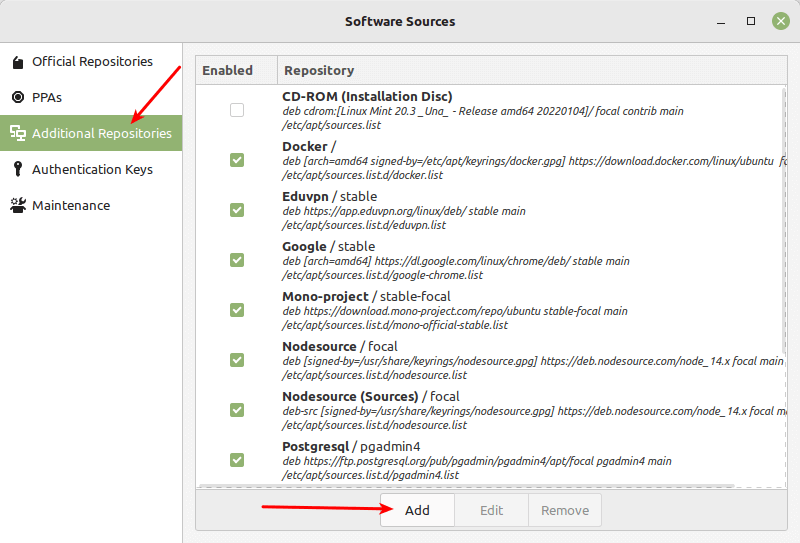
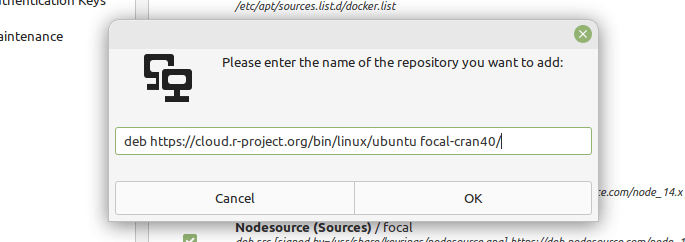
On Linux Mint, open your system menu and search for Software Sources, then open it. When asked to authenticate, enter your password to invoke the application with root privileges.
Next, click on the Additional Repositories tab, then click the Add button.
In the pop window, add the repo and click OK.
Once the repo has been added successfully, a message will display at the bottom of the window. Click OK to proceed.

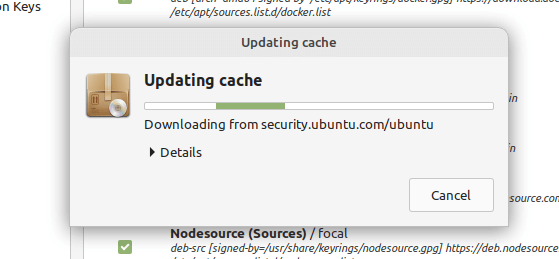
Then wait for the local package index to update. Once it is OK, you can proceed to install packages from the just added repo.
That’s it for now! In this guide, we have shown different ways to add a package repository in Debian and Ubuntu Linux, and their derivatives such as Linux Mint. For any comments or questions, reach us via the feedback form below.
Как установить пакеты DEB в Ubuntu и Linux Mint
Если вы нашли установочный файл программного обеспечения, заканчивающийся форматом (.deb), это означает, что файл является пакетом Debian, разработанным специально для систем на базе Debian.
Если вы новичок в Linux, это может показаться немного раздражающим, потому что вам может понадобиться несколько дополнительных шагов для установки этих пакетов Debian. Но не волнуйтесь, мы здесь, чтобы помочь вам в этом.
Установка пакетов DEB в Ubuntu и Linux Mint
В этом руководстве мы собираемся показать вам шаг за шагом, как установить пакет Debian в Ubuntu. Мы рассмотрим два основных метода:
- Установка пакетов Debian через командную строку (терминал)
- Установка пакетов Debian через графический интерфейс пользователя (приложение Software Center и приложение GDebi).
Но прежде чем мы начнем наше руководство, давайте сначала убедимся, что у вас есть обновленная система Ubuntu, используя следующие две команды:
sudo apt update
sudo apt upgrade
Метод I: Установка пакетов Debian через командную строку
В методе командной строки мы будем использовать терминал для установки пакета Debian. В принципе, вы можете использовать терминал одним из двух методов:
В общем, если вы используете команду dpkg, вы можете использовать следующий формат команды:
sudo dpkg -i «пакет_debian.deb».
Где вам нужно заменить «пакет_debian.deb» на путь к вашему пакету Debian. Поэтому, например, для установки пакета ASC Music Debian вы используете команду, подобную следующей:
sudo dpkg -i Downloads/asc-music_1.3-4_all.deb
Наш второй метод работы с командной строкой — это использование команды GDebi. Если вы не установили GDebi в вашу систему, то используйте следующую команду для ее установки:
Далее, давайте воспользуемся командой GDebi для установки пакета Debian с помощью следующей команды:
sudo gdebi Downloads/asc-music_1.3-4_all.deb
Метод 2: Установка пакетов Debian через графический интерфейс пользователя
Самый простой метод установки пакета Debian — это использование графического интерфейса пользователя. Опять же, вы можете выбрать один из двух методов:
Установка пакета Debian с помощью Software Center
В этом методе мы будем использовать Software Center по умолчанию, который поставляется с Ubuntu. К счастью, здесь не так много шагов, вы просто дважды щелкаете на пакете, который вам нужно установить. Затем установите его через приложение Software Center. Давайте подробнее рассмотрим следующие шаги:
Прочтите: Microsoft Edge в Linux: как добавить официальные репозитории, чтобы поддерживать его в актуальном состоянии
Шаг 1. Проверьте пакет Debian в каталоге Загрузки.

Дважды щелкните на пакете Debian.
Шаг 2. Как вы можете заметить, откроется Центр программного обеспечения. Теперь вы можете нажать кнопку Install, чтобы начать установку.

Шаг 3. Вам может потребоваться ввести пароль sudo для аутентификации. Как вы видите, установка пакета Debian продолжается.

После успешного завершения установки вы можете получить окно, как показано ниже, с кнопкой Remove. Кнопка Remove может быть использована для удаления пакета Debian из вашей системы.

Теперь вы должны были успешно установить пакет Debian.
Установка пакета Debian с помощью приложения GDebi
Во втором графическом методе мы можем использовать приложение GDebi. В этом методе у вас должен быть установлен пакет GDebi. Если он не установлен, вы можете использовать следующую команду для его установки:
Теперь давайте воспользуемся приложением GDebi.
Шаг 1. Сначала перейдите в каталог, где находится пакет Debian. Затем щелкните правой кнопкой мыши на пакете Debian и выберите «Открыть с помощью другого приложения».

Шаг 2. В меню рекомендуемых приложений выберите GDebi Package Installer. Затем нажмите кнопку «Выбрать».

Шаг 3. Приложение GDebi откроется и загрузит пакет Debian.

Шаг 4. После загрузки пакета Debian вы можете нажать кнопку Установить пакет, чтобы начать установку.

Шаг 5. Как вы можете заметить, панель установки находится внизу программы установки GDebi.

Шаг 6. После успешного завершения установки вы должны получить сообщение, как показано ниже.

Поздравляем, вы только что узнали несколько методов установки пакета Debian на вашу систему Ubuntu Linux. Это руководство должно работать на дистрибутивах Linux на базе Ubuntu, включая Linux Mint, elementary OS, Pop!_OS и других.