- Dist upgrade linux mint
- How to Upgrade to Linux Mint 20 [Step by Step Tutorial]
- How to upgrade to Linux Mint 20
- Step 1: Make sure you have a 64-bit system
- Step 2: Update your system by installing any available updates
- Step 3: Create a system snapshot with Timeshift [Optional yet recommended]
- Step 4: Make a backup of your files on an external disk [Optional yet recommended]
- Step 5: Disable PPAs and third-party repositories [Optional yet recommended]
- Step 6: Install the upgrade tool
- Step 7: Run an upgrade sanity check
- Step 8: Download package upgrades
- Step 9: Install the Upgrades [Point of no return]
- Enjoy Linux Mint 20
- Did you upgrade to Linux Mint 20?
- Как обновить Linux Mint до новой версии
- Создание резервной копии
- Подготовка
- Обновление Linux Mint
- Перезагрузка компьютера
Dist upgrade linux mint
How to Upgrade to Linux Mint 20 [Step by Step Tutorial]
This is a regularly updated guide for upgrading an existing Linux Mint install to a new available version.
The guide has been updated with the steps for upgrading to Linux Mint 20 from Mint 19.3. The steps are almost the same or updating from 18.3 to 19. I have kept those steps at the end of the tutorial.
How to upgrade to Linux Mint 20
- Do you really need to upgrade? Linux Mint 19.x is supported till 2023.
- If you have a 32-bit system, you cannot install or upgrade to Mint 20.
- You’ll need a good speed internet connection to download upgrades of around 1.4 GB in size.
- Based on your internet speed, it may take a couple of hours to complete the upgrade procedure. You must have patience.
- It is a good idea to make a live USB of Linux Mint 20 and try it in a live session to see if it is compatible with your hardware. Newer kernels might have issues with older hardware and hence testing it before the real upgrade or install can save you a lot of frustration.
- A fresh installation is always better than a major version upgrade but installing Linux Mint 20 from scratch would mean you’ll lose your existing data. You must take backup on an external disk.
- Though upgrades are mostly safe, it’s not 100% fail proof. You must have system snapshots and proper backups.
- You can upgrade to Linux Mint 20 only from Linux Mint 19.3 Cinnamon, Xfce and MATE. Check your Linux Mint version first. If you are using Linux Mint 19.2 or 19.1, you need to upgrade to 19.3 first from the Update Manager. If you are using Linux Mint 18, I advise you go for a fresh installation rather than upgrading to several Mint versions.
- The upgrade process is done via command line utility. If you don’t like using terminal and commands, avoid upgrading and go for a fresh installation.
Once you know what you are going to do, let’s see how to upgrade to Linux Mint 20.
Step 1: Make sure you have a 64-bit system
Linux Mint 20 is a 64-bit only system. If you have a 32-bit Mint 19 installed, you cannot upgrade to Linux Mint 20.
In a terminal, use the following command to see whether you are using 64-bit operating system or not.

Step 2: Update your system by installing any available updates
Launch the Update Manager with Menu -> Administration -> Update Manager. Check if there are any package updates available. If yes, install all the software updates first.
You may also use this command in the terminal for this step:
Step 3: Create a system snapshot with Timeshift [Optional yet recommended]
Creating a system snapshot with Timeshift will save you if your upgrade procedure is interrupted or if you face any other issue. You can even revert to Mint 19.3 this way.
Suppose your upgrade failed for power interruption or some other reason and you end up with a broken, unusable Linux Mint 19. You can plug in a live Linux Mint USB and run Timeshift from the live environment. It will automatically locate your backup location and will allow you to restore your broken Mint 19 system.
This also means that you should keep a live Linux Mint 19 USB handy specially if you don’t have access to a working computer that you can use to create live Linux Mint USB in the rare case the upgrade fails.
Step 4: Make a backup of your files on an external disk [Optional yet recommended]
Timeshift is a good tool for creating system snapshots but it’s not the ideal tool for your documents, pictures and other such non-system, personal files. I advise making a backup on an external disk. It’s just for the sake of data safety.
When I say making a backup on an external disk, I mean to simply copy and paste your Pictures, Documents, Downloads, Videos directory on an external USB disk.
If you don’t have a disk of that much of a size, at least copy the most important files that you cannot afford to lose.
Step 5: Disable PPAs and third-party repositories [Optional yet recommended]
It’s natural that you might have installed applications using some PPA or other repositories.
Some PPAs might be already available for Ubuntu 20.04 and thus for Mint 20. But if the PPA or repository is not available for the new version, it may impact the upgrade procedure with broken dependencies.
For this reason, it is advised that you disable the PPAs and third-party repositories. You may also delete the applications installed via such external sources if it is okay with you and doesn’t result in config data loss.
In the Software Sources tool, disable additional repositories, disable PPAs.

You should also downgrade and then remove foreign packages available in the maintenance tab.
For example, I installed Shutter using a PPA. I disabled its PPA. Now the package becomes ‘foreign’ because the version available from the repository doesn’t match the ones from Mint repositories.

Step 6: Install the upgrade tool
Now that your system is updated, you are ready for upgrading to Linux Mint 20. Linux Mint team provides a command line tool called mintupgrade for the sole purpose of upgrading Linux Mint 19.3 to Linux Mint 20.
You can install this tool using the command below:
Step 7: Run an upgrade sanity check
The mintupgrade tool lets you run a sanity check by simulating initial part of the upgrade.
You can run this check to see what kind of changes will be made to your system, which packages will be upgraded. It will also show the packages that cannot be upgraded and must be removed.
There won’t be any real changes on your system yet (even if it feels like it is going to make some changes).
This step is important and helpful in determining whether your system can be upgrade to Mint 20 or not.
If this steps fails half-way through type mintupgrade restore-sources to go back to your original APT configuration.
Step 8: Download package upgrades
Once you are comfortable with the output of mintupgrade check, you can download the Mint 20 upgrade packages.
Depending on your internet connection, it may take some time in downloading these upgrades. Make sure your system is connected to a power source.
While the packages are being downloaded, you can continue using your system for regular work.

Note that this command points your system to the Linux Mint 20 repositories. If you want to go back to Linux Mint 19.3 after using this command, you still can do that with the command “mintupgrade restore-sources“.
Step 9: Install the Upgrades [Point of no return]
Now that you have everything ready, you can upgrade to Linux Mint 20 using this command:
Give it some time to install the new packages and upgrade your Mint to the newer version. Once the procedure finishes, it will ask you to reboot.

Enjoy Linux Mint 20
Once you reboot your system, you’ll see the Mint 20 welcome screen. Enjoy the new version.
The steps for upgrading to Linux Mint 19 from 18.3 is pretty much the same as the steps you saw for Mint 20. The only change is in checking for display manager.
I’ll quickly mention the steps here. If you want more details, you can refer to Mint 20 upgrade procedure.
Step1: Create a system snapshot with Timeshift [Optional yet recommended]
Step2: Make a backup of your files on an external disk [Optional yet recommended]
Step 3: Make sure you are using LightDM
You must use LightDM display manager for Mint 19. To check which display manager you are using, type the command:
If the result is “/usr/sbin/lightdm“, you have LightDM and you are good to go.
On the other hand, if the result is “/usr/sbin/mdm“, you need to install LightDM, switch to LightDM and removing MDM. Use this command to install LightDM:
While installing, it will ask you to choose the display manager. You need to select LightDM.
Once you have set LightDM as your display manager, remove MDM and reboot using these commands:
Step 4: Update your system by installing any available updates
Step 5: Install the upgrade tool
Step 6: Check upgrade
Step 7: Download package upgrades
Step 8: Apply upgrades
Did you upgrade to Linux Mint 20?
Upgrading to Linux Mint 20 might not be as friendly as upgrading Ubuntu version but you should be glad that there at least exists the upgrade option. In distributions like Debian, you have to do a lot more manual tasks than this.
I hope you find the tutorial helpful. Did you upgrade to Linux Mint 20 or you opted for a fresh installation?
If you faced any issues or if you have any questions about the upgrade procedure, please feel free to ask in the comment section.
Like what you read? Please share it with others.
Как обновить Linux Mint до новой версии
Рассмотрим, как обновить установленную систему Linux Mint до свежей версии.
Мы будем рассматривать процесс обновления дистрибутива Linux Mint 19.1 до Linux Mint 19.2.
Создание резервной копии
Перед обновлением желательно создать резервную копию важных данных и сделать снимок системы (снапшот).
Снимок системы позволит вам восстановить прежнее состояние системы, если во время обновления возникнут какие-нибудь сбои.
Для создания снимка системы можно использовать программу Timeshift. Запустить программу можно из главного меню из раздела Администрирование ( Administration ) .
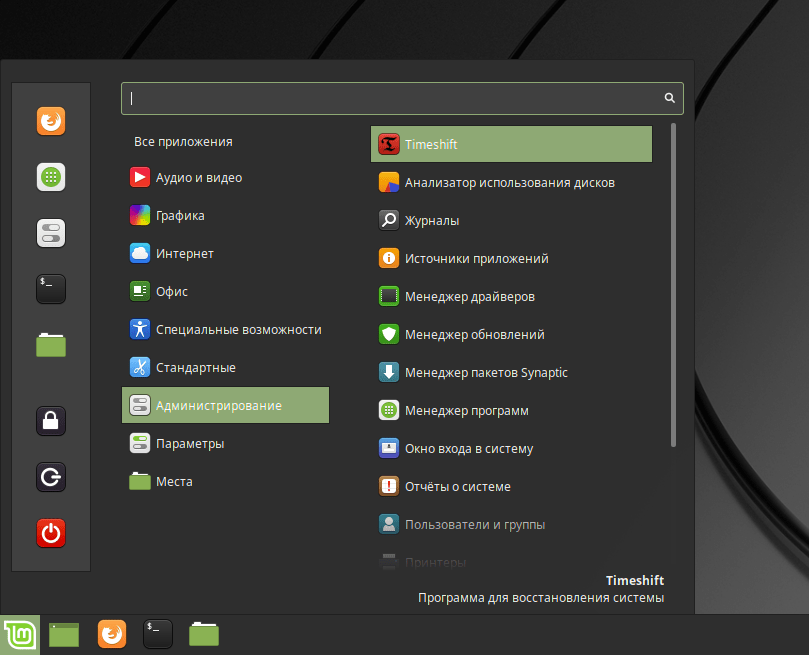
Запуск программы Timeshift
Подготовка
Разработчики дистрибутива рекомендуют отключить экранную заставку (скринсейвер) перед началом обновления, так как в некоторых случаях она может заблокировать вам доступ к рабочему столу. Чтобы отключить заставку в главном меню выберите пункт Параметры→Экранная заставка ( Preferences→Screensaver ) .
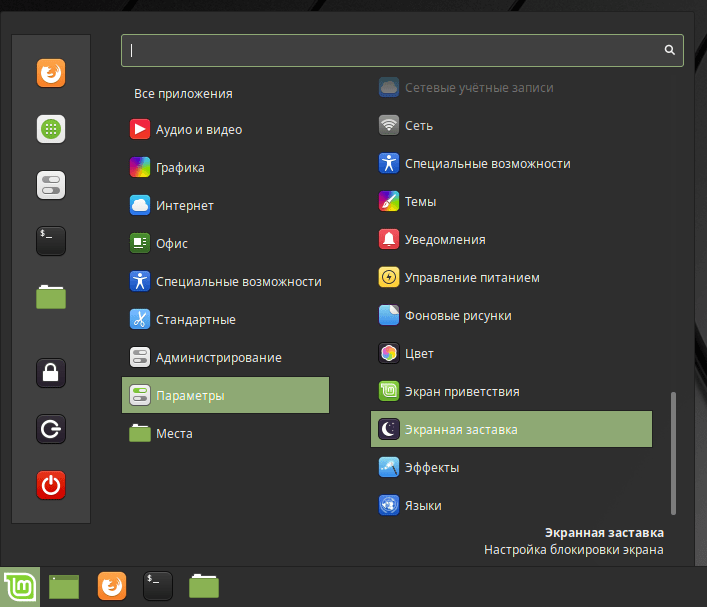
Запуск настроек Экранной заставки
В открывшемся окне в разделе Настройки заставки установите время задержки в состояние Никогда
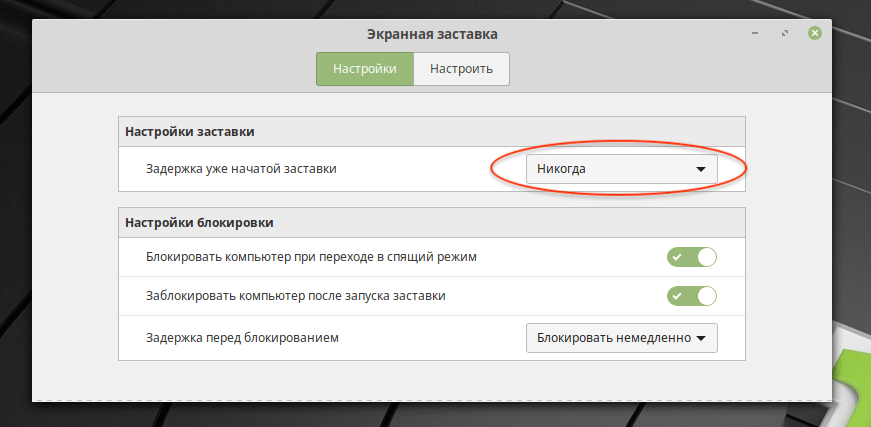
Настройки экранной заставки
Также, если ранее вы устанавливали дополнения Cinnamon spices, обновите их через системные настройки.
Обновление Linux Mint
Теперь можно выполнить обновление дистрибутива.
Запустите утилиту Менеджер обновлений (Update Manager). Для этого в главном меню выберите пункт
Администрирование→Менеджер обновлений ( Administration→Update Manager )
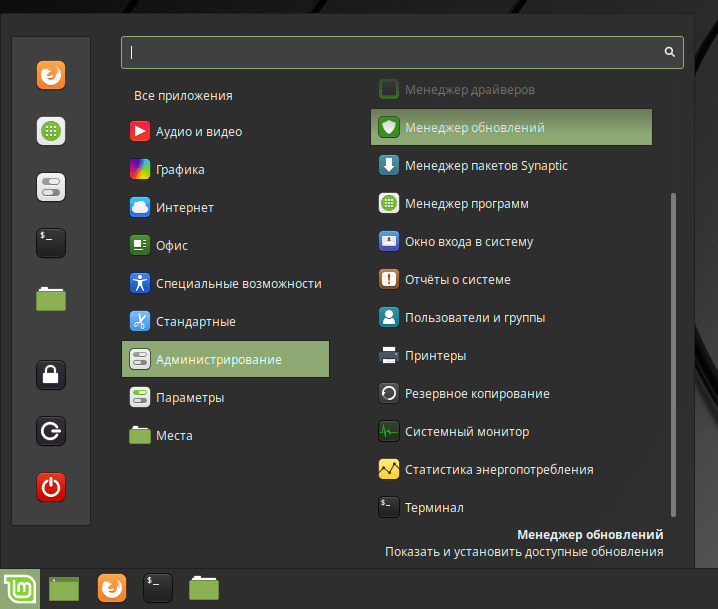
Запуск Менеджера обновлений
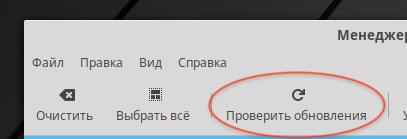
В Менеджере обновлений нажмите кнопку Проверить обновления , чтобы проверить не появилась ли новая версия самой утилиты «Менеджер обновлений» (в которой вы сейчас находитесь): пакеты mintupdate и mint-upgrade-info.
Проверка обновлений
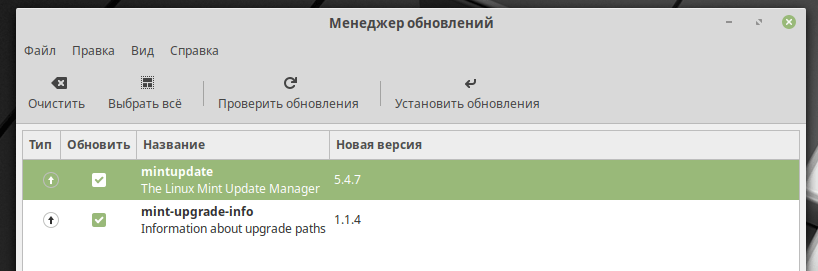
Если есть обновления для пакетов mintupdate и mint-upgrade-info, то отметьте их галочками и нажмите кнопку Установить обновления
Обновление пакетов mintupdate и mint-upgrade-info
Теперь в меню выберите пункт Правка→Обновить до «Linux Mint 19.2 Tina» ( Edit→Upgrade to «Linux Mint 19.2 Tina» ) (версия дистрибутива может отличаться).

Запуск обновления Linux Mint
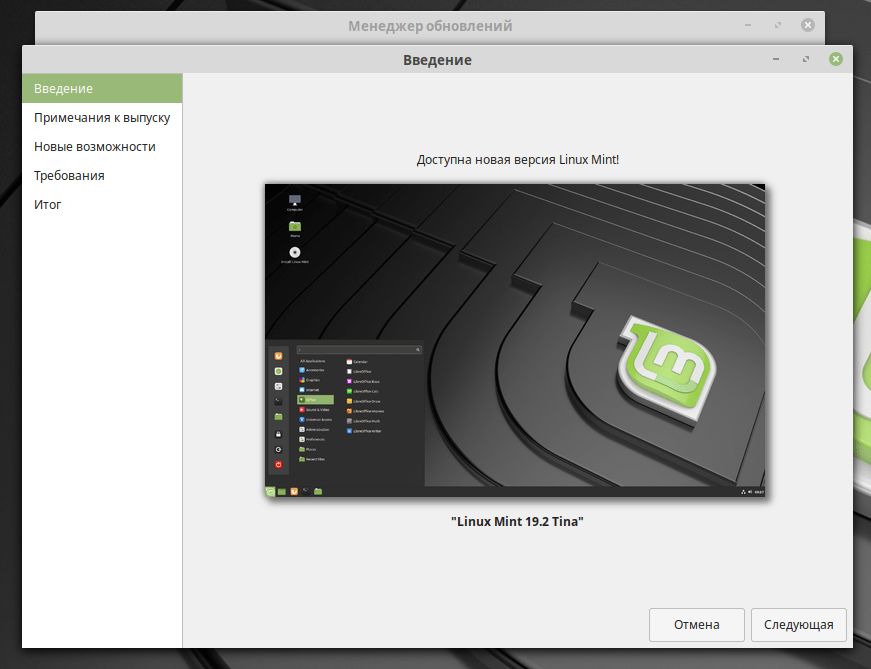
Откроется утилита, в которой необходимо выполнить несколько простых шагов.
Утилита обновления Linux Mint
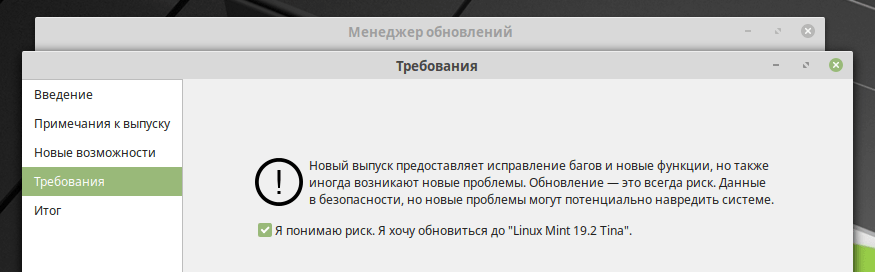
Вам требуется только нажимать кнопку Следующая ( Next ) . На предпоследнем шаге установите галочку у пункта « Я понимаю риск. Я хочу обновиться до Linux Mint.. » и нажать кнопку Применить .
Утилита обновления Linux Mint до новой версии
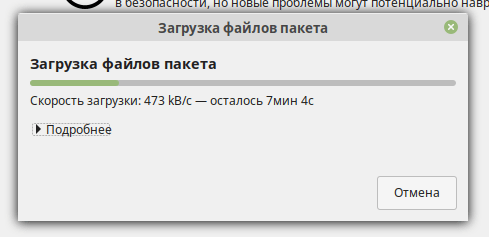
Начнется процесс обновления системы. Сначала будут загружены новые версии пакетов, затем будет произведена их установка. Процесс может занять продолжительное время.
Процесс обновления
Перезагрузка компьютера
Когда обновление завершится, необходимо перезагрузить компьютер.

Обновление Linux Mint завершено