Немного о GRUB в Linux Mint
По умолчанию если на ПК установлена только Linux Mint, меню загрузки Grub скрывыется. Чтобы активировать его показ, необходимо проделать несколько простых шагов:
*если ОС жалуется на недостаток прав — добавьте впереди команду sudo
Здесь нас интересует конфигурационный файл от Linux Mint (на скриншоте выше выделен синим). У меня этот файл называется «50_linuxmint.cfg», у вас название может быть другим, например, «90_custom.cfg».
*вместо «50_linuxmint.cfg» укажите имя вашего файла
GRUB_TIMEOUT — время ожидания. Я установил 7 секунд, вы можете установить время на своё усмотрение. Если значение будет «0», начнётся загрузка операционной системы без отображения загрузчика. Если «-1» — меню будет отображаться до тех пор, пока не будет выбрано действие.
GRUB_TIMEOUT_STYLE — стиль отображения времени ожидания. Возможные значения:
«hidden» — скрыть меню загрузчика;
«menu» — отобразить меню загрузчика;
«countdown» — показывать только обратный отсчёт.
После редактирования сохраняем изменения (Ctrl+O) и выходим из редактора (Ctrl+X).
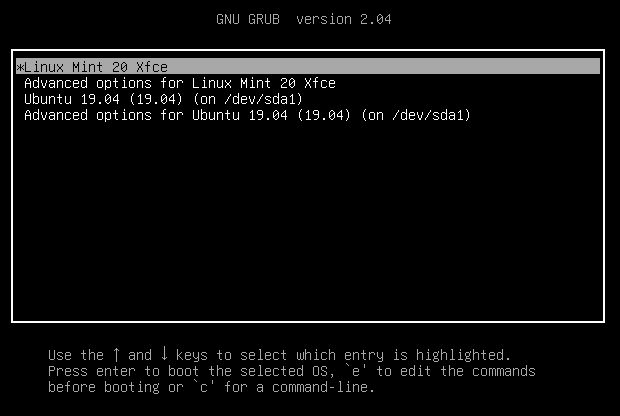
При следующем запуске компьютера отобразится меню загрузчика Grub:
Установка темы Linux Mint для GRUB
Если у вас установлено несколько операционных систем, меню загрузки будет отображаться при запуске ПК, но стандартная тема загрузчика выглядит слишком скучно.
Установим тему Linux Mint с помощью следующей команды:
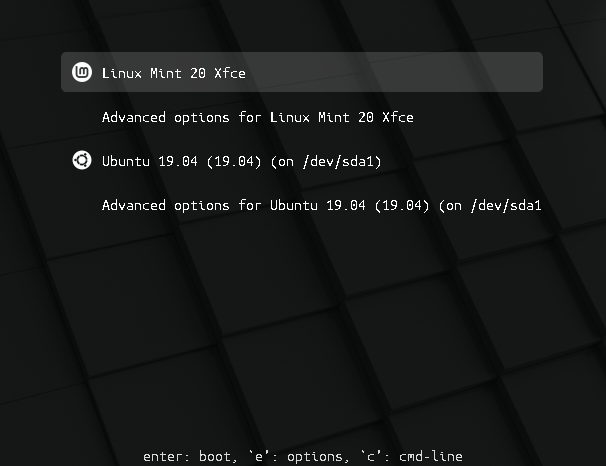
После установки можете перезагрузить ПК и насладиться более приятным видом загрузчика:
Grub Boot Menu
If you have more than one operating system installed, it allows you to select which one to boot.
Grub is also useful for troubleshooting. You can use it to modify the boot arguments or to boot from an older kernel.
How to make the Grub menu always visible
If you only run Linux Mint and there are no other operating systems on the computer, the menu is hidden by default.
To make it visible, as root, add these lines to /etc/default/grub.d/90_custom.cfg :
GRUB_TIMEOUT="5" GRUB_TIMEOUT_STYLE="menu"
Then type the following commands in a terminal:
How to theme the Grub menu
For compatibility reasons, some releases sometimes ship without a Grub theme:
You can make it look like this:
To do so, open a terminal and type:
apt install --reinstall -o Dpkg::Options::="--force-confmiss" grub2-theme-mint
Or if you have a HiDPI screen, type this instead:
apt install --reinstall -o Dpkg::Options::="--force-confmiss" grub2-theme-mint-2k
© Copyright 2020, Linux Mint Revision 92937742 .
Versions latest Downloads pdf html epub On Read the Docs Project Home Builds Free document hosting provided by Read the Docs.
Linux mint grub file
Although grub can be edited using a software Grub Customizer but if you want more control and do it manually in a text editor, here are the steps:
1. For removing memtest, open terminal and type:
sudo chmod -x /etc/grub.d/20_memtest86+
This can also be done graphically by opening /etc/grub.d, right click on 20_memtest86+ and disabling/unchecking “Allow executing file as program”. User must have administrative permissions to do this action. To get administrative rights, type in terminal:
A new window will open which will have administrative rights. Browse the location from this window and perform reguired operations.
2. To remove grub recovery option, open file /etc/default/grub as administrator and uncomment GRUB_DISABLE_RECOVERY=»true» by removing # in front of it. To open this file as administrator, right click on file and select «Open as Administrator».
3. To change default timeout, change the value of GRUB_TIMEOUT=»10″ to «30 or any other value (in seconds) whichever is required in the same file which is mentioned in step 2. Grub Timeout determines how long the grub menu is displayed before the default entry is loaded.
This command is necessary for implementing changes made in step 1 , 2 and 3.
5. For editing/removing boot entries, edit grub.cfg file present in /boot/grub/. To remove extra operating system entry (say Linux Mint 12 installed on sda8) remove these lines from grub.cfg file:
menuentry «Linux Mint 12 32-bit, 3.0.0-12-generic (/dev/sda8) (on /dev/sda8)» —class gnu-linux —class gnu —class os insmod part_msdos
insmod ext2
set root='(hd0,msdos8)’
search —no-floppy —fs-uuid —set=root 8d535868-a72d-4b53-93da-9e83e1d8b7f3
linux /boot/vmlinuz-3.0.0-12-generic root=UUID=8d535868-a72d-4b53-93da-9e83e1d8b7f3 ro quiet splash vt.handoff=7
initrd /boot/initrd.img-3.0.0-12-generic
>
6. To remove memtest, recovery option and other extra operating systems, first follow step 1 and 2, then run command update-grub . Then remove any extra entries from grub.cfg.
7. By default Operating system is listed something like this:
Linux Mint 12 32-bit, 3.0.0-12-generic (on /dev/sda8)
To change its name ie suppose you want this operating system to be listed as «Lisa», edit the name which is written inside quotes after menuentry (see 5th step) to Lisa. On next boot, this operating system will be listed with name «Lisa».
8. If no key is pressed within timeout, the latest installed operating system is selected by default. To change default operating system to start after timeout, change the value in below highlighted text in «set default» from 0 to 1 or 2 according to your choice (do a little bit experiment).
### BEGIN /etc/grub.d/00_header ###
if [ -s $prefix/grubenv ]; then
set have_grubenv=true
load_env
fi
set default=»0″
if [ «$» ]; then
set saved_entry=»$»
save_env saved_entry
set prev_saved_entry=
save_env prev_saved_entry
set boot_once=true
fi
Note: 1. Do not run command update-grub after editing/removing/renaming entries in grub.cfg file as this command reconfigures grub.cfg file and will again include all operating systems present on system.
2. If two Mint or Linux operating systems are installed, step 1 and 2 has to be done for both operating systems. Command chmod -x /etc/grub.d/20_memtest86+ works for main/latest operating system as for previous operating system, sometimes file name is changed by grub. For secondary/previous operating system, open /etc/grub.d and find exact name of file 20_memtest. and run above command.
Please don’t demote this tutorial on basis of method of root permissions. This tutorial is basically for editing grub entries, not about root permissions. Methods of taking root permissions I have mentioned may not be appropriate but I have adopted easiest methods I know.