- Linux Mint Recovery Menu
- Enable Grub Menu on Linux Mint
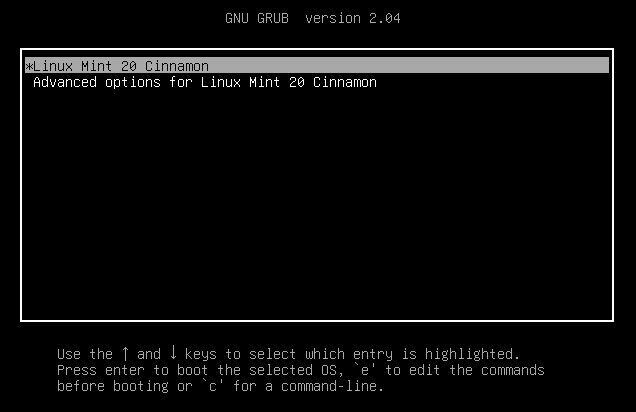
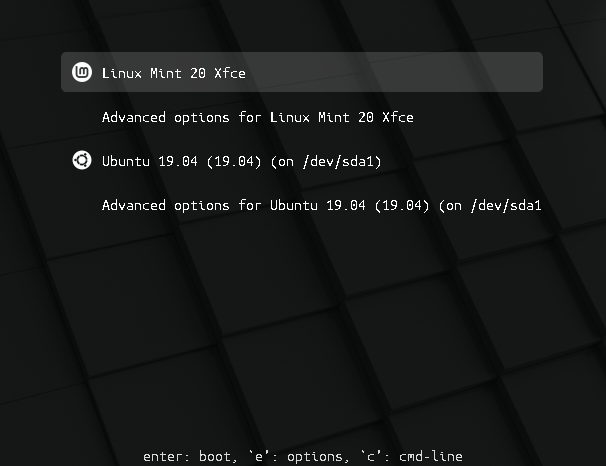
- Reboot: The grub boot menu will appear the next time you start
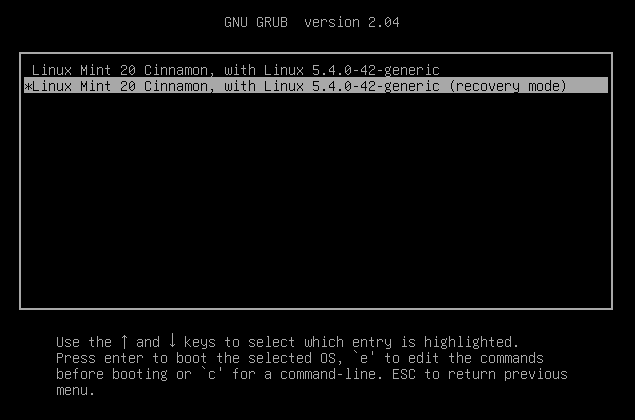
- Choose the second entry “Advanced options for Linux Mint 20”.
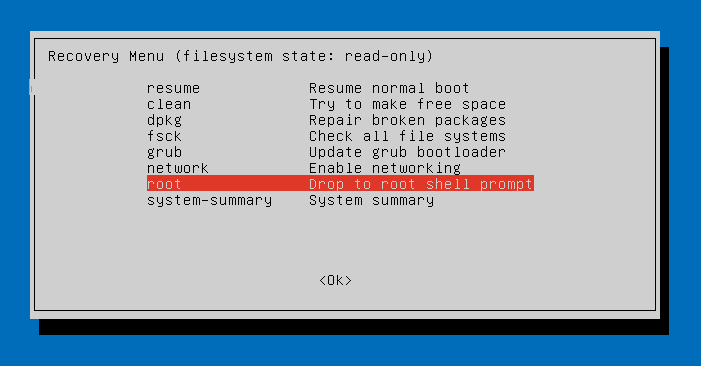
- The recovery menu with repair options and the root shell appears promptly.
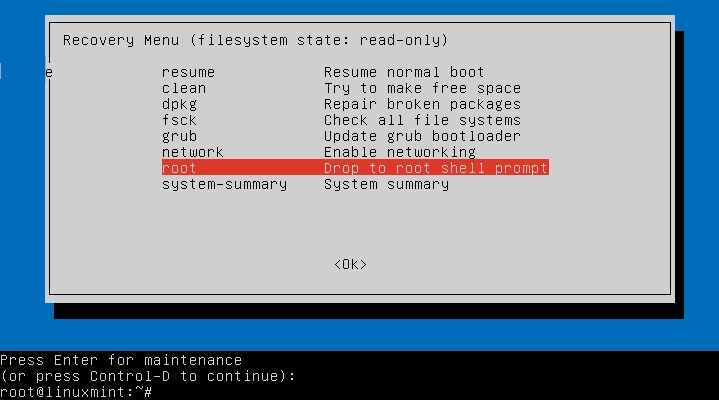
- Choose “Drop to root shell prompt” that opens the Single Mode Console.
- Recovery Mode (Single Mode)
- root password forgotten
- sudo rulebook plugin could not be initialized
- Hard drive has no free space
- Grub Boot Menu
- How to make the Grub menu always visible
- How to theme the Grub menu
- How to Configure The Grub Boot Menu in Linux
- Configure Grub manually via Editing config file
- 1. GRUB_DEFAULT
- 2. GRUB_TIMEOUT
- 3. GRUB_DISTRIBUTOR
- 4. GRUB_CMDLINE_LINUX
- 5. GRUB_TERMINAL
- 6. GRUB_DISABLE_SUBMENU
- 7. GRUB_THEME
- Apply Changes
- Configure boot menu via graphical Grub-Customizer
- compizomania
Linux Mint Recovery Menu
If Linux Mint is installed on the computer and no other operating systems are available, the Grub Boot menu is hidden by default. In order to get the Grub menu at startup, the right Shift key has to be pressed after switching on, unfortunately this does not work with virtual machines, here you have to set up the Grub menu persistently.
Enable Grub Menu on Linux Mint
If the Grub menu should appear at each start to get the recovery menu for system repairs, or to pass kernel parameters, edit the file 90_custom.cfg as root:
First become root with sudo su –
$ vi /etc/default/grub.d/90_custom.cfgand add the following lines:
GRUB_TIMEOUT="5" GRUB_TIMEOUT_STYLE="menu"If the file 90_custom.cfg does not exist, simply create it with an editor of your choice.
After editing, run the following command:
Reboot:
The grub boot menu will appear the next time you start
Choose the second entry “Advanced options for Linux Mint 20”.
The recovery menu with repair options and the root shell appears promptly.
Choose “Drop to root shell prompt” that opens the Single Mode Console.
Recovery Mode (Single Mode)
Enter in maintenance console. Here you are root and have write permissions on the file system. The single-user runlevel is the lowest operating state for maintenance, in which only system resources such as hard drives or file systems are active.
root password forgotten
Here are some of the most self-inflicted errors. If the root password has been forgotten, a new one can now be assigned.
root@localhost:# passwd rootsudo rulebook plugin could not be initialized
Improper changes to the sudoers file may result in errors.
$ sudo visudo >>> /etc/sudoers: syntax error near line 24 If sudo is no longer possible in the standard runlevel and you have locked out yourself as root, sudo can be restored.
Before /etc/sudoers can be changed, the file must be given write permission.
$ chmod u+w /etc/sudoers && vi /etc/sudoers
After editing, sudoers must be protected again.
Here is the sudoers original file of Linux Mint 20 in case it has been changed to unusable.
Note! Changes should always only be made with visudo.
# This file MUST be edited with the 'visudo' command as root. # Please consider adding local content in /etc/sudoers.d/ instead of Directly modifying this file. # See the man page for details on how to write a sudoers file. # Defaults env_reset Defaults mail_badpass Defaults secure_path="/usr/local/sbin:/usr/local/bin:/usr/sbin:/usr/bin:/sbin:/bin:/snap/bin" Host alias specification User alias specification Cmnd alias specification User privilege specification root ALL=(ALL:ALL) ALL Members of the admin group may gain root privileges %admin ALL=(ALL) ALL Allow members of group sudo to execute any command %sudo ALL=(ALL:ALL) ALL See sudoers(5) for more information on "#include" directives: #includedir /etc/sudoers.d
Hard drive has no free space
If there is no more free disk space, the logs can no longer be saved, which leads to system downtime, here the space allocation can be checked in the Single User Mode Console to create free space again.
$ tree -ah /var/log -L 1 $ tree --you -d -shaC | grep -Ev '[^ ]( ** )
If the tree command does not exist on the system, one of the following (disk usage) commands can help.
$ sudo du -hc --max-depth=0 /var $ sudo du -ah /var | sort -n -r | head -n 5 $ sudo du /home -Sh | sort -rh | head -5
Click on a star to rate it!
Average rating 4 / 5. Vote count: 8
No votes so far! Be the first to rate this post.
We are sorry that this post was not useful for you!
Tell us how we can improve this post?
Grub Boot Menu
If you have more than one operating system installed, it allows you to select which one to boot.
Grub is also useful for troubleshooting. You can use it to modify the boot arguments or to boot from an older kernel.
How to make the Grub menu always visible
If you only run Linux Mint and there are no other operating systems on the computer, the menu is hidden by default.
To make it visible, as root, add these lines to /etc/default/grub.d/90_custom.cfg :
GRUB_TIMEOUT="5" GRUB_TIMEOUT_STYLE="menu"
Then type the following commands in a terminal:
How to theme the Grub menu
For compatibility reasons, some releases sometimes ship without a Grub theme:

You can make it look like this:

To do so, open a terminal and type:
apt install --reinstall -o Dpkg::Options::="--force-confmiss" grub2-theme-mint
Or if you have a HiDPI screen, type this instead:
apt install --reinstall -o Dpkg::Options::="--force-confmiss" grub2-theme-mint-2k
© Copyright 2020, Linux Mint Revision 92937742 .
Versions latest Downloads pdf html epub On Read the Docs Project Home Builds Free document hosting provided by Read the Docs.
How to Configure The Grub Boot Menu in Linux
GNU Grub, stands for GNU GRand Unified Bootloader, is the default boot-loader from the most Linux operating systems. It’s the most common way to handle the boot menu when dual or multi-boot other OSes with Linux.
Including Ubuntu, Debian, Fedora, Arch, openSUSE, CentOS, Linux Mint, and others, you can configure Grub to do the jobs below:
- Change the default system to boot.
- Set boot menu timeout before automatically booting the default.
- Add Linux Kernel parameters.
- Hide the recovery menu entry.
- Set boot screen resolution.
- Change boot screen text font, background, and themes.
- And more.
And things can be done either via a graphical tool Grub-Customizer or by manually editing the configuration file.
Configure Grub manually via Editing config file
The main configuration file normally locates at /boot/grub/grub.cfg . It however varies on different Linux Distros, such as Fedora generates the file at /boot/efi/EFI/fedora/grub.cfg for UEFI and /boot/grub2/grub.cfg for BIOS-boot.
It is an automatic generated file that is being loaded by Grub on each boot. We don’t recommend to edit the file directly because it changes automatically after applying system updates.
Users can edit the /etc/default/grub as well as files under /etc/grub.d/ to control how to generate the main configuration file.
Firstly, open terminal and run command to edit /etc/default/grub .
Here I use the universal nano command line text editor. To save changes, press Ctrl+X, type y, and hit Enter. For choice, replace nano with your favorite text editor, such as gedit for Ubuntu/Fedora, xed for Linux Mint.

As you see in the picture above, lines started with # at the beginning are comments. They do nothing but descriptions. You can comment / un-comment a line by adding / removing # at the beginning.
1. GRUB_DEFAULT
The GRUB_DEFAULT line sets which OS to boot by default. The value can be either a number or full-name of a boot menu entry.
The number value counts from 0. It can be 0, 1, 2, 3, 4, …
- To boot the first entry, set GRUB_DEFAULT = 0.
- For the second entry, use GRUB_DEFAULT = 1.
- And GRUB_DEFAULT = 2 will set the third entry as default.
You can also set the full-text of a menu entry as the value. For example:

Also it can set to GRUB_DEFAULT = saved. With it, you NEED one more rule to set default OS:
- Boot the last booted entry with one more line: GRUB_SAVEDEFAULT = true
- Set default entry anytime via grub-set-default command, without editing config file:
- sudo grub-set-default 1 set the second entry as default.
- sudo grub-set-default 3 set the fourth entry as default.
2. GRUB_TIMEOUT
The GRUB_TIMEOUT value controls how long the boot menu will display in seconds, before it boots the default automatically. Press any key during the time will interrupt the timeout.
The timeout may not work if you set to 0 in recent Ubuntu releases, e.g., Ubuntu 20.04 & higher. It's overwritten by /etc/grub.d/30_os-prober file. As a workaround, add GRUB_DISABLE_OS_PROBER=true to disable 30_os-prober.
You can control how the timeout count down via GRUB_TIMEOUT_STYLE. Though the value is also overwritten to always ‘menu’ in Ubuntu if more than one menu entries available.
- GRUB_TIMEOUT_STYLE = ‘menu’ will display boot menu and wait for timeout.
- Set GRUB_TIMEOUT_STYLE = ‘countdown’ will NOT display the menu, but countdown before timeout.
- And GRUB_TIMEOUT_STYLE = ‘hidden’ will also hide the boot menu, but wait until timeout silently.
There’s also GRUB_RECORDFAIL_TIMEOUT. If the last boot failed, it will stuck at boot menu until you choose an entry and hit Enter. In the case, use GRUB_RECORDFAIL_TIMEOUT to set a timeout to boot the default.
3. GRUB_DISTRIBUTOR
The value of the key is usually your Linux Distribution name, exported via a simple command. It is useful for a certain script in /etc/grub.d/ directory to take effect. Leave it unchanged unless you know what you’re doing.
4. GRUB_CMDLINE_LINUX
The GRUB_CMDLINE_LINUX value adds kernel parameters to the menu entry.
The GRUB_CMDLINE_LINUX_DEFAULT will also add kernel parameters. But they are added after those listed in ‘GRUB_CMDLINE_LINUX‘. As well, it generates ‘recovery mode‘ for each kernel entry (without parameter).
To disable the recovery mode, use GRUB_DISABLE_RECOVERY = true.
5. GRUB_TERMINAL
The GRUB_TERMINAL value specifies the input and output device. You can use ‘GRUB_TERMINAL_INPUT’ and/or ‘GRUB_TERMINAL_OUTPUT’ respectively, or use ‘GRUB_TERMINAL’ to overwrite both to the same.
- “console” – native platform console.
- “serial” – serial terminal
- “serial_ “ – serial terminal with explicit port selection.
- “at_keyboard” – PC AT keyboard input device.
- “usb_keyboard” – USB keyboard using the HID Boot Protocol.
- “gfxterm” – graphics-mode output.
- “vga_text” – VGA text output.
- “mda_text” – MDA text output.
- “morse” – Morse-coding using system beeper
- “spkmodem” – simple data protocol using system speaker.
6. GRUB_DISABLE_SUBMENU
The key will toggle on / off the sub-menu (e.g. “Advanced options for …”). By setting GRUB_DISABLE_SUBMENU = true, it brings out the sub-menu items into top-level menu.
7. GRUB_THEME
Grub boot-loader supports themes! You can find a theme either in gnome-look.org or Github.
By installing theme folders into “/boot/grub/themes” directory, you can add GRUB_THEME=”/boot/grub/themes/THEME_NAME/theme.txt” to apply one.
And you can specify the boot screen resolution via “GRUB_GFXMODE”. For example:
It will try to use 32-bit color 1280×1024 resolution. If failed, fallback to 1024×768. The default will in use via ‘auto‘ if all the previous not available.
Apply Changes
After editing the config file, or running grub-set-default command, you need to update the main config file to apply change.
Normally, run this command will do the job:

The command vary on some Linux, such as Fedora you need to run for UEFI boot:
grub2-mkconfig -o /boot/efi/EFI/fedora/grub.cfg
For legacy bios boot in Fedora, run:
grub2-mkconfig -o /boot/grub2/grub.cfg
Configure boot menu via graphical Grub-Customizer
Grub-Customizer is a free open-source tool to edit the Grub boot menu. It can do the most previous settings as easy as a few clicks. Including add, remove, edit, and rearrange the menu entries.
The software is available in the most Linux repositories. Except for Manjaro (due to package conflict), you can either install it in your system’s package manager, app store, or by running a command below:
For Debian, Ubuntu, Linux Mint based system, run command to install the tool:
sudo apt install grub-customizer
sudo dnf install grub-customizer
sudo pacman -S grub-customizer
Once installed, open it from system app launcher and enjoy!
compizomania

После установки дистрибутива Ubuntu/Linux Mint на жесткий диск компьютера единственной системой, как правило меню загрузки GRUB не появляется во время загрузки и система загружается автоматически.
С одной стороны это хорошо, быстрее грузится система и не нужно нажимать Enter, чтобы освободиться от таймера GRUB, но с другой стороны, пользователь не может попасть в пункт Дополнительные параметры, который отображается в меню, где можно изменить загрузку системы с другого ядра, произвести восстановление системы в случае какого-то сбоя и т.п.
Если вы хотите, чтобы ваша система использовала меню загрузки GRUB, для выбора другого ядра или режима восстановления, то нужно сделать следующее:
Откройте редактор на редактирование файла grub:
Для Ubuntu/Linux MInt Cinnamon следующей командой в терминале:
sudo gedit /etc/default/grub
sudo pluma /etc/default/grub
Когда откроется редактор с файлом, нужно закомментировать (поставить знак решётки # ) перед следующей строкой:
Должно получиться следующее:
# GRUB_HIDDEN_TIMEOUT=0

А также измените на своё усмотрение время отображения GRUB в строке GRUB_TIMEOUT=10.
После изменений сохраните файл Ctrl+S и закройте редактор.
Затем обновите загрузчик GRUB следующей командой:
Перезагрузите компьютер, чтобы увидеть присутствие меню загрузки GRUB во время загрузки:
