- Linux mint install commands
- 3 Command Line Tools to Install Deb Packages in Ubuntu
- 1. Install .deb Package Using dpkg Command
- Remove Deb Packages Using dpkg Command
- 2. Install .deb Package Using Apt Command
- Remove Deb Packages using apt Command
- 3. Install .deb Package Using Gdebi Command
- Install .deb Packages Using Gdebi GUI
Linux mint install commands
There are several ways of installing softwares in linux and they are described in many tutorials. this tutorial will cover most of the processes of installing softwares in a linux system.
Online installation:
#1. Through software manager(linux mint)/software center(ubuntu):
first open the terminal and run this command to get the latest version of the software:
sudo apt-get update
1. open software manager/center. it’s in the menu.
2. search your desired software in the search box
3. if it’s in the list then it will appear before you . if it’s not in the list follow the instructions in the ppa installation section of this tutorial.
4. now double click on the desired software entry and then click «install«.
5. it will be installed on your system as per your network connection speed.
#2. Through synaptic package manager:
if it is absent in your linux distribution then you will have to install it through software manager/center first.
to me it’s the best way to install softwares in linux.
1. open synaptic package manager . click reload to get the latest version of the softwares.
2. search your desired software/s in the search box.
3. right click each software you want to install and mark them for installing. it will mark additional dependencies on it’s own.
if your softwares not in the list follow the instructions in the ppa installation section of this tutorial.
4. after marking for installing, click apply
6. it will download and install the marked softwares.
if you have a list of softwares then save the file with the list, with .list extension (this file should contain the exact package name one at every line with an extra string «install» included after each package name preceding by an space/tab). then go to file->read markings and then brows to the file and open it. synaptic will mark the softwares in the list automatically.
if you know the exact name of the software then you can install it through terminal by simply entering the command:
sudo apt-get update (to get the latest version)
sudo apt-get install software-package-name
if it says «unable to locate package. » then follow the instructions in the ppa installation section of this tutorial.
if your software’s not in the software list then it may come from private package archives (PPA’s).
these are private development of softwares so use it at your own risk.
1. search google for the ppa address for your software. (like ppa for package-name)
2. then add it to the repository by entering this command in terminal:
sudo add-apt-repository ppa. whatever_it_is
3. then run this command (must)
sudo apt-get update
4. now your desired software is in the list. so you can follow one of the above processes (#1,#2,#3)
Offline installation:
say, you downloaded your desired softwares from some website. in this case if you don’t trust the origin of the software then don’t install it or install it at your own risk.
Your downloaded softwares may come as a .zip, tar.gz, tar.bz2, .deb, .rpm, .tgz, tar.xz or any other types of archives.
if you are in linux mint or in ubuntu or in a debian based OS try to download .deb packages because it’s easier to install in debian based OS.
#5. installing .deb packages:
cd path_to_the_directory_that_contains_the_.deb_file
sudo dpkg -i filename.deb
through gdebi package manager:
if gdebi is not installed then you have to install it through one of the processes #1,#2,#3 (requires internet connection)
1. then double click on the .deb file or open the file with gdebi package manager and click install.
2. it will be istalled soon.
#6. installing .rpm packages:
rpm has to be installed in the system, otherwise follow one of the processes #1,#2,#3 to install rpm (requires internet connection)
cd path_to_the_directory_that_contains_the_.rpm_file
sudo rpm -i filename.rpm
#7. installing from archives(.zip tar.gz. etc):
these archives generally conatains the source of the package. each of them generally has a different approach to install. I will be discussing a common method which will supposedly work for all of them.
As these archives contains the source, your system needs the required programming languages to compile and build the source. so the general requirement packages stated above may not be sufficient for you. in that case you have to install the required packages through one of the processes #1,#2,#3 (requires internet connection). you can know about the dependencies about your software in a readme file included in the archives.
1. open the archives with archive manager by double clicking it, then extract it.
cd path-to-the-extracted-folder
3. inside the extracted folder look carefully.
a. if you find a file named configure then :
sudo make install
if the first code fails to execute then run this code before above codes:
chmod +x configure
b. if you find a file named install.sh then
chmod +x install.sh
./install.sh or sudo ./install.sh (if it needs root permission)
or you can double click it and select run in terminal or simply run
N.B : sometimes there is a file, something like your_software_name.sh is found instead of install.sh. for this case you have to replace install.sh with the correct name in the previous codes.
c. if you find a file named install then
chmod +x install
./install or sudo ./install (if it needs root permission)
or you can double click it and select run in terminal or simply run
d. if you find a file named make (if there is no configure file) then
sudo make install
e. If you still can’t find the required files
then it may be in a special folder (generally in a folder named ‘bin’). move to this folder with cd command with appropriate path and then look again and follow the same process.
some packages are archived as pre installed packages i.e you don’t have to install them , you just need to extract them in a secure place and theres an executable file (name is generally same as the software name) in the extracted folder or in child folders like bin,build etc. you have to find it and make it executable.
Example: eclipse, adt bundle (android developing tool)
chmod +x filename_with_exact_path
or double clicking it and selecting run in terminal or run, whatever supports your software.
some softwares come with a .sh file to install it
chmod +x filename.sh
./filename.sh or sudo ./filename.sh (if it needs root permission)
or double click it and select run in terminal or run, whatever supports your software.
some softwares come with a .run file to install it
chmod +x filename.run
./filename.run or sudo ./filename.run (if it needs root permission)
or double click it and select run in terminal or run, whatever supports your software.
Additional info about offline installation:
Often, softwares generally have a lot of dependencies. You need to download all of them, which sometimes can be very difficult and tiring. for this you can follow the instructions here which will save your time and effort.
for adding an entry in the menu for your newly installed software you can see my other tutorial:
W: The first three online methods are the safest way to install a software. For other methods you have to take risks of potential damage of your system or software dependencies.
N.B: A well formatted copy of this tutorial can be found here. (This link may change)
3 Command Line Tools to Install Deb Packages in Ubuntu
In this tutorial, you will learn how to install local software packages (.DEB) in Debian and its derivatives such as Ubuntu and Linux Mint using three different command line tools and they are dpkg, apt, and gdebi.
This is useful to those new users who have migrated from Windows to Ubuntu or Linux Mint. The very basic problem they face is installing local software on the system.
However, Ubuntu and Linux Mint have their own Graphical Software Center for easy software installation, but we will be looking forward to installing deb packages through the terminal way.
1. Install .deb Package Using dpkg Command
Dpkg is a package manager for Debian and its derivatives such as Ubuntu and Linux Mint. It is used to install, build, remove, and manage .deb packages. but unlike other Linux package management systems, it cannot automatically download and install packages with their dependencies.
To install a .deb package, use the dpkg command with the -i flag along with the package name as shown.
$ sudo dpkg -i teamviewer_amd64.deb
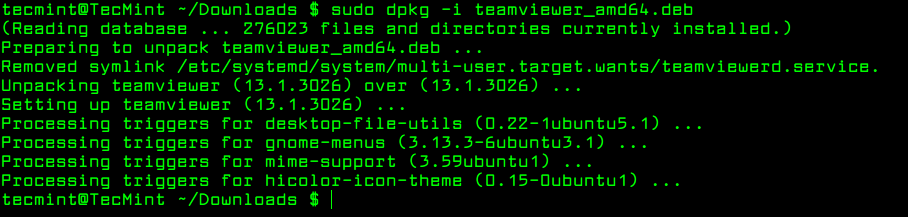
If you get any dependency errors while installing or after installing and launching a program, you can use the following apt command to resolve and install dependencies using the -f flag, which tells the program to fix broken dependencies.
Remove Deb Packages Using dpkg Command
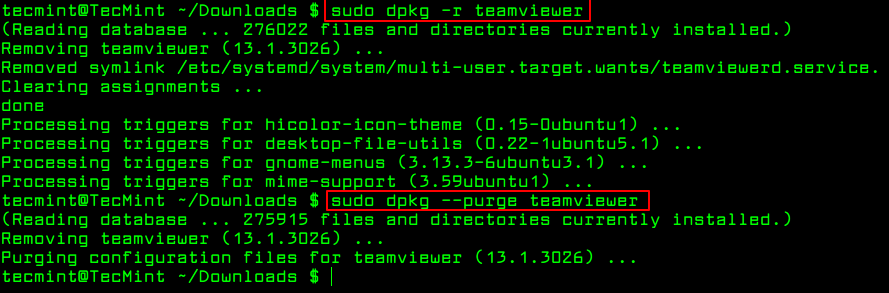
To remove a .deb package use the -r option or if you want to remove all its files including configuration files, you can purge it using the —purge option as shown.
$ sudo dpkg -r teamviewer [Remove Package] $ sudo dpkg --purge teamviewer [Remove Package with Configuration Files]
To know more about installed packages, read our article that shows how to list all files installed from a .deb package.
2. Install .deb Package Using Apt Command
The apt command is an advanced command-line tool, which offers new software package installation, existing software package upgradation, updating of the package list index, and even upgrading the whole Ubuntu or Linux Mint system.
It also offers apt-get and apt-cache command-line tools for managing packages more interactively on Debian and its derivatives such as Ubuntu and Linux Mint systems.
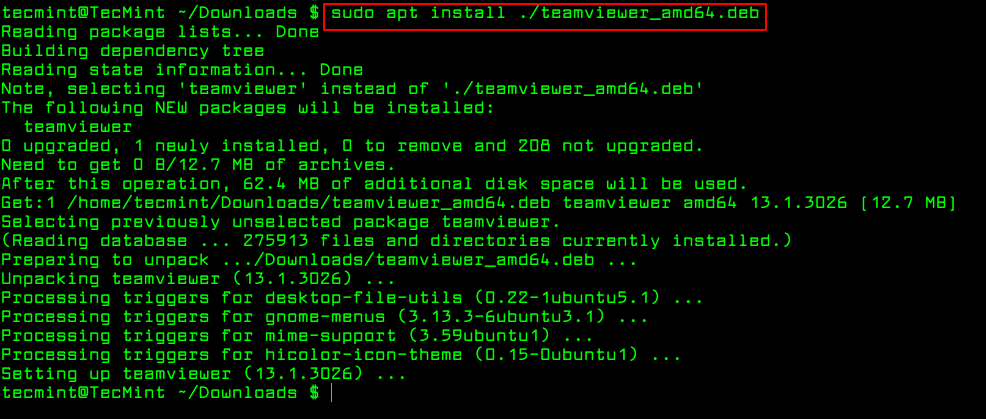
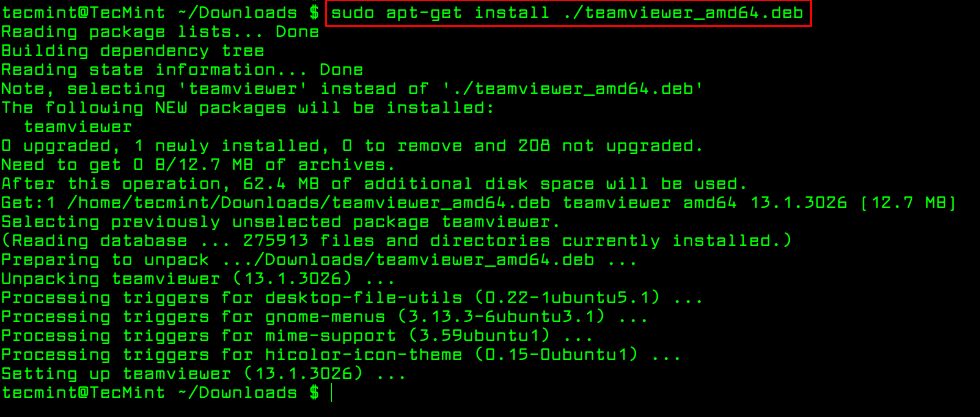
Essentially, apt-get or apt do not understand .deb files, they are designed to primarily handle package names (for example teamviewer, apache2, mariadb, etc..) and they retrieve and install .deb archives associated with a package name, from a source specified in the /etc/apt/sources.list file.
The only trick to installing a .deb Debian package using apt-get or apt is by specifying a local relative or absolute path ( ./ if in current dir) to the package, otherwise it will try to retrieve the package from remote sources and the operation will fail.
$ sudo apt install ./teamviewer_amd64.deb $ sudo apt-get install ./teamviewer_amd64.deb
Remove Deb Packages using apt Command
To remove a .deb package use the remove option or if you want to remove all its files including configuration files, you can purge it using the purge option as shown.
$ sudo apt-get remove teamviewer $ sudo apt-get purge teamviewer OR $ sudo apt remove teamviewer $ sudo apt purge teamviewer
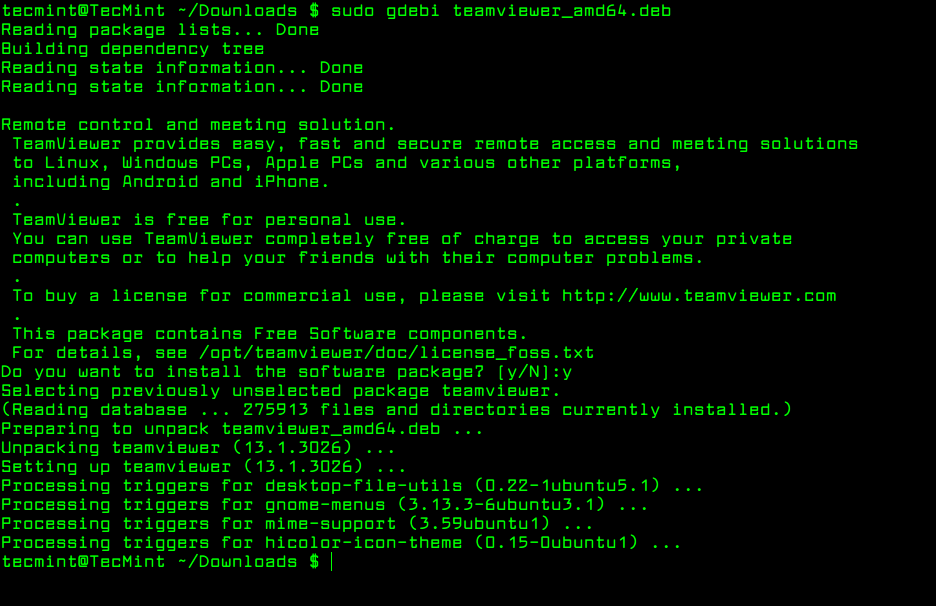
3. Install .deb Package Using Gdebi Command
gdebi is a tiny command line and GUI tool for installing local deb packages. It resolves and installs package dependencies on the fly. To install a package, use the following command.
$ sudo gdebi teamviewer_13.1.3026_amd64.deb
To remove a .deb package installed from gdebi, you can use apt, apt-get or dpkg commands using purge option as shown.
$ sudo apt purge teamviewer OR $ sudo apt-get purge teamviewer OR $ sudo dpkg --purge teamviewer
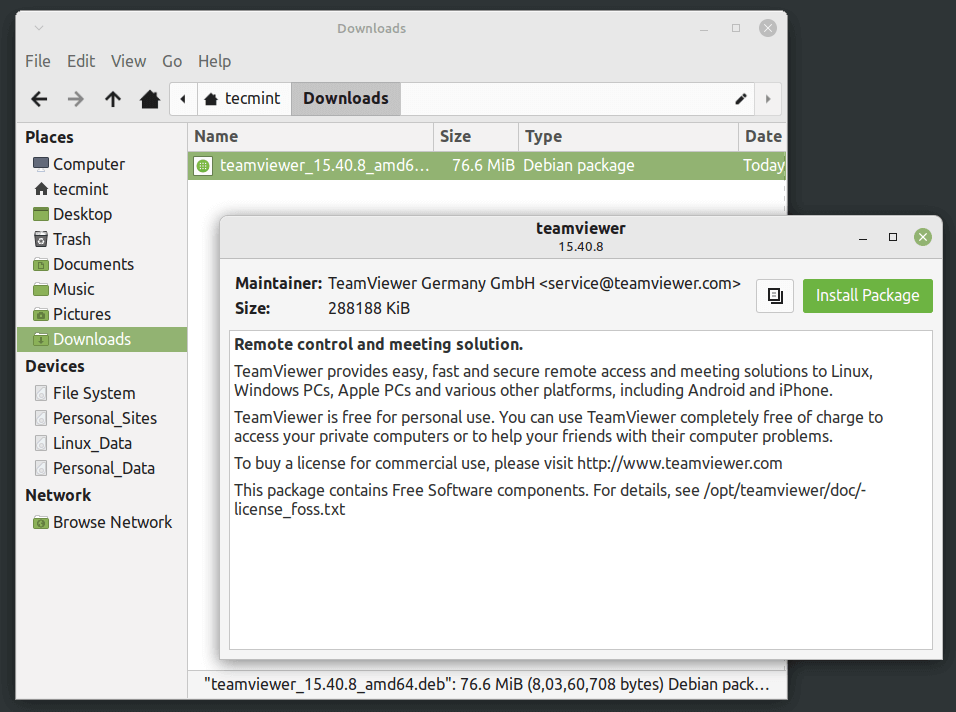
Install .deb Packages Using Gdebi GUI
The most recommended way for beginners to installing .deb files is through the Gdebi GUI installer. Simply, go to the directory where you have downloaded the file and double-click to install it as shown.
That’s It! In this tutorial, we have explained three different command line tools for installing or removing .deb Debian packages in Ubuntu and Linux Mint.
If you know any other way of installing local packages, do share with us using our comment section below.