- Устанавливаем ядро Linux 6.3 в Linux Mint 20 и Linux Mint 21
- Установка ядра Linux 6.3 в Linux Mint (GUI)
- Install or Upgrade To Latest Linux Kernel on Ubuntu 20.04 & Linux Mint 20
- Step 1: Check currently installed Kernel version
- Step 2: Download the Linux Kernel Bash Script
- Step 3: Place the Linux Kernel script in “/usr/local/bin/”
- Step 4: Install or update the Linux Kernel version
- Step 5: Reboot the system
- Step 6: Verify the latest Kernel version
- Conclusion
- About the author
- Kamran Sattar Awaisi
- How to Install the Latest Linux Kernel on Ubuntu & Linux Mint?
- Installing the latest Linux Kernel on Ubuntu and Linux Mint
- Step 1: Check the installed version
- Step 2: Download the latest Linux Kernel
- Step 3: Install the Linux Kernel from the downloaded Debian files
- Step 4: Verify the Linux Kernel installation
- Conclusion
- About the author
- Kamran Sattar Awaisi
Устанавливаем ядро Linux 6.3 в Linux Mint 20 и Linux Mint 21
Linux Mint является одним из самых популярных дистрибутивов, и не зря, разработчики ответственно относятся к его разработке стараясь сделать систему удобной и стабильной. Сам дистрибутив основывается на Ubuntu, и как следствие, поставляется примерно с тем же ядром. Конечно, в последнее время стали появляться сборки Linux Mint с более свежими ядрами Linux. Имеется ввиду сборки под названием EDGE, но пока такая сборка существует для Linux Mint 20.3. Летом планируется выпустить Linux Mint EDGE 21, но что делать, если необходимо более свежее ядро для корректной работы на данный момент? В этой статье мы узнаем, как установить в Linux Mint 20 и Linux Mint 21 ядро Linux 6.3.
P.S. Обратите внимания, что данный шаг желателен только при условии, что для корректной работы системы необходимо более свежее ядро чем то, которое идет с дистрибутивом. Если система работает стабильно, то нет смысла в установке ядра Linux 6.3. Конечно, можно посмотреть как система будет работать с обновленным ядром, если что, то откатится. Но повторюсь, если система работает стабильно, оставьте то ядро, которое идет в комплекте.
Установка ядра Linux 6.3 в Linux Mint (GUI)
Итак, перед дальнейшими действиями, обновите Linux Mint до последних актуальных версий пакетов. Затем подключим PPA репозиторий Ubuntu Mainline, этот метод позволяет вам быстро загрузить последний исходный код ядра Linux и установить его на свой компьютер с Linux Mint. Используя для установки либо интерфейс командной строки (CLI), либо графический интерфейс пользователя (GUI). Тут все зависит от личных предпочтений. В общем, отправляемся в терминал и подключаем репозиторий Ubuntu Mainline:
sudo add-apt-repository ppa:cappelikan/ppa -y
Install or Upgrade To Latest Linux Kernel on Ubuntu 20.04 & Linux Mint 20
![]()
The kernel is the most essential and crucial unit of every OS (operating system). It enables communication between computer hardware and software applications. It is also responsible for managing the processes, filesystems, I/O disks, etc. Linus Torvalds starting Linux development in 1991 as a personal project. The Linux Kernel updates are released gradually and it is best practice to update the Linux Kernel time by time to have security fixes, bug fixes, and the latest functionality.
This guide explains the easiest and most authentic method to upgrade to the latest Kernel on Ubuntu 20.04 and Linux Mint 20. At the moment of writing, Linux Kernel 5.9 is the latest stable version.
Follow the following steps to upgrade your system’s Linux kernel to the latest version.
Step 1: Check currently installed Kernel version
First, check the currently installed Kernel version using the following system:

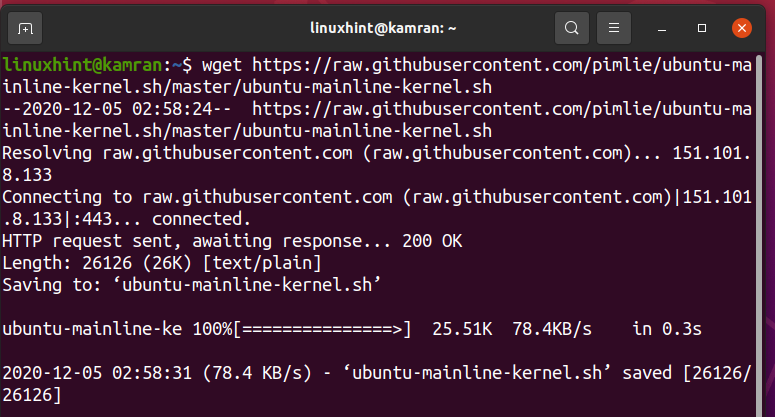
Step 2: Download the Linux Kernel Bash Script
We will download the Linux Kernel bash script and install the latest Kernel through this script. Run the following command to download the Linux Kernel bash script:
$ wget https: // raw.githubusercontent.com / pimlie / ubuntu-mainline-kernel.sh /
master / ubuntu-mainline-kernel.sh
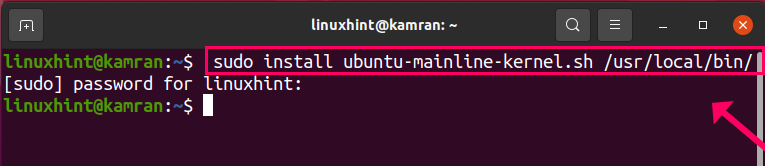
Step 3: Place the Linux Kernel script in “/usr/local/bin/”
The “/usr/local/bin/” is the executable path and the Linux Kernel script must be placed into this path. Execute the following command:
Step 4: Install or update the Linux Kernel version
Now we are ready to install or update the Linux Kernel version using the following command:
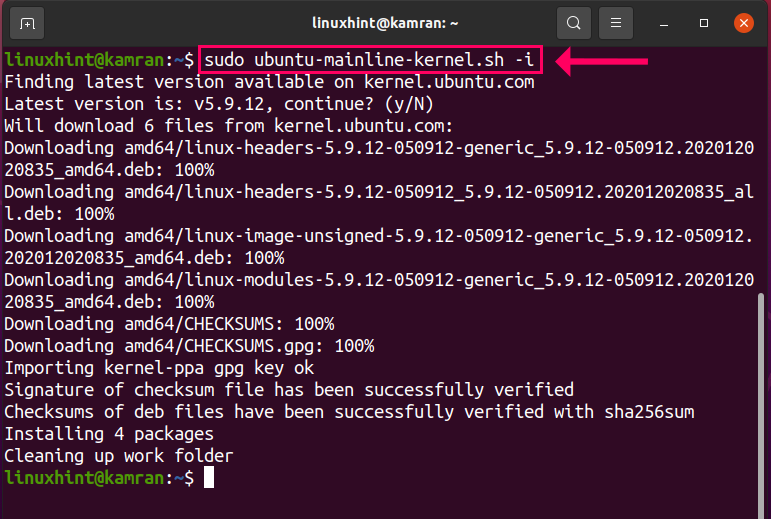
The abovementioned command will find the latest version of the kernel available for Ubuntu 20.04 and Linux Mint and will install it.
During the installation, the command line will display a prompt. You should press “y” to progress with the installation process. However, if you want to cancel the installation process then press ‘n’ and hit enter.
Step 5: Reboot the system
After the successful latest Kernel installation, reboot the system using the following command:

Step 6: Verify the latest Kernel version
Once the system is a reboot, now you are ready to verify the installation of the latest Kernel version using the following command:

Conclusion
The Kernel is the vital element of any OS. It performs the core responsibilities and enables communication between hardware and other applications. This guide presents the easiest way to update to the latest Kernel on Ubuntu 20.04 and Linux Mint 20.
About the author
Kamran Sattar Awaisi
I am a software engineer and a research scholar. I like to write article and make tutorial on various IT topics including Python, Cloud Computing, Fog Computing and Deep Learning. I love to use Linux based operating systems.
How to Install the Latest Linux Kernel on Ubuntu & Linux Mint?
![]()
The Kernel is the important component of any operating system as it manages the system resources, and processes and facilitates the communication between hardware and software. The Linux Kernel gained popularity over the years and now it is part of most desktop and mobile operating systems. The new Linux Kernel version is released after a few months with bug fixes and important updates. As of writing this post, the latest Linux Kernel version is 5.10.
Installing the latest Linux Kernel on Ubuntu and Linux Mint
Complete the below-given steps to install the latest Linux Kernel on Ubuntu and Linux Mint:
Step 1: Check the installed version
Fire up the terminal and run the below-given command to check the already installed version on your system.

The Linux Kernel 5.8.0 is installed on my Ubuntu system.
Step 2: Download the latest Linux Kernel
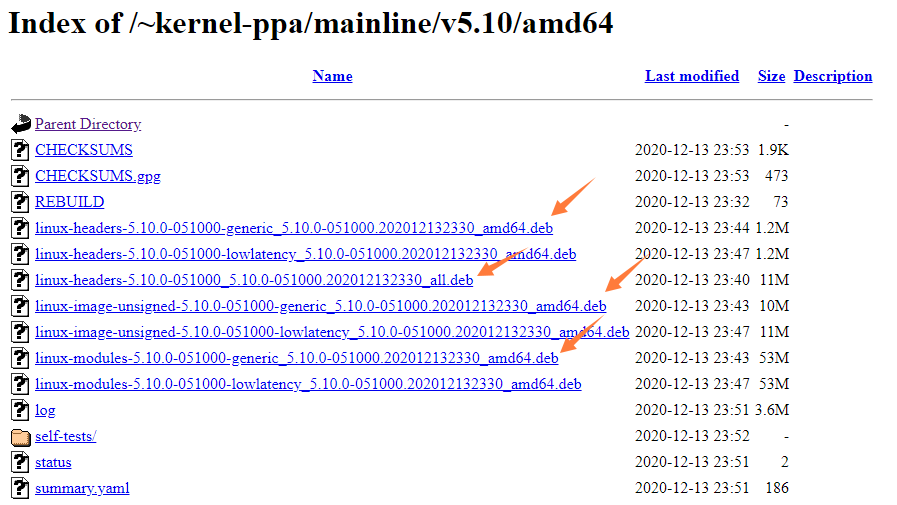
Next, download the latest Linux Kernel for Ubuntu and Linux Mint. You can download it either from the official website or from the terminal. If you wish to download the Linux Kernel files from the official website, then visit the Kernel Ubuntu official website (https://kernel.ubuntu.com/~kernel-ppa/mainline/v5.10/amd64/) and download the Linux Kernel version 5.10 generic files.
You have to download the following files:
- linux-headers-5.10.0-051000-generic_5.10.0-051000.202012132330_amd64.deb (https://kernel.ubuntu.com/~kernel-ppa/mainline/v5.10/amd64/linux-headers-5.10.0-051000-generic_5.10.0-051000.202012132330_amd64.deb)
- linux-headers-5.10.0-051000_5.10.0-051000.202012132330_all.deb (https://kernel.ubuntu.com/~kernel-ppa/mainline/v5.10/amd64/linux-headers-5.10.0-051000_5.10.0-051000.202012132330_all.deb)
- linux-image-unsigned-5.10.0-051000-generic_5.10.0-051000.202012132330_amd64.deb (https://kernel.ubuntu.com/~kernel-ppa/mainline/v5.10/amd64/linux-image-unsigned-5.10.0-051000-generic_5.10.0-051000.202012132330_amd64.deb)
- linux-modules-5.10.0-051000-generic_5.10.0-051000.202012132330_amd64.deb (https://kernel.ubuntu.com/~kernel-ppa/mainline/v5.10/amd64/linux-modules-5.10.0-051000-generic_5.10.0-051000.202012132330_amd64.deb)
Alternatively, to download the Linux Kernel files from the command line using the wget command, open the terminal and run the below-given commands:
$ wget kernel.ubuntu.com / ~kernel-ppa / mainline / v5.10 / amd64 / linux-headers-5.10.0-051000-generic_5.10.0- 051000.202012132330 _amd64.deb

$ wget kernel.ubuntu.com / ~kernel-ppa / mainline / v5.10 / amd64 / linux-headers-5.10.0-051000_5.10.0- 051000.202012132330 _all.deb
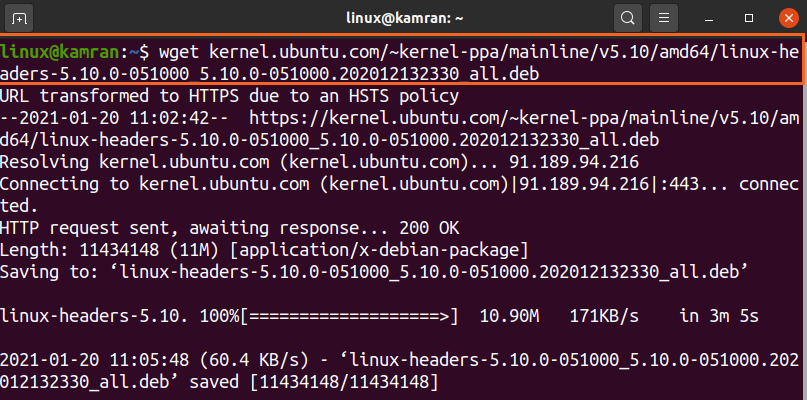
$ wget kernel.ubuntu.com / ~kernel-ppa / mainline / v5.10 / amd64 / linux-image-unsigned-5.10.0-051000-generic_5.10.0- 051000.202012132330 _amd64.deb

$ wget kernel.ubuntu.com / ~kernel-ppa / mainline / v5.10 / amd64 / linux-modules-5.10.0-051000-generic_5.10.0- 051000.202012132330 _amd64.deb

Once all the Debian files for the generic version are downloaded, navigate to the directory where the downloaded files are saved.
If the downloaded files are saved in the Home directory, then you can skip this step.
Step 3: Install the Linux Kernel from the downloaded Debian files
Next, install the latest Linux Kernel from the Debian files with the command below:

Step 4: Verify the Linux Kernel installation
Once the Linux Kernel is successfully installed, reboot the system using the appended command:
Finally, when the system has restarted, verify the Linux Kernel installation and check the installed version with the command below:

The output shows that the Linux Kernel 5.10 is successfully installed on my Ubuntu system.
Conclusion
Created by Linus Torvalds, Linux Kernel is a part of many Linux-based operating systems. The new version of Linux Kernel is released after every few months with important new updates and bug fixes. This article explains thoroughly how to install the Linux Kernel 5.10 installation.
About the author
Kamran Sattar Awaisi
I am a software engineer and a research scholar. I like to write article and make tutorial on various IT topics including Python, Cloud Computing, Fog Computing and Deep Learning. I love to use Linux based operating systems.