- How To Install XFCE Desktop on Linux Mint 20
- Install XFCE Desktop on Linux Mint 20 Ulyana
- How to Install Xfce Desktop 4.16 in Ubuntu 20.04, Linux Mint 20
- How to Install Xfce 4.16 in Ubuntu:
- Uninstall Xfce 4.16:
- Related posts:
- Primary Sidebar
- Popular Posts
- Install XFCE in Linux Mint 21
- Installation of XFCE on Linux Mint 21
- Removal of XFCE on Linux Mint 21
- Conclusion
- About the author
- Karim Buzdar
How To Install XFCE Desktop on Linux Mint 20
In this tutorial, we will show you how to install XFCE Desktop on Linux Mint 20. For those of you who didn’t know, Xfce is a lightweight desktop environment for UNIX-like operating systems. The XFCE desktop uses fewer resources (Memory and CPU) than the other desktops and is also comparatively stable. If you have Cinnamon or the MATE desktop running on your system, you can still install and switch to the XFCE desktop in Linux Mint.
This article assumes you have at least basic knowledge of Linux, know how to use the shell, and most importantly, you host your site on your own VPS. The installation is quite simple and assumes you are running in the root account, if not you may need to add ‘ sudo ‘ to the commands to get root privileges. I will show you the step-by-step installation of an XFCE Desktop on a Linux Mint 20 (Ulyana).
Prerequisites
- A server running one of the following operating systems: Linux Mint 20 (Ulyana).
- It’s recommended that you use a fresh OS install to prevent any potential issues.
- A non-root sudo user or access to the root user . We recommend acting as a non-root sudo user , however, as you can harm your system if you’re not careful when acting as the root.
Install XFCE Desktop on Linux Mint 20 Ulyana
Step 1. Before running the tutorial below, it’s important to make sure your system is up to date by running the following apt commands in the terminal:
sudo apt update sudo apt install curl build-essential gcc make
Step 2. Installing XFCE Desktop on Linux Mint 20.
Run the following command below to install the XFCE desktop to your Linux Mint system:
sudo apt install task-xfce-desktop
Once the installation is completed, run the following command below to set the default target to graphical:
sudo systemctl set-default graphical.target First, we open ‘Synaptic package Manager’ by searching from the start menu.
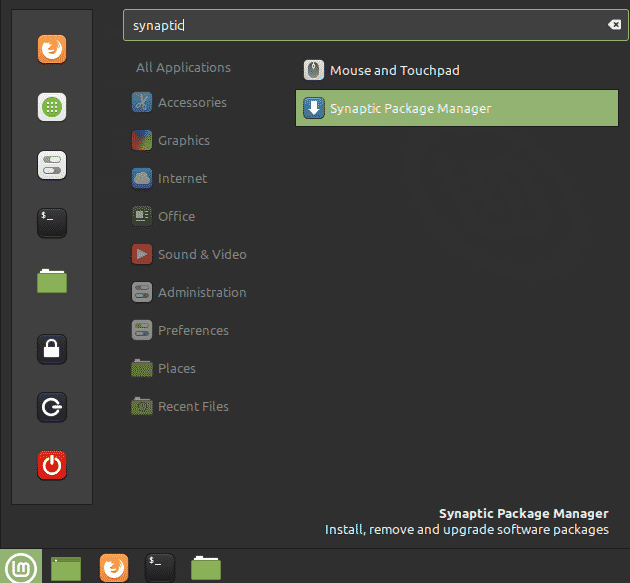
When it prompts for authentication provide the password. Then, click the Authenticate button. Next, in the Synaptic Package Manager application, search for the xfce4 package:
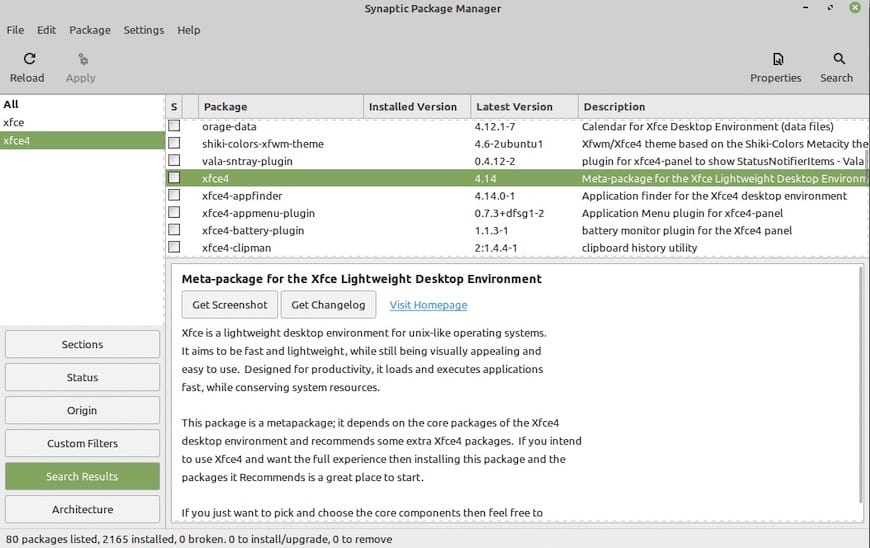
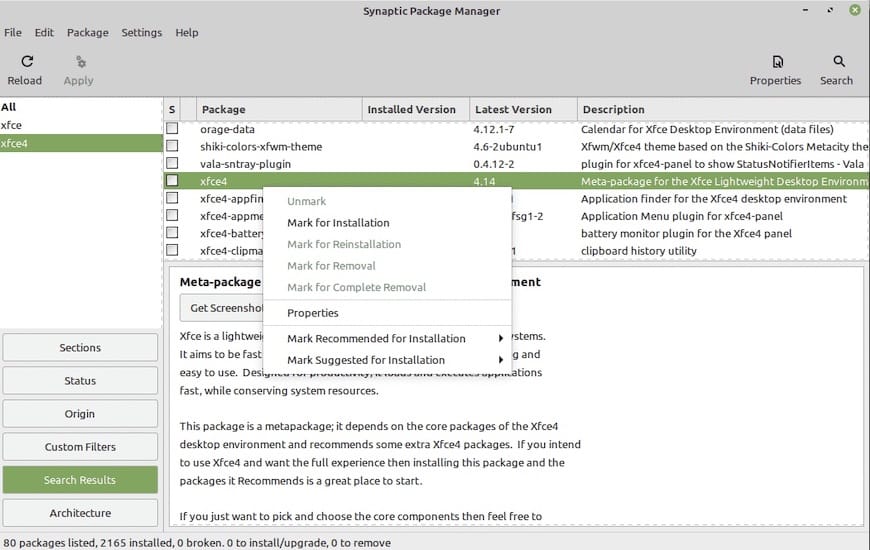
Click on the xfce4 package and select Mark for Installation from the context menu:
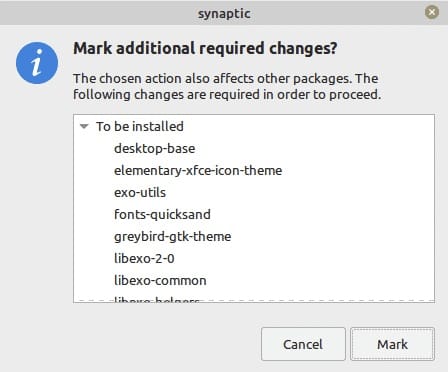
Click Mark to select the dependencies for installation:
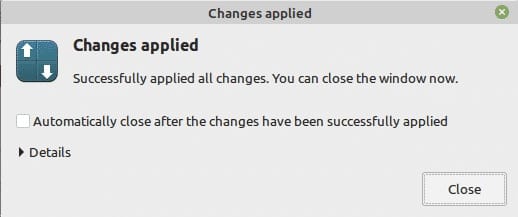
Once the installation is complete, you will see the following window. Click the Close button to close the window:
Finally, reboot your system using the following command below:
Step 3. Accessing XFCE Desktop on Linux Mint.
Once the system is up, The following login screen appears for login click the icon as highlighted below:
Congratulations! You have successfully installed XFCE. Thanks for using this tutorial for installing the latest version of XFCE Desktop on the Linux Mint system. For additional help or useful information, we recommend you check the official XFCE website.
If you don’t have time to do all of this stuff, or if this is not your area of expertise, we offer a service to do “VPS Manage Service Offer”, starting from $10 (Paypal payment). Please contact us to get the best deal!
How to Install Xfce Desktop 4.16 in Ubuntu 20.04, Linux Mint 20

Xfce Desktop 4.16 was announced as the new major release a few days ago. Here’s how to install it in Ubuntu 20.04, Linux Mint 20 for testing.
- New icons and palette
- New Default Applications dialog merges ‘Mime Settings’ and ‘Preferred Applications’ dialogs
- Better HiDPI support with fractional scaling
- More default keyboard shortcuts.
- Add pause button in Thunar’s file copy and move dialogs
- Dark panel mode (Enabled by default)
- New ‘Status Tray’ plugin combines both legacy Systray and StatusNotifier.
- New ‘About’ dialog shows basic system information.
- Improved power manager settings and more.
![]()
How to Install Xfce 4.16 in Ubuntu:
So far the only easy way to get the desktop packages is using the “Xubuntu Developers” team QA Staging PPA.
As the description says, the packages in the PPA are primarily geared towards testing. Use it at your own risk!
1.) Open terminal from your system application launcher. When it opens, run command to add the PPA:
sudo add-apt-repository ppa:xubuntu-dev/staging
Type user password (no asterisk feedback) for sudo prompts and hit Enter to continue.

2.) For XUbuntu and Linux Mint Xfce Edition, install available system updates either via the package manager or by running command:
sudo apt update; sudo apt upgrade

For others, install Xfce desktop via command:
sudo apt install xubuntu-desktop
Uninstall Xfce 4.16:
For XUbuntu and Linux Mint Xfce Edition, run command to purge the PPA which will downgrade Xfce packages to the stock versions:
sudo apt install ppa-purge && sudo ppa-purge ppa:xubuntu-dev/staging
To just remove the “Xubuntu Developers” team PPA, run command:
sudo add-apt-repository ppa:xubuntu-dev/staging
To completely remove xfce packages (not recommended for XUbuntu and Linux Mint Xfce), run command:
sudo apt remove --auto-remove '~nxubuntu*' '~nxfce4*' '~nthunar*' atril-common brltty-x11 tumbler-common
Related posts:
Primary Sidebar
Popular Posts
- 3 Ways to Disable GetApps on Xiaomi, Redmi, and Poco Phones Running MIUI 1.9k views
- 8 Best Sites to Read Manga Online for Free 1.6k views
- How To Extract & Install tar.gz Files In Ubuntu 1.4k views
- Exclamation Mark on Network Signal, Mobile Data Not Working? 8 Ways to Fix 1.4k views
- How to Fix YouTube Server Connection Error [400] on Android 1k views
- [Working] Remove Blue Circle From Your Samsung Phone Touchscreen 1k views
- How To Search On Google Using Image or Video 1k views
- How to Copy Paste in Linux Terminal [For Absolute Beginners] 0.9k views
- 3 Ways to Hide Tabs in Google Chrome 0.9k views
- Discord Stream Has No Sound? 6 Ways to Fix 0.9k views
- How To Install Android App APK on Samsung Tizen OS Device 0.9k views
- Service Host Network Service High network usage in Windows 11/10 800 views
- Troubleshooting “E: Unable to locate package” Error on Ubuntu [Beginner’s Tutorial] 800 views
- How to find a lost Apple Pencil using your iPad (1st and 2nd gen) 800 views
- How do I enable or disable Alt Gr key on Windows 10 keyboard 700 views
- How to Create a Multi-Page PDF in Photoshop 700 views
- Linux: What is Opt Directory and How to Open Opt Directory 700 views
Install XFCE in Linux Mint 21
![]()
“XFCE is one of the popularly available desktop environments for the Linux operating system. It is a lightweight and hence faster desktop environment but still offers an appealing look and feel. In this guide, we will learn to install the XFCE desktop on a Linux Mint 21 system.”
Installation of XFCE on Linux Mint 21
To install XFCE on Linux Mint 21, you need to perform the following steps:
Step # 1: Check the Current Desktop Environment
First, you should check your current desktop environment with the command given below:

You can realize from the output of this command shown in the following image that the current desktop environment is X-Cinnamon.

Step # 2: Update Linux Mint 21
Now, we need to update our Linux Mint 21 system with the command shown below:

Step # 3: Install the XFCE Desktop on Linux Mint 21
Once the Linux Mint 21 system is updated, you can install the XFCE desktop on it with the following command:

Step # 4: Switch to the XFCE Desktop Environment
After the complete installation of the XFCE desktop on your system, you can switch to this environment by executing the command shown below:

This command will produce the following output on the terminal:

Step # 5: Reboot Your System
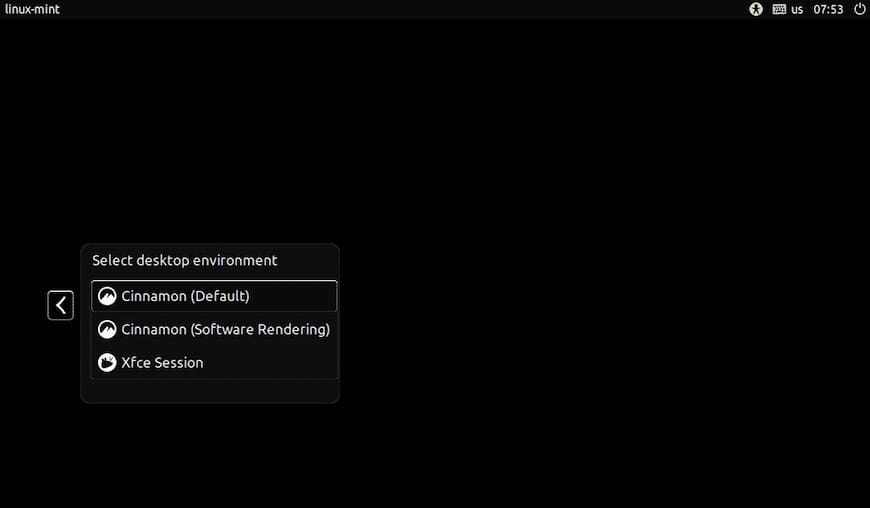
Now, you need to reboot or log out of your system. Once you will do this, you will be presented with the login screen. From here, you need to click on the icon highlighted in the image shown below:

When you will do this, you will be presented with a menu from where you need to select the “Xfce Session” option and then log into your system.

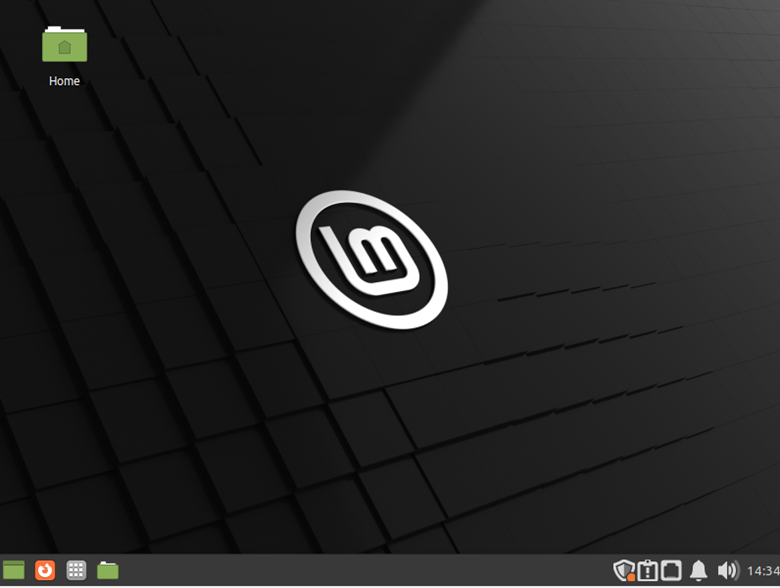
Once you will do this, you will land straight into the XFCE desktop environment, as shown in the following image:
Step # 6: Verify if the Desktop Has Been Changed to XFCE or Not
You can verify if the current desktop environment has been changed to XFCE or not by running the same command that we executed in the first step of this method. The output of this command is shown in the image below, which confirms that the XFCE desktop has been successfully installed on our Linux Mint 21 system.

Removal of XFCE on Linux Mint 21
You can remove the XFCE desktop from your Linux Mint 21 system at any time by running the following command:

Conclusion
This article shared the method of installing the XFCE desktop on a Linux Mint 21 system. Not only that, but we also taught you how you could set this desktop as your default desktop environment. Moreover, we even shared with you the method of removing this desktop from your system so that whenever you feel like you are not using it any longer, you can simply free up your system’s space by removing it from your system.
About the author
Karim Buzdar
Karim Buzdar holds a degree in telecommunication engineering and holds several sysadmin certifications. As an IT engineer and technical author, he writes for various web sites. He blogs at LinuxWays.