- Linux mint iso ftp
- Как установить FTP-сервер на Linux Mint 20
- Установить FTP-сервер на Linux Mint 20 Ulyana
- Шаг 1. Перед запуском приведенного ниже руководства важно убедиться, что ваша система обновлена, выполнив следующие apt команды в терминале:
- Шаг 2. Установка FTP-сервера в системах Linux Mint.
- Шаг 3. Настройте FTP-сервер.
- Шаг 4. Защитите FTP-сервер с помощью SSL.
- Шаг 5. Настройте брандмауэр.
- Шаг 6. Создайте пользователя FTP.
- Шаг 7. Протестируйте FTP-сервер на Linux Mint 20.
- Install and configure FTP server on Linux Mint 20
- Installing FTP server
- Step 1: Install VSFTPD
- Step 2: Configure VSFTPD
- Step 3: Allow ports in firewall
- Step 4: Enable and run VSFTPD
- Step 5: Create an FTP user
- Step 6: Test FTP connection
- About the author
- Karim Buzdar
Linux mint iso ftp
ftp is one of the protocols to transfer files to your server. You can use ftp client like Filezilla, but you can take it one sdep further and mount that server into you computer, and use your file manager to copy and move files and olders to it, as if you have a cloud drive, just like Dropbox.
sudo apt-get install curlftpfs
now create a folder wherever you want to mount to it. I will use ftpFolder in /home/myname as example, and for the exmaple let me assume my server is NAME.com, my user name to log in is userNAME, and password is passNAME.
— to mount to the folder, in terminal type:
curlftpfs userNAME:passNAME@NAME.com /home/myname/ftpFolder
to auto mount on log in, you need to change file /etc/fstab.
to do that you need to open it with sudo. my fevrote way to do that is using gedit. if you don’t have gedit, go ahead and install it first:
sudo apt-get install gedit
add the following line to it:
curlftpfs#:@ fuse auto, user,uid=1000,allow_other,_netdev 0 0
in the exmaple, it will be:
curlftpfs#userNAME:passNAME@NAME.com /home/myname/ftpFolder fuse auto,user,uid=1000,allow_other,_netdev 0 0
I haven’t tested much with it, but if you don’t want any other users to mount it automatically, try omitting the allow_other.
also if you don’t want to hsow the password. you need to create a file called .netrc in the home folder, and place in it
but I use the laptop myself alone, so was not intersetd in these extra secutiry settings.
Как установить FTP-сервер на Linux Mint 20

В этом руководстве мы покажем вам, как установить FTP-сервер на Linux Mint 20. Для тех из вас, кто не знал, FTP означает «протокол передачи файлов» и позволяет передавать файлы на удаленный компьютер. Наиболее распространенным программным обеспечением FTP-сервера для Ubuntu является пакет vsftpd, что означает «очень безопасный демон FTP». Это пакет FTP по умолчанию для Ubuntu, а также для большинства других дистрибутивов Linux.
В этой статье предполагается, что у вас есть хотя бы базовые знания Linux, вы знаете, как использовать оболочку, и, что наиболее важно, вы размещаете свой сайт на собственном VPS. Установка довольно проста и предполагает, что вы работаете с учетной записью root, в противном случае вам может потребоваться добавить ‘ sudo ‘ к командам для получения привилегий root. Я покажу вам пошаговую установку FTP-сервера на Linux Mint 20 (Ульяна).
Установить FTP-сервер на Linux Mint 20 Ulyana
Шаг 1. Перед запуском приведенного ниже руководства важно убедиться, что ваша система обновлена, выполнив следующие apt команды в терминале:
Шаг 2. Установка FTP-сервера в системах Linux Mint.
Выполните следующие команды, чтобы установить сервер VSFTP на Linux Mint 20:
Шаг 3. Настройте FTP-сервер.
После успешной установки мы приступаем к настройке VSFTPD. Файл конфигурации находится по адресу : / etc / vsftpd . conf
Добавьте или раскомментируйте следующие строки, если они уже добавлены:
listen=NO anonymous_enable=NO local_enable=YES write_enable=YES local_umask=022 dirmessage_enable=YES use_localtime=YES xferlog_enable=YES connect_from_port_20=YES chroot_local_user=YES secure_chroot_dir=/var/run/vsftpd/empty pam_service_name=vsftpd user_sub_token=$USER pasv_enable=Yes pasv_min_port=30000 pasv_max_port=30100 allow_writeable_chroot=YES userlist_enable=YES userlist_file=/etc/vsftpd.user_list userlist_deny=NO ssl_tlsv1=YES ssl_sslv2=NO
Сохраните и закройте файл, когда закончите, затем перезапустите службу vsftpd:
sudo systemctl restart vsftpd.service
Шаг 4. Защитите FTP-сервер с помощью SSL.
Выполните следующую команду, чтобы сгенерировать самозаверяющий сертификат SSL:
sudo openssl req -x509 -nodes -days 3650 -newkey rsa:2048 -keyout /etc/ssl/private/vsftpd.pem -out /etc/ssl/private/vsftpd.pem
Затем откройте файл конфигурации FTP и добавьте путь SSL:
rsa_cert_file=/etc/ssl/private/vsftpd.pem rsa_private_key_file=/etc/ssl/private/vsftpd.pem ssl_enable=YES
Шаг 5. Настройте брандмауэр.
Чтобы открыть порт 21 (командный порт FTP), порт 20 ( порт данных FTP) и (диапазон пассивных портов), выполните следующие команды: 30000 — 31000
sudo ufw allow 20:21/tcp sudo ufw allow 30000:31000/tcp
Перезагрузите правила UFW, отключив и снова включив UFW:
sudo ufw disable sudo ufw enable
Шаг 6. Создайте пользователя FTP.
Теперь мы создадим нового пользователя, которого будем использовать для входа в FTP. В этом примере мы создадим нового пользователя с именем meilana:
$ sudo useradd -m meilana $ sudo passwd maria New password: Retype new password: passwd: password updated successfully
Чтобы убедиться, что все работает правильно, вы должны сохранить хотя бы один файл в домашнем каталоге meilana. Этот файл должен быть виден, когда мы войдем в FTP на следующих шагах:
sudo bash -c "echo FTP TESTING > /home/ftpuser/FTP-TEST"
Шаг 7. Протестируйте FTP-сервер на Linux Mint 20.
Чтобы проверить FTP-соединение, вам необходимо установить FTP-клиент в той же или в отдельной системе, откуда вы хотите получить доступ к FTP-серверу. В нашем случае мы используем FileZilla в качестве FTP-клиента.
Поздравляю! Вы успешно установили FTP-сервер . Благодарим за использование этого руководства для установки последней версии FTP-сервера в системе Linux Mint. Для получения дополнительной помощи или полезной информации мы рекомендуем вам посетить официальный сайт vsftpd .
Install and configure FTP server on Linux Mint 20
![]()
FTP or the File Transfer Protocol is the most popular network protocol that is used to transfer files and information between two systems over a network. However, the FTP by default does not encrypt the traffic, which is not a secure method and can result in an attack on a server. This is where VSFTPD comes which stands for Very Secure FTP Daemon and is a secure, stable, and fast FTP server. VSFTPD is licensed under GNU GPL. For most of the Linux distributions, VSFTPD is used as a default FTP server. In this article, you will learn how to install and configure the FTP server on Linux Mint OS.
Note: We have explained the procedure and commands on Linux Mint 20 OS. More or less the same procedure can be followed in older Mint versions.
Installing FTP server
To install an FTP server on Linux Mint, follow the below steps:
Step 1: Install VSFTPD
Our first step will be to install VFTPD on our system. To do so, launch the Terminal in Mint OS by using the Ctrl+Alt+T keyboard shortcut. Then issue the following command in the Terminal to update the system repository index:
Then install VSFTPD using the following command in Terminal:
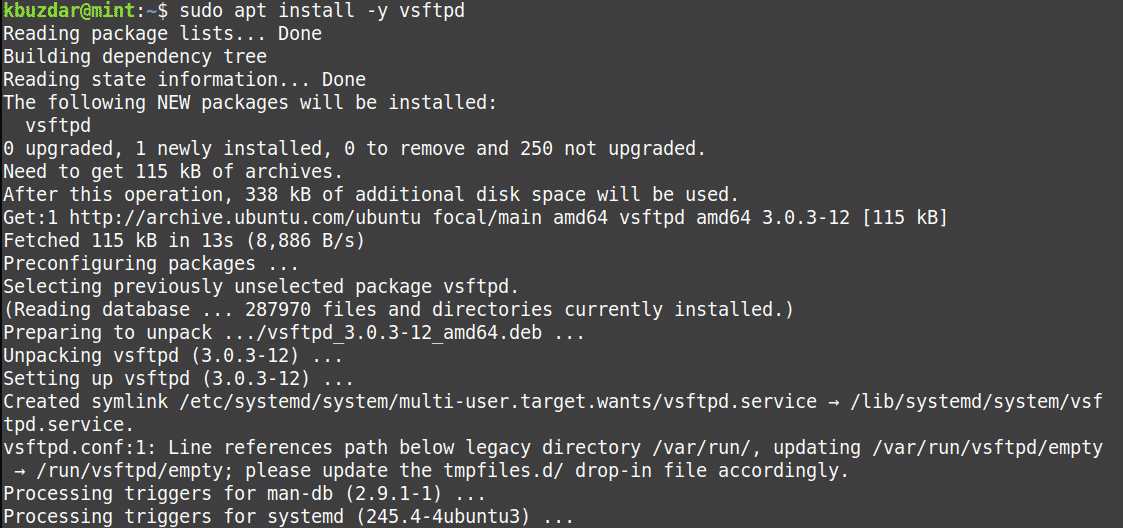
After the installation of VSFTPD is completed, we will move towards configuration.
Step 2: Configure VSFTPD
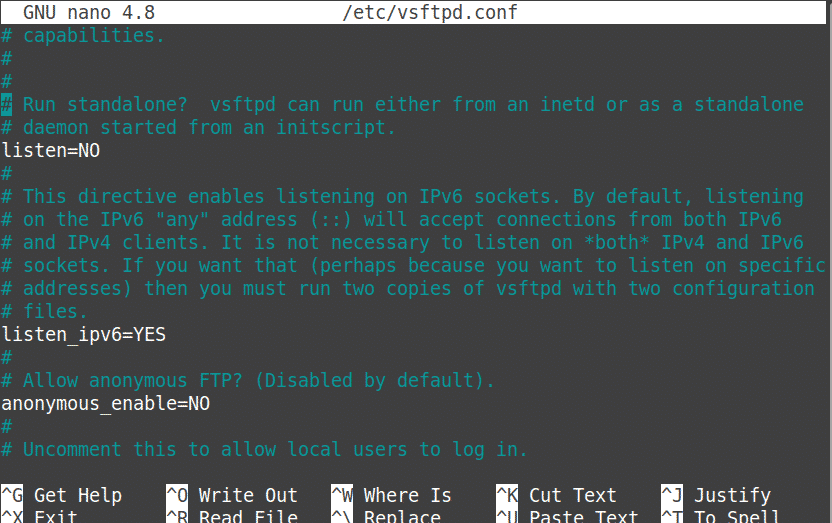
The VSFTPD can be configured through the /etc/vsftpd.conf file. Edit the /etc/vsftpd.conf file using the following command in Terminal:
Now add or uncomment the following lines (if already added in the file):
listen=NO
anonymous_enable=NO
local_enable=YES
write_enable=YES
local_umask=022
dirmessage_enable=YES
use_localtime=YES
xferlog_enable=YES
connect_from_port_20=YES
chroot_local_user=YES
secure_chroot_dir=/var/run/vsftpd/empty
pam_service_name=vsftpd
rsa_cert_file=/etc/ssl/certs/ssl-cert-snakeoil.pem
rsa_private_key_file=/etc/ssl/private/ssl-cert-snakeoil.key
ssl_enable=Yes
pasv_enable=Yes
pasv_min_port=10000
pasv_max_port=10100
allow_writeable_chroot=YES
ssl_tlsv1=YES
ssl_sslv2=NO
ssl_sslv3=NO
Once done, save and close the /etc/vsftpd.conf file.
Step 3: Allow ports in firewall
If a firewall is running on your system, you will need to allow some FTP ports through it. Issue the following commands in Terminal to allow the ports 20 and 21:
You can verify whether the port has been allowed in the firewall or not using the following command in Terminal:
Step 4: Enable and run VSFTPD
Now the VSFTPD is configured and allowed in the firewall; now we can enable and run the VSFTPD services. Here are the commands to do so:
To enable the VSFTPD service to start on boot, issue the following command in Terminal:
To run the VSFTPD service, issue the following command in Terminal:
If you need to restart the VSFTPD service after making any configuration changes, issue the following command in Terminal:
To verify if the VSFTPD is active and running, issue the following command in Terminal:

Step 5: Create an FTP user
Next, create a user account that will be used to test the FTP connection. Issue the following commands in Terminal to create a user account and set a password:
Step 6: Test FTP connection
Now our FTP server is ready, so it’s time to test the FTP connection.
To test FTP connection locally, issue the following command in Terminal by replacing the by the actual IP address of your FTP server:

You can also test the FTP connection remotely by using the same above command from the remote system. I have tested the FTP connection from the Windows machine on the network.

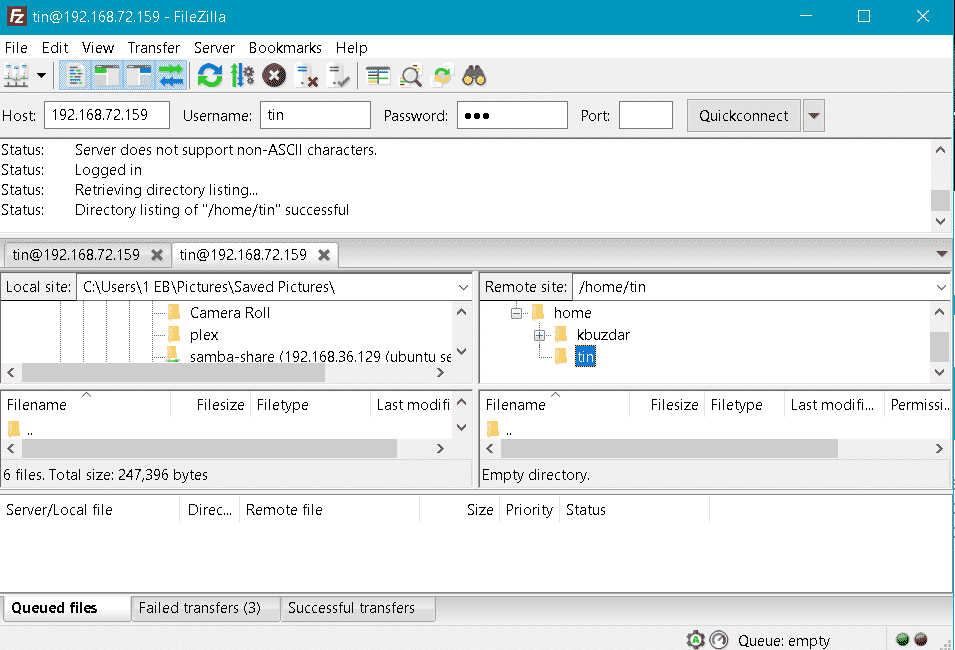
You can also use the FTP client like Filezilla to connect to the FTP server. To use the Filezilla application for connecting to the FTP server, provide the IP address of FTP server, username and password that you have set earlier, and port number 21 and then click the Quickconnect button.

Once connected, you will be successfully signed in to the FTP server and will be able to access remote server files and folders.
There you have the installation and configuration of the FTP server on the Linux Mint 20 system. By following the above described simple steps, you can easily setup the FTP server and transfer files through it.
About the author
Karim Buzdar
Karim Buzdar holds a degree in telecommunication engineering and holds several sysadmin certifications. As an IT engineer and technical author, he writes for various web sites. He blogs at LinuxWays.