- Записки Линуксоидов
- Настройка авторизации через LDAP
- Автоматическое создание домашних директорий пользователям из LDAP
- Ограничение авторизации
- Авторизация с использованием LDAP
- How to configure LDAP client on Linux Mint
- How LDAP client works
- How to configure LDAP client on Linux Mint
- Create User Home Directory
- How to remove LDAP client from Linux Mint
- Conclusion
Записки Линуксоидов
В системах с большим числом машин почти всегда встает вопрос централизованного управления пользователями и группами (авторизации, аутентификации т.д.). Для этого удобно использовать LDAP. В этой статье я расскажу как настроить аутентификацию через LDAP и ограничить доступ к машине только для определенных групп.
Настройка авторизации через LDAP
sudo apt-get install ldap-auth-client nscd
- URI of LDAP server — URI нашего сервера, например, ldap://ldapserver.corp.local (ldap может быть доступен по протоколам ldaps и ldapi).
- Name of the LDAP search base — базовый каталог для поиска, обычно он похож на домен на котором расположен сервер, в нашем примере это будет dc=corp,dc=local
- Make local admin database admin — позволит локальным администраторам изменять учетные записи в LDAP, обычно нужно ответить нет.
- Does the LDAP database require login — требуется ли логиниться в LDAP для того чтобы авторизовать пользователя, как правило нет.
# Базовый каталог для поиска base dc=corp,dc=local # LDAP URI uri ldap://ldap.corp.local # Версия протокола ldap_version 3 # Политика соединения # hard - будет долго пытаться соединиться при ошибках # soft - при ошибке сразу же вернет ошибку модулю авторизации bind_policy soft # Искать ли политику управления паролями в LDAP pam_lookup_policy yes # Политика изменения пароля (exop через LDAP) pam_password exop # Задаем синонимы атрибутов(uniqueMember значит то же, что и member т.е. вхождение в группы) nss_map_attribute uniqueMember member # Если сервер ldap использует tls для шифрования указываем эти опцию ssl start_tls # Требовать и проверять сертификат сервера tls_checkpeer yes # Директория с корневыми сертификатами tls_cacertfile /etc/ssl/certs/you-ca.pem # Группы членство в которых не будет браться из LDAP nss_initgroups_ignoreusers backup,bin,daemon,games,gnats,irc,landscape,libuuid,libvirt-dnsmasq,libvirt-qemu,list,lp,mail,man,messagebus,news,proxy,root,sshd,statd,sync,sys,syslog,uucp,whoopsie,www-data,zabbix # Расположение директорий с пользователями, паролями и группами nss_base_passwd ou=people,dc=corp,dc=local nss_base_shadow ou=people,dc=corp,dc=local nss_base_group ou=group,dc=corp,dc=local
Если ваш LDAP сервер использует зашифрованное соединение, то нужно скопировать корневой сертификат, которым подписан сертификат сервера LDAP в папку /etc/ssl/certs.
Включаем авторизацию через ldap:
sudo auth-client-config -t nss -p lac_ldap
sudo pam-auth-update sudo /etc/init.d/nscd restart
id ldap-user uid=10001(ldap-user) gid=10003(users) группы=10001(admins),10003(users)
Теперь пользователи из LDAP смогут авторизоваться на нашем компьютере и даже менять свой пароль при помощи passwd.
Автоматическое создание домашних директорий пользователям из LDAP
С текущей настройкой пользователи из LDAP смогут авторизоваться на компьютере, но у них не будет домашней директории. Чтобы исправить это давайте настроим модуль pam_mkhomedir, для этого нужно создать файл настроек pam модулей /usr/share/pam-configs/my_mkhomedir с вот таким содержимым:
Name: activate mkhomedir Default: yes Priority: 900 Session-Type: Additional Session: required pam_mkhomedir.so umask=0022 skel=/etc/skel
И активируем его командой: pam-auth-update. Теперь любой пользователь из LDAP сможет авторизоваться и у него будет собственный домашний каталог. Каталог будет создан по указанному шаблону (в примере /etc/skel) и с правами соответсвующими маске (в примере 755).
Ограничение авторизации
Сейчас любой пользователь из LDAP сможет авторизоваться на нашей машине, если мы хотим ограничить доступ для некоторых пользователей или групп или разрешить авторизацию только определенным пользователям или группам. Для этого можно использовать модуль pam pam_listfile.so.
Обязательно, сначала создайте файл /etc/login.group.allowed со список групп которым разрешено заходить на хост, иначе потом придется делать это с live-cd:
Также лучше добавить в список пользователя root, иначе не сможете под ним залогиниться, даже локально.
Теперь добавляем в начало /etc/pam.d/common-auth следующую строку:
auth required pam_listfile.so onerr=fail item=group sense=allow file=/etc/login.group.allowed
- onerr — что делать в случае ошибок.
- item — что записано в указанный файл (имена пользователей — user, групп — group, хостов и т.д.)
- sense — что делать, когда запись найдена в файле, allow — разрешить, deny=запретить авторизоваться.
- file — полный путь до файла со списком.
Помимо этого метода можно сделать через nss_base_ это позволит указывать LDAP на какие машины разрешено заходить пользователю или группе.
Авторизация с использованием LDAP
getent passwd не выводит доменных пользователей, но в логах появляется ошибка:
Nov 18 12:54:29 test sudo: pam_unix(sudo:session): session closed for user root Nov 18 12:54:48 test nscd: nss_ldap: failed to bind to LDAP server ldap://dc.domen.loc: Invalid credentials Nov 18 12:54:48 test nscd: nss_ldap: reconnecting to LDAP server. Nov 18 12:54:48 test nscd: nss_ldap: failed to bind to LDAP server ldap://dc.domen.loc: Invalid credentials Nov 18 12:54:48 test nscd: nss_ldap: reconnecting to LDAP server (sleeping 1 seconds). Nov 18 12:54:49 test nscd: nss_ldap: failed to bind to LDAP server ldap://dc.domen.loc: Invalid credentials Nov 18 12:54:49 test nscd: nss_ldap: could not search LDAP server - Server is unavailable ldapsearch -x -h dc -b "dc=domen,dc=loc" -D "cn=Administrator,dc=domen,dc=loc" -W "sAMAccountName=user1"ldap_bind: Invalid credentials (49) additional info: Simple Bind Failed: NT_STATUS_LOGON_FAILURE ldapsearch -x -h dc -b "dc=domen,dc=loc" -D "Administrator@domen.loc" -W "sAMAccountName=user1"# extended LDIF # # LDAPv3 # base with scope subtree # filter: sAMAccountName=user1 # requesting: ALL # # search reference ref: ldap://domen.loc/CN=Configuration,DC=domen,DC=loc # search reference ref: ldap://domen.loc/DC=DomainDnsZones,DC=domen,DC=loc # search reference ref: ldap://domen.loc/DC=ForestDnsZones,DC=domen,DC=loc # search result search: 2 result: 0 Success # numResponses: 4 # numReferences: 3 Если в ldap.conf выстовляю binddn Administrator@domen.loc то в логах ничего нету
How to configure LDAP client on Linux Mint
![]()
The LDAP (acronym of Lightweight Directory Access Protocol) is an industry-standard application protocol to access and maintain Directory Information Services on IP networks. The directory information services map the information of network resources to respective IP addresses. One common example is DNS. The primary purpose of the LDAP clients is to store emails, usernames, and passwords in a central place, and then this data can be used by several applications to validate the users. In this article, LDAP client configuration is performed on Linux Mint.
Before getting to the configurations, let’s have a look at the working of the LDAP client.
How LDAP client works
LDAP servers back up the LDAP clients, and all the stored information is made available to LDAP clients via servers. When a new database needs to be added, the LDAP client changes to the LDAP database as per the users’ requirements. When a change occurs, it is synchronized with existing data and thus nullifies the act of updating. Moreover, with the help of the LDAP client, you can perform the following key actions:
- Search and retrieve data from directories
- Add/Update/Delete/Rename entries in a database
How to configure LDAP client on Linux Mint
The following steps follow the configuration of the LDAP client. Firstly, you have to install the utilities associated with the LDAP client. To install LDAP client and its associated utilities, provide the following command in terminal.
The time you run the above command, you get an interface like shown below in Step 1.
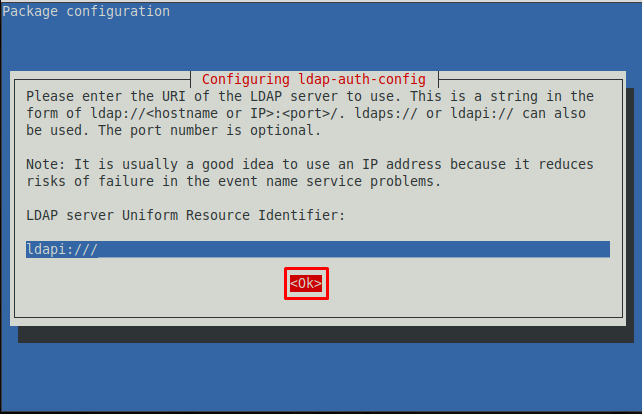
Step 1: You have to enter the details of the LDAP server. The following image requires the URI(Unique Resource Identifier) of the LDAP server.
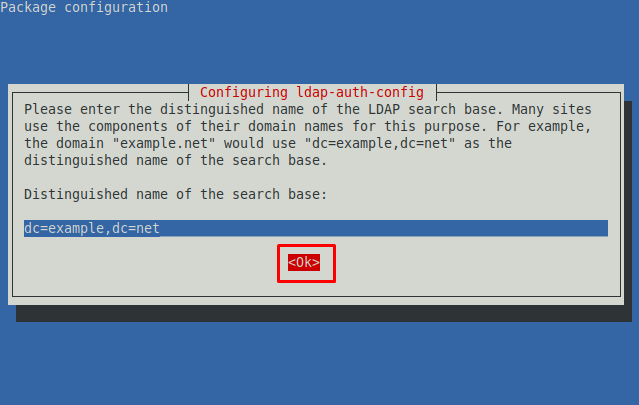
Step 2 : The next prompt asks you to set up a distinct name for the LDAP search base. Navigate to OK and go with the default.
ote : The dc and dc in the image below represent the domain name. For instance, considering linuxhint.com, the distinguished name would be dc=linuxhint and dc=com.
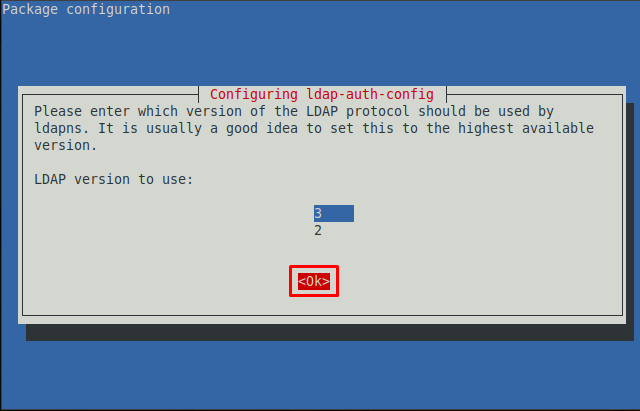
Step 3 : Choose the latest LDAP version from the available. As the image below shows that 3 is the latest version.
Step 4 : Here, you have to allow LDAP’s root account like a local root. Navigate to “Yes” and hit Enter.

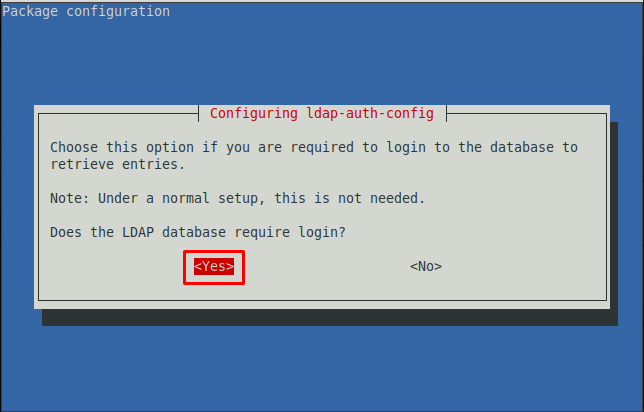
Step 5 : Choose the authentication for the LDAP database. Navigating to “Yes” will require login for the LDAP database. However, if you do not want the authentication step while logging in to the database, you must choose “NO“. Here we are going with “Yes“.
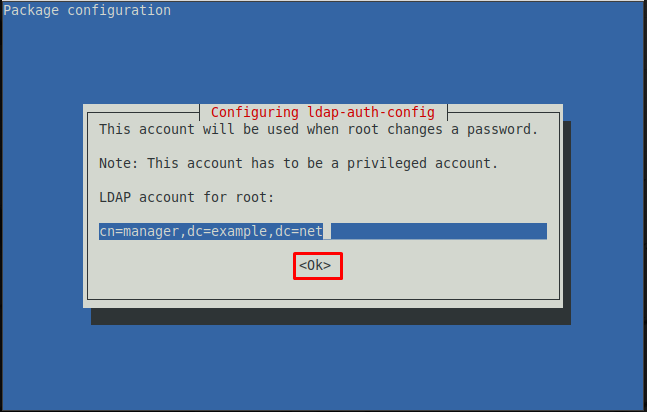
Step 6 : Choose the account to use when the root password is changed.
Note : The cn in the image below shows the user associated with the distinguished database.
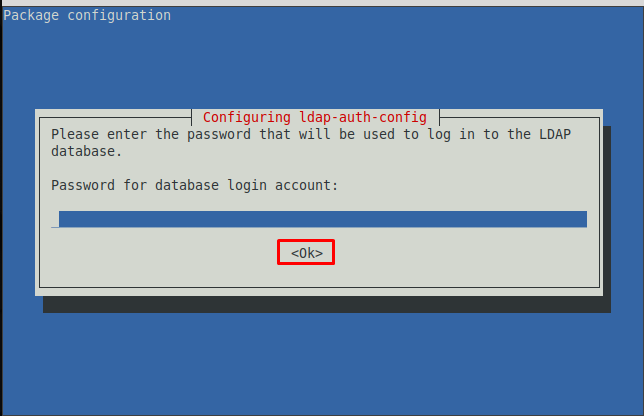
Step 7 : Choose a password to use when ldap-auth-config uses the root account of LDAP.

Step 8 : Enter the password that you set earlier to log in to the LDAP database.
After doing the above steps the command will be executed completely that was initiated before Step 1.
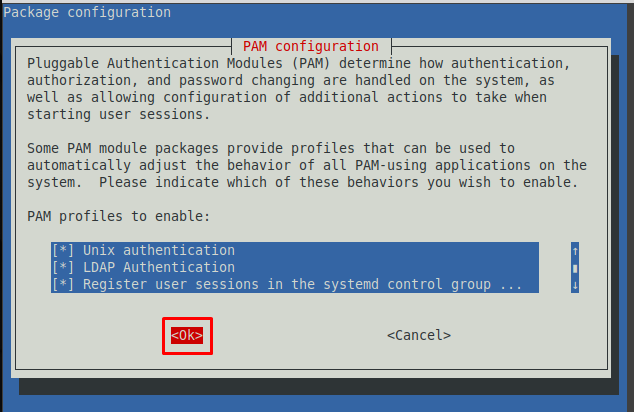
Step 9 : You must configure the Linux Mint to use LDAP for authentication. Firstly, update the PAM-auth file.
The following prompt will appear, and you can enable any profile from the provided list. Keep the default settings and choose “OK“.
The steps provided above do most of the configurations automatically. There are several steps that need to be performed manually.
Create User Home Directory
The common-session file of PAM directory can be edited to perform some comigration changes. For instance, you can create a user home directory by accessing the common-session file inside pam.d directory.
The command provided below opens the common-session file in nano editor.
Now, at the end of this file, add the following line to create a new user home directory.

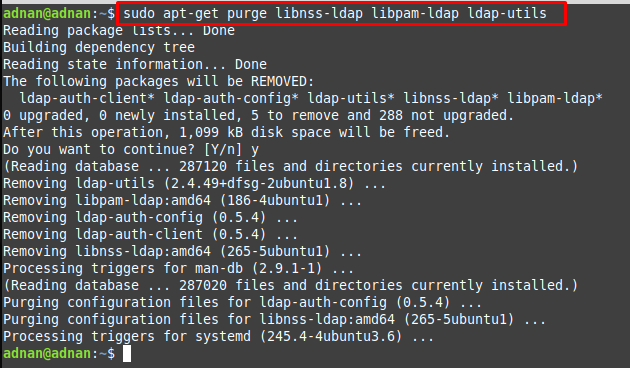
How to remove LDAP client from Linux Mint
If you want to remove LDAP client from your Linux Mint, it is recommended to adopt the following way. The below-mentioned command removes the installed LDAP and the associated libraries.
Conclusion
The LDAP is an authentication platform that is used to authenticate the users for web applications or servers. The usernames and passwords are obtained and then LDAP uses them to check for the authentication. This writeup demonstrates the way to configure LDAP client on Linux Mint. The LDAP configuration is mostly system based and the user may require very few manual steps. This guide also provides the commands to install or uninstall the LDAP client from Linux Mint.