- Saved searches
- Use saved searches to filter your results more quickly
- License
- home-assistant/supervised-installer
- Name already in use
- Sign In Required
- Launching GitHub Desktop
- Launching GitHub Desktop
- Launching Xcode
- Launching Visual Studio Code
- Latest commit
- Git stats
- Files
- README.md
- About
- Установка Home Assistant Supervised в Ubuntu 22.04 LTS
- Шаг 0. Установка Ubuntu Server 22.04 LTS
- Шаг 1. Устанавливаем зависимости
- Шаг 2. Устанавливаем Home Assisistant Supervised
- Tutorial: How to Install Home Assistant on a Generic Linux System
- Preparation
- Enable ssh (optional)
- Update your system
- Set up static (fixed) IP address
- Install Samba
Saved searches
Use saved searches to filter your results more quickly
You signed in with another tab or window. Reload to refresh your session. You signed out in another tab or window. Reload to refresh your session. You switched accounts on another tab or window. Reload to refresh your session.
Installer for a generic Linux system
License
home-assistant/supervised-installer
This commit does not belong to any branch on this repository, and may belong to a fork outside of the repository.
Name already in use
A tag already exists with the provided branch name. Many Git commands accept both tag and branch names, so creating this branch may cause unexpected behavior. Are you sure you want to create this branch?
Sign In Required
Please sign in to use Codespaces.
Launching GitHub Desktop
If nothing happens, download GitHub Desktop and try again.
Launching GitHub Desktop
If nothing happens, download GitHub Desktop and try again.
Launching Xcode
If nothing happens, download Xcode and try again.
Launching Visual Studio Code
Your codespace will open once ready.
There was a problem preparing your codespace, please try again.
Latest commit
Git stats
Files
Failed to load latest commit information.
README.md
This installation method is for advanced users only
Install Home Assistant Supervised
This installation method provides the full Home Assistant experience on a regular operating system. This means, all components from the Home Assistant method are used, except for the Home Assistant Operating System. This system will run the Home Assistant Supervisor. The Supervisor is not just an application, it is a full appliance that manages the whole system. It will clean up, repair or reset settings to default if they no longer match expected values.
By not using the Home Assistant Operating System, the user is responsible for making sure that all required components are installed and maintained. Required components and their versions will change over time. Home Assistant Supervised is provided as-is as a foundation for community supported do-it-yourself solutions. We only accept bug reports for issues that have been reproduced on a freshly installed, fully updated Debian with no additional packages.
This method is considered advanced and should only be used if one is an expert in managing a Linux operating system, Docker and networking.
Run the following commands as root ( su — or sudo su — on machines with sudo installed):
Step 1: Install the following dependencies with this command:
apt install \ apparmor \ jq \ wget \ curl \ udisks2 \ libglib2.0-bin \ network-manager \ dbus \ lsb-release \ systemd-journal-remote \ systemd-resolved -y
Step 2: Install Docker-CE with the following command:
curl -fsSL get.docker.com | sh Step 3: Install the OS-Agent:
Instructions for installing the OS-Agent can be found here
Step 4: Install the Home Assistant Supervised Debian Package:
wget https://github.com/home-assistant/supervised-installer/releases/latest/download/homeassistant-supervised.deb apt install ./homeassistant-supervised.deb
- generic-x86-64
- odroid-c2
- odroid-c4
- odroid-n2
- odroid-xu
- qemuarm
- qemuarm-64
- qemux86
- qemux86-64
- raspberrypi
- raspberrypi2
- raspberrypi3
- raspberrypi4
- raspberrypi3-64
- raspberrypi4-64
- tinker
- khadas-vim3
The default path for our $DATA_SHARE is /usr/share/hassio . This path is used to store all home assistant related things.
You can reconfigure this path during installation with
DATA_SHARE=/my/own/homeassistant dpkg --force-confdef --force-confold -i homeassistant-supervised.deb
If something’s going wrong, use journalctl -f to get your system logs. If you are not familiar with Linux and how you can fix issues, we recommend to use our Home Assistant OS.
About
Installer for a generic Linux system
Установка Home Assistant Supervised в Ubuntu 22.04 LTS
Обновлен мануал по установке Home Assistant (далее для краткости — HA) в связи с выходом новой версии Ubuntu и Home Assistant. В качестве отправной точки взято видео Alex Kvazis Raspberry Pi 4B в корпусе Argon ONE M.2 c SSD диском 128 ГБ, собираем сервер для Home Assistant. Однако автор использует вариант установки Home Assistant Operating System, который является наиболее простым и удобным. В данной же статье будет использоваться способ Home Assistant Supervised.
Варианты установки Home Assistant
Официальный сайт предлагает нам несколько способов установки Home Assistant:
Home Assistant Operating System для Raspberry Pi. Самый простой способ установки: залил образ и нет проблем. Все фичи в наличии. Рекомендован разработчиками. Минус — отсутствие полноценной системы.
Home Assistant Operating System (VM) для Linux. Поднимаем виртуальную машину. Качаем образ. Запускаем. Профит. Да, все фичи на месте. Рекомендован разработчиками. Минус — виртуальная машина более затратна для системы чем Docker. Впрочем, этот способ я не пробовал.
Home Assistant Container. Установка в контейнер Docker. Также рекомендован разработчиками. Минус — нет Supervisor.
Home Assistant Core. Устанавливаем окружение Python. Устанавливаем Home Assistant. Минус — нет Supervisor.
Home Assistant Supervised. Установка в контейнер Docker, но уже с Supervisor в комплекте.
Шаг 0. Установка Ubuntu Server 22.04 LTS
Здесь и далее я буду подключать Raspberry через WiFi. Начнем с того, что пропишем в нашем домашнем DHСP сервере статический IP-адрес Raspberry. Это нужно для удобства, чтобы не выяснять каждый раз, как достучаться до малинки.
Качаем образ Ubuntu от сюда и заливаем при помощи Balena Etcher на имеющийся под рукой usb-носитель или SD-карту.
Возможно, перед началом последующих действий потребуется обновить загрузчик малинки.
sudo apt update sudo apt upgrade sudo apt install rpi-eeprom sudo rpi-eeprom-update -a sudo reboot -h nowОткрываем файл network-config и прописываем туда параметры WiFi. Должно получится что-то вроде:
version: 2 ethernets: eth0: dhcp4: true optional: true wifis: wlan0: dhcp4: true optional: true access-points: Название сети: password: "сюда пишем пароль"А теперь немного комментариев разработчиков:
При первой загрузке Raspberry попытается присоединится к WiFi. Эта попытка обречена на провал. Но не расстраивайтесь, просто перезагрузите малинку sudo reboot -h now и все заработает.
Дефолтный логин ubuntu пароль ubuntu . При первом запуске пароль придется сменить. Что мы делаем сразу после установки системы? Правильно — обновляемся.
sudo apt update sudo apt upgrade sudo reboot -h nowТак же рекомендую воспользоваться сервисом duckdns.org, чтобы получить доступ к системе удаленно. После этого требуется настроить обновление информации о текущем ip адресе. Как это сделать, подробно написано на duckdns.org. Если используете Argon ONE M.2, как у меня, рекомендую настроить power button & fan control
sudo curl https://download.argon40.com/argon1.sh | bash .
Ну и конечно же не забываем пробросить порты 22 — на консоль Ubuntu, 8123 на Home Assistant
Шаг 1. Устанавливаем зависимости
Устанавливаем jq. sudo apt install jq .
sudo apt update sudo apt install ca-certificates curl gnupg lsb-release sudo curl -fsSL https://download.docker.com/linux/ubuntu/gpg | sudo gpg --dearmor -o /usr/share/keyrings/docker-archive-keyring.gpg echo "deb [arch=$(dpkg --print-architecture) signed-by=/usr/share/keyrings/docker-archive-keyring.gpg] https://download.docker.com/linux/ubuntu $(lsb_release -cs) stable" | sudo tee /etc/apt/sources.list.d/docker.list > /dev/null sudo apt update sudo apt install docker-ce docker-ce-cli containerd.io docker-compose-pluginРазработчики требуют, чтобы в системе было установлено Docker, Systemd, NetworkManager, AppArmor. Systemd и AppArmor уже установлены в системе — по ним дополнительных действий не требуется.
Теперь возьмемся за NetworkManager. Для начала устанавливаем его командой sudo apt install network-manager . Добавляем в автозагрузку sudo systemctl enable NetworkManager . Чтобы переключится на него идем в /etc/netplan и редактируем файл конфигурации командой sudo vi /etc/netplan/50-cloud-init.yaml . Примечание: у меня это 50-cloud-init.yaml . Говорят, название может отличаться. Добавляем строку renderer: NetworkManager на уровень ниже (с одним отступом) после строки network: . Обращаем внимание на отступы. В yaml отступы решают. Делаем sudo netplan generate и sudo netplan apply , перезагружаемся. Останавливаем systemd-networkd — он теперь больше не нужен — sudo systemctl stop systemd-networkd и отключаем его от автозагрузки sudo systemctl disable systemd-networkd , перезагружаемся.
Устанавливаем OS-Agent. В командах ниже ссылка на последнюю версию OS-Agent на момент написания статьи. Перед скачиванием рекомендую уточнить этот вопрос. В любом случае наша архитектура aarch64 .
wget github.com/home-assistant/os-agent/releases/download/1.2.2/os-agent_1.2.2_linux_aarch64.deb sudo dpkg -i os-agent_1.2.2_linux_aarch64.debШаг 2. Устанавливаем Home Assisistant Supervised
Скачиваем установочный файл
wget https://github.com/home-assistant/supervised-installer/releases/latest/download/homeassistant-supervised.debНо запускать его не спешим. Сначала создаем временный файл командой
и добавляем туда строку systemd.unified_cgroup_hierarchy=false .
Запускаем установщик и удаляем временный файл
sudo dpkg -i homeassistant-supervised.deb sudo rm /etc/default/grubTutorial: How to Install Home Assistant on a Generic Linux System
Are you as baffled as I am about Home Assistant installation? Got a generic Linux system and are not sure where to begin? Well, look no further, as i am setting out here the necessary steps, as i identified them through my recent research.
Home Assistant is one of the best open source home automation systems out there that focuses on privacy. I have been using it for a few months now to make our home smarter and more secure.
There are more than one way of installing Home Assistant. In this article I am going to focus on one of the officially supported ways, which is called the “Home Assistant Supervised” method. It means Home Assistant is installed on the top of a generic Linux system
The aim of this article is to give all the steps needed to get Home Assistant Supervised and some of the most commonly used additional software components working on a generic Linux system. I assume you already have a working Linux box – throughout this article I use the latest version of Xubuntu available at the time of writing, which was 20.04.
Preparation
Enable ssh (optional)
I prefer working on my main (Windows) computer and I tend to use ssh to access the computer Home Assistant will be running on. As Xubuntu doesn’t come with an ssh server built in, I started by installing one. If you prefer working on the actual box, you can skip this step.
Once the ssh server is up and running, you can use an ssh client to access it. I used Microsoft’s relatively new Terminal. Putty and Termius are also good choices.
Update your system
For the installation to succeed it is important to start with a fully updated system. To install the latest updates execute this command:
Set up static (fixed) IP address
To avoid a lot of headaches later, it is a good idea to set up a fixed IP address for the computer running Home Assistant.
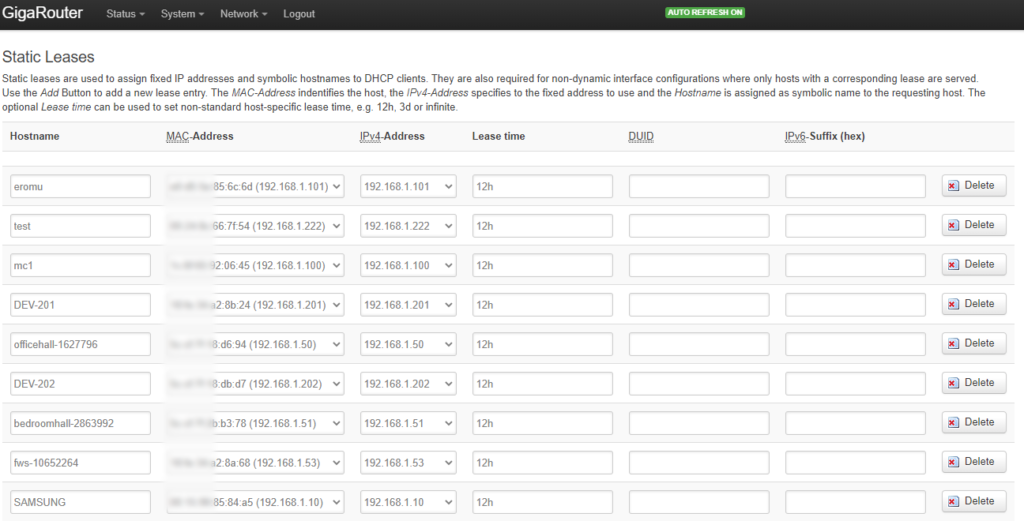
The easiest way of doing it is to set up a specific address for your Linux box in your router. Since each router is different, I can only show you a screenshot of my settings on a router running OpenWRT:
If, for some reason, you want to set up the static IP address on your Linux computer, you need to do the following:

- Check the current network configuration:
nmcli con show
You will get something like this: - Change the configuration with the following command:
sudo nmcli con mod «Wired connection 1» ipv4.addresses «192.168.1.98/24» ipv4.gateway «192.168.1.2» ipv4.dns «192.168.1.3» ipv4.dns-search «viktak» ipv4.method «manual»
Note #1: Change the parameters (all the values in between the double quotes) to match your own network.
Note #2: The above command must be entered as one line, even if it looks like two lines on this blog. - Reboot the computer:
sudo reboot
After reboot, the computer should be available for ssh connection on the new address you provided.
Install Samba
Since I work much more comfortably from/in a Windows environment, I also set up a share on the Linux computer so that any configuration and/or data files used by the home automation can be easily accessed from my main Windows computer. This allows me to work with Visual Studio Code on the configuration files, and also to make backups of them.
To set up a samba share (Windows compatible) on Linux, issue the following commands: