- Где NetworkManager хранит настройки (РЕШЕНО)
- Где NetworkManager хранит настройки сетевых подключений
- Все конфигурационные файлы NetworkManager
- Связанные статьи:
- How to configure a network on Linux Mint
- How to find your IP address on Linux Mint
- How to do network configuration on Linux Mint using Network settings
- How to configure your network using the NMTUI utility
- How to reset network settings
- How to configure incoming and outgoing traffic
- Conclusion
- About the author
- Taimoor Mohsin
Где NetworkManager хранит настройки (РЕШЕНО)
NetworkManager поддерживает различные подключаемые модули, которые могут определять новые места хранения информации о конфигурации.
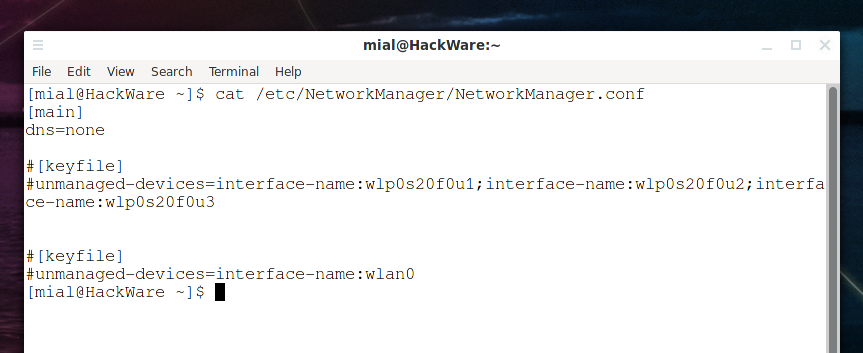
Основным конфигурационным файлом NetworkManager в который обычно вносят изменения, является /etc/NetworkManager/NetworkManager.conf. Вы можете посмотреть его содержимоео следующей командой:
cat /etc/NetworkManager/NetworkManager.conf
Кроме этого файла, настройки NetworkManager могут быть сохранены в директориях /etc/NetworkManager/conf.d и /usr/lib/NetworkManager/conf.d.
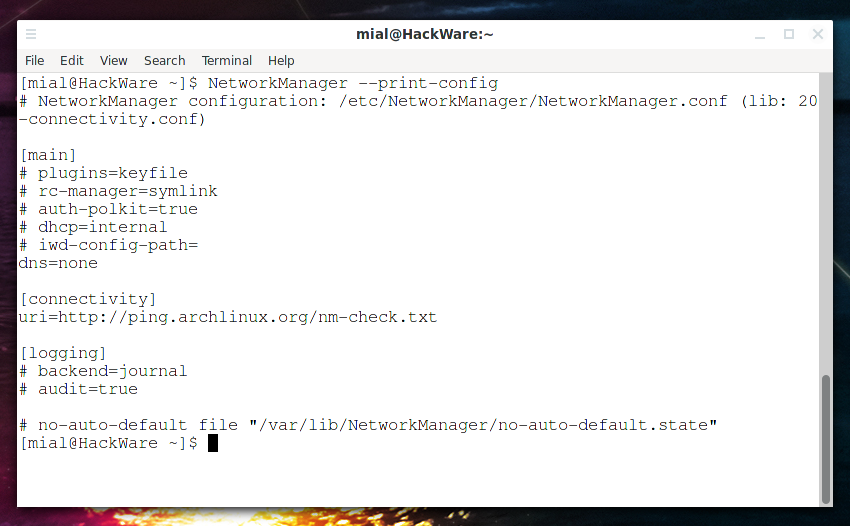
Для получения списка всех настроек NetworkManager, учитывающих все конфигурационные файлы, выполните команду:
NetworkManager --print-config
Где NetworkManager хранит настройки сетевых подключений
NetworkManager хранит настройки каждого подключения в отдельных текстовых файлах с расширением .nmconnection. Типичным местом хранения файлов настроек является директория /etc/NetworkManager/system-connections/. Кроме неё, файлы с подключениями могут располагаться в других местах, определяемых плагинами NetworkManager, например, настройки сетевых подключений по Bluetooth могут храниться в папке /var/run/NetworkManager/system-connections. Конфигурационным файлом NetworkManager является /etc/NetworkManager/NetworkManager.conf. Кроме этих основных мест, могут быть и другие пути, специфичные для дистрибутивов Linux.
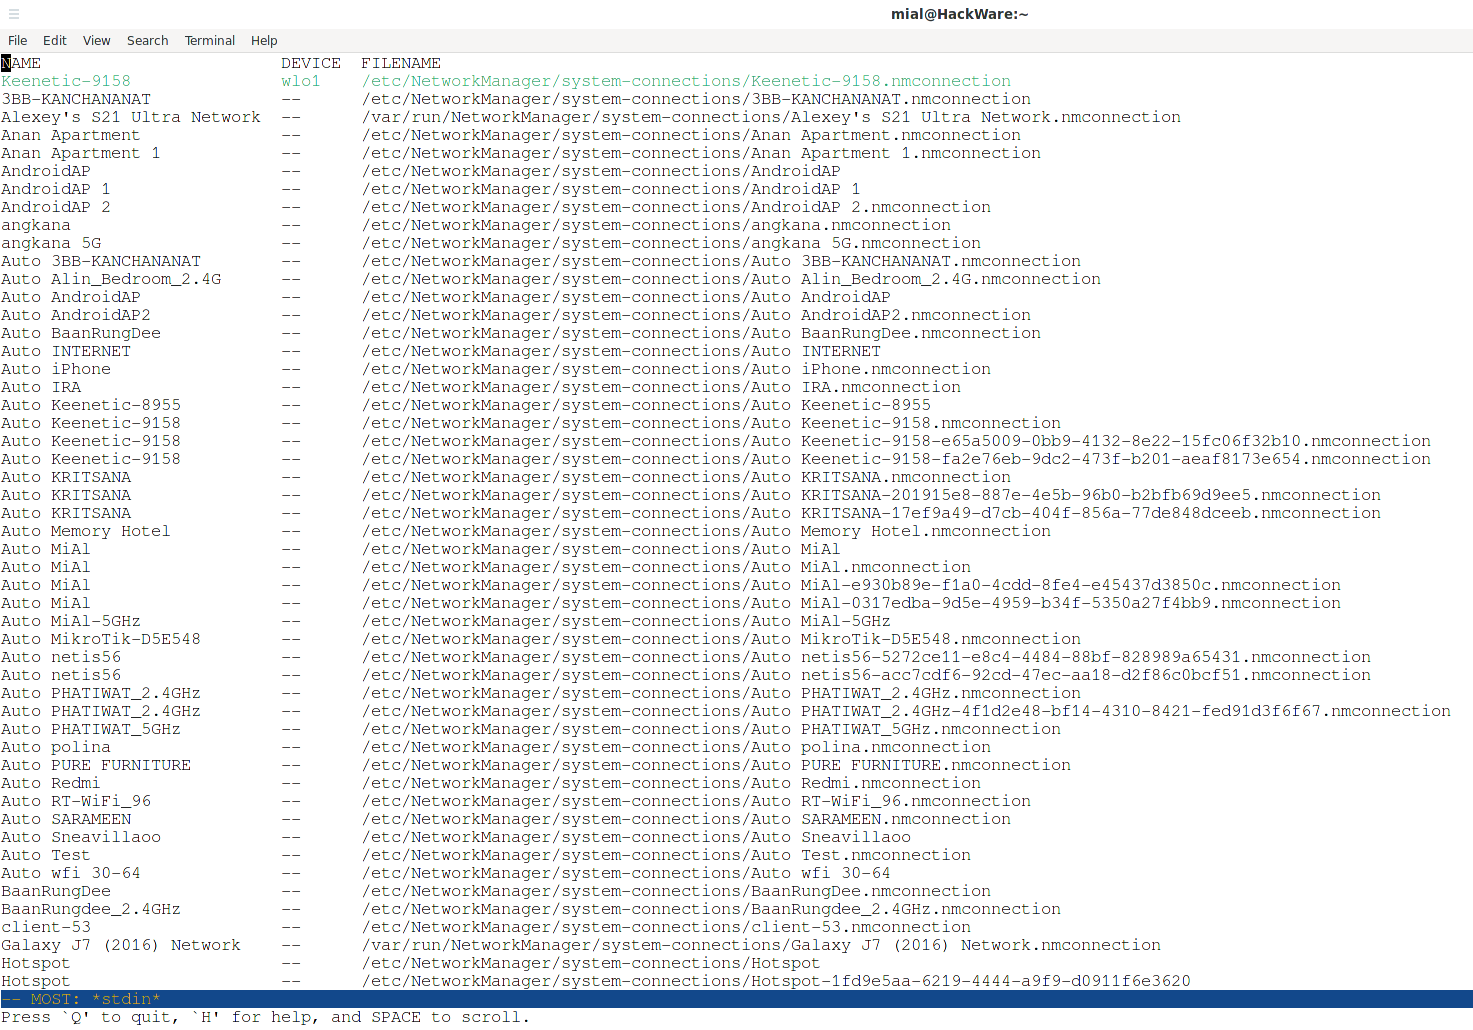
Чтобы вывести список всех сетевых подключений и расположение их файлов конфигураций выполните команду:
nmcli -f NAME,DEVICE,FILENAME connection show
Все конфигурационные файлы NetworkManager
Итак, конфигурационными файлами NetworkManager являются следующие:
- /etc/NetworkManager/NetworkManager.conf — главный конфигурационный файл
- /etc/NetworkManager/conf.d — директория с конфигурационными файлами
- /usr/lib/NetworkManager/conf.d — системная директория с конфигурационными файлами (например, файл /usr/lib/NetworkManager/conf.d/20-connectivity.conf)
- /var/lib/NetworkManager/NetworkManager-intern.conf — внутренний файл конфигурации. Этот файл записывается и читается NetworkManager, и его значения конфигурации объединяются с конфигурацией из NetworkManager.conf. Изменения, вносимые в этот файл, будут перезаписаны
- /var/lib/NetworkManager/NetworkManager.state — файл с набором состояний
- /etc/NetworkManager/system-connections/ — директория, в которой хранятся проводные и беспроводные соединения
- /var/run/NetworkManager/system-connections/ — директория с некоторыми видами соединений, например, Интернет по Bluetooth модему
- /var/lib/NetworkManager/
- /etc/NetworkManager/dispatcher.d/
- /etc/NetworkManager/dnsmasq.d/
- /etc/NetworkManager/dnsmasq-shared.d/
Связанные статьи:
How to configure a network on Linux Mint
![]()
It is always suggested that you execute some essential network setups while working on your operating system before utilizing the internet on any device. These settings are made to guarantee that your internet is running smoothly and with all of the protocols that you want it to. Also, if your Internet is slow or you’re having difficulties connecting to it, you should always check the network parameters to see if anything is wrong.
Similarly, as a network administrator, your major responsibility is to monitor several activities throughout a network, and network configuration allows them to trace any changes that influence the network’s performance. Administrators can decrease network downtime by using change tracking software. If a system upgrade degrades network performance, you can revert to a previous configuration that worked well.
Linux Mint is well-known for its power, reliability, and security. Network configuration is a comprehensive process that involves setting up network controls, managing network traffic, and operating the network to facilitate network communication. So this article will cover some of the basic details that are necessary to configure your network.
How to find your IP address on Linux Mint
Before the network configuration, it is better to know your own IP address first so that you can reset it later if needed by typing.

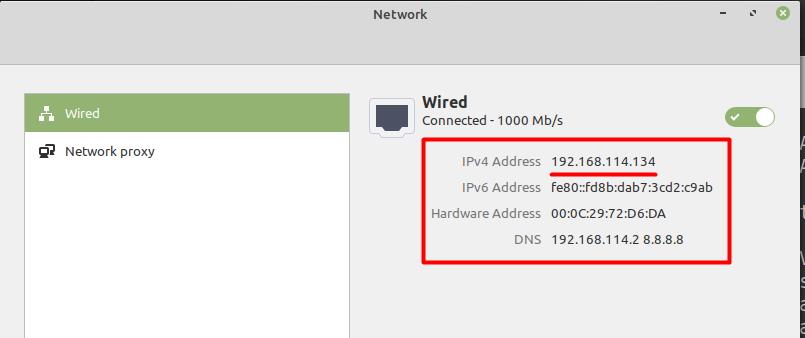
After typing this command, you will find your IP address on the second point which is the ens33 network configuration port that can be seen in the image.
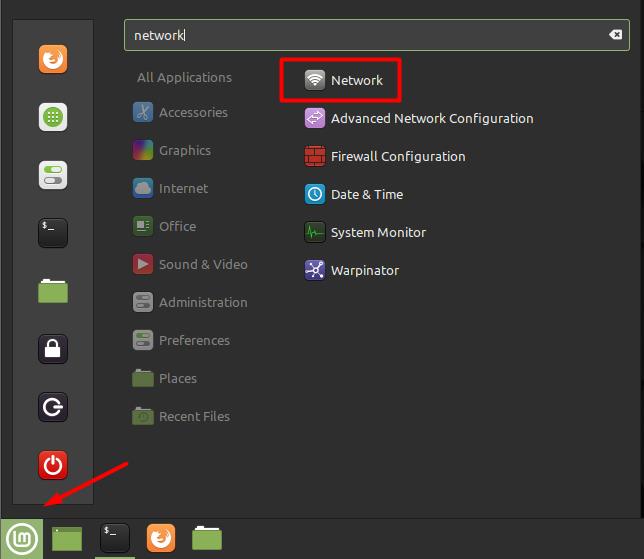
You can also check your IP address from the network settings as well, and for that, you need to click on the menu and select Network settings.
How to do network configuration on Linux Mint using Network settings
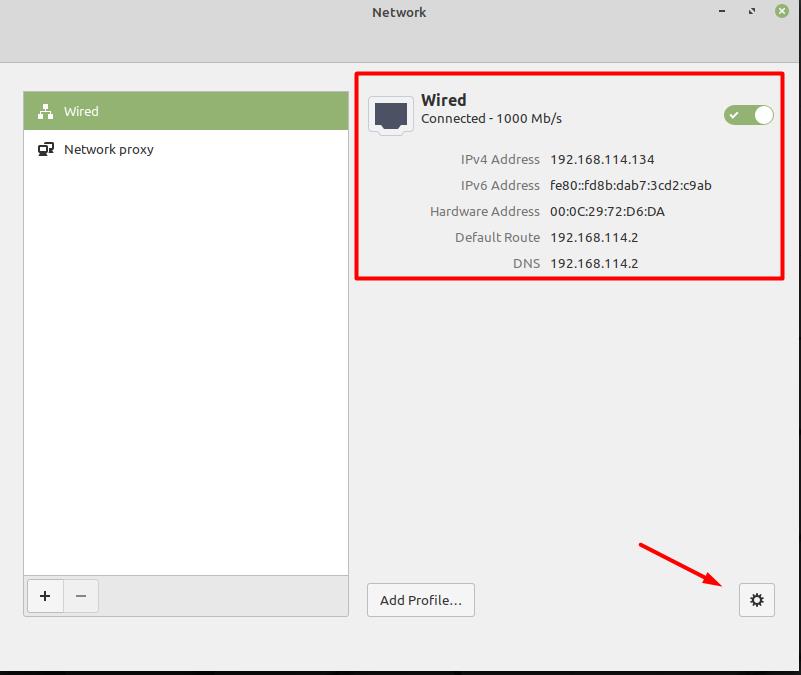
Your system will be assigned by the default IP address that is currently available from the network pool. You can configure your network by going into the network settings that you can find on the menu bar, as shown below. After that, you need to click on the bottom right “gear icon” option to open network settings for you.
Next, you need to click on the IPv4 tab, and there you will see that your network is set to “Dynamic Host Control Protocol (DHCP)” by default, and some other options can also be seen there.
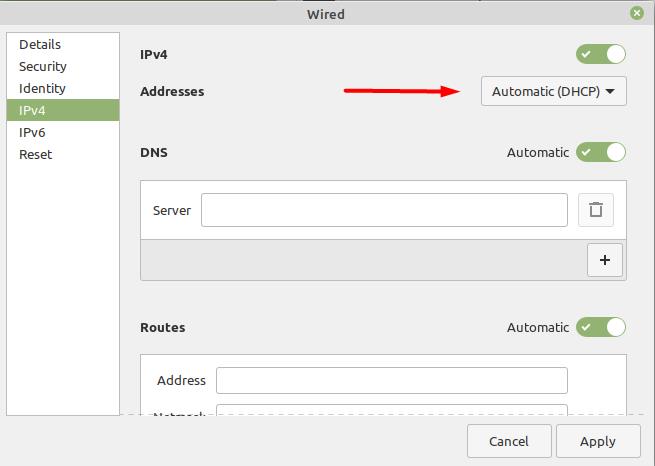
DHCP is used to provide you with the IP address automatically, but if you want to configure the network settings manually, you need to set it to the “Manual” from the drop-down menu.
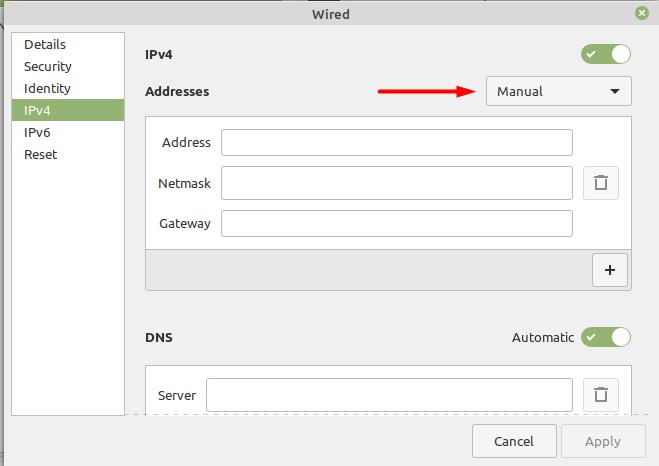
Now you can configure your network manually and need to provide the values for the network address. For example, the values that we have selected in our case are mentioned below.
Address: 192.168.114.100
Netmask: 255.255.255.0
Gateway: 192.168.114.2
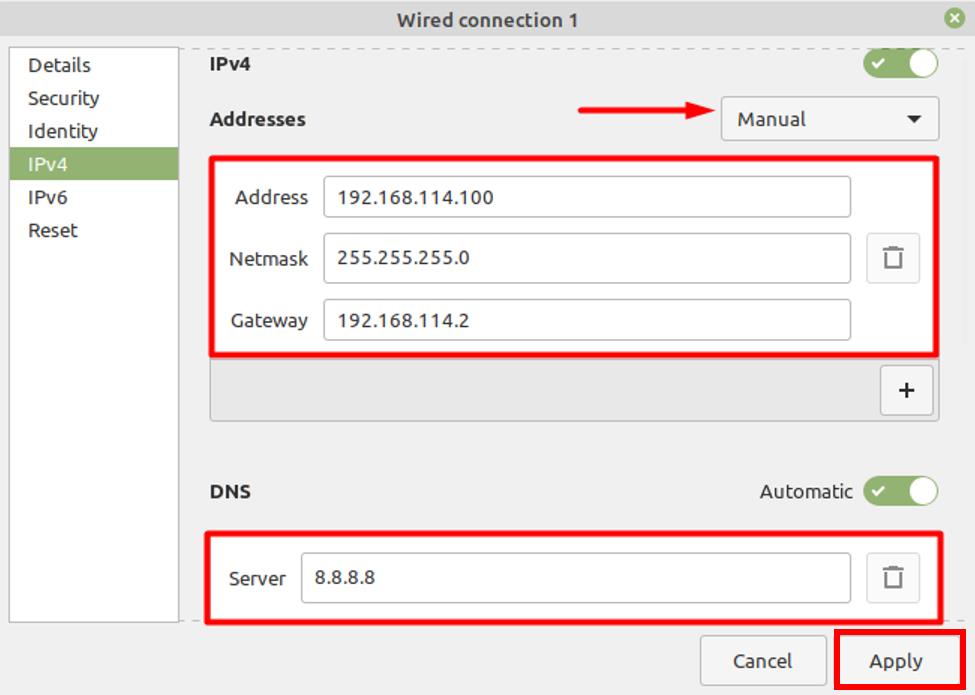
After providing the required values, you need to click on the “Apply” button, and then new settings will be implemented.
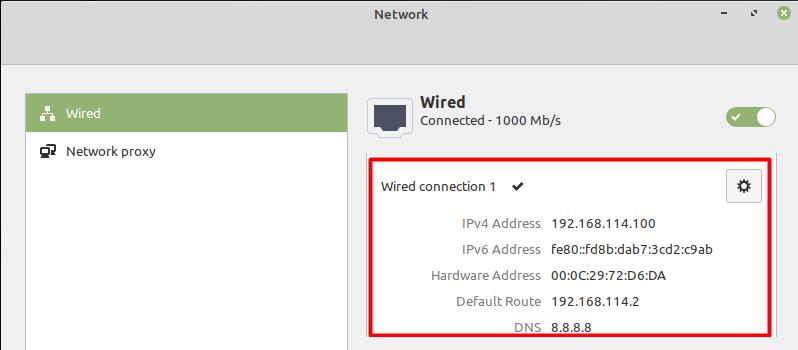
Now verify the new settings, and for that, you need to open your network settings again, and there you will see this new information:
How to configure your network using the NMTUI utility
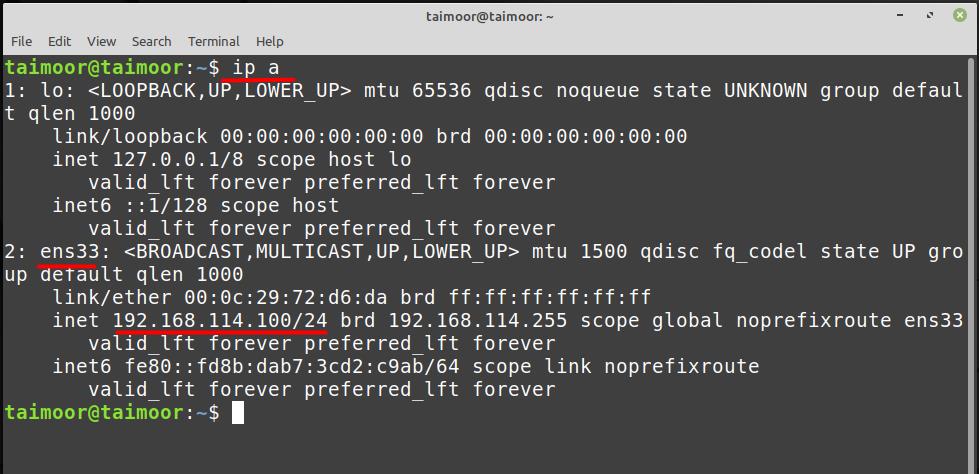
You can check your current network IP address either by the terminal or from the network settings. So to check it from the terminal, you can type:

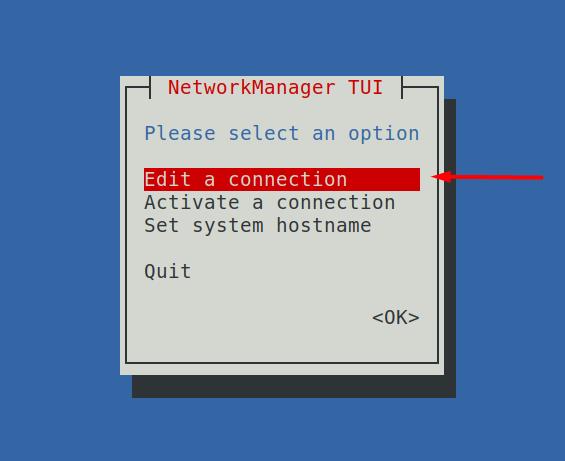
To configure your network using the NMTUI utility, you need to use the command given below:
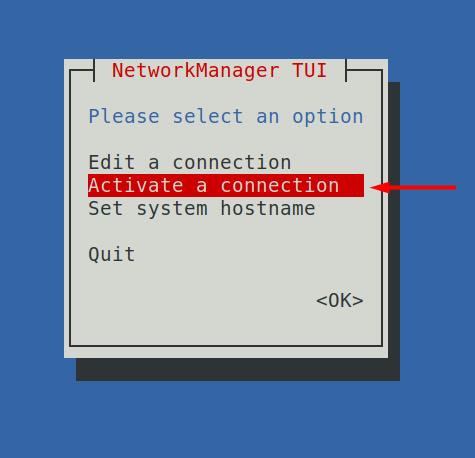
This will open a new window in the terminal with multiple options, as shown below. You need to select the “Edit a connection” option to configure the network.
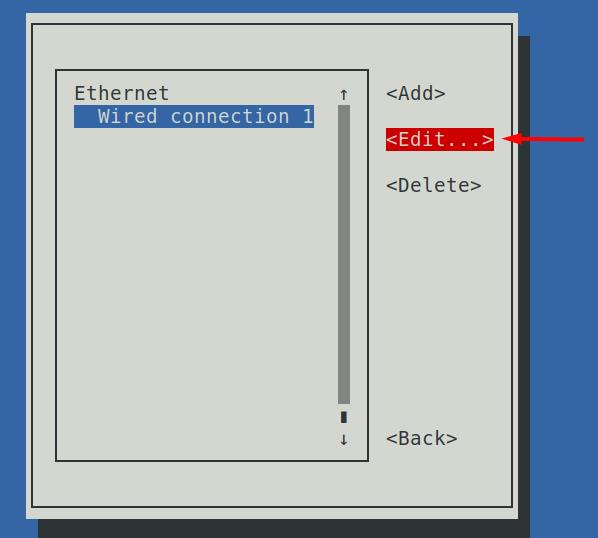
After selecting this option, you need to choose your network connection and click on the “Edit” tab.
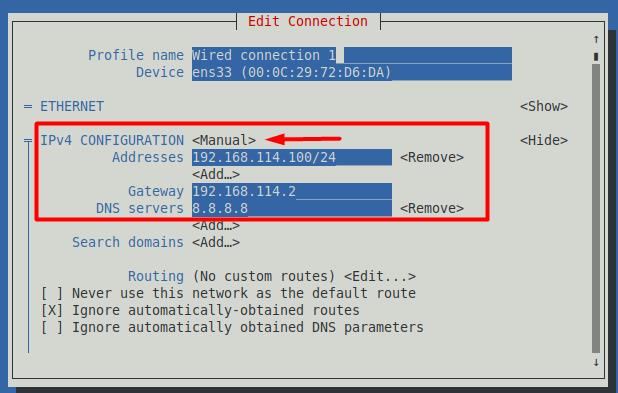
Choose the IPv4 tab and then “Manual” settings:

This will open all the necessary settings for you that are required to configure a network. Here we have implemented the same network settings as mentioned in the previous part as displayed below.
After applying settings, the next step is to go back to the main menu and select option, “Activate connection“:
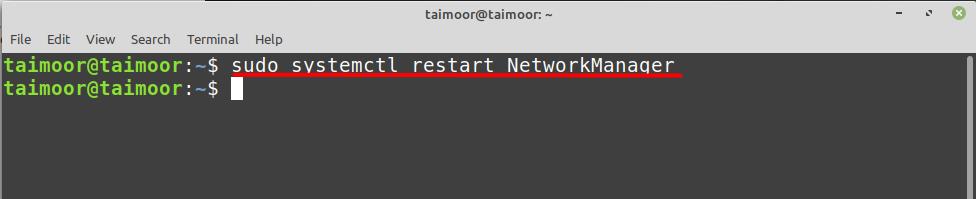
To activate the newly applied settings, you need to deactivate your network connection and then again activate it.
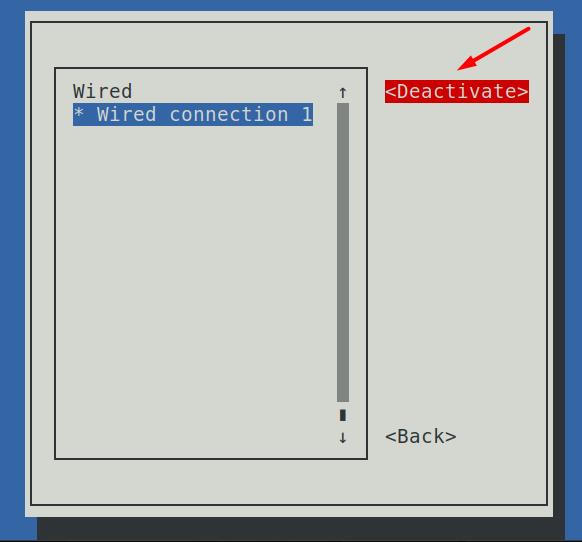
This will refresh your network settings so that new settings can be applied, and later you can also verify this by typing again the previously discussed command in the terminal.
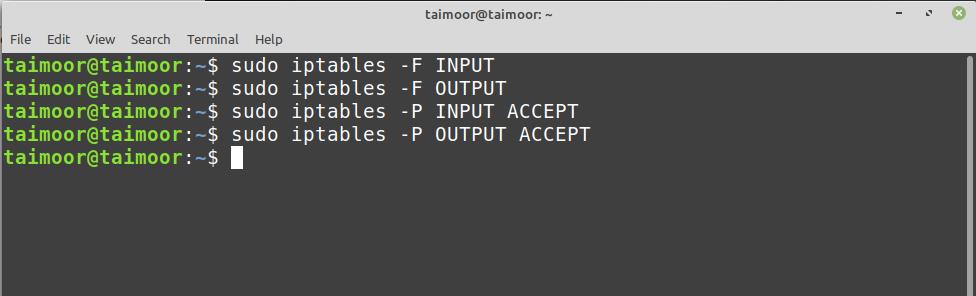
How to reset network settings
To reset all the network settings, use :
The “INPUT” and “OUTPUT” are the chains consist of rules for incoming and outgoing connections, where the “F” option is for flush:
$ sudo iptables -P INPUT ACCEPT
$ sudo iptables -P OUTPUT ACCEPT
And “P” option to set the policy to target chain:
Then execute the command mentioned below:
And now reboot your system using:
How to configure incoming and outgoing traffic
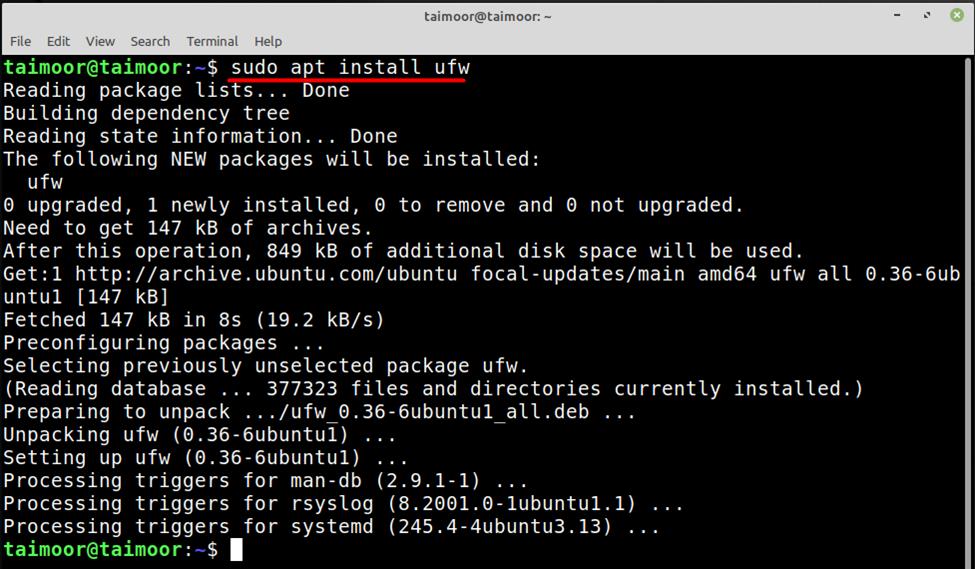
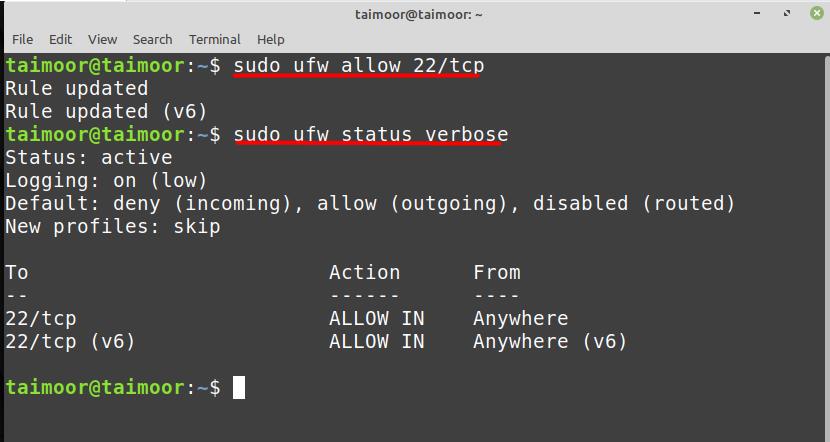
If you want to configure your network to allow or block your network to communicate with an outside world then you can do that by configuring a firewall. One way of doing this is by installing an uncomplicated firewall (UFW) and you can do that by typing.
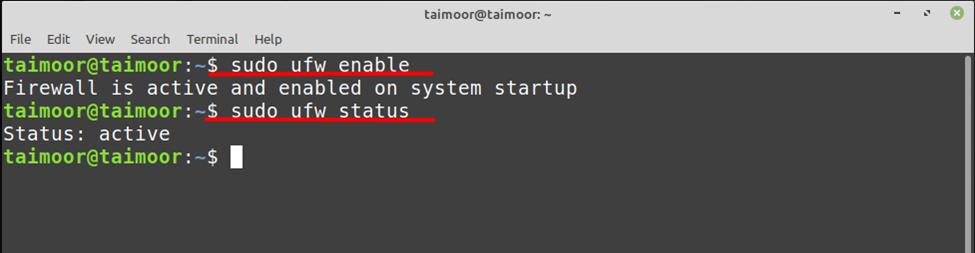
After its installation, you need to make sure that your firewall is enabled and currently active by typing
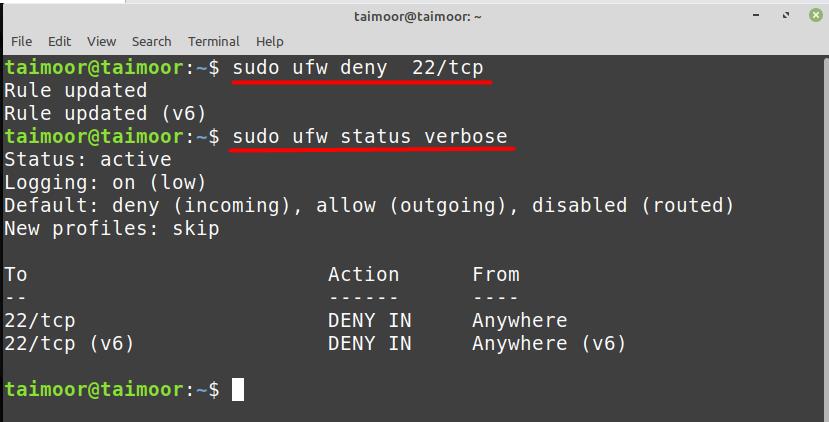
Now if you want to allow or deny any specific port for communication then you can do that by typing
And later you can verify if these rules have been implemented or not by typing again.
In the same way, you can also disable any network port by typing.
Conclusion
Once you’ve set up your network connection according to your preferences, you won’t have any problems utilizing the Internet on your Linux Mint. Furthermore, if you ever feel that any of your configurations have become screwed up, you can always go back to your network settings and correct the problem in the same way we outlined in this article. By following this approach, you will not only improve your networking knowledge but will also be able to resolve the majority of your network-related problems on your own.
About the author
Taimoor Mohsin
Hi there! I’m an avid writer who loves to help others in finding solutions by writing high-quality content about technology and gaming. In my spare time, I enjoy reading books and watching movies.