- Install Samba on Linux Mint to share files with Windows
- Install and Configure Samba Server on Linux Mint 20
- 1. Run system update
- 2. Install Samba on Linux Mint
- 3. Allow samba in Linux Mint Firewall
- 4. Add your user to the Samba group
- 5. Share some Linux Mint folder
- 6. Access the shared folder on Windows or Linux
- Extra tip- Linux Mint SambaShare User
- 8 thoughts on “Install Samba on Linux Mint to share files with Windows”
- Linux mint network with windows
- Настойка локальной сети в Windows и Linux Mint. Создание общей папки
Install Samba on Linux Mint to share files with Windows
Samba is a popular, open-source networking software that computers with a Unix or Linux – operating system allow the sharing of network resources from Windows -networks, such as files and printers. However, it is not limited to Windows only, we can install and use on Unix / Linux- based servers pr Desktop to share resources over the network. The common protocols Server Message Block (SMB) and Common Internet File System (CIFS, an open version of SMB) are the basis on which Samba is based. The name ” Samba ” is just a name given to represent “SMB”.
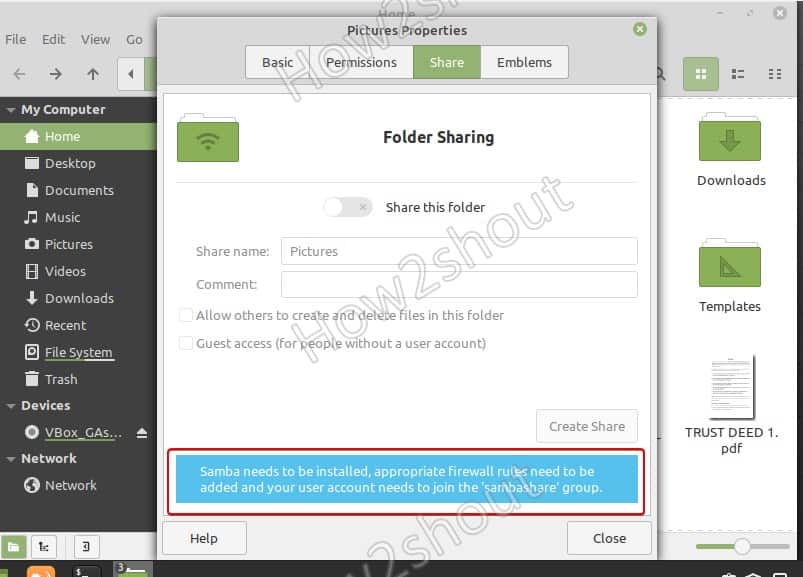
If you are using Linux Mint and want to share some folder, then right-click on it and select properties. And then the Share Tab. However, you will not able to enable this option because samba is not there yet. To confirm, you can see a message given at the bottom “Samba needs to be installed, appropriate firewall rules need to be added and your user account needs to join the ‘samba share group“.
To solve this let’s follow the given steps in this article…
Install and Configure Samba Server on Linux Mint 20
1. Run system update
Well, it is not a necessary step, however, run the system update command to rebuild the repo cache and make sure all the system installed packages are up to date.
2. Install Samba on Linux Mint
Next, in your command terminal use the APT package manager to install Samba on your Linux Mint. The packages to set it up are already there in the system repository, thus we don’t need to add anything extra.
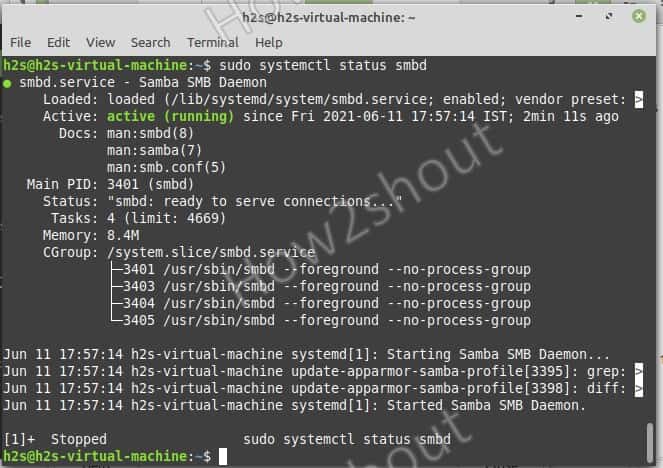
Check its service is active and running:
sudo systemctl status smbd
If it is not active then run:
sudo systemctl --enable now smbd
3. Allow samba in Linux Mint Firewall
To connect and access the shared files over SMB protocol, we have to first whitelist and allow its service to get accessed from the outside of the computer. Thus, allow it in the firewall
4. Add your user to the Samba group
Let’s add the current System user to the SambaShare group, so it can access all files and folders shared under it.
sudo usermod -aG sambashare $USER
set the password for share: This will be different from your system password.
Note: $USER means your current user, if you want to set some other user then change $USER with the particular user name. Also, the file or folder you want to share must be accessible to that particular user.
Alternatively, if you want to add some other users to the SAMBA group use:
sudo usermod -aG sambashare your-user
sudo smbpasswd -a your-user
5. Share some Linux Mint folder
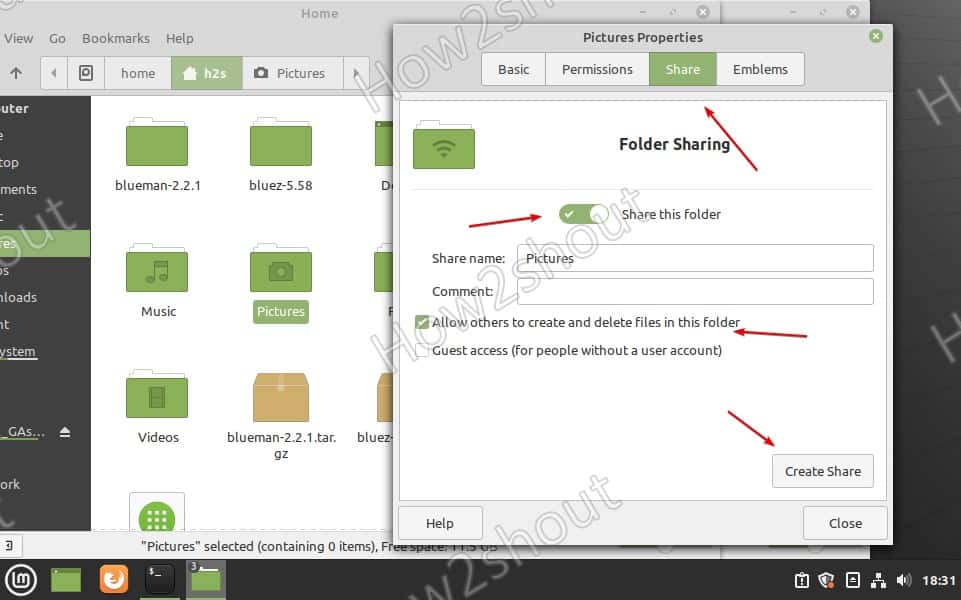
Lets’ say I want to share the Pictures folder or any other on my Linux Mint that is owned by my current user. So, for that simply go to that folder, right-click on it and select the Share tab.
6. Access the shared folder on Windows or Linux
Now, we can mount the Linux Mint shared folder on other Windows or Linux systems available in the same network or domain.
On Windows 10/8/7
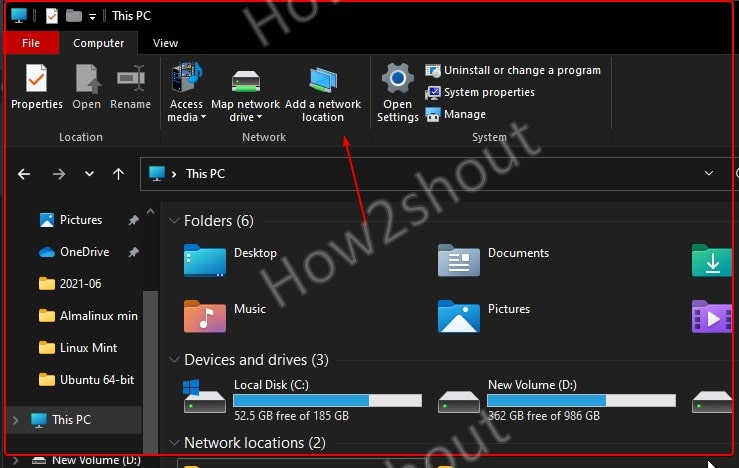
- Open My Computer or This PC
- Select Add network location icon given in the top menu.

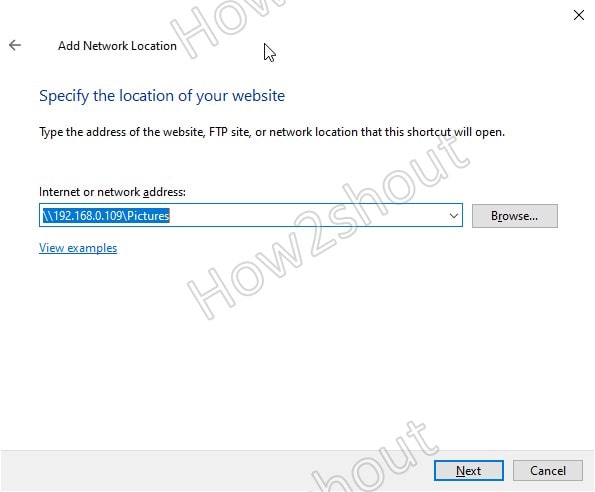
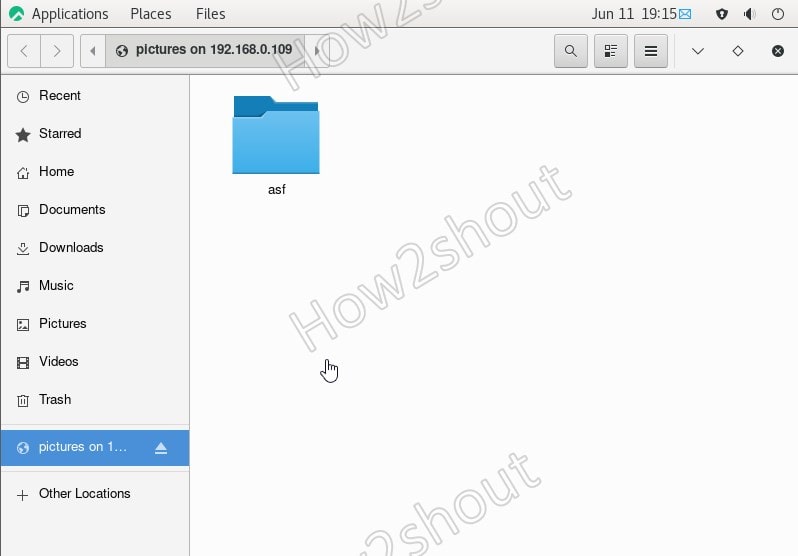
- Add your Linux Mint \\server-ipaddress\shared -folder-path– For example, here we have shared the Pictures folder, the path will be like this- \\192.168.0.109\Pictures

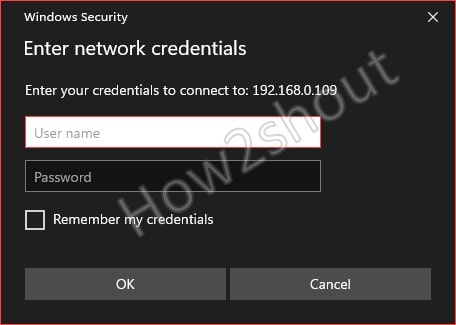
- Enter Samba User and password

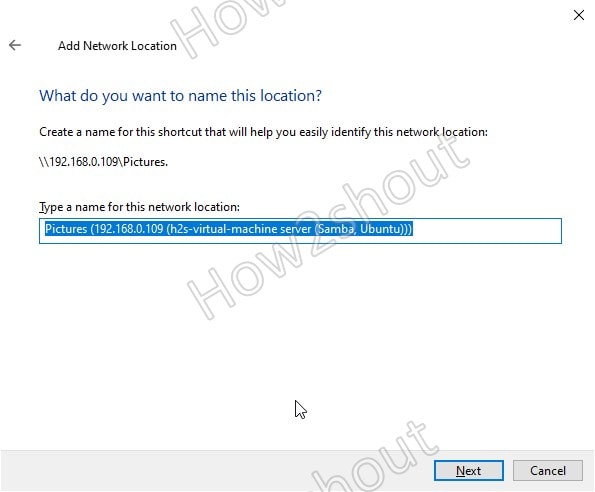
- The system will set a random name for your shared folder, however, you change to something easy to remember.
- Finally, you have the shared folder with read and write access.


On Linux systems such as Ubuntu, CentOS, and others…
The place to connect the samba server can be different from Linux to Linux, depending upon the desktop environment.
Here we are showing an example for Ubuntu and CentOS using GNOME.
- Open File Manager
- Select Other Locations from the right side given panel.
- At the bottom, in the “Connect Server” box type- smb://server-ip/shared-folder-path

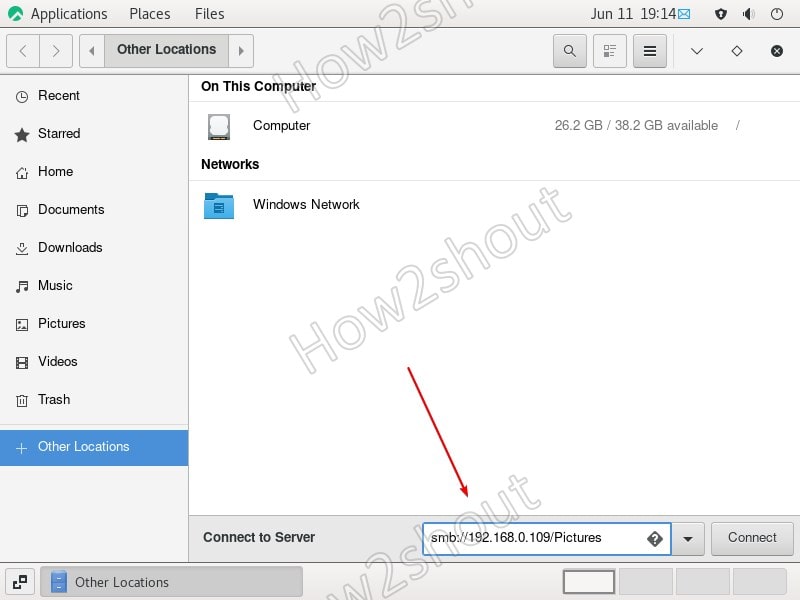
- Click on Connect.
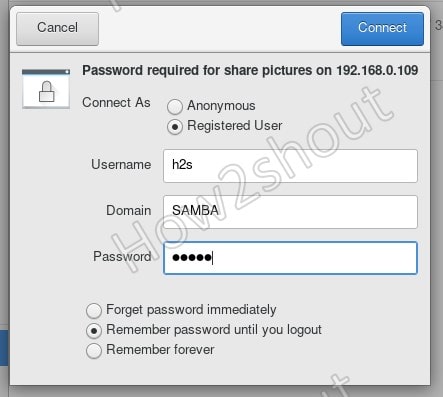
- Select Registered User and enter that username and password


Extra tip- Linux Mint SambaShare User
If you want to create a new user to access the folder you want to share except it cannot access anything else then follow the below steps:
Create users:
Add user to Sambashare group
sudo usermode -aG new-user sambshare
Change the folder rights of a folder that you want to share to read and write for all users. So, that our new user can access that.
sudo chmod 777 folder-path
Now, you can access the shared folder using the new user and its password.
8 thoughts on “Install Samba on Linux Mint to share files with Windows”
I had to use “sudo smbpasswd -a $USER” otherwise I got the error “Failed to find the entry for user …”
Otherwise, a very straightforward setup. Many thanks. Reply
Awesome walkthrough, thank you!| One minor typo in the “Add user to Sambashare group” step:
Command should be `sudo usermod -aG sambashare new-user` …and then it might be good to set the password for that new user immediately following: `sudo smbpasswd -a new-user` Reply
For the command line “sudo systemctl –enable now smbd”
in my version – Linux Mint 17.3 “Rosa” Cinnamon – I had to shorton to “sudo enable now smbd” to work. Reply
Everything working fast, I have an old gateway DX4200 with 8 GB, and a tablet with Windows 10. Your tutorial was accurate and worked for me. Thanks so much, would please provide a xfer link and send you $ufficient grace. Reply
step 4 is missing instructions on how to create the user in the first place.
step 5 is bad. nemo sharing is terrible. it won’t let you specify who you share what with, it just shares it with everyone Reply
Linux mint network with windows
Добрый день.
Сразу хочу предупредить в Linux я как «чайник», так что сильно не бейте. Есть небольшая сетка из двух компов и ноута. Ноут с Linux mint 19, один комп с Windows 7, второй с Windows 10 оба с расшаренными папками. Решил настроить локальную сеть на ноуте для обмена файлами. Скачал Sambu, установил, перезагрузил ноут и попробовал зайти на комп с Windows 10, через smb://192.168.1.3, все ОК. А вот зайти на комп с Windows 7, через smb://192.168.1.5, не получилось. В ответ получил ошибку «Failed to retrieve share list from server: invalid argument».
System: Host: ACER-5235 Kernel: 4.15.0-36-generic x86_64
bits: 64 gcc: 7.3.0
Desktop: Cinnamon 3.8.9 (Gtk 3.22.30-1ubuntu1)
Distro: Linux Mint 19 Tara
Machine: Device: laptop System: Acer product: Extensa 5235 serial: N/A
Mobo: Acer model: BA50-MV serial: N/A
BIOS: Phoenix v: V1.3311 date: 12/21/2009
CPU: Single core Intel Celeron 900 (-UP-)
arch: Penryn rev.10 cache: 1024 KB
flags: (lm nx sse sse2 sse3 ssse3) bmips: 4389 speed: 2194 MHz (max)
Graphics: Card: Intel Mobile 4 Series Integrated Graphics Controller
bus-ID: 00:02.0
Display Server: x11 (X.Org 1.19.6 )
drivers: modesetting (unloaded: fbdev,vesa)
Resolution: 1280×1024@60.02hz
OpenGL: renderer: Mesa DRI Mobile Intel GM45 Express
version: 2.1 Mesa 18.0.5 Direct Render: Yes
Audio: Card Intel 82801I (ICH9 Family) HD Audio Controller
driver: snd_hda_intel bus-ID: 00:1b.0
Sound: Advanced Linux Sound Architecture v: k4.15.0-36-generic
Network: Card-1: Qualcomm Atheros AR928X Wireless Network Adapter (PCI-Express)
driver: ath9k bus-ID: 07:00.0
IF: wlp7s0 state: up mac:
Card-2: Qualcomm Atheros AR8131 Gigabit Ethernet
driver: atl1c v: 1.0.1.1-NAPI port: 4000 bus-ID: 09:00.0
IF: enp9s0 state: down mac:
Drives: HDD Total Size: 201.1GB (65.0% used)
ID-1: /dev/sda model: TOSHIBA_MK1237GS size: 120.0GB
ID-2: USB /dev/sdb model: TS80GSJ25S size: 80.0GB
ID-3: USB /dev/sdc model: Multi size: 1.0GB
Partition: ID-1: / size: 17G used: 8.2G (53%) fs: ext4 dev: /dev/sda5
ID-2: /home size: 11G used: 5.6G (58%) fs: ext4 dev: /dev/sda7
ID-3: swap-1 size: 3.10GB used: 0.06GB (2%)
fs: swap dev: /dev/sda6
RAID: No RAID devices: /proc/mdstat, md_mod kernel module present
Sensors: System Temperatures: cpu: 64.0C mobo: N/A
Fan Speeds (in rpm): cpu: N/A
Info: Processes: 213 Uptime: 4:56 Memory: 1955.5/2869.4MB
Init: systemd runlevel: 5 Gcc sys: 7.3.0
Client: Shell (bash 4.4.191) inxi: 2.3.56
С этого же ноута, из под Windows 7, расшаренные папки видно Что делаю не правильно. Спасибо за помощь.
Настойка локальной сети в Windows и Linux Mint. Создание общей папки
Настроить локальную сеть между Linux и Windows через роутер по Wi-Fi оказалось не сложной задачей. Возможно, настройки по умолчанию были выстроены как надо. Честно сказать, я не специалист по настройке локальной сети и данная статья не содержит каких-то углублённых настроек и сложной конфигурации сети. Всё просто: обмен данных идёт через роутер, доверяем сети и позволяем Windows и Linux менять содержимое папки.
Покажу как я настраивал обмен данными по локальной сети через расшаренную папку. Для взаимодействия Linux с другими компьютерами нужно установить samba:
sudo apt-get install samba
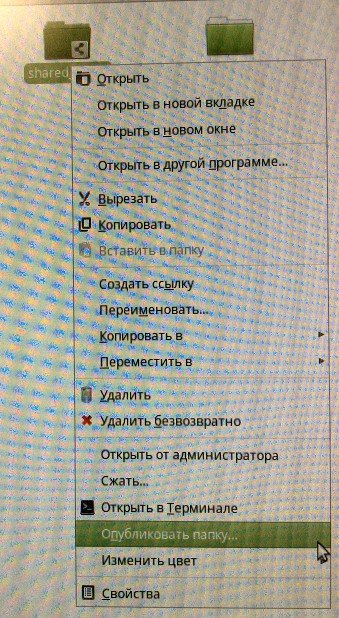
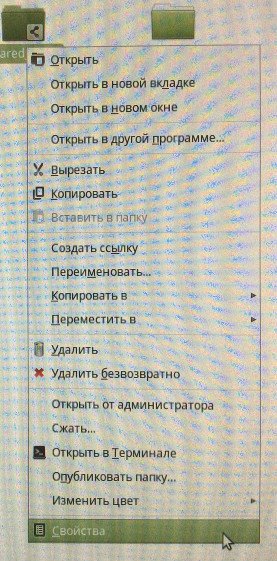
Создаём папку с необходимым именем (напр., shared_folder) в своей домашней папке и открываем доступ (опубликовываем) через контекстное меню, другими словами нужно щёлкнуть правой кнопкой по папке и выбрать «Опубликовать. » (у кого-то пункт может называться «открыть доступ»).
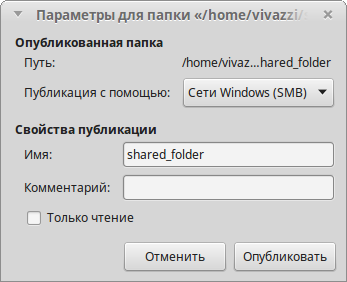
Вводим пароль администратора и в появившемся окошке выставляем следующие параметры:
Затем заходим в свойства папки:
Везде выставляем максимальные права на изменение содержимого папки:
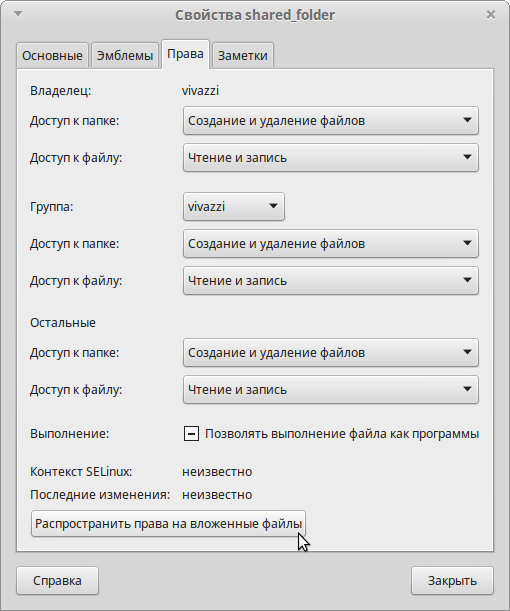
Щелкаем распространить права на вложенные файлы и нажимаем «Закрыть».
Теперь должно работать расшаривание в обе стороны: можно добавлять и изменять содержимое папки как в Linux, так и в Windows.
Чтобы из Windows открыть расшаренную папку нужно в проводнике найти пункт «Сеть». В этой папке должен быть виден другой компьютер Linux:
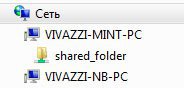
Виден компьютер VIVAZZI-MINT-PC и папочку shared_folder. В ней можно вставлять и доставать файлы.
Вот и всё. Если что-то пошло не так, то искать в гугле, потому как, ещё раз повторюсь, с локальными сетями я имею дело крайне редко.
П. С. Прошу прощения за качество некоторых изображений — в Linux Mint почему-то не могу сделать скриншот, когда открыто контекстное меню.