- Установка nginx, php-fpm, mariadb, nodejs и Laravel в Ubuntu
- laravel
- создание виртуального хоста laravel.test
- права доступа
- How to Install NGINX on Linux Mint 21
- How to Install NGINX on Linux Mint 21
- UFW Configuration
- How to Remove NGINX on Linux Mint 21
- Conclusion
- About the author
- Syeda Wardah Batool
- Linux Mint 19 installs PHP7.3 and configures with nginx
- Hot Topics
- How To Install Linux, Nginx, MariaDB, PHP (LEMP Stack) on Linux Mint 19
- Install MariaDB
- Install Nginx
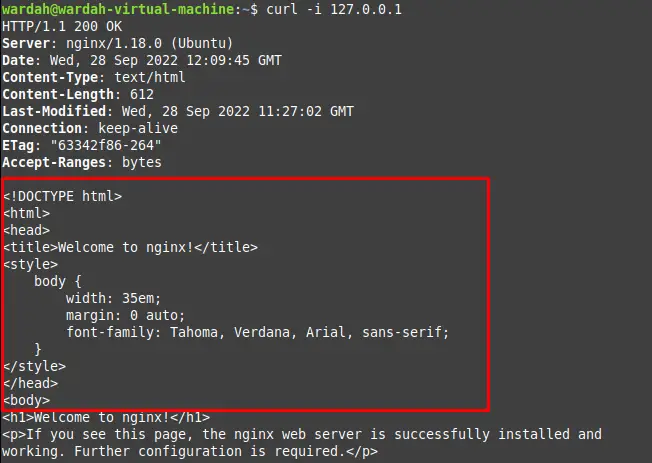
- Test Nginx
- Install PHP-FPM
- EnablePHP-FPM Support on Virtual Host
- Testing PHP-FPM support on the Virtual Host
- On Client machine
Установка nginx, php-fpm, mariadb, nodejs и Laravel в Ubuntu
Если нужно установить самую последнюю версию, нужно придерживаться инструкции https://getcomposer.org/download/.
php -r "copy('https://getcomposer.org/installer', 'composer-setup.php');" sudo php composer-setup.php --install-dir=/usr/bin --filename=composerlaravel
# создание проекта Laravel в текущей папке composer create-project --prefer-dist laravel/laravel laravel.testсоздание виртуального хоста laravel.test
Создание файла /etc/nginx/conf.d/laravel.test
server < listen 80; server_name laravel.test; root /home/path/to/folder/public; access_log /path/to/folder/laravel.test/access.log; error_log /path/to/folder/laravel.test/error.log; add_header X-Frame-Options "SAMEORIGIN"; add_header X-Content-Type-Options "nosniff"; index index.php; charset utf-8; location / < try_files $uri $uri/ /index.php?$query_string; >location = /favicon.ico < access_log off; log_not_found off; >location = /robots.txt < access_log off; log_not_found off; >error_page 404 /index.php; location ~ \.php$ < fastcgi_pass unix:/var/run/php/php8.1-fpm.sock; fastcgi_param SCRIPT_FILENAME $realpath_root$fastcgi_script_name; include fastcgi_params; >location ~ /\.(?!well-known).* < deny all; >># добавление домена в /etc/hosts 127.0.0.1 localhost laravel.testправа доступа
По умолчанию PHP запускается от имени www-data. Поэтому нужно изменить пользователя, от которого запускается nginx. В файле /etc/nginx/nginx.conf
# нужно эту строку user nginx; # поменять на user www-data;Допустим я работаю от имени myname:myname. Тогда нужно добавиться в группу www-data и пользователя www-data нужно добавить в свою группу myname.
# добавление пользователя в группу sudo usermod -a -G group_name user_name # выполняем команды sudo usermod -a -G myname www-data sudo usermod -a -G www-data mynameHow to Install NGINX on Linux Mint 21
![]()
In the Linux system, NGINX is a free, open-source, and highly scalable web server based on an asynchronous and event-driven structure. It performs different functions like reverse proxy, load balancing, web serving, media streaming, and HTTP cache serving. It was primarily designed for web serving only but later extended its services.
It is a high-performance HTTP server that top-ranked companies use. Also, it is adopted by most Linux users because of its rich features like stability, simple configuration, and high performance.
How to Install NGINX on Linux Mint 21
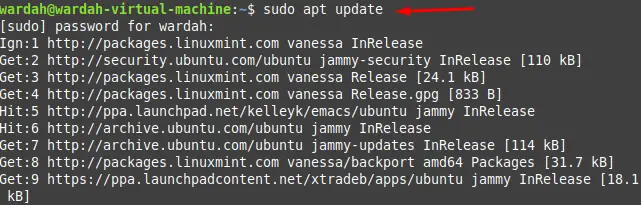
Update the Linux Mint system repository to upgrade and refresh all the packages up-to-date. This ensures that system will install the latest update of the required application:
In the next move, execute the installation command to install the NGINX server on Linux Mint 21 system. It would be done using the mentioned command:
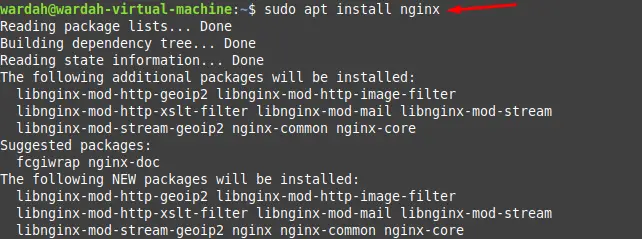
Confirm its installation and check if the system has installed the latest update of NGINX server:

Start the NGINX service with the help of command:

You can also enable to let the service start automatically:

Now, check the status of NGINX service for further configuration:
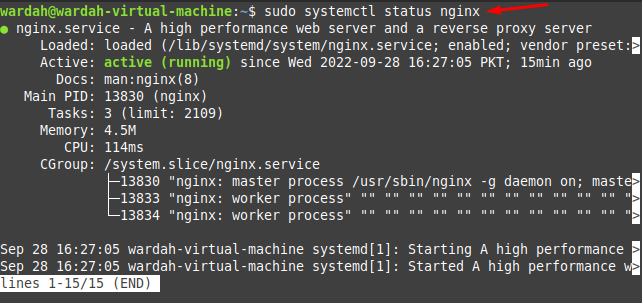
Active status shows that you can configure NGINX service.
UFW Configuration
Enable the firewall by the following command:

List down the available applications for the firewall using the command:

Now, allow the server to enable HTTP (Port 80) and HTTPS (Port 443). It would be done using the NGINX Full command:

To adopt the changes, we have given to ufw service, reload the firewall through the command:

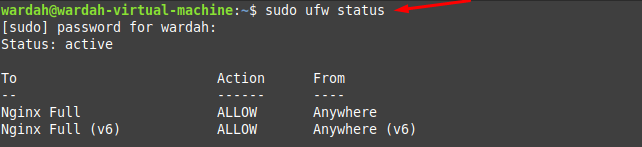
Confirm the firewall rules we have updated above by using the status command:
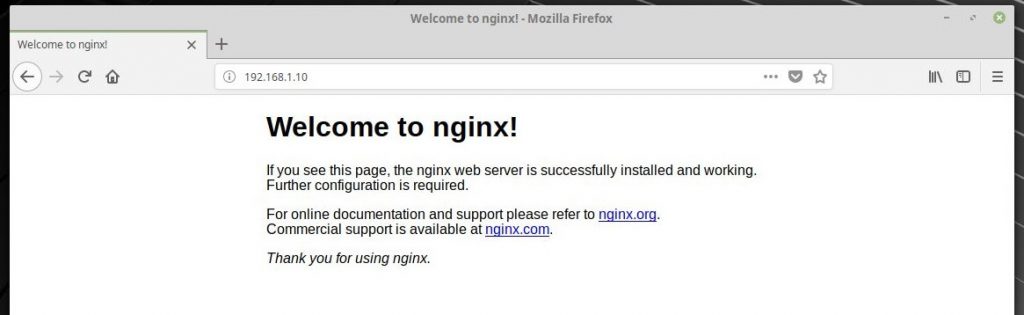
Now, test the NGINX server its working by assigning your IP address if it works properly:
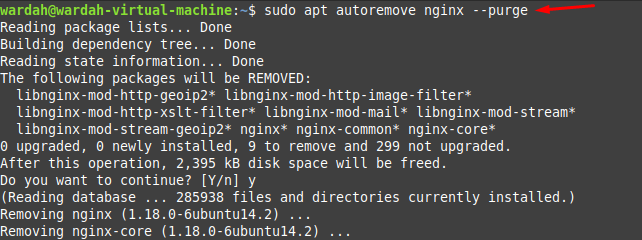
How to Remove NGINX on Linux Mint 21
You can also remove it by typing the mentioned command:
Conclusion
Nginx software is a web-based server used for HTTP cache serving, media streaming, web serving, email proxy and reverse proxy. It is famous among Linux users because of its notable features like high performance, load balancing, stability, and many more.
This guide has mentioned a detailed guide on how to install the Nginx server on Linux Mint. We have seen a step-by-step process to install it. Moreover, the details configuration setup is also mentioned in this guide.
About the author
Syeda Wardah Batool
I am a Software Engineer Graduate and Self Motivated Linux writer. I also love to read latest Linux books. Moreover, in my free time, i love to read books on Personal development.
Linux Mint 19 installs PHP7.3 and configures with nginx
Make sure that you are running the latest version of Linux Mint. If there are important programs running and you do not want to upgrade them, you can only update the package list and run the following command:
sudo apt update sudo apt upgradeIf a newer version of Kernel is installed, it is recommended to restart after the upgrade:
2, Adding the PHP 7.3 repository to Linux Mint 19
Since Linux Mint 19 is based on Ubuntu 18.04, the repository to be added is for Ubuntu 18.04.
Add the ondrej/php PPA repository, which contains the PHP 7.3 package and other necessary PHP extensions:
sudo add-apt-repository ppa:ondrej/php sudo apt updateNote: with the continuous update of Linux Mint 19, PHP version 7.3 may be provided in the future. This step can be omitted at that time.
3, Installing PHP 7.3 on Linux Mint 19
After adding the repository, install PHP 7.3 by running the following command on the terminal:
sudo apt-get install php7.3You can check the version using the php — command:
PHP 7.3.1-1+ubuntu18.04.1+deb.sury.org+1 (cli) (built: Jan 13 2019 10:19:33) ( NTS ) Copyright (c) 1997-2018 The PHP Group Zend Engine v3.3.1, Copyright (c) 1998-2018 Zend Technologies with Zend OPcache v7.3.1-1+ubuntu18.04.1+deb.sury.org+1, Copyright (c) 1999-2018, by Zend Technologies4, Install PHP 7.3 extension
Use the following command to install the PHP 7.3 extension:
sudo apt-get install php7.3-
sudo apt install php7.3-cli php7.3-json php7.3-pdo php7.3-mysql php7.3-zip php7.3-gd php7.3-mbstring php7.3-curl php7.3-xml php7.3-bcmathYou can use the apt policy command to confirm the installed PHP extension version:
php7.3-gd: Installed: 7.3.1-1+ubuntu18.04.1+deb.sury.org+1 Candidate: 7.3.1-1+ubuntu18.04.1+deb.sury.org+1 Version table: *** 7.3.1-1+ubuntu18.04.1+deb.sury.org+1 500 500 http://ppa.launchpad.net/ondrej/php/ubuntu bionic/main amd64 Packages 100 /var/lib/dpkg/status5, Installing PHP7.3-FPM on Linux Mint
If you are using Nginx Web Server and you need to install php7.3-fpm to provide PHP pages, run the following command:
sudo apt install php7.3-fpmThe PHP FPM configuration file is located in the / etc/php/7.3/fpm/ folder.
After installing PHP, it is recommended to restart the Web server:
sudo systemctl restart apache2sudo systemctl restart nginxSo far, PHP7.3-FPM installation is completed.
Note here: the path of PHP configuration file php.ini will vary with the PHP version, so the command to find the php.ini file location is as follows
The command means: php-i displays the details of PHP, and then matches the information of php.ini. As shown in the above figure, the path is / etc/php/7.2/cli/php.ini. The PHP configuration files used to set up the environment are / etc/php/7.3/cli/php.ini and / etc/php/7.3/apache2/php.ini.
Now build a PHP file to see if you can run normally.
Then press i again to enter the editing mode, and input the contents of the file as follows
Save the changes and access them in the browser
The PHP version 7.3.13-1 + Ubuntu 18.04.1 + deb.sury.org + 1 page appears.
Finally, there is a small place. Because nginx and php are turned off by default for cgi.fix ﹐ pathinfo. That is to say, you can’t use pathinfo if you don’t open it. But if it is opened, there will be serious loopholes. So make a little modification so that you can use pathinfo with cgi.fix? Pathinfo turned off.
sudo vi /etc/nginx/sites-available/default #. PHP $is changed to. PHP, which is to remove the $after PHP. location ~ \.php < include snippets/fastcgi-php.conf; # Increase the support for PathInfo to prevent cgi.fix'PathInfo vulnerability. fastcgi_split_path_info ^(.+?\.php)(/.*)$; sudo systemctl restart nginxWARNING: channel "pecl.php.net" has updated its protocols, use "pecl channel-update pecl.php.net" to update
First, determine whether to install pecl and phpize if not
sudo apt install php-pear sudo apt install php7.3-dev //I use php7.3 here. Please refer to your version number for detailsAfter the above dependencies are installed, execute the
swoole will be installed automatically
Then, according to how to find php.ini mentioned above, find the php.ini configuration file location
Add to the configuration file of php cli(/etc/php/7.3/cli/php.ini)
Restart php service and web server service
Hot Topics
- Java - 6403
- Python - 2524
- Javascript - 1868
- Database - 1639
- Linux - 1537
- Back-end - 1512
- Spring - 1429
- Algorithm - 1406
- Front-end - 1257
- Android - 1140
- C++ - 1108
- MySQL - 1045
- Programming - 1042
- network - 904
- data structure - 866
- Attribute - 865
- C - 742
- xml - 735
- less - 697
- github - 694
How To Install Linux, Nginx, MariaDB, PHP (LEMP Stack) on Linux Mint 19
![]()
This tutorial will help to install Nginx on Linux Mint 19 with PHP support (through PHP-FPM) and MariaDB support.
I hope you know what Nginx is? Nginx is an open-source web server which can also be used as a reverse proxy, load balancer, mail proxy and HTTP cache.
Nginx was created by Igor Sysoev, released under BSD-like license.
Install MariaDB
First, we will install the MariaDB by issuing the following command. Update the repository index using the apt command.
Install MariaDB server using the following command.
sudo apt install -y mariadb-server
You can quickly log in to MariaDB server without the MySQL root password by running sudo mysql -u root -p or mysql -u root -p command as root in Linux Mint.
Install Nginx
Download the Nginx signing key from the official site.
wget http://nginx.org/keys/nginx_signing.key
Add Nginx repository to the system using the below commands.
echo "deb [arch=amd64] http://nginx.org/packages/ubuntu/ bionic nginx" | sudo tee /etc/apt/sources.list.d/nginx.list echo "deb-src [arch=amd64] http://nginx.org/packages/ubuntu/ bionic nginx" | sudo tee -a /etc/apt/sources.list.d/nginx.list
Install Nginx using the following command.
Test Nginx
Open a web browser and hit it to,
You should see the below page, and this confirms you that the Nginx is successfully installed on the server.
The default document root of Nginx on Linuxmint 19 is /usr/share/nginx/html/. The configuration files are stored under /etc/nginx directory.
Install PHP-FPM
Next is to install PHP through PHP-FPM (PHP-FPM (FastCGI Process Manager), it is an alternative PHP FastCGI implementation. Install it by using the apt command.
sudo apt install -y php-fpm php-mysql php-cli
Edit the respective php.ini depending on the PHP version you have installed on the system.
sudo nano /etc/php/7.2/fpm/php.ini
set cgi.fix_pathinfo to 0.
Edit the /etc/php/7.2/fpm/pool.d/www.conf file.
sudo nano /etc/php/7.2/fpm/pool.d/www.conf
Make sure to change the following value.
listen = /var/run/php7.2-fpm.sock
EnablePHP-FPM Support on Virtual Host
Let’s create name-based virtual host on Nginx server for the following details.
Server Name : web.itzgeek.local
Document Root : /usr/share/nginx/html/web.itzgeek.local
Create the configuration file /etc/nginx/conf.d/web.itzgeek.local.conf for our virtual host.
sudo nano /etc/nginx/conf.d/web.itzgeek.local.conf
Add the following content.
Testing PHP-FPM support on the Virtual Host
Create the document root directory.
sudo mkdir /usr/share/nginx/html/web.itzgeek.local
For testing the PHP, place a .php file on to the document root of the created virtual host. In the terminal copy/paste the following line.
sudo nano /usr/share/nginx/html/web.itzgeek.local/index.php
Now, Copy/Paste this line into the index.php file and then save it.
sudo systemctl restart php7.2-fpm sudo systemctl restart nginx
On Client machine
Create host entry for your domain (web.itzgeek.local) in /etc/hosts file or make an A record in case you have DNS server in your environment.
Add a host entry something like below.
192.168.1.10 web.itzgeek.local web
Now open up a browser and type your domain in the web address.
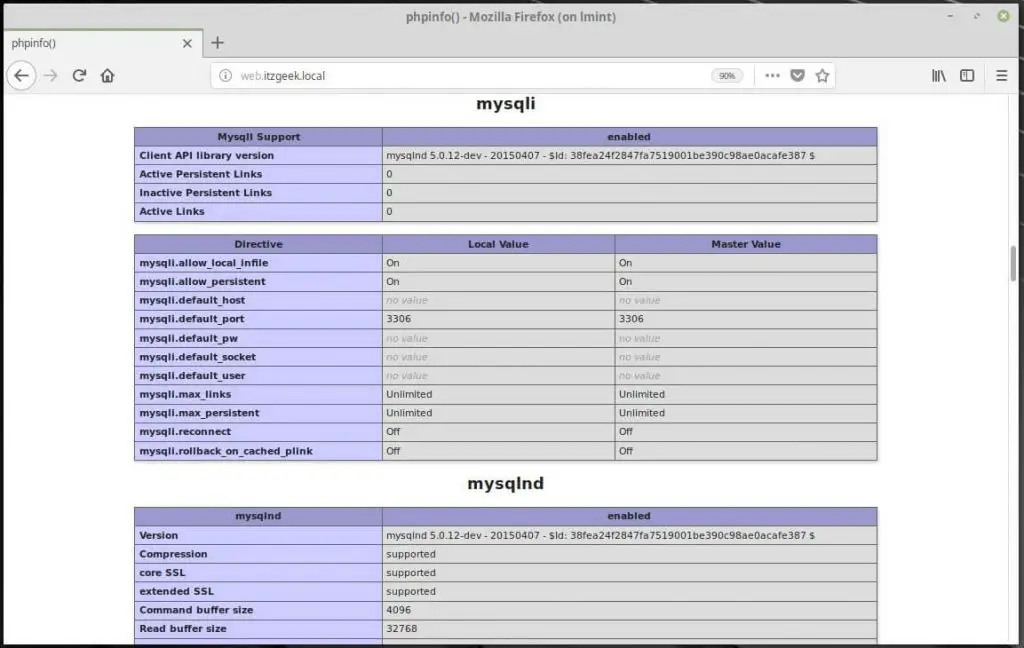
The page looks like below.
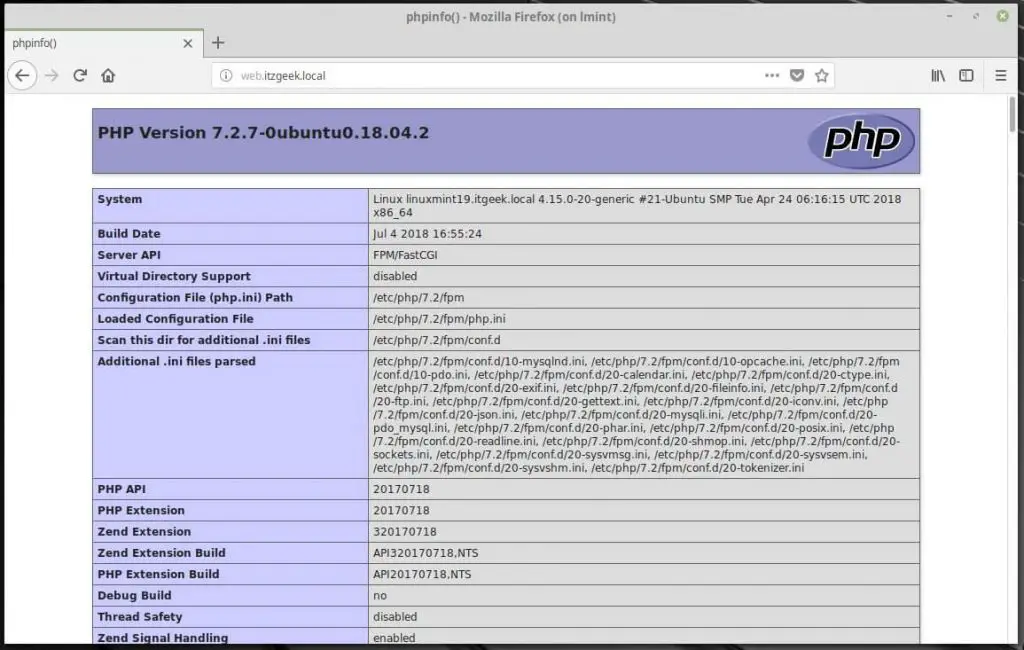
From the above screenshot, PHP is working through FPM/FastCGI, as shown in the Server API line.
Additionally, scroll the page further down to see all the modules that are enabled in PHP.
MySQL support information:
More To Read: