- How to Install OpenVPN on Linux Mint 21?
- Install OpenVPN on Linux Mint 20 — A step by step process ?
- Steps to install OpenVPN on Linux Mint 20
- How to Uninstall OpenVPN from Linux Mint 20 ?
- [Need assistance in configuring OpenVPN on your Linux system ? We can help you . ]
- Conclusion
- Как установить OpenVPN на Linux Mint 20
- Способ установки OpenVPN в Linux Mint 20:
- Шаг 1: Установите OpenVPN на Linux Mint 20:
- Шаг 2: Запустите службу OpenVPN:
- Шаг 3: Включите службу OpenVPN:
- Шаг 4: Проверьте статус службы OpenVPN:
- Способ удаления OpenVPN из Linux Mint 20:
- Вывод:
- Рекомендуемый контент
- Privacy Overview
How to Install OpenVPN on Linux Mint 21?

OpenVPN provides flexible VPN solutions to secure your data communications, whether it’s for Internet privacy, remote access for employees, securing IoT, or networking Cloud data centers.
We can deploy OpenVPN Server software solutions on-premises using standard servers or virtual appliances, or on the cloud.
A VPN reduces security risk by preventing unauthorized access to specific network resources and ensures privacy on untrusted Wi-Fi and other public access networks.
ParagraphPrivate companies, journalists, and individuals use VPN services to gain access to certain parts of the internet which are restricted by the Government.
Even though TOR is a better option for accessing restricted content, some people prefer VPN as it is usually faster than TOR.
VPN keeps you safe when you are connected to public wi-fi or an untrusted network. It encrypts your data and re-routes it through the VPN server to provide you with a secure experience.
The technology behind OpenVPN is open source, so it is accessible to everyone and can be hosted on a self-managed server by the VPN company.
Almost every VPN company supports OpenVPN and they provide you with manual configuration files to set up on your operating system.
Linux Mint provides built-in support for OpenVPN and so do many other Linux distros.
You can easily install OpenVPN on Linux Mint 21 and in older versions in just a few easy steps.

Follow these steps to configure OpenVPN on Linux Mint 21:
To set up OpenVPN, we first need to download its configuration files. Just check on the internet for VPN services that provide OpenVPN configuration.
For the sake of this tutorial, I am using vpnbook.com which provides open VPN access.
First, go to your VPN services’ website and download OpenVPN configuration files and note down your username and password. We will need them later.

I have downloaded my configuration files from vpnbook and have decompressed them as shown in the picture above.
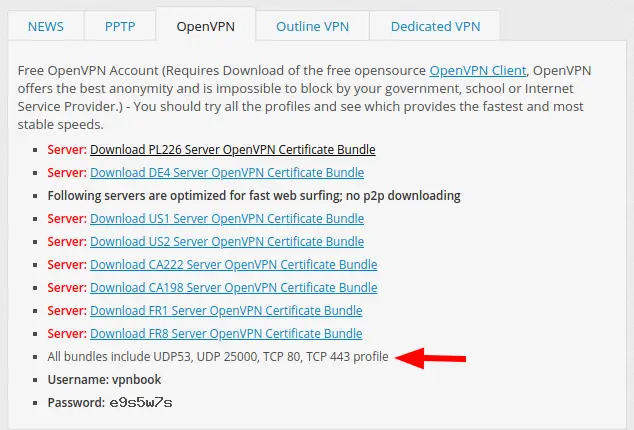
You may see more than one file after decompressing. This is because each one of these files is for a different protocol and you may choose whichever one you like or need.
After acquiring the necessary files, we will now set up OpenVPN.
To set up OpenVPN, click on the network icon present on the default panel in the right bottom corner and choose “Network Settings”.
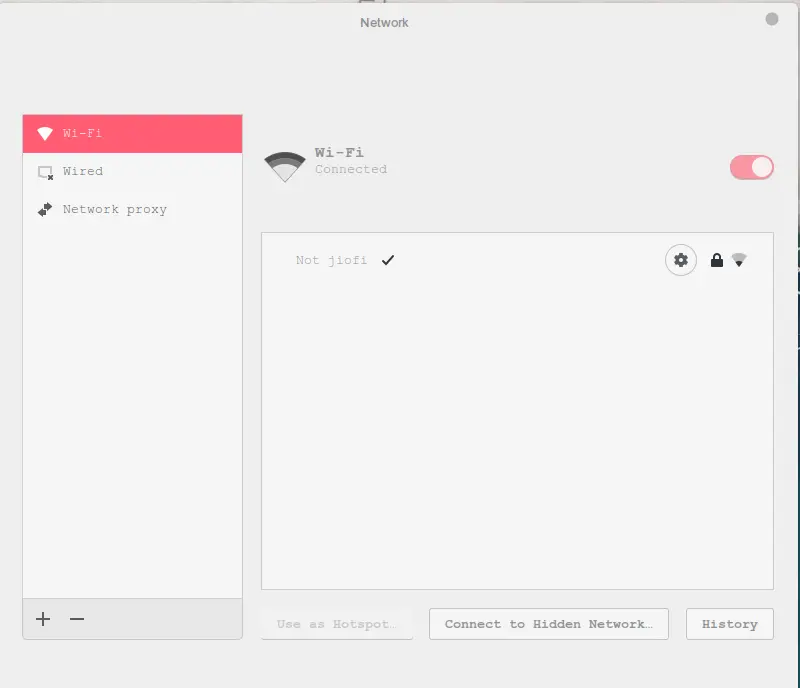
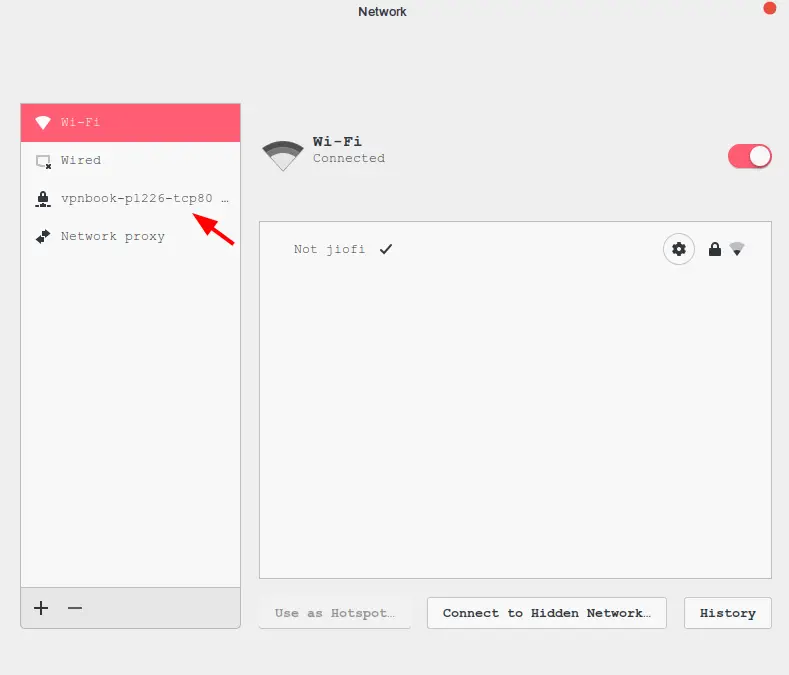
A pop-up will appear on your screen as shown in the picture above.
This is our network manager from where we can add or remove network connections. We will use it to set up our VPN connection.
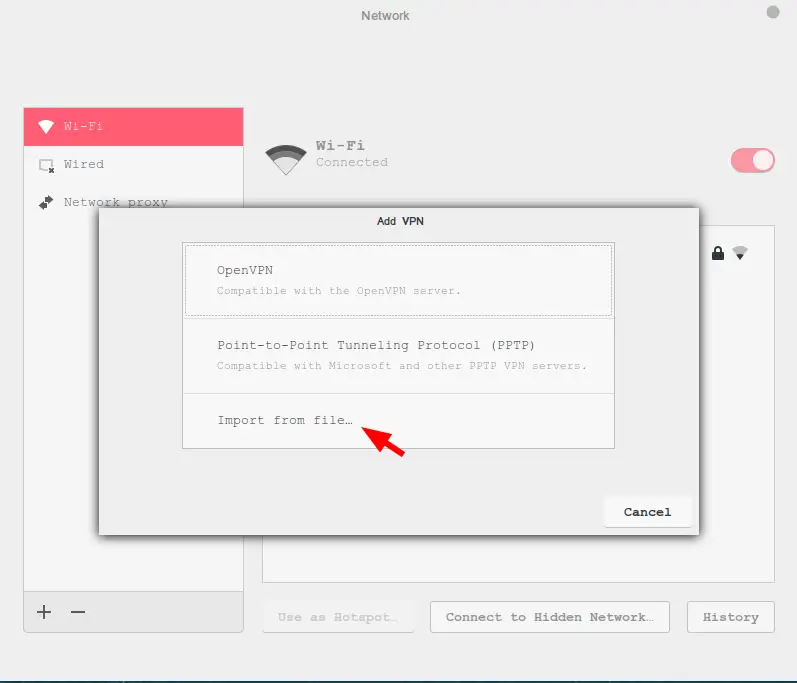
Now click on the plus icon in the bottom left of the window.
Now it will provide us with three options as shown in the picture above. Choose the “Import from File…” option as we have our configuration stored in a file.
It will open a file manager from where you can choose the file we downloaded in the first step. You can choose any of those four files; I have chosen the one with TCP protocol.
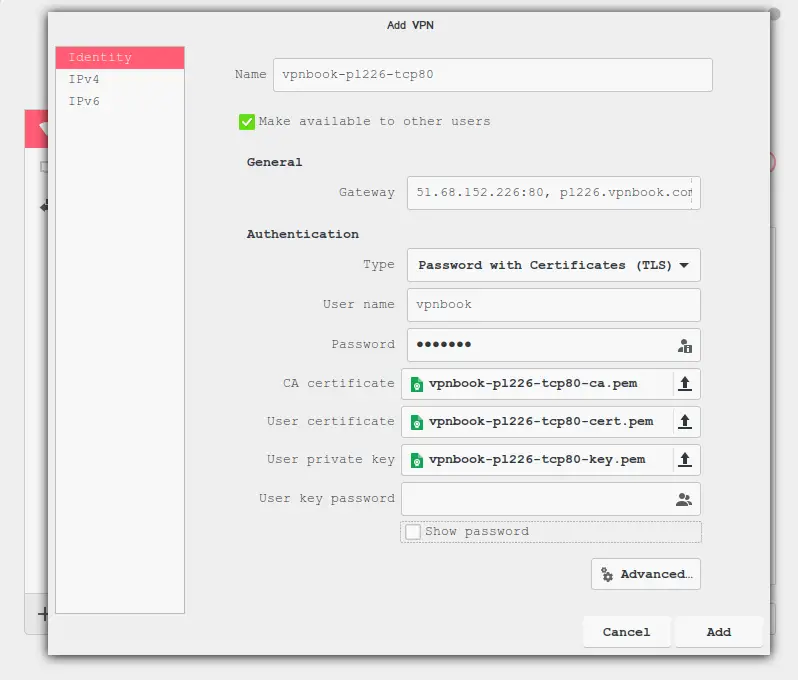
Now enter your username and password. If you are using VPNbook, then you can find the username and password on the same page from which you downloaded the configuration files.
I have entered all the information that we will need to set up our VPN client. We only have to input our username and password manually, and it automatically fills the rest of the stuff from the configuration file that we selected.
Our installation is now complete and now we can connect to VPN servers
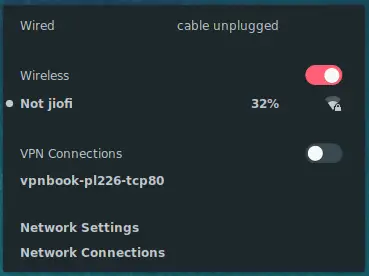
Click on the network icon again as shown in the picture above you will see your VPN connection name under VPN Connections section.
Now toggle the button next to “VPN Connections”.
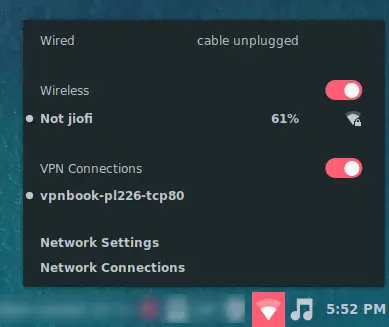
It will take around 10 seconds for the connection to become active. You will receive a notification after the connection has been successfully set up or will receive an error message if something went wrong.
We have completed our setup. If you receive any error then cross-check your username, password, and configuration file.
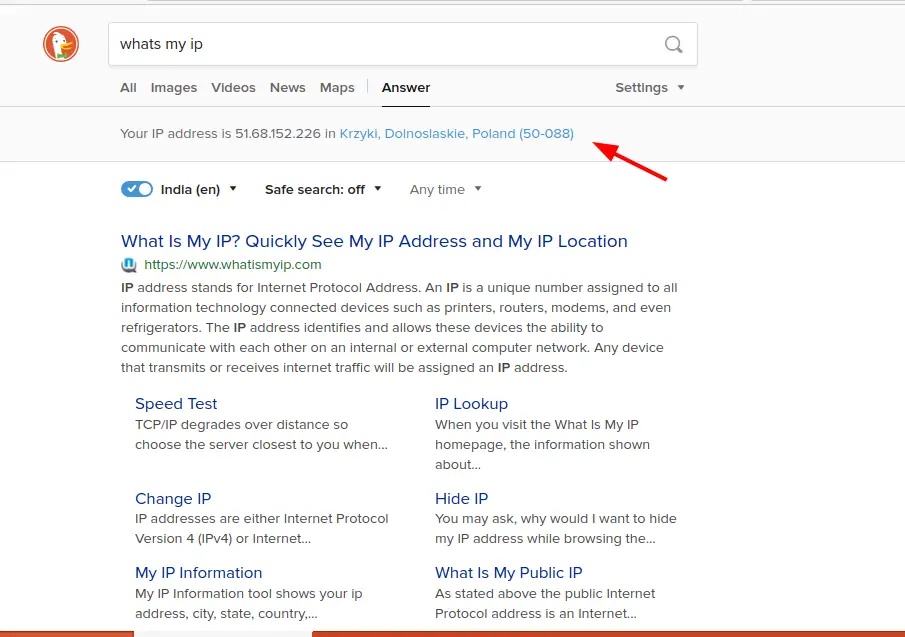
Now go to your web browser and search “what’s my IP” or visit Ipleak and check if your IP has been changed.
For me, it shows that I am in Poland and also shows a different IP address than my actual one.
This is it, and we have now successfully set up an OpenVPN connection in our Linux Mint machine.
Remember, if you are using a free VPN service like VPN then you should only use it for general purposes. For better and enhanced security, I recommend a premium VPN service.
This is the end of this article. I hope it helped you if so then share this article and drop your questions and doubts in the comments section.
Subscribe to our Newsletter for more interesting and fun Linux tutorials.
Install OpenVPN on Linux Mint 20 — A step by step process ?

OpenVPN is a tool using which you can create virtual private networks for securing your network communications. This tool also provides the facility of remotely accessing a system. Moreover, it can be used very easily with both the Linux and Windows operating systems.
Here at LinuxAPT , as part of our Server Management Services , we regularly help our Customers to perform related system security application Installation queries.
In this context, we shall look into the installation method of OpenVPN on a Linux Mint 20 machine.
Steps to install OpenVPN on Linux Mint 20
To install the OpenVPN client on Linux Mint 20, you need to perform the following steps.
First, you need to install the OpenVPN client on an updated system with the below command:
2. Install OpenVPN Network Manager
Now, install OpenVPN by running the below command:
$ sudo apt-get install network-manager-openvpn 3. Start the OpenVPN Service
After installing the OpenVPN client on your system, you need to start this service with the following command:
$ sudo systemctl start openvpn 4. Enable the OpenVPN Service
Now, you can enable the OpenVPN client on your system with the execution of the command stated below:
$ sudo systemctl enable openvpn 5. Check the Status of the OpenVPN Service
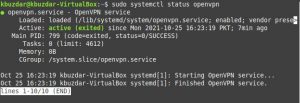
Finally, the active status of the OpenVPN client can be checked by running the following command:
$ sudo systemctl status openvpn Now, you will see the active status of the OpenVPN client installed on our Linux Mint 20 system.
How to Uninstall OpenVPN from Linux Mint 20 ?
You can easily remove the OpenVPN client from your system whenever you want by running the following command:
$ sudo apt-get purge --autoremove network-manager-openvpn [Need assistance in configuring OpenVPN on your Linux system ? We can help you . ]
Conclusion
This article covers the process of installing the OpenVPN client on a Linux Mint 20 system. In fact, after installing this tool on your system, it can be used effectively for enabling secure communications via the creation of virtual private networks.
Как установить OpenVPN на Linux Mint 20

OpenVPN — это инструмент, с помощью которого вы можете создавать виртуальные частные сети для защиты ваших сетевых коммуникаций. Этот инструмент также предоставляет возможность удаленного доступа к системе. Более того, его можно очень легко использовать как с операционными системами Linux, так и с Windows. Однако в этой статье мы просто поговорим о методе установки OpenVPN на машине с Linux Mint 20.
Способ установки OpenVPN в Linux Mint 20:
Чтобы установить клиент OpenVPN в Linux Mint 20, вам необходимо выполнить следующие шаги:
Шаг 1: Установите OpenVPN на Linux Mint 20:
Во-первых, вам необходимо установить клиент OpenVPN в обновленной системе с помощью команды, показанной ниже:
$ sudo apt-get install network-manager-openvpn
Шаг 2: Запустите службу OpenVPN:
После установки клиента OpenVPN в вашей системе вам необходимо запустить эту службу с помощью следующей команды:
$ sudo systemctl start openvpn
Шаг 3: Включите службу OpenVPN:
Теперь вы можете включить клиент OpenVPN в своей системе, выполнив команду, указанную ниже:
$ sudo systemctl enable openvpn
Шаг 4: Проверьте статус службы OpenVPN:
Наконец, активный статус клиента OpenVPN можно проверить, выполнив следующую команду:
$ sudo systemctl status openvpn
Активный статус клиента OpenVPN, установленного в нашей системе Linux Mint 20, показан на изображении ниже:
Способ удаления OpenVPN из Linux Mint 20:
Вы можете легко удалить клиент OpenVPN из своей системы, когда захотите, выполнив следующую команду:
$ sudo apt-get purge --autoremove network-manager-openvpn
Вывод:
В этой статье подробно описан метод установки клиента OpenVPN в системе Linux Mint 20. После установки этого инструмента в вашей системе его можно эффективно использовать для обеспечения безопасной связи посредством создания виртуальных частных сетей.
Рекомендуемый контент
Мы используем файлы cookie на нашем веб-сайте, чтобы предоставить вам наиболее релевантный опыт, запоминая ваши предпочтения и повторные посещения. Нажимая «Принять все», вы соглашаетесь на использование ВСЕХ файлов cookie. Однако вы можете посетить «Настройки файлов cookie», чтобы предоставить контролируемое согласие.
Privacy Overview
Этот веб-сайт использует файлы cookie, чтобы улучшить вашу работу во время навигации по веб-сайту. Из них файлы cookie, которые классифицируются как необходимые, хранятся в вашем браузере, поскольку они необходимы для работы основных функций веб-сайта. Мы также используем сторонние файлы cookie, которые помогают нам анализировать и понимать, как вы используете этот веб-сайт. Эти файлы cookie будут храниться в вашем браузере только с вашего согласия. У вас также есть возможность отказаться от этих файлов cookie. Но отказ от некоторых из этих файлов cookie может повлиять на ваш опыт просмотра.
Necessary cookies are absolutely essential for the website to function properly. These cookies ensure basic functionalities and security features of the website, anonymously.
| Cookie | Duration | Description |
|---|---|---|
| cookielawinfo-checkbox-analytics | 11 months | This cookie is set by GDPR Cookie Consent plugin. The cookie is used to store the user consent for the cookies in the category «Analytics». |
| cookielawinfo-checkbox-functional | 11 months | The cookie is set by GDPR cookie consent to record the user consent for the cookies in the category «Functional». |
| cookielawinfo-checkbox-necessary | 11 months | This cookie is set by GDPR Cookie Consent plugin. The cookies is used to store the user consent for the cookies in the category «Necessary». |
| cookielawinfo-checkbox-others | 11 months | This cookie is set by GDPR Cookie Consent plugin. The cookie is used to store the user consent for the cookies in the category «Other. |
| cookielawinfo-checkbox-performance | 11 months | This cookie is set by GDPR Cookie Consent plugin. The cookie is used to store the user consent for the cookies in the category «Performance». |
| viewed_cookie_policy | 11 months | Этот файл cookie устанавливается подключаемым модулем GDPR Cookie Consent. Файлы cookie используются для хранения согласия пользователя на файлы cookie в категории «Необходимые». |
Functional cookies help to perform certain functionalities like sharing the content of the website on social media platforms, collect feedbacks, and other third-party features.
Performance cookies are used to understand and analyze the key performance indexes of the website which helps in delivering a better user experience for the visitors.
Analytical cookies are used to understand how visitors interact with the website. These cookies help provide information on metrics the number of visitors, bounce rate, traffic source, etc.
Advertisement cookies are used to provide visitors with relevant ads and marketing campaigns. These cookies track visitors across websites and collect information to provide customized ads.
Other uncategorized cookies are those that are being analyzed and have not been classified into a category as yet.