- Управление соединениями VPN в Cinnamon
- Установка NetworkManager VPN plugin for OpenVPN
- Сетевые соединения и настройки сети в Cinnamon (Network Connections и Network Settings)
- Управление подключениями OpenVPN в Network Settings
- Управление подключениями OpenVPN в Network Connections
- Подключение к OpenVPN серверу
- How To Set Up OpenVPN on Linux Mint
- 1. Download the free OpenVPN Certificate Bundles to your computer.
- 2. Install the OpenVPN software.
- 3. Create a VPN network connection
- How to use
Управление соединениями VPN в Cinnamon
Графическое окружение рабочего стола Cinnamon характерно в первую очередь для Linux Mint.
Установка NetworkManager VPN plugin for OpenVPN
Для того чтобы у вас присутствовал показанный в данной инструкции пункт меню в NetworkManager, у вас должен быть установлен плагин NetworkManager VPN для OpenVPN
В некоторых дистрибутивах он установлен по умолчанию. Если у вас он отсутствует, выполните одну из следующих команд по его установке.
- Установка в Debian и производные дистрибутивы (Linux Mint, Ubuntu, Kali Linux и другие):
sudo apt install network-manager-openvpn-gnome
sudo pacman -S networkmanager-openvpn
Для того, чтобы изменения вступили в силу (чтобы NetworkManager начал использовать установленный плагин) перезапустите службу NetworkManager следующей командой:
sudo systemctl restart NetworkManager
Сетевые соединения и настройки сети в Cinnamon (Network Connections и Network Settings)
При клике на значок сетевого подключения (его вид зависит от того, используете ли вы проводное или беспроводное соединение) для управления сетями будут доступны две опции:
- Network Settings — настройки сетей от Cinnamon (следовательно, присутствует только в данном графическом окружении рабочего стола)
- Network Connections — настройки сетей от NetworkManager (следовательно, присутствует в любом дистрибутиве с NetworkManager)
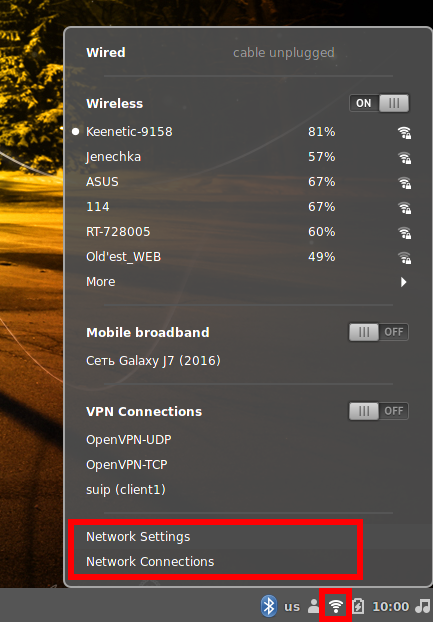
В целом эти настройки позволяют делать одинаковые вещи: добавлять, редактировать и удалять сетевые подключения.
Network Settings содержит список доступных для подключения Wi-Fi сетей, а также список OpenVPN настроек, прокси, проводные соединения. В Network Settings можно активировать то или иное сетевое соединение.
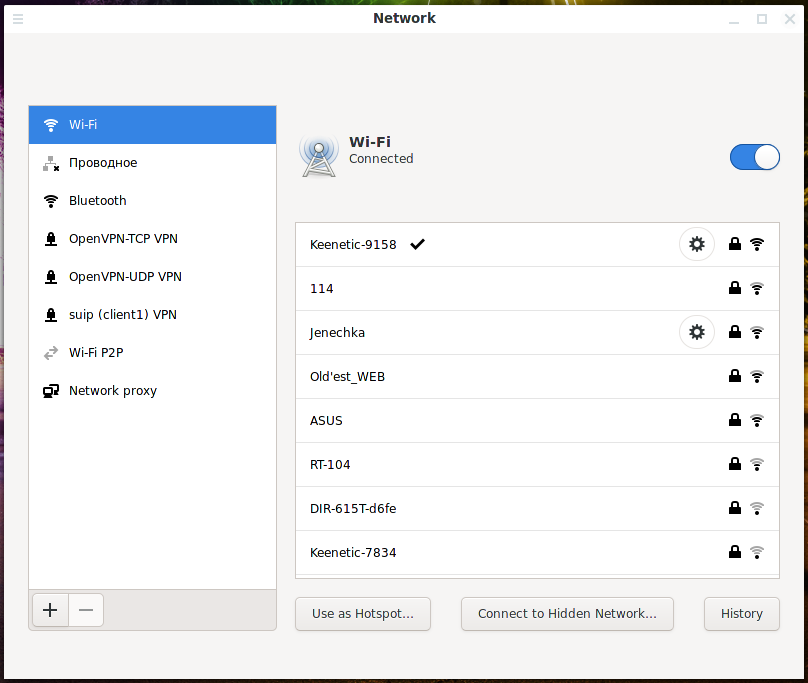
Network Connections не показывает доступные для подключения Wi-Fi сети, но зато хранит настройки сетей, к которым компьютер когда либо подключался.

Управление подключениями OpenVPN в Network Settings
Для удаления OpenVPN подключения выделите его и нажмите знак минус (—).
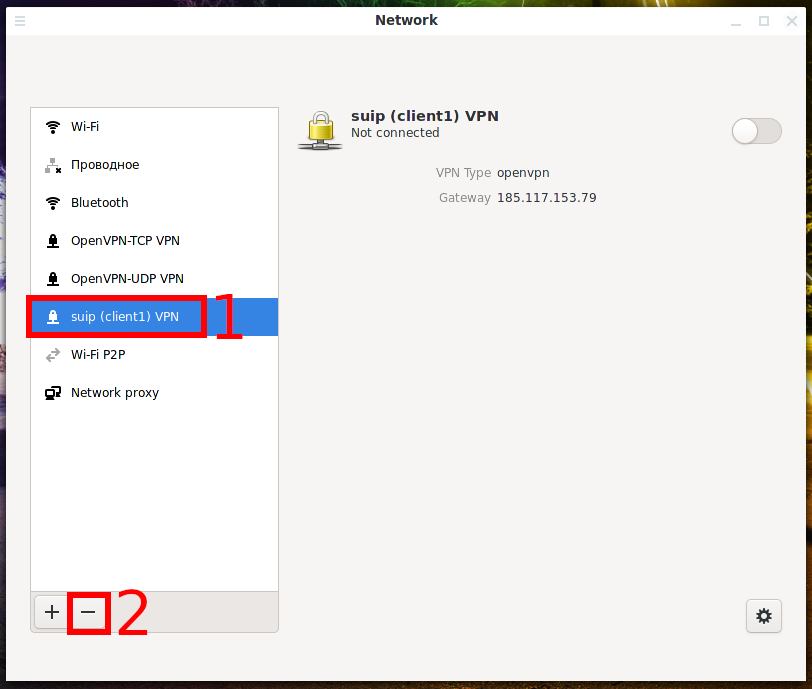
Подключение будет удалено без подтверждения.
Для добавления OpenVPN подключения нажмите знак плюс (+).
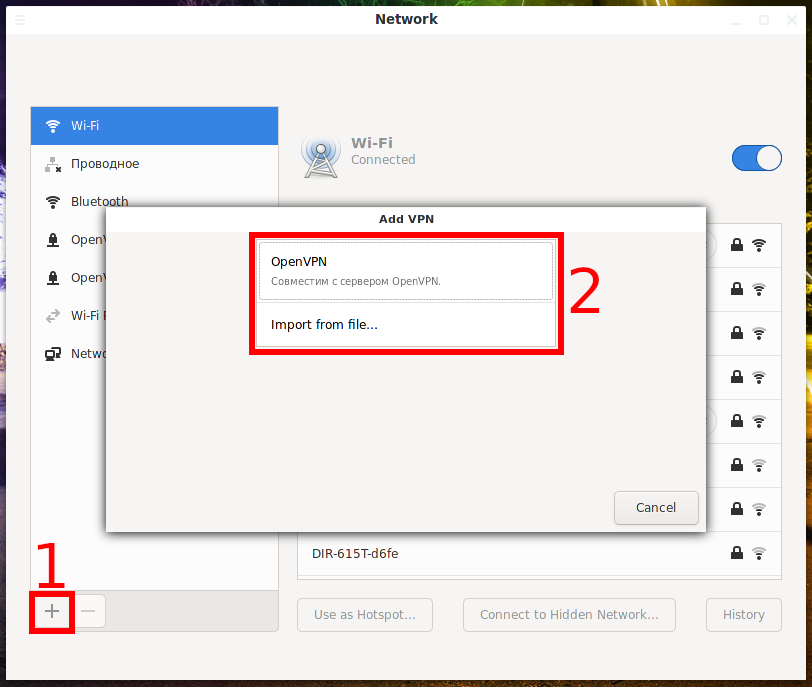
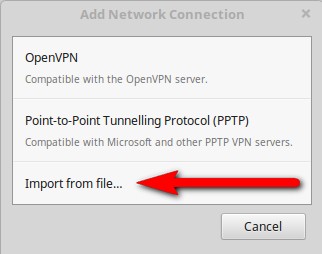
Вам будет предложено 2 опции:
- OpenVPN (совместимое с сервером OpenVPN) — вам нужно будет ввести настройки вручную и указать файлы сертификатов
- Import from file — импортировать настройки из файла
При ручной настройке вам не нужно что-либо менять на вкладках IPv4 и IPv6. Часть настроек располагается на вкладке Identity, для доступа к другим настройкам нажмите кнопку «Дополнительно»:
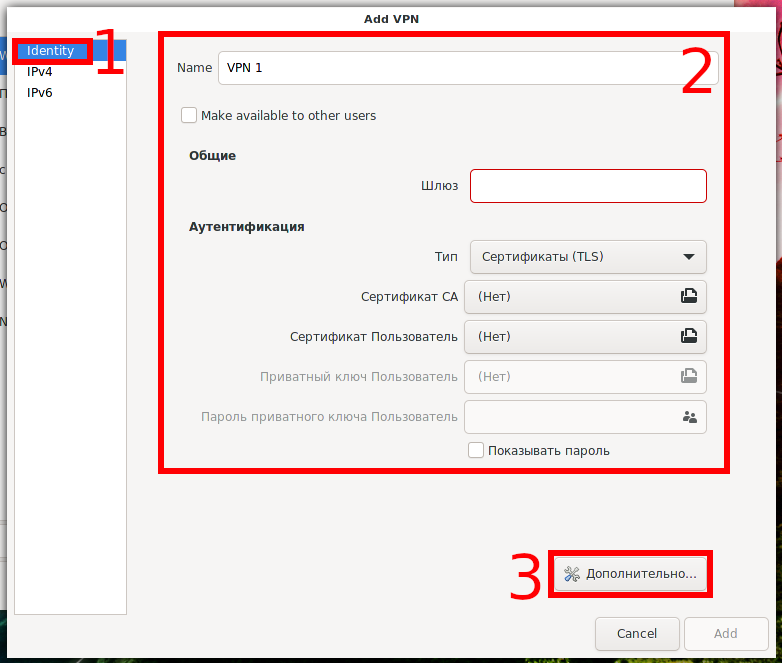
Для редактирования подключения OpenVPN выберите его и нажмите значок шестерёнки.

Часть настроек располагается на вкладке Identity.

, для доступа к другим настройкам нажмите кнопку «Дополнительно».

Управление подключениями OpenVPN в Network Connections
Для удаления OpenVPN подключения выделите его и нажмите знак минус (—).
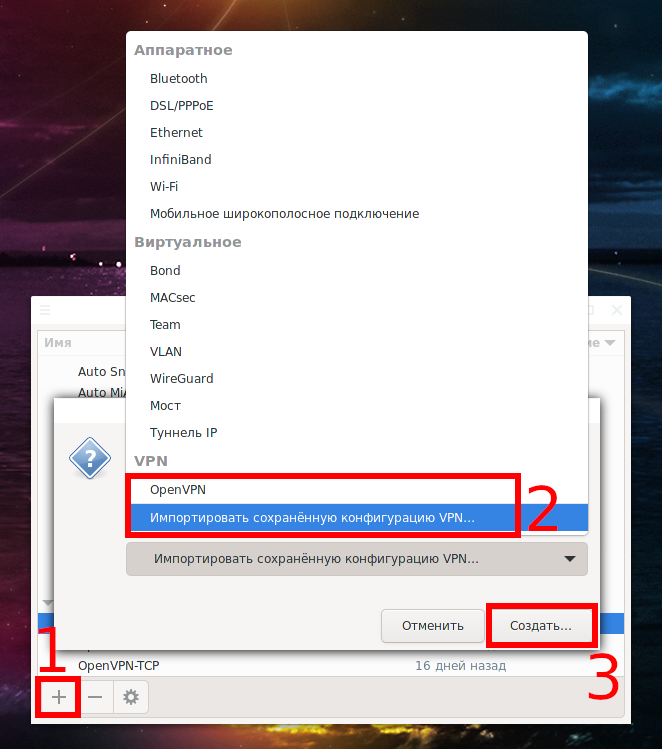
Для добавления OpenVPN подключения нажмите знак плюс (+).

В выпадающем списке вам будет доступно много опций, 2 из них имеют отношение к OpenVPN:
- OpenVPN — вам нужно будет ввести настройки вручную и указать файлы сертификатов
- Импортировать сохранённую конфигурацию VPN
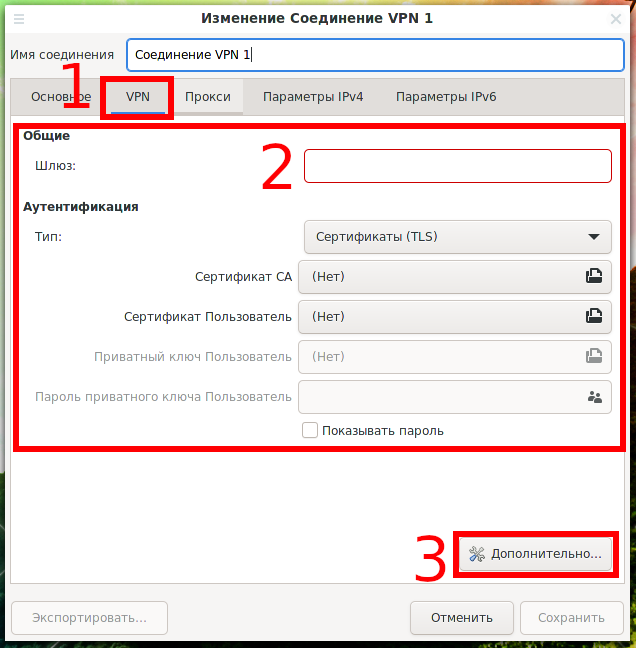
При ручной настройке вам не нужно что-либо менять на вкладках Основное, Прокси, Параметры IPv4 и Параметры IPv6. Часть настроек располагается на вкладке VPN, для доступа к другим настройкам нажмите кнопку «Дополнительно».
Для редактирования подключения OpenVPN выберите его и нажмите значок шестерёнки.
Подключение к OpenVPN серверу
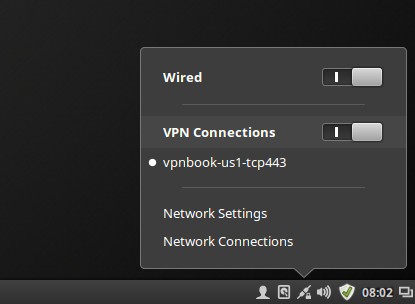
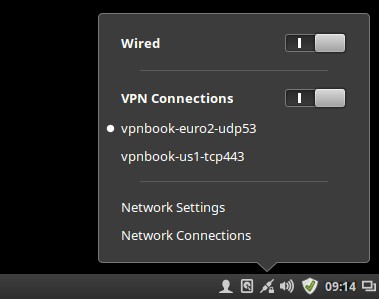
Вы можете добавить несколько OpenVPN подключений и включать любое из них в зависимости от ваших потребностей. Включать их можно как на основной панели NetworkManager – кликните на выбранное подключение:

Также включать VPN подключения можно в Network Settings, для этого выберите нужное VPN соединение и нажмите переключатель:
How To Set Up OpenVPN on Linux Mint
This guide describes the steps taken to set up the free OpenVPN service on Linux Mint and create a toggle switch in the Network Connections applet to simplify its use.
A VPN connection toggle switch circumvents the need to launch the OpenVPN service by typing a command in a terminal window. Additionally, multiple VPN networks can be added to the Network Connection applet as desired, to manage all your VPN networks effectively.
Linux Mint VPN Network Connection using the free OpenVPN service
In brief, the steps required are:
- Visit vpnbook.com and download the free OpenVPN Certificate Bundles to your computer.
- Install the OpenVPN network daemon, network management framework and OpenVPN plugin core using Software Manager.
- Create a VPN network connection using one of the downloaded OpenVPN Certificates.
1. Download the free OpenVPN Certificate Bundles to your computer.
Free OpenVPN is the best and most recommended open-source VPN software world-wide.
Visit vpnbook.com/freevpn and download one or more Certificate Bundles appropriate for your needs.
Also, make a note of the Username and Password that are displayed beneath the list of certificates.
The Certificate Bundles are provided in a compressed file and need to be extracted. Go to your download folder and right-click the downloaded zip file. Select Extract Here to unzip the files quickly inside your download folder.
Right-click and select Extract Here
At this point, you may want to create a dedicated certificate folder in which to store all your extracted certificates.
2. Install the OpenVPN software.
Launch Linux Mint Software Manager from the Menu and enter your password when prompted.
Select Software Manager from the Linux Mint menu
In the Software Manager search field, type openvpn.
Search for openvpn in Software Manager
If the following packages are not installed, install them using the Software Manager interface:
- Openvpn | Virtual private network daemon.
- Network-manager-openvpn-gnome | Network management framework (openvpn plugin gnome gui).
- Network-manager-openvpn | Network management framework (openvpn plugin core).
3. Create a VPN network connection
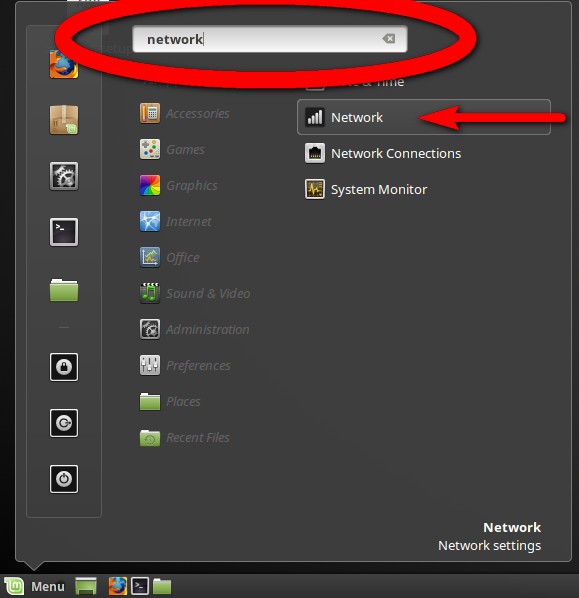
Click the Linux Mint Menu button and type network in the search bar. Select the Networking Configuration Manager.
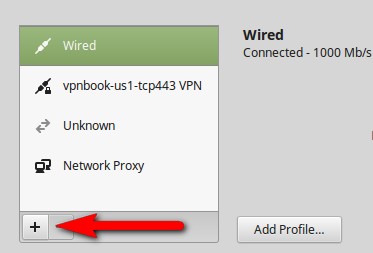
Add a new connection by pressing the plus symbol beneath the list of available networks.
Add a new network connection
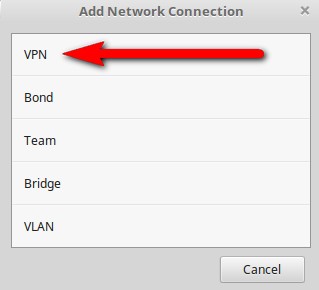
Select VPN from the Add Network Connection options.
Select VPN from the options
Select Import from file…
Navigate to your certificate folder, chose a certificate (.ovpn file) and press Open to import that file.
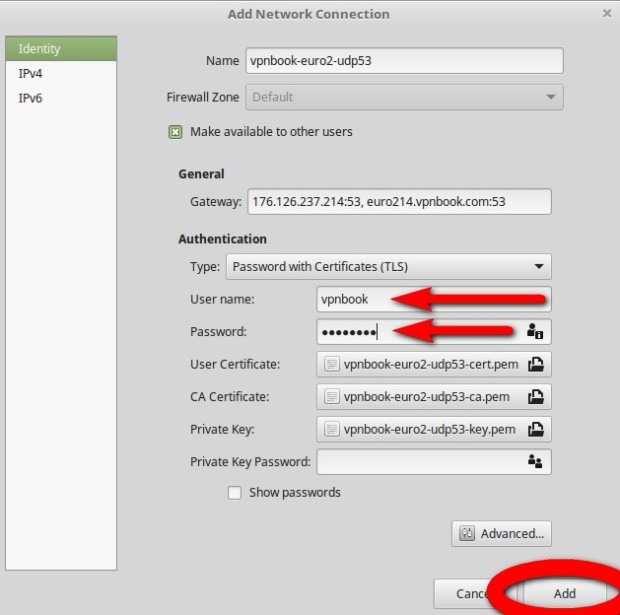
A User Certificate, CA Certificate and Private Key are extracted from the vpnbook certificate file and stored on your computer. File locations can be obtained by clicking the folder icon adjacent to each file.
Enter the username and password in the appropriate fields and press Add to complete the Add Network Connection process.
It is important to note that the username and password are case sensitive.
Add username and password
The new network connection will now be visible in the Networking manager. It can be enabled and disabled in the Networking manager to test the connection.
Connection added to Linux Mint Networking Manager
Most connection failures will be due to an incorrectly typed username or password. To edit a network configuration, select the network by left clicking it in the list, then press the crossed spanner and screw driver icon in the Networking manager.
Upon confirmation of connection success, close the Networking manager window.
How to use
Left click the network icon (located at the bottom right of the Linux Mint task bar) to see a summary of available networks and those currently connected.
Linux Mint Network applet
Use the toggle switch to enable or disable VPN Connections.
If you have multiple VPN connections configured, the one in use will be shown at the top of the list with a bullet point to its left.
To connect to a different VPN network, use the Network Settings option to return to the Networking configuration manager. Enable and disable VPN connections there.
Note that the vpnbook password is changed frequently. If you find that a previously working vpn configuration fails to connect, visit vpnbook.com and obtain the new password. Then make the appropriate change in the configuration as described in step 3.
