Linux Mint Forums
Most of this information is readily available somewhere, but I’m not aware of anywhere with all of it in one place. Which method to use depends on the situation. If able to boot into the system, the first and simplest method usually will be sufficient. If unable, e.g., because a Windows update has overwritten the boot loader, boot a live session and try the second method. Usually this works. If not, escalate to chroot. If all else fails, try purge-and-reinstall. Notice I don’t mention the Boot Repair app. Have seen too many cases where it made the situation worse, but you have that option.
Simple method . Run sudo grub-install /dev/sdx , where x = device to which installing the boot loader. Works for both BIOS and UEFI. For example, returns control of Grub to the primary system after installing a second as a test box (by default, the last system installed controls Grub). As mentioned, for this to work, you have to be booted into the system you want to control Grub.
Live session method . Works with both BIOS and UEFI, but the commands are a bit different. First you mount the system partition to /mnt. If there is a boot partition, this must be mounted also; insert a new second step: sudo mount sdxn /mnt/boot , where sdxn is the boot partition’s ID. Then, in UEFI, you mount the EFI partition. The command to install Grub is very simple because it invokes a script which does most of the work behind the scenes. Notice the target for grub always is the device, for illustration sda. This is true in UEFI as well as BIOS. See GNU Grub Manual.
For BIOS, assuming the system/root partition is sda1. Modify as appropriate, of course, if the system partition is sda5, sdb1, etc.
sudo mount /dev/sda1 /mnt sudo grub-install /dev/sda --boot-directory=/mnt/bootapt install grub-efi-amd64-signed shim-signed sudo mount /dev/sda2 /mnt sudo mount /dev/sda1 /mnt/boot/efi sudo grub-install /dev/sda --boot-directory=/mnt/boot --uefi-secure-bootNotes: For reasons unknown, grub-install only installs the secure boot loaders if the live session is connected to the internet. If secure boot is disabled, will get a squawk to that effect, but the command will complete without issue. If you want to install Grub without secure boot, change the first line to apt install grub-efi-amd64 (no -signed or shim-signed) and omit —uefi-secure-boot from the last line; internet access not needed, but doesn’t hurt.
chroot . Mainly useful if for some reason you need to run update-grub, as well as install/reinstall Grub. For that matter, if all you need to do is update Grub from the live session, you do that the same way; just leave out the grub-install line. As with the regular live session method, if you have a boot partition, you need to insert a second step to mount it.
For BIOS, still assuming the system partition is sda1:
sudo mount /dev/sda1 /mnt for i in /dev /dev/pts /proc /sys; do sudo mount -B $i /mnt$i; done sudo chroot /mnt grub-install /dev/sda update-grub exit sudo umount -R /mntFYI, the second line is a compact way of doing bind mounts (sudo mount —bind /dev /mnt/dev, etc.), so those directories are available in the chroot environment. Per Arch Wiki, adding -R (—recursive) to the unmount command also releases the bind mounts.
For UEFI, assuming the system partition is sda2 and the EFI partition is sda1:
sudo mount /dev/sda2 /mnt sudo mount /dev/sda1 /mnt/boot/efi for i in /dev /dev/pts /proc /sys; do sudo mount -B $i /mnt$i; done sudo cp /etc/resolv.conf /mnt/etc modprobe efivars sudo chroot /mnt apt install grub-efi-amd64-signed shim-signed grub-install /dev/sda --uefi-secure-boot update-grub exit sudo umount /mnt/boot/efi sudo umount -R /mntAs mentioned above, grub-install needs access to the internet to install the secure boot loader. That’s what the fourth and fifth lines do. Be sure to set up a connection in the live session before running the commands. As with the regular method, you’ll get a squawk if secure boot isn’t enabled. And you can install without secure boot; modify the apt install and grub-install lines as described above.
Purge-and-Reinstall . It’s rare to need to escalate this far. The few cases I’ve noticed entailed someone or something having bollixed the Grub scripts in /etc/grub.d (yes, I’m looking at you, Grub Customizer). If still able to boot, the commands are simple:
For BIOS: Run apt purge grub-common ; will be prompted to confirm removal of boot loader. Then run apt install grub-pc os-prober . Select destination for boot loader when prompted (tap space key to select). Unless you have a very good reason, install to the device, not the system partition.
os-prober is removed by purge but only a recommended package on reinstall, so specifying additionally. Same with shim-signed for UEFI.
For UEFI: Similar, but the packages to install are different. Run apt purge grub-common , then apt install grub-efi-amd64-signed os-prober shim-signed . Select destination for boot loader if prompted (probably won’t be).
Purge-and-Reinstall in chroot . This is for the scenario where can’t boot. Remember, if you have a boot partition, insert a second step to mount it.
For BIOS, assuming the system partition is sda1:
sudo mount /dev/sda1 /mnt for i in /dev /dev/pts /proc /sys; do sudo mount -B $i /mnt$i; done sudo cp /etc/resolv.conf /mnt/etc sudo chroot /mnt apt purge grub-common apt install grub-pc os-prober exit sudo umount -R /mntFor UEFI, assuming the system partition is sda2 and the EFI partition is sda1. Again, you need to set up an internet connection.
sudo mount /dev/sda2 /mnt sudo mount /dev/sda1 /mnt/boot/efi for i in /dev /dev/pts /proc /sys; do sudo mount -B $i /mnt$i; done sudo cp /etc/resolv.conf /mnt/etc modprobe efivars sudo chroot /mnt apt purge grub-common apt install grub-efi-amd64-signed os-prober shim-signed exit sudo umount /mnt/boot/efi sudo umount -R /mntFrankly, if you’ve gotten this far and still no joy, probably no alternative except reinstall of the whole system.
Как восстановить загрузчик GRUB — пропало меню с выбором ОС после переустановки Windows (актуально для Linux Mint / Elementary OS / Ubuntu и др.)
Всем доброго времени!
Эта заметка будет довольно специфична и пригодится только тем, у кого на компьютере установлено несколько версий ОС: Windows, Linux.
Так вот, при переустановке (обновлении) одной из ОС (обычно, так делает Windows) — может затереться загрузчик Grub, и при включении ПК более не будет появляться «черного» меню с предложением выбрать какую систему загружать. 👀
Разумеется, чтобы не переустанавливать ОС (и не настраивать всё заново) — лучше просто восстановить сам этот загрузчик. Как правило, для этого достаточно загрузиться с LiveCD (👉 Linux Mint, Elementary OS, Ubuntu и пр.), смонтировать корневой раздел Linux и ввести спец. команды для восстановления.
Однако, «ручная» работа через терминал имеет «тонкости» (и не всегда выполняется просто). Поэтому здесь хочу предложить гораздо более легкий вариант! 👌
Восстановление Grub
ШАГ 1
Для начала нам нужно подготовить загрузочную флешку (LiveCD) c одним из дистрибутивов Linux. Скорее всего она у вас должна быть!
(Если у вас одна из «разновидностей» Ubuntu — я бы порекомендовал использовать образ 👉 с Linux Mint — т.к. в нем уже предустановлена нужная утилита // Boot Repair).
На всякий случай здесь приведу несколько ссылок в помощь:
Будем считать, что загрузиться с подготовленной флешки у вас получилось. 👌
ШАГ 2
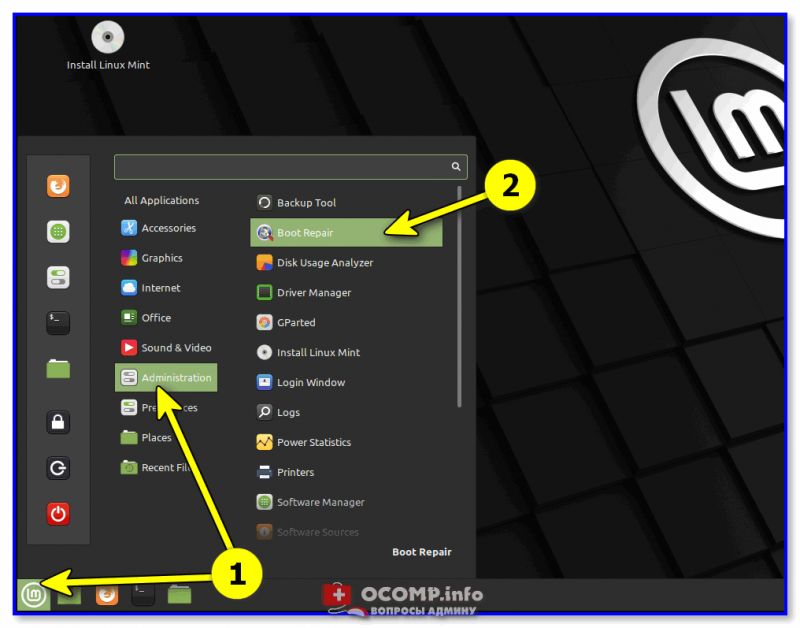
Далее (после загрузки с LiveCD с Linux) нам понадобиться установить утилиту Boot Repair (если у вас последняя версия Linux Mint — то она встроена, и чтобы ее запустить — откройте меню «Пуск / Administration / Boot Repair» ).
После можно переходить к ШАГУ 3 (для тех, у кого нет встроенной Boot Repair — чуть ниже я покажу как ее установить) .
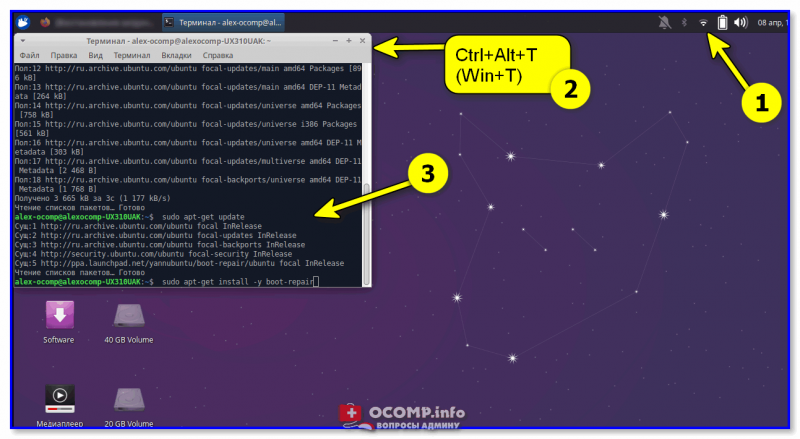
Для инсталляции Boot Repair сначала проверьте, что у вас есть подключение к Интернет.
Далее необходимо открыть терминал (обычно, для этого используют сочетания Ctrl+Alt+T или Win+T) и ввести поочередно следующие три команды (после каждой нажимать Enter!).
sudo add-apt-repository ppa:yannubuntu/boot-repair
sudo apt-get update
sudo apt-get install -y boot-repair
Xubuntu (для примера) — устанавливаем Boot Repair
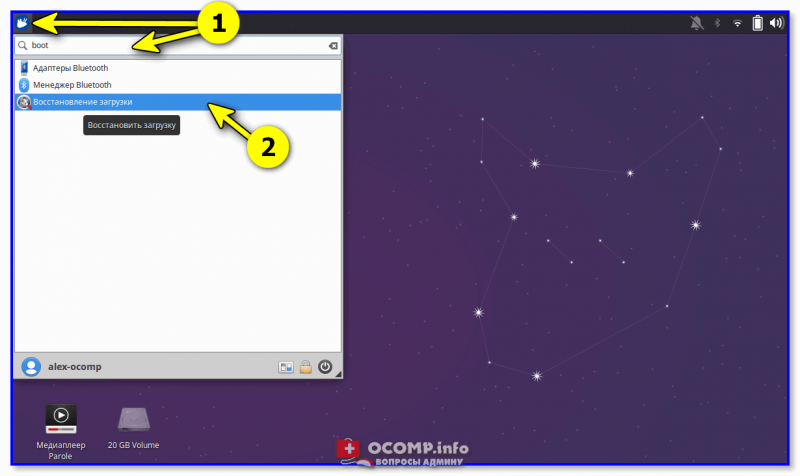
После в меню «Пуск» должна появиться ссылка на нашу утилиту (обратите внимание, что на русском она называется как «Восстановление загрузки» . 👇). Кстати, запустить Boot Repair можно и из консоли. Команда:
ПУСК — восстановление загрузки (Boot Repair)
ШАГ 3
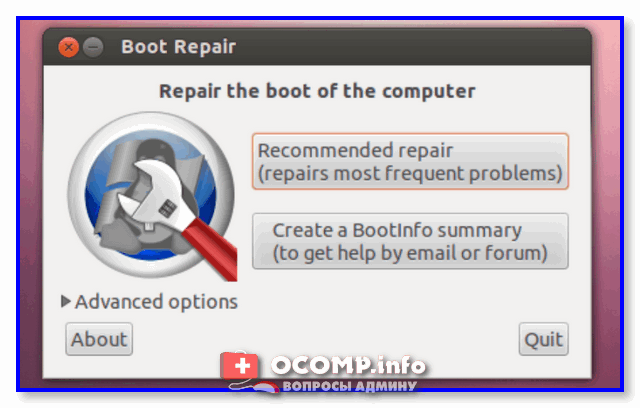
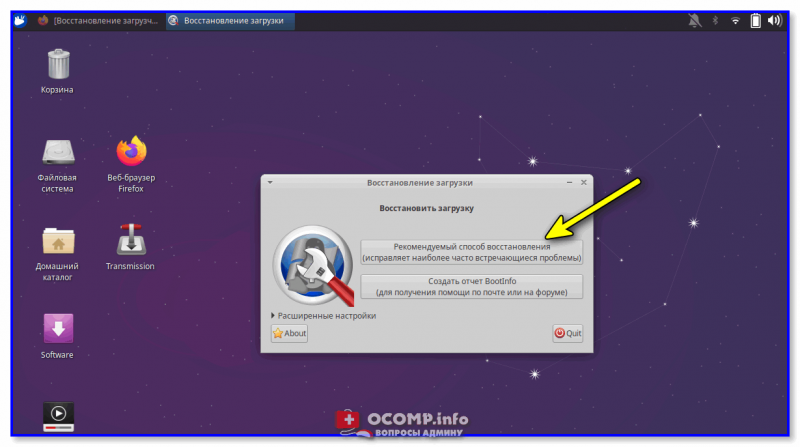
1) В большинстве случаев утилита Boot Repair справляется с восстановлением Grub в автоматическом режиме. Поэтому порекомендую вам сразу же нажать на первый пункт «Recommended Repair» . Пару скринов ниже. 👇
Boot Repair (на английском)
Рекомендуемый способ восстановления (русская версия)
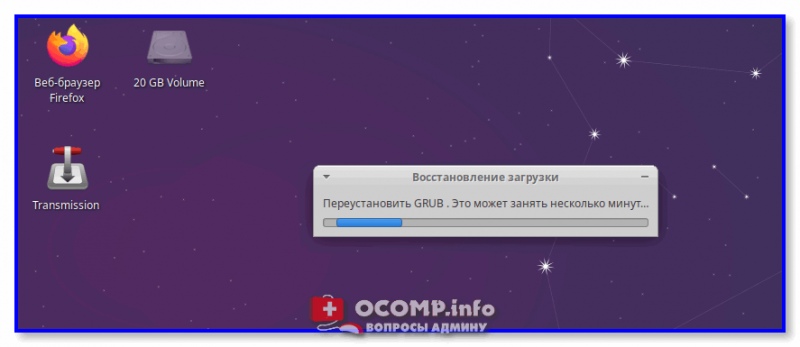
2) Как правило, на весь процесс требуется 1-2 мин. 👇
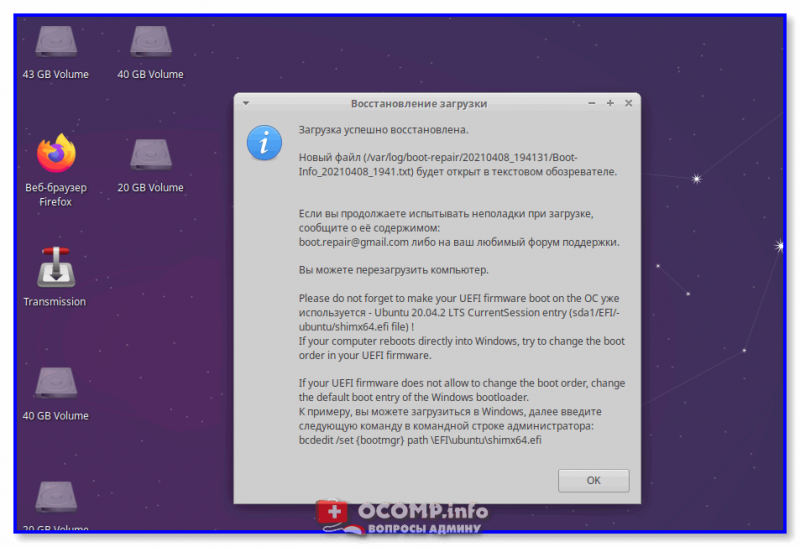
3) Если всё прошло успешно — увидите окно об успешном восстановлении Grub. Теперь можно выключить ПК (ноутбук), вынуть из USB-порта флешку с LiveCD и проверить как загружается устройство: появляется ли меню Grub. 👌
Загрузка успешно восстановлена
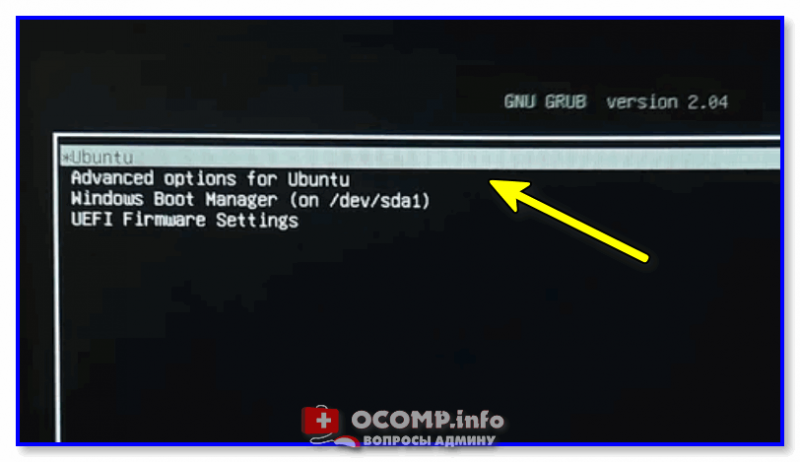
GNU Grub version 2.04 — все заработало!
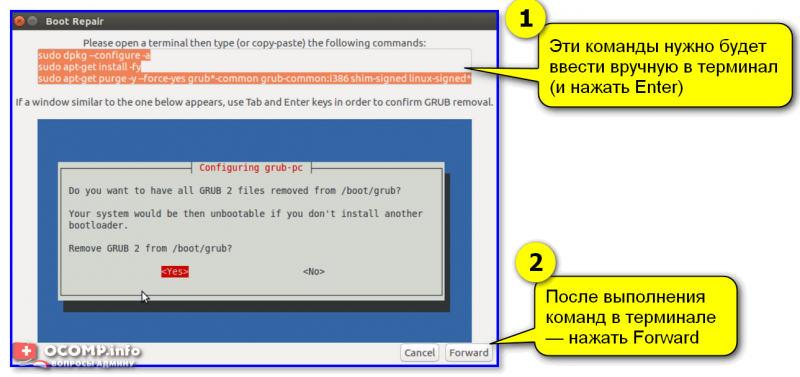
4) Кстати, иногда утилита Boot Repair может попросить вас выполнить ряд команд в терминале (сочетание клавиш для его запуска: Ctrl+Alt+T или Win+T) .
Сами команды, разумеется, утилита приводит в своем окне. После их выполнения — нажмите на кнопку «Forward» (если вы не выполнили команды — утилита снова покажет текущее окно) . Ничего «опасного» и удаляющего данные с домашних разделов диска —в них быть не должно!
Эти команды нужно будет ввести вручную в терминал (и нажать Enter)
Кстати, у Boot Repair есть расширенные настройки , в которых можно вручную задать ряд параметров. Если вы слабо представляете «что, где и как. » — то лучше это меню не трогать (во избежание лишних проблем. ).
Другие простые решения, — само собой, приветствуются!
