- primaryobjects / readme.md
- Fix no RDP option in Remmina
- Fix Remmina no RDP
- Copying files in Linux
- Transferring files with SCP
- Installing Visual Studio Code in Ubuntu
- Pre-requisite to Enable Remote desktop —
- — Ubuntu 18.04 or 20.04
- — IP or Hostname of remote computer
- — Network connectivity between remote and your computer
- — Internet connection
- — Sudo access to the root
- — Enable sharing on the remote computer
- How to Install Remmina Remote Desktop Client
- 1. Command-line installation of remmina using apt
- Step #1 Check the Pre-installed version of Remmina
- Step #2 Add PPA remmina repository
- Step #3 Update the Ubuntu package repository
- Step #4 Install Remmina in Ubuntu
- 2. Install remmina using GUI (Graphical User Interface)
- Step #1 Type «Ubuntu software» in the application search bar
- Step #2 Install Remmina software
- Step #3 Launch Remmina in Ubuntu
- How to check the Remmina version in Ubuntu
- How to install the latest remmina desktop client 1.4.10 using snap
- How to Connect Remote computer using Remmina
- To connect a remote computer using the VNC plugin follow these steps
- Step #1 Enable Sharing on Remote computer
- Step #2 Allow connection to control screen
- Step #3 Launch Remmina
- Step #4 Create a Profile to connect to the remote computer
- Step #5 Connect the Remote computer using Remmina software
- Video Tutorial #1
- Video tutorial on «How to enable Remote Desktop in Ubuntu — Remmina» for beginners
primaryobjects / readme.md
The following steps detail how to connect over Remote Desktop from Linux Mint or Ubuntu to Windows 10 with an AzureAD username and password login account.
- In Windows 10, right-click This PC or My Computer and select Properties.
- Click Remote Settings.
- Check the option Allow remote connections to this computer.
- Uncheck the option Allow connections only from computers running Remote Desktop with Network Level Authentication.
- Click OK.
- In Linux Mint, running Software Manager and install Remmina.
- Open a terminal and install the RDP plug-in with the following command:
sudo apt install remmina remmina-plugin-rdp
Remmina Settings for Linux
The following configuration settings may be used with Remmina in Linux.
Name: MYCOMPUTER AzureAD Server: MYCOMPUTER Username: AzureAD\username@company.com Domain: Resolution: Use initial window size Colour depth: True colour (32 bpp) Network connection type: None Quality: Medium Security protocol: TLS protocol security Gateway transport type: HTTP FreeRDP log level: INFO [x] Ignore certificate Remote Desktop Settings for Windows 10
In Windows 10, if you continue to see «The logon attempt failed», try the following steps with Remote Desktop to create a new RDP configuration file.
- Run Remote Desktop and enter the settings to create a new connection. See here.
- Click Save As to save the rdp configuration file.
- Open Notepad to edit the file and enter the following lines to the end of the file. See example.
enablecredsspsupport:i:0 domain:s:AzureAD username:s:AzureAD/your_user_name@company.com For slow network connections or if experiencing lag, you can adjust the color mode of the connection by editing the rdp configuration file at the following line:
The default setting is session bpp:i:32 for «Highest Quality (32 bit)», while session bpp:i:8 is the lowest setting for «256 Colors». Note, the lowest setting the GUI interface will allow is «High Color (15 bit)». 256 is only available through the configuration file.
Adjusting the Screen Resolution 4K
If your desktop computer resolution is different than the remote desktop resolution and you find issues with the mouse pointer cursor disappearing in RDP, you can set the remote desktop resolution to match your computer. This may especially be the case if you are using a 4K monitor.
desktopwidth:i:3840 desktopheight:i:2160 smart sizing:i:1 This file contains bidirectional Unicode text that may be interpreted or compiled differently than what appears below. To review, open the file in an editor that reveals hidden Unicode characters. Learn more about bidirectional Unicode characters
| screen mode id:i:2 |
| use multimon:i:0 |
| desktopwidth:i:1920 |
| desktopheight:i:1080 |
| winposstr:s:0,3,0,0,800,600 |
| compression:i:1 |
| keyboardhook:i:2 |
| audiocapturemode:i:0 |
| videoplaybackmode:i:1 |
| connection type:i:7 |
| networkautodetect:i:1 |
| bandwidthautodetect:i:1 |
| displayconnectionbar:i:1 |
| username:s:AzureAD\user@domain.com |
| enableworkspacereconnect:i:0 |
| disable wallpaper:i:0 |
| allow font smoothing:i:0 |
| allow desktop composition:i:0 |
| disable full window drag:i:1 |
| disable menu anims:i:1 |
| disable themes:i:0 |
| disable cursor setting:i:0 |
| bitmapcachepersistenable:i:1 |
| full address:s:PF0XLRLF |
| audiomode:i:0 |
| redirectprinters:i:1 |
| redirectcomports:i:0 |
| redirectsmartcards:i:1 |
| redirectclipboard:i:1 |
| redirectposdevices:i:0 |
| drivestoredirect:s: |
| autoreconnection enabled:i:1 |
| authentication level:i:2 |
| prompt for credentials:i:0 |
| negotiate security layer:i:1 |
| remoteapplicationmode:i:0 |
| alternate shell:s: |
| shell working directory:s: |
| gatewayhostname:s: |
| gatewayusagemethod:i:4 |
| gatewaycredentialssource:i:4 |
| gatewayprofileusagemethod:i:0 |
| promptcredentialonce:i:0 |
| gatewaybrokeringtype:i:0 |
| use redirection server name:i:0 |
| rdgiskdcproxy:i:0 |
| kdcproxyname:s: |
| enablecredsspsupport:i:0 |
| domain:s:AzureAD |
| username:s:AzureAD/user@domain.com |
| session bpp:i:8 |
Fix no RDP option in Remmina
Remmina is a remote desktop client for POSIX-based computer operating systems. It supports the Remote Desktop Protocol, VNC, NX, XDMCP, SPICE, and SSH protocols.
I feel Managing RDP and SSH is better with Remmina. Why? One Click launch is a Great time saver for me.
Currently I switched to Linux Mint. Feel it’s way better than Normal Ubuntu. Also minimal resource consumer. I’ll write a Post about this soon explaining why.
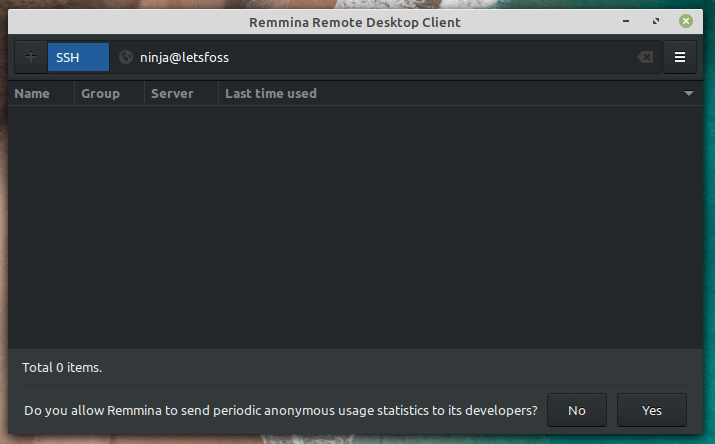
I Installed remmina and launched it and tried clicking the option to switch b/w SSH to RDP. But I felt there is no RDP Plugin installed.
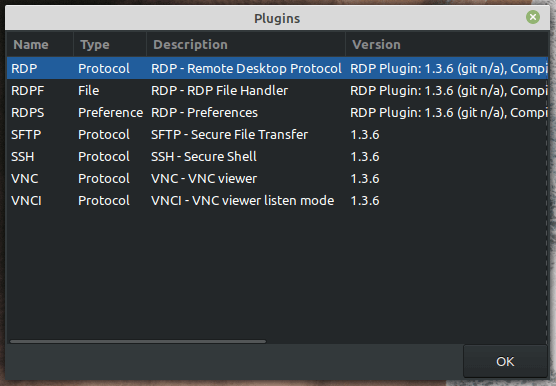
Upon Checking, I confirmed there is no RDP plugin installed. You can check using Menu -> Plugins in Remmina.
Fix Remmina no RDP
So, I fired up the Terminal and run these command one by one.
Above command will kill/force stop all the Instances of Remmina.
sudo apt-get purge remmina* -y This will completely remove installed remmina from system.
Upon running the below command, will remove all the preferences of remmina
Now run below commands to install Remmina with RDP and VNC Plugin.
sudo apt-get install remmina remmina-plugin-vnc remmina-plugin-rdp Now, Check Menu -> Plugins. Now you can see VNC and RDP are installed.
Copying files in Linux
Copying files and folder is an essential task for every user, No matter what operating system you use. In this article, We will see how we can copy the Files or Folders using the Linux terminal.
Transferring files with SCP
SCP stands for Secure Copy Protocol it’s based on SSH which allows us to access the remote system over the secure connection. The Good thing about SSH is we can connect to the remote system and execute the commands.
Installing Visual Studio Code in Ubuntu
VSCode is my favorite IDE created by Microsoft. It’s Open Source and the source code is available on GitHub. Using this method you can easily install vscode on your Ubuntu system
How to enable Remote Desktop in Ubuntu — Remmina
Three default plugins SSH, VNC and RDP are pre-installed with remmina in Linux, but you are always free to install more plugins like SFTP, SPICE, Exec and many more.
Remmina is a Remote desktop client , which provides many ways and protocols to connect remote computers running Windows, Linux or mac os.
Pre-requisite to Enable Remote desktop —
— Ubuntu 18.04 or 20.04
— IP or Hostname of remote computer
— Network connectivity between remote and your computer
— Internet connection
— Sudo access to the root
— Enable sharing on the remote computer
How to Install Remmina Remote Desktop Client
There are two ways to install Remmina remote desktop client. You can choose any one of them
- Remmina desktop client installation using Command line
- Remmina desktop client installation using GUI
Let’s check out both steps one by one
1. Command-line installation of remmina using apt
Step #1 Check the Pre-installed version of Remmina
Generally, Remmina is included in all Linux and GNU distributions. To check whether Remmina is installed or not, run sudo dpkg -l command in Ubuntu
Dev@ubuntu:~/Desktop$ sudo dpkg -l remmina [sudo] password for dev: Desired=Unknown/Install/Remove/Purge/Hold | Status=Not/Inst/Conf-files/Unpacked/halF-conf/Half-inst/trig-aWait/Trig-pend |/ Err?=(none)/Reinst-required (Status,Err: uppercase=bad) ||/ Name Version Architecture Description +++-==============-===================-============-===========================> ii remmina 1.4.2+dfsg-1ubuntu1 amd64 GTK+ Remote Desktop C Remmina 1.4.2 is installed in my Ubuntu.
If it is not installed due to any reason, you can install or upgrade it from the ppa repository. I will upgrade my remmina version to 1.4.2 to 1.4.7 (latest)
Step #2 Add PPA remmina repository
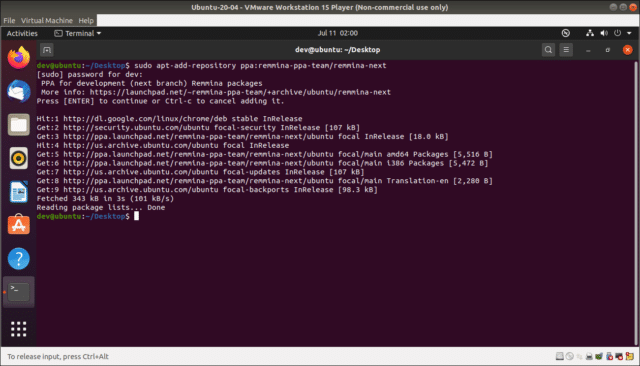
Add ppa repository of remmina using apt-add-repository
$ sudo apt-add-repository ppa:remmina-ppa-team/remmina-next
Step #3 Update the Ubuntu package repository
Step #4 Install Remmina in Ubuntu
Install remmina and RDP plugin with it.
$ sudo apt install remmina remmina-plugin-rdp remmina-plugin-secret
In case of an upgrade, make sure that your remmina is not running, close it or kill it before upgrading remmina.
If you want to explore different methods of installing packages in Ubuntu, have a look on my post on 4-ways to install packages in Ubuntu Linux
2. Install remmina using GUI (Graphical User Interface)
Let’s see step by step, How to install and Enable the remmina desktop in Ubuntu using GUI method —
Step #1 Type «Ubuntu software» in the application search bar
Open Ubuntu software centre
Step #2 Install Remmina software
Search for «remmina» and Click on Install
Step #3 Launch Remmina in Ubuntu
Launch Remmina software to connect the remote computer
How to check the Remmina version in Ubuntu
- Open Terminal by pressing Ctrl + Alt + t > keys on ubuntu.
- Run remmina —version command.
For example, the upgraded version of remmina is 1.4.7 in our case.
You can also run the remmina —full-version command to check all other available plugins, which are installed.
Update 13-Jan-2021:-
As per remmina.org website, remmina will not be available as ppa package after the release of version 1.4.8. So you need to select snap or flatpak option to install latest version of remmina.
How to install the latest remmina desktop client 1.4.10 using snap
Either you love the fact or hate it, Ubuntu is moving to snap from apt or ppa repository model. The latest version of many software are available only on snap and remmina is no exception. So in my view, there is no harm to accept this change and get habitual of snap also.
- Open the terminal and check whether snap is installed or not. By default, the snap is available on the Ubuntu 20.04 distro.
- If it’s not installed in your system, by any chance. Then install it using the apt command.
$ sudo apt update $ sudo apt install snapd
- Make sure you first uninstall the remmina old version already installed. Steps are already provided in the «How to Remove/Uninstall Remmina» section of this post.
- Install remmina version 1.4.10 (currently the latest available) on your ubuntu.
$ sudo snap install remmina
- Check the remmina version. It will show you the latest available version installed from the snap store.
But there are some issues with snap installation (as expected) that you have to fix manually. You can visit the remmina site to check out details on it. My suggestion would be to stick with version 1.4.7 using apt until you really need the latest version. As per the remmina.org website —
How to Connect Remote computer using Remmina
To connect a remote computer using the VNC plugin follow these steps
I will show you connecting my remote Ubuntu 20.04 (IP 192.168.126.130) machine, which I have installed on the Vmware workstation player, using ubuntu 18.04 (IP 192.168.126.1)
Step #1 Enable Sharing on Remote computer
Go to settings — click on sharing on the left panel — enable sharing using the slide switch
Step #2 Allow connection to control screen
Click on Screen sharing (off by default) — enable «Allow connections to control the screen«.
In the access option, enable «new connections must ask for access«. Request either need to approve or deny on the remote computer, to complete the remote connection. You need someone on the remote computer to perform this action.
Select «Require a password» if you don’t want to manually approve the connection on the remote computer. Set password as per your preference, you need to give it during remote authentication.
Step #3 Launch Remmina
Open remmina on the source computer (ubuntu 18.04)
Step #4 Create a Profile to connect to the remote computer
Create a new connection profile and complete mandatory fields to connect the remote computer
Name — Remote connection as per your preference
Protocol — VNC (Virtual network computing)
Server — Remote server IP address
Username — Remote user name
Password — Given while enabling sharing in step 2
Colour depth — Set as per your preference, or keep the default
Quality — as per your network connection.
Step #5 Connect the Remote computer using Remmina software
Tap save and connect, ubuntu 20.04 connected
¡Warning
Disable sharing from settings on the remote computer, if you are not using it anymore. It may lead to vulnerability or remote attack, if you will not disable it.


