Linux Mint Forums
Forum rules
There are no such things as «stupid» questions. However if you think your question is a bit stupid, then this is the right place for you to post it. Please stick to easy to-the-point questions that you feel people can answer fast. For long and complicated questions prefer the other forums within the support section.
Before you post please read how to get help. Topics in this forum are automatically closed 6 months after creation.
Add screen resolution 1920×1080 permanently
Post by Lee_on » Mon Jul 30, 2018 5:41 am
I am on Linux Mint 19 Tara cinnamon and I need help please, I need to add screen resolution of 1920×1080 as a permanent option, I know how to go into terminal and do the following steps,
1. Cvt 1920 1080,
2. xrandr –newmode,
3.xrandr —addmode VGA-1,
After these steps the resolution is there and I am able to select it from the options and it works but then when I restart the PC the option is gone, so I need help to basically add this option permanently to the machine so that when you switch the machine off and on the resolution option remain, I have tried from other forums the following but it didn’t work,
1.Alt+Ctrl+F1 (switch to console mode)
2.Login by typing user name and password
3.sudo service lightdm stop (For Mint 12 Lisa users) or sudo service mdm stop (For Mint 13 Maya users)
4.sudo X -configure (generates new xorg.conf file)
I do not get the xorg.conf file or if its there I cant find it.
Please help me with step by step guide as my knowledge is limited,,lol
Lord Boltar Level 5
Posts: 803 Joined: Mon Jan 09, 2017 7:24 pm Location: Sunny Florida
Re: Add screen resolution 1920×1080 permanently
Post by Lord Boltar » Mon Jul 30, 2018 9:37 am
First you want to run the CVT Tool
In terminal type in cvt 1920 1080 or whatever resolution you desire
You should see an output similar to this
1920×1080 59.96 Hz (CVT 2.07M9) hsync: 67.16 kHz; pclk: 173.00 MHz
Modeline «1920x1080_60.00» 173.00 1920 2048 2248 2576 1080 1083 1088 1120 -hsync +vsync
Next type in xrandr –newmode then copy and paste everything from Modeline above so it looks like below
xrandr —newmode «1920x1080_60.00» 173.00 1920 2048 2248 2576 1080 1083 1088 1120 -hsync +vsync
Next you have to add the desired mode
xrandr —addmode «1920x1080_60.00»
xrandr —output —mode «1920x1080_60.00»
First command creates a new mode with resolution 1920×1080
Second command makes it available for use, with display (VGA-0 may be needed depends on your xrandr output)
Third command selects the newly added mode as the display resolution for the specified display
Thats it. Enjoy
IF your problem has been solved, please edit your original post and add [SOLVED] to the beginning of the Subject Line. It helps other members
The only way for evil to prosper is for good men to do nothing
Re: Add screen resolution 1920×1080 permanently
Post by ralplpcr » Mon Jul 30, 2018 10:03 am
Hi Lee_on, and welcome to the forums!
There’s a couple of ways you can go with this. it all depends on how much (if any) work you wish to do after booting to set the resolution?
The easiest method I can think of would be to create a bash file containing the commands needed to set your resolution.
(I’m going to give the full output lines from my system setting 1280×1024 as an example. Adjust for your own system with the results of your chosen resolution as needed!)
Open a terminal, and execute the following commands in sequence:
1. Type cvt 1280 1024 and press ENTER.
2. You should get an output similar to the following:
# 1280x1024 59.89 Hz (CVT 1.31M4) hsync: 63.67 kHz; pclk: 109.00 MHz Modeline "1280x1024_60.00" 109.00 1280 1368 1496 1712 1024 1027 1034 1063 -hsync +vsyncxrandr --newmode "1280x1024_60.00" 109.00 1280 1368 1496 1712 1024 1027 1034 1063 -hsync +vsyncScreen 0: minimum 320 x 200, current 1280 x 1024, maximum 1920 x 2048 VGA-0 connected primary 1280x1024+0+0 (normal left inverted right x axis y axis) 0mm x 0mm 1024x768 60.0 800x600 60.3 56.2 848x480 60.0 640x480 59.9 1280x1024_60.00 59.9* 5. The connected screen name is what you need — on my system, it’s VGA-0. It should also show the new resolution as stored. not yet active, however.
6. Type xrandr —addmode VGA-0 1280x1024_60.00 . This will add the mode to the dropdown when you go into the display settings.
7. Type xrandr —output VGA-0 —mode «1280x1024_60.00» . This should change your resolution within a split second to your desired setting.
If you followed the above instructions and have successfully gotten the screen to change to your desired resolution, you can now create a bash file to automate this.
Open a text editor. XED is the one that comes with Cinnamon. You’ll need to take some of the outputs that you manually entered and duplicate them exactly here. fortunately, copy/paste works pretty well for that!
Again, using my example above, I’d put the following into my bash file:
#! /bin/bash xrandr --newmode "1280x1024_60.00" 109.00 1280 1368 1496 1712 1024 1027 1034 1063 -hsync +vsync xrandr --addmode VGA-0 1280x1024_60.00 xrandr --output VGA-0 --mode "1280x1024_60.00" Save this on your ~/Desktop, and call it something like «SetResolution.sh».
— Once it’s saved, close your text editor.
— Right-click on the icon for SetResolution.sh, and choose «Properties».
— Select the «Permissions» tab.
— Click on the checkbox to allow executing file as program, and then click «Close».
You should now be able to double-click this file and instantly change your resolution whenever you boot into your system.
If you want it to be automated, simply add a link to this file into your Startup Applications (which you can find in your menu)
Как изменить разрешение экрана в Linux Mint 20.1 MATE
После установки операционной системы она должна сама установить оптимальное разрешение экрана. Но иногда этого не происходит и пользователю приходиться самостоятельно изменять его. Если взять Windows то там все просто а вот с системами Linux могут возникнуть трудности. Изменить разрешения в них можно двумя способами, используя терминал но с этим справятся только опытные пользователи или используя графический интерфейс. Но даже используя графическую оболочку не опытному пользователю все равно будет сложно это сделать. Так как найти данные настройки будет не просто. Сегодня хочу рассказать и показать как это делается в операционной системе Linux Mint 20.1 MATE. Рассмотрим оба варианта.
Прежде чем продолжить дальше хочу вам порекомендовать ранее написанные мною статьи на тему настройки ОС Linux Mint 20.1.
Как поменять разрешение Linux Mint 20.1
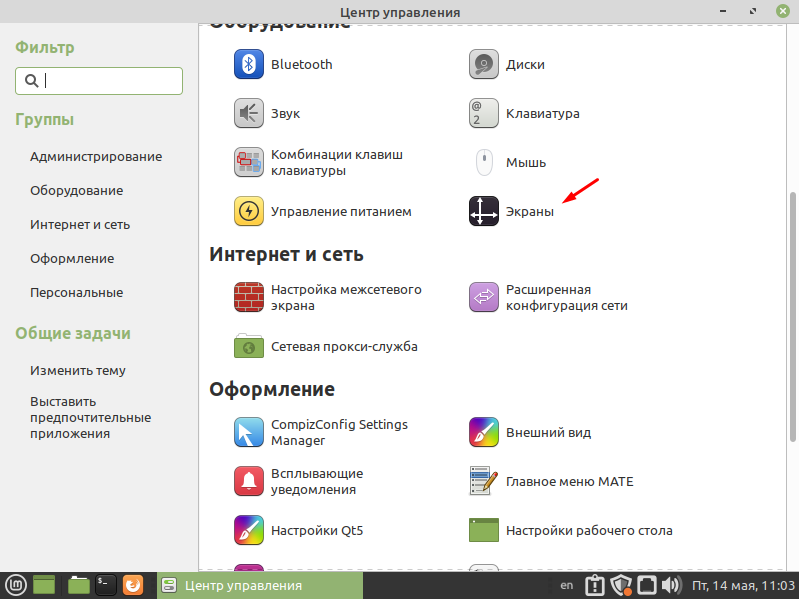
Найти настройки экрана можно в «Центре управления» который в свою очередь находиться в пуске.

В открывшемся окне переходим в раздел «Оборудование» и выбираем пункт «Экраны».
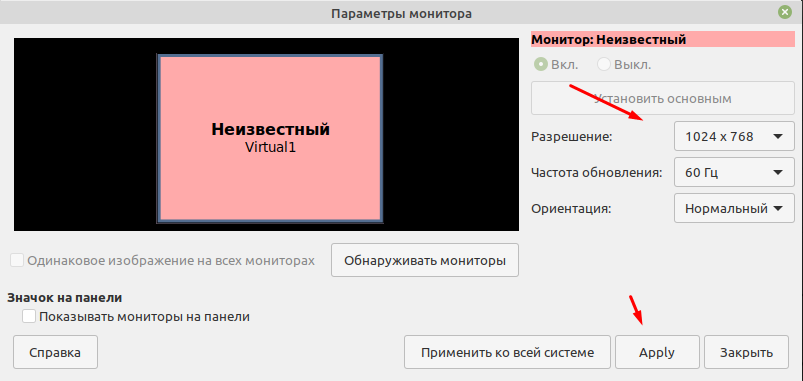
Вот тут и можно изменить разрешение экрана, указать частоту обновления Гц и ориентацию.
Теперь рассмотрим второй вариант изменения разрешения экрана через терминал. Первое что нужно сделать это узнать все доступные разрешения введя команду
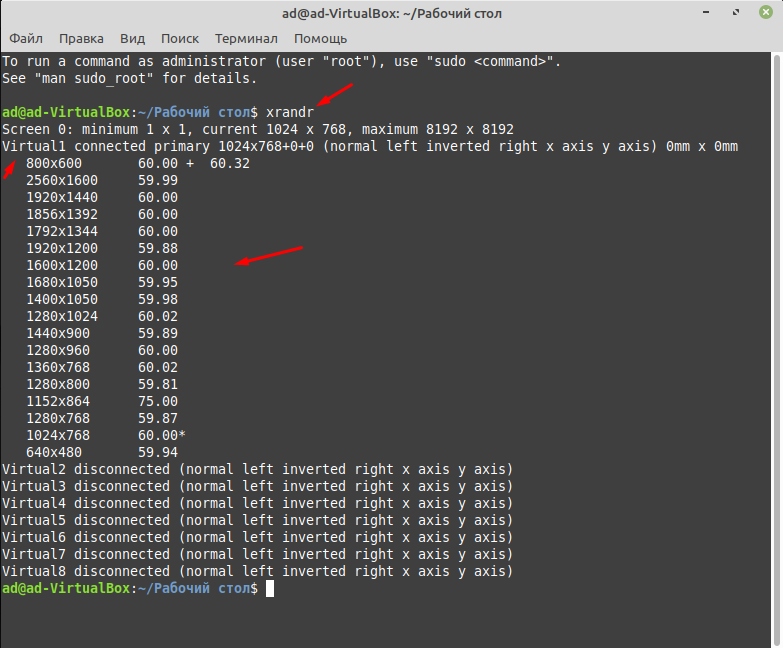
После этого вы должны увидеть количество подключенных мониторов и доступных для разрешений экрана. Так как у меня Linux Mint 20.1 установлена на виртуальную машину, монитор называется Virtual1 и ниже отображен список, из которого я могу выбрать.
Для того чтобы изменить разрешение нужно ввести команду.
xrandr —output Virtual1 —mode 1280×768
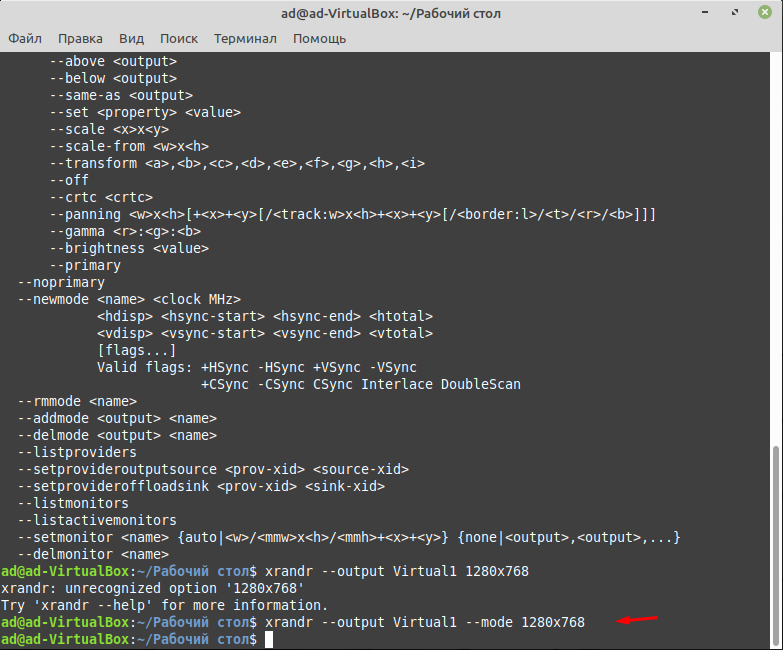
Кстати таким образом можно изменить разрешения экрана практически в любой операционной систем Linux. Так же кода будет вводить команду не ставьте лишних пробелов. Например, если вы напишите так.
xrandr —output Virtual1 — mode 1280×768
Команда не сработает, если кто не заметил то я постав пробел вот тут —_mode.
В общем все достаточно просто, главное нужно быть внимательней.