- How to share Linux Mint 20 Desktop
- How do I share my desktop in Linux?
- How do I enable Remote Desktop on Linux Mint 20?
- Does Linux Mint have a remote desktop?
- How do I enable desktop in Linux?
- How do I share my desktop?
- How do I install Chrome Remote Desktop on Linux?
- What is the best remote desktop app for Linux?
- How do I access a network share in Linux?
- How do I share files between Windows 10 and Linux Mint?
- How do I share a folder in Linux Mint?
- How To Enable Desktop Sharing In Ubuntu and Linux Mint?
- Enabling Desktop Sharing in Ubuntu
- Enabling Desktop Sharing in Linux Mint
- To share an individual window or application in Ubuntu, you can use the following steps
- To share an individual window or application in Linux Mint, you can use the following steps
- Conclusion
- How To Enable Desktop Sharing In Ubuntu and Linux Mint
- Enabling Desktop Sharing in Ubuntu and Linux Mint
- Testing Desktop Sharing in Ubuntu Remotely
How to share Linux Mint 20 Desktop
Navigate to org->gnome->desktop->remote-access on the left panel of dconf-editor . Then you will see various desktop sharing options. Most importantly, click on enabled to activate desktop remote access.
How do I share my desktop in Linux?
- Open the Activities overview and start typing Settings.
- Click on Settings.
- Click on Sharing in the sidebar to open the panel.
- If the Sharing switch at the top-right of the window is set to off, switch it to on. .
- Select Screen Sharing.
- To let others view your desktop, switch the Screen Sharing switch to on.
How do I enable Remote Desktop on Linux Mint 20?
In Linux Mint, click on the menu button, Preferences and then Desktop Sharing. This will open the Desktop Sharing Preferences screen where you can enable other users to connect to the Linux system.
Does Linux Mint have a remote desktop?
Remmina: Remmina is a remote desktop client specifically designed for all the different flavors of the Linux operating system including Linux Mint 20. It fully supports the Remote Desktop Protocol (RDP) and Secure Shell (SSH) Protocol to enable you to access the remote servers with the utmost convenience.
How do I enable desktop in Linux?
- Want to add a desktop environment after you install Ubuntu Server? .
- Start by updating the repositories and package lists: sudo apt-get update && sudo apt-get upgrade. .
- To install GNOME, start by launching tasksel: tasksel. .
- To install KDE Plasma, use the following Linux command: sudo apt-get install kde-plasma-desktop.
How do I share my desktop?
- Tap Share in the meeting controls.
- Tap Screen.
- The Android system will display a notification informing you of what the screen share will have access to. .
- The screen share will start and Zoom will continue to run in the background.
How do I install Chrome Remote Desktop on Linux?
- On your computer, open Chrome.
- In the address bar, enter remotedesktop.google.com/access .
- Under “Set up Remote Access,” click Download .
- Follow the onscreen directions to download and install Chrome Remote Desktop.
What is the best remote desktop app for Linux?
- SolarWinds® Dameware® Remote Everywhere (DRE)
- SolarWinds Dameware Remote Support (DRS)
- VNC Connect.
- Zoho Assist.
- KRDC.
How do I access a network share in Linux?
Accessing the shared folder from Linux
There are two very easy ways to access shared folders in Linux. The easiest way (in Gnome) is to press (ALT+F2) to bring up the run dialog and type smb:// followed by the IP address and the folder name. As shown below, I need to type smb://192.168.1.117/Shared.
How do I share files between Windows 10 and Linux Mint?
Create and share a folder on Linux Mint. This shared folder will be reachable from Windows 10 machine. To share a folder, right click the folder and select Properties. On the Properties window select Share tab and tick the check box of Share this folder.
How do I share a folder in Linux Mint?
You can share any user directory you wish by using Nemo, the file browser provided by default in Linux Mint. Start Nemo, the file browser and navigate to a directory somewhere below your home that you want to share. Rt-Click the directory of choice and select Properties. Then take a close look at the «Sharing» tab.

Install
Installing pip for Python 3Start by updating the package list using the following command: sudo apt update.Use the following command to install pip fo.

Mongodb
How do I download MongoDB on Ubuntu?Where is MongoDB installed in Ubuntu?How do I know if MongoDB is installed on Ubuntu?How do I start MongoDB in Lin.

Gentoo
How do I install Gentoo?Is it hard to install Gentoo?How do I get started with Gentoo?Is Gentoo Linux dead?Can you install Gentoo?Should I install Gen.
Latest news, practical advice, detailed reviews and guides. We have everything about the Linux operating system
How To Enable Desktop Sharing In Ubuntu and Linux Mint?
Desktop sharing or remote desktop access is a useful feature that allows you to access another computer or device from your own system. This feature is particularly useful when you need to provide technical assistance to someone who is not physically present with you. Ubuntu and Linux Mint are two popular Linux distributions that come with desktop sharing features pre-installed. In this article, we will discuss how to enable desktop sharing in Ubuntu and Linux Mint.
Enabling Desktop Sharing in Ubuntu
Ubuntu comes with a built-in desktop sharing feature called «Vino». Vino allows you to share your desktop with other users on your local network. Here are the steps to enable desktop sharing in Ubuntu −
- Step 1 − Open the «Settings» application from the dash or by pressing the «Super» key (Windows key) and searching for «Settings».
- Step 2 − In the «Settings» application, go to the «Sharing» section.
- Step 3 − In the «Sharing» section, toggle on the «Screen Sharing» option.
- Step 4 − You can configure additional settings such as password protection and whether or not to allow remote control.
- Step 5 − Once you have configured the settings, you can share your desktop by giving the other person your IP address and the password (if you set one).
Enabling Desktop Sharing in Linux Mint
Linux Mint also comes with a built-in desktop sharing feature called «Vino». Here are the steps to enable desktop sharing in Linux Mint −
- Step 1 − Open the «System Settings» application from the menu or by pressing the «Super» key (Windows key) and searching for «System Settings».
- Step 2 − In the «System Settings» application, go to the «Desktop Sharing» section.
- Step 3 − In the «Desktop Sharing» section, toggle on the «Sharing» option.
- Step 4 − You can configure additional settings such as password protection and whether or not to allow remote control.
- Step 5 − Once you have configured the settings, you can share your desktop by giving the other person your IP address and the password (if you set one).
While desktop sharing is a useful feature, it is important to note that it can also be a security risk if not used properly. Therefore, it is recommended to use desktop sharing only with trusted users and to use strong passwords to protect your desktop sharing session.
Additionally, there are other desktop sharing software options available for Ubuntu and Linux Mint, such as «TeamViewer» and «AnyDesk». These software options offer additional features and capabilities beyond the built-in desktop sharing features, such as file transfer and remote printing. However, these options may not be open-source and may come with a cost.
Another important consideration when using desktop sharing in Ubuntu and Linux Mint is firewall settings. By default, Ubuntu and Linux Mint have the UFW firewall enabled, which may block incoming desktop sharing requests. If you are having trouble connecting to a remote system using desktop sharing, it may be necessary to configure the firewall settings to allow the necessary ports.
To allow desktop sharing through the UFW firewall in Ubuntu, you can use the following command −
This command will allow incoming desktop sharing requests on port 5900, which is the default port used by the Vino desktop sharing feature.
In Linux Mint, the firewall settings can be configured through the «Firewall Configuration» tool, which can be found in the «Administration» menu.
Another consideration when enabling desktop sharing in Ubuntu and Linux Mint is the type of session you want to share. By default, the desktop sharing feature in these Linux distributions shares the entire desktop session. However, it is also possible to share individual windows or applications.
To share an individual window or application in Ubuntu, you can use the following steps
- Open the application or window you want to share.
- Open the «Screen Sharing» settings.
- Change the «Desktop Sharing» option to «Window Sharing».
- Click the «Select Window» button and select the window or application you want to share.
To share an individual window or application in Linux Mint, you can use the following steps
- Open the application or window you want to share.
- Open the «Desktop Sharing» settings.
- Change the «Desktop Sharing» option to «Application Sharing».
- Click the «Select Application» button and select the window or application you want to share.
Sharing individual windows or applications can be useful when you only need to share a specific part of your desktop session. This can help to reduce network bandwidth and improve performance when working remotely.
Conclusion
Enabling desktop sharing in Ubuntu and Linux Mint is a straightforward process. Both distributions come with built-in desktop sharing features that are easy to configure. Desktop sharing is a useful feature that can save time and effort when providing technical assistance or working remotely.
How To Enable Desktop Sharing In Ubuntu and Linux Mint
Desktop sharing refers to technologies that enable remote access and remote collaboration on a computer desktop via a graphical terminal emulator. Desktop sharing allows two or more Internet-enabled computer users to work on the same files from different locations.
In this article, we will show you how to enable desktop sharing in Ubuntu and Linux Mint, with a few vital security features.
Enabling Desktop Sharing in Ubuntu and Linux Mint
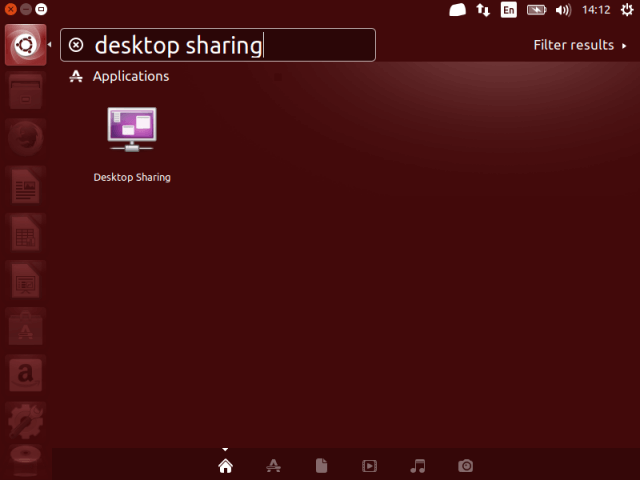
1. In the Ubuntu Dash or Linux Mint Menu, search for “desktop sharing” as shown in the following screenshot, once you get it, launch it.
2. Once you launch Desktop sharing, there are three categories of desktop sharing settings: sharing, security and notification settings.
Under sharing, check the option “Allow others users to view your desktop” to enable desktop sharing. Optionally, you can also permit other users to remotely control your desktops by checking the option “Allow others users to control your desktop”.

3. Next in security section, you can choose to manually confirm each remote connection by checking the option “You must confirm each access to this computer”.
Again, another useful security feature is creating a certain shared password using the option “Require user to enter this password”, that remote users must know and enter each time they want to access your desktop.
4. Concerning notifications, you can keep an eye on remote connections by choosing to show the notification area icon each time there is a remote connection to your desktops by selecting “Only when someone is connected”.

When you have set all the desktop sharing options, click Close. Now you have successfully permitted desktop sharing on your Ubuntu or Linux Mint desktop.
Testing Desktop Sharing in Ubuntu Remotely
You can test to ensure that it’s working using a remote connection application. In this example, I will show you how some of the options we set above work.
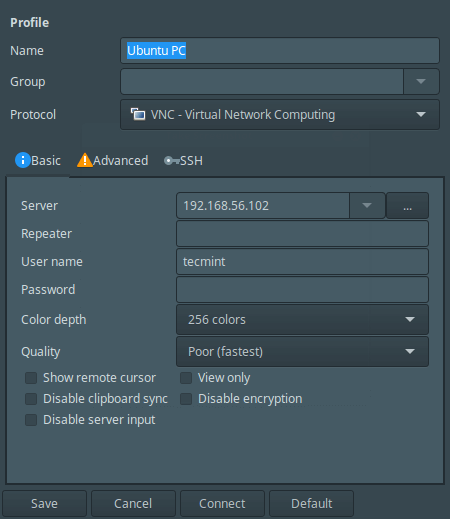
5. I will connect to my Ubuntu PC using VNC (Virtual Network Computing) protocol via remmina remote connection application.

6. After clicking on Ubuntu PC item, I get the interface below to configure my connection settings.
7. After performing all the settings, I will click Connect. Then provide the SSH password for the username and click OK.
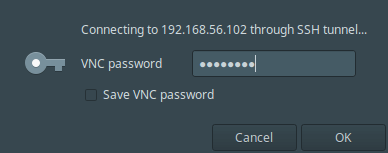
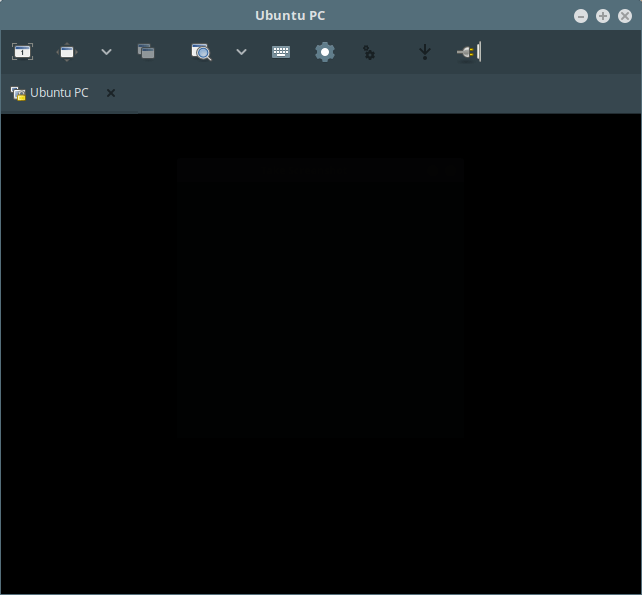
I have got this black screen after clicking OK because, on the remote machine, the connection has not been confirmed yet.
8. Now on the remote machine, I have to accept the remote access request by clicking on “Allow” as shown in the next screenshot.

9. After accepting the request, I have successfully connected, remotely to my Ubuntu desktop machine.

That’s it! In this article, we described how to enable desktop sharing in Ubuntu and Linux Mint. Use the comment section below to write back to us.